openfire+asmack搭建的安卓即时通讯(六) 15.4.16
啊啊啊啊啊啊啊啊,这东西越做越觉得是个深坑啊!
1.SharedPreferences.Editor的密码保存和自动登录:

首先还是从主界面开始,因为要提升一下用户体验自然要加入保存密码和自动登录的功能。
         <CheckBox

             android:text="保存密码"

             android:layout_weight="1"

             android:id="@+id/save_password"

             android:layout_width="wrap_content"

             android:layout_height="wrap_content" />

         <CheckBox

             android:text="自动登录"

             android:layout_weight="1"

             android:id="@+id/auto_login_in"

             android:layout_width="wrap_content"

             android:layout_height="wrap_content" />
接着在主活动里写一下下:
        check_watch=(CheckBox)findViewById(R.id.show);

         check_watch.setOnCheckedChangeListener(checkBox_Listener);

         check_save=(CheckBox)findViewById(R.id.save_password);

         check_save.setOnCheckedChangeListener(checkBox_Listener);

         check_auto=(CheckBox)findViewById(R.id.auto_login_in);

         check_auto.setOnCheckedChangeListener(checkBox_Listener);
 private SharedPreferences sp;

 public static SharedPreferences.Editor editor;
sp = this.getSharedPreferences("userInfo",Context.MODE_PRIVATE);//存储密码
 private OnCheckedChangeListener checkBox_Listener = new OnCheckedChangeListener() {//所有checkbox的监听器

         @Override

         public void onCheckedChanged(CompoundButton buttonView,

                                      boolean isChecked) {

             // TODO Auto-generated method stub

                 switch (buttonView.getId())

                 {

                     case R.id.show:

                         if (isChecked) {

                             password.setTransformationMethod(HideReturnsTransformationMethod.getInstance());

                         } else {

                             password.setTransformationMethod(PasswordTransformationMethod.getInstance());

                         }

                         break;

                     case R.id.save_password:

                         if (isChecked) {

                             sp.edit().putBoolean("ISCHECK", true).apply();

                         } else {

                             sp.edit().putBoolean("ISCHECK", false).apply();

                         }

                         break;

                     case R.id.auto_login_in:

                         if (isChecked) {

                             sp.edit().putBoolean("AUTO_ISCHECK", true).apply();

                         } else {

                             sp.edit().putBoolean("AUTO_ISCHECK", false).apply();

                         }

                         break;

                 }

         }

     };

     private void checkbox_init() {//checkbox判断函数

         //判断记住密码多选框的状态

         if(sp.getBoolean("ISCHECK", false))

         {

             //设置默认是记录密码状态

             check_save.setChecked(true);

             name.setText(sp.getString("USER_NAME",""));

             password.setText(sp.getString("PASSWORD",""));

             //判断自动登陆多选框状态

             if(sp.getBoolean("AUTO_ISCHECK", false))

             {

                 //设置默认是自动登录状态

                 check_auto.setChecked(true);

                 //跳转界面

                 //account=sp.getString("USER_NAME","");

                 //pwd=sp.getString("PASSWORD","");

                 Log.i("======================"+account,pwd+"===================================");

                 accountLogin();

             }

         }

     }

     private void setCheck_save(){

         if(check_save.isChecked())

         {

             //记住用户名、密码、

             editor = sp.edit();

             editor.putString("USER_NAME", account);

             editor.putString("PASSWORD",pwd);

             editor.apply();

         }

     }
在onCreat()里面每次都要判check_init()断一下密码的存储状态,然后再在每次登陆成功后运行setCheck_save()来保存密码。OnCheckChangeListener()里面设置checkbox的按下和弹起的状态。
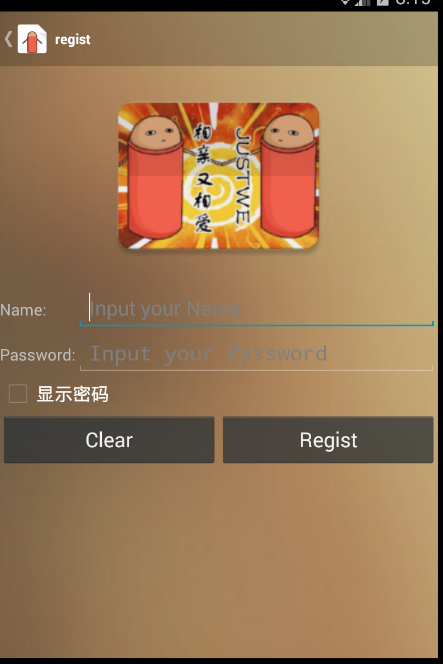
2.用户的注册、利用webview进行访问作者博客:

在下面加入了两个新的Button的用来注册和访问作者博客。
1)webview的使用:
加入了一个放一个webview的活动:
 package com.lfk.webim;

 import android.os.Bundle;

 import android.view.KeyEvent;

 import android.view.View;

 import android.webkit.WebSettings;

 import android.webkit.WebView;

 import android.webkit.WebViewClient;

 import android.widget.ZoomButtonsController;

 import com.lfk.webim.appli.BaseActivity;

 import java.lang.reflect.Field;

 public class AuthorBlog extends BaseActivity {

     private WebView webView;

     @Override

     protected void onCreate(Bundle savedInstanceState) {

         super.onCreate(savedInstanceState);

         setContentView(R.layout.activity_author_blog);

         webView=(WebView)findViewById(R.id.webview);

         webView.setScrollBarStyle(View.SCROLLBARS_INSIDE_OVERLAY);  //使滚动条不占位

         WebSettings webSettings =webView.getSettings();

         webSettings.setBuiltInZoomControls(true);

         webView.setInitialScale(100);//缩放比例(完全不缩放)

         webView.getSettings().setDisplayZoomControls(false);//隐藏webview缩放按钮

         setZoomControlGone(webView);

         webView.getSettings().setJavaScriptEnabled(true);//允许使用JS

         webView.setWebViewClient(new WebViewClient() {//设置url

             @Override

             public boolean shouldOverrideUrlLoading(WebView view, String url) {

                 view.loadUrl(url);

                 return true;

             }

         });

        webView.loadUrl("http://www.cnblogs.com/lfk-dsk/");

     }

     public void setZoomControlGone(View view) {

         Class classType;

         Field field;

         try {

             classType = WebView.class;

             field = classType.getDeclaredField("mZoomButtonsController");

             field.setAccessible(true);

             ZoomButtonsController mZoomButtonsController = new ZoomButtonsController(view);

             mZoomButtonsController.getZoomControls().setVisibility(View.GONE);

             try {

                 field.set(view, mZoomButtonsController);

             } catch (IllegalArgumentException e) {

                 e.printStackTrace();

             } catch (IllegalAccessException e) {

                 e.printStackTrace();

             }

         } catch (SecurityException e) {

             e.printStackTrace();

         } catch (NoSuchFieldException e) {

             e.printStackTrace();

         }

     }

     @Override

     public boolean onKeyDown(int keyCode, KeyEvent event) {//设置返回键,返回键不直接回都上一个活动,而是放回webview的上一页

         if (keyCode == KeyEvent.KEYCODE_BACK && webView.canGoBack()) {

             webView.goBack();// 返回前一个页面

             return true;

         }

         return super.onKeyDown(keyCode, event);

     }

 }
2)注册的方法实现:
 public static String regist(String account, String password) {

         if (connect.getConnection() == null)

             return "0";

         Registration reg = new Registration();

         reg.setType(IQ.Type.SET);

         reg.setTo(connect.getConnection().getServiceName());

         reg.setUsername(account);// 注意这里createAccount注册时,参数是username,不是jid,是“@”前面的部分。

         reg.setPassword(password);

         reg.addAttribute("android", "geolo_createUser_android");// 这边addAttribute不能为空,否则出错。所以做个标志是android手机创建的吧!!!!!

         PacketFilter filter = new AndFilter(new PacketIDFilter(

                 reg.getPacketID()), new PacketTypeFilter(IQ.class));

         PacketCollector collector = connect.getConnection()

                 .createPacketCollector(filter);

         connect.getConnection().sendPacket(reg);

         IQ result = (IQ) collector.nextResult(SmackConfiguration

                 .getPacketReplyTimeout());

         // Stop queuing results

         collector.cancel();// 停止请求results(是否成功的结果)

         if (result == null) {

             Log.e("RegistActivity", "No response from server.");

             return "no find on internet";

         } else if (result.getType() == IQ.Type.RESULT) {

             return "regist success";

         } else { // if (result.getType() == IQ.Type.ERROR)

             if (result.getError().toString().equalsIgnoreCase("conflict(409)")) {

                 Log.e("RegistActivity", "IQ.Type.ERROR: "

                         + result.getError().toString());

                 return "this account has existed";

             } else {

                 Log.e("RegistActivity", "IQ.Type.ERROR: "

                         + result.getError().toString());

                 return "regist failed";

             }

         }

     }
最好把这个函数加入工具类,接着写一个和主界面差不多的界面用来注册:

 package com.lfk.webim;

 import android.app.Activity;

 import android.os.Bundle;

 import android.os.Message;

 import android.text.method.HideReturnsTransformationMethod;

 import android.text.method.PasswordTransformationMethod;

 import android.util.Log;

 import android.view.View;

 import android.widget.CheckBox;

 import android.widget.CompoundButton;

 import android.widget.EditText;

 import android.widget.Toast;

 import com.lfk.webim.server.ConnecMethod;

 import com.lfk.webim.server.connect;

 public class regist extends Activity implements View.OnClickListener {

     private EditText name,password;

     private String nametemp,pwdtemp;

     static int MSTTL=1;

     static int MSTTLS=0;

     @Override

     protected void onCreate(Bundle savedInstanceState) {

         super.onCreate(savedInstanceState);

         setContentView(R.layout.activity_regist);

         name=(EditText)findViewById(R.id.login_name_reg);

         password=(EditText)findViewById(R.id.login_password_reg);

         findViewById(R.id.buttonclear_reg).setOnClickListener(this);

         findViewById(R.id.button_regist_reg).setOnClickListener(this);

         CheckBox checkBox1=(CheckBox)findViewById(R.id.show_reg);

         connect.getConnection();

         checkBox1.setOnCheckedChangeListener(new CompoundButton.OnCheckedChangeListener() {

             @Override

             public void onCheckedChanged(CompoundButton buttonView,

                                          boolean isChecked) {

                 // TODO Auto-generated method stub

                 if (isChecked) {

                     password.setTransformationMethod(HideReturnsTransformationMethod.getInstance());

                 } else {

                     password.setTransformationMethod(PasswordTransformationMethod.getInstance());

                 }

             }

         });

     }

     private android.os.Handler RegHandler = new android.os.Handler() {

         public void handleMessage(android.os.Message msg) {

             switch (msg.what) {

                 case 1:

                     name.setText("");

                     password.setText("");

                     Log.d("+++++","=======================");

                     break;

                 case 0:

                     String temp= String.valueOf(msg.obj);

                     Toast.makeText(regist.this,temp,Toast.LENGTH_SHORT).show();

                 default:

                     break;

             }

         }

     };

     private void accountRegis() {

         new Thread() {

             public void run() {

                 String account = ((EditText) findViewById(R.id.login_name_reg))

                         .getText().toString();

                 String pwd = ((EditText) findViewById(R.id.login_password_reg)).getText()

                         .toString();

                 String is = ConnecMethod.regist(account, pwd);

                 Message message=new Message();

                 message.what=MSTTLS;

                 message.obj=is;

                 RegHandler.sendMessage(message);

             }

         }.start();

     }

     @Override

     public void onClick(View v) {

         // TODO Auto-generated method stub

         switch (v.getId()) {

             case R.id.buttonclear_reg:

                 Message message=new Message();

                 message.what=MSTTL;

                 RegHandler.sendMessage(message);

                 break;

             case R.id.button_regist_reg:

                 Log.d("======================", "Reg");

                 accountRegis();

                 break;

             default:

                 break;

         }

     }

 }
另外加入了一个Clear的Button用来清理所有的东西让用户重新入。
3.好友界面的修改:
 find方法还没有弄完,所以先说之前的。
加入了谷歌的下拉刷新来及时的更新数据:
     <android.support.v4.widget.SwipeRefreshLayout

         xmlns:android="http://schemas.android.com/apk/res/android"

         android:id="@+id/swipe_refresh"

         android:layout_below="@id/find_fri"

         android:layout_width="match_parent"

         android:layout_height="match_parent">

         <ListView

             android:id="@+id/friend_list"

             android:layout_width="match_parent"

             android:layout_height="match_parent">

         </ListView>

     </android.support.v4.widget.SwipeRefreshLayout>
        swipeLayout.setOnRefreshListener(new SwipeRefreshLayout.OnRefreshListener() {

             @Override

             public void onRefresh() {

                 new Handler().postDelayed(new Runnable() {//延迟跳转=-=

                     public void run() {

                         swipeLayout.setRefreshing(true);

                         mArrayAdapter.clear();

                         ClientConServer.getFriends();

                         swipeLayout.setRefreshing(false);

                     }

                 }, 500);

             }

         });
在每次refresh的时候就重新获取一下好友数据。
4.添加服务防止后台清理:
一个聊天软件只要后台就要重新启动,不觉得很坑嘛?我们就在friend活动添加一个服务开启,即使我们按了HOME键,也不会退出也可以重新进入,而且最好在friend活动添加,这样我们成功的登陆了这样也方便。
 public class Myserver extends Service {

     @Override

     public IBinder onBind(Intent intent) {

         return null;

     }

     @Override

     public void onCreate(){

         super.onCreate();

         Notification notification=new Notification(R.mipmap.ic_launcher,"Just We running",System.currentTimeMillis());

         Intent intent=new Intent(this, friend.class);

         PendingIntent pendingIntent=PendingIntent.getActivity(this,0,intent,0);

         notification.setLatestEventInfo(this,"Just We","Online",pendingIntent);

         Log.d("Myservice       ","         Oncreater");

         startForeground(1, notification);

     }

 }
         Intent intentServer= new Intent(this, Myserver.class);

         startService(intentServer);
然后在活动里intent一下一边开启一个带通知的前台服务。而且你还可以通过这个前台的通知随时进入friend活动界面。
5.注销帐号:
我们能登陆就要能注销,这样才便于我们使用:

我把一个注销帐号的方法写进meau里面了。
        <item

            android:id="@+id/action_settings_base"

            android:title="@string/action_stop"

            android:showAsAction="never"

            tools:ignore="AppCompatResource" />
我写了一个BaseActivity然后添加了这个meau让后让应该继承的来继承:
                 MainActivity.check_save.setChecked(false);

                 MainActivity.check_auto.setChecked(false);

                 MainActivity.editor.putString("USER_NAME", "");

                 MainActivity.editor.putString("PASSWORD", "");

                 Intent intent = new Intent(this, MainActivity.class);

                 startActivity(intent);

                 Intent stopintent = new Intent(this, Myserver.class);

                 stopService(stopintent);

                 user.UserName="";user.FromName_="";user.FromName="";user.UserName="";
清空checkbox,清空密码,关闭服务,跳转页面清空全局变量的存储。
6.对发送进行限制:

         if(content.equals("")) {

             android.os.Message mm = new android.os.Message();

             mm.what=1;

             mhandle.handleMessage(mm);

         }
  case 1:

                         Toast.makeText(useractivity.this, "不能发送空消息", Toast.LENGTH_SHORT).show();

                         break;
功能是越来越丰富了呢!今天就改到这样好了,求赞=-=
openfire+asmack搭建的安卓即时通讯(六) 15.4.16的更多相关文章
- openfire+asmack搭建的安卓即时通讯(一) 15.4.7
最进开始做一些android的项目,除了一个新闻客户端的搭建,还需要一个实现一个即时通讯的功能,参考了很多大神成型的实例,了解到operfire+asmack是搭建简易即时通讯比较方便,所以就写了这篇 ...
- openfire+asmack搭建的安卓即时通讯(三) 15.4.9
(能用得上话的话求点赞=-=,我表达不好的话跟我说哦) 上一次我们拿到了服务器端的组数据和用户信息,这就可以为我们日后使用好友系统打下基础了! 但是光是拿到了这些东西我们怎么能够满足呢?我们一个即时通 ...
- openfire+asmack搭建的安卓即时通讯(七) 15.5.27
本地化之章! 往期传送门: 1.http://www.cnblogs.com/lfk-dsk/p/4398943.html 2.http://www.cnblogs.com/lfk-dsk/p/441 ...
- openfire+asmack搭建的安卓即时通讯(四) 15.4.10
之前的教程不知道你们成功了没,,,没成功可以问我啊=-= 第四篇博文是要实现发送消息的功能. 首先在我们登陆后的活动的layout里添加这样的两个控件,一个EditText和一个Button用于发送数 ...
- openfire+asmack搭建的安卓即时通讯(五) 15.4.12
这一篇博客其实是要昨天写的,但昨天做了作修改就停不下来了,这次的修改应该是前期开发的最终回了,其余的功能有空再做了,下周可能要做一些好玩的东西,敬请期待! 1.修改下Logo:(Just We) ht ...
- openfire+asmack搭建的安卓即时通讯(二) 15.4.9
上期没有放成果图呢!忘了=-=,这就是上次的成果图,textview里面会显示登陆的名字(这个是默认管理员帐号=-=) 好吧,登陆了服务器我们就有了交互的功能啦可以说是前进了一大步呢!下面能我们就要试 ...
- Openfire XMPP Smack RTC IM 即时通讯 聊天 MD
Markdown版本笔记 我的GitHub首页 我的博客 我的微信 我的邮箱 MyAndroidBlogs baiqiantao baiqiantao bqt20094 baiqiantao@sina ...
- XMPP(三)-安卓即时通讯客户端
由于时间原因,所以更新比较慢 ,还请大家谅解,此次是对上篇文章中的安卓客户端初级版本进行的一次更新优化,在这次更新后,就有那么一点样子了,可以拿的出手了,呵呵,还在关注的同学也可以及时下载更新.此次主 ...
- 急急如律令!火速搭建一个C#即时通信系统!(附源码分享——高度可移植!)
(2016年3月更:由于后来了解到GGTalk开源即时通讯系统,因此直接采用了该资源用于项目开发,在此对作者表示由衷的感谢!) —————————————————————————————————— 人 ...
随机推荐
- 与众不同 windows phone (46) - 8.0 通信: Socket, 其它
[源码下载] 与众不同 windows phone (46) - 8.0 通信: Socket, 其它 作者:webabcd 介绍与众不同 windows phone 8.0 之 通信 Socket ...
- [PE结构分析] 5.IMAGE_OPTIONAL_HEADER
结构体源代码如下: typedef struct _IMAGE_OPTIONAL_HEADER { // // Standard fields. // +18h WORD Magic; // 标志字, ...
- 泛函编程(9)-异常处理-Option
Option是一种新的数据类型.形象的来描述:Option就是一种特殊的List,都是把数据放在一个管子里:然后在管子内部对数据进行各种操作.所以Option的数据操作与List很相似.不同的是Opt ...
- Linux Shell系列教程之(十七) Shell文件包含
本文是Linux Shell系列教程的第(十七)篇,更多Linux Shell教程请看:Linux Shell系列教程 通过文件包含,可以引用其他文件的内容,也可以将复杂内容分开,使程序结构更加清晰. ...
- Ahjesus获取自定义属性Attribute或属性的名称
1:设置自己的自定义属性 public class NameAttribute:Attribute { private string _description; public NameAttribut ...
- [WP8] ListBox的Item宽度自动填满
[WP8] ListBox的Item宽度自动填满 范例下载 范例程序代码:点此下载 问题情景 开发WP8应用程序的时候,常常会需要使用ListBox作为容器来呈现各种数据集合.但是在ListBox呈现 ...
- css超出2行部分省略号...
今天做东西,遇到了这个问题,百度后总结得到了这个结果. 首先,要知道css的三条属性. overflow:hidden; //超出的文本隐藏 text-overflow:ellipsis; //溢出用 ...
- 一台电脑存放多个git账户的多个rsa秘钥
未命名.html div.oembedall-githubrepos{border:1px solid #DDD;border-radius:4px;list-style-type:none;marg ...
- SAP中获取当前用户相关信息的两个函数
函数名:TH_USER_LIST作用:可以得到SM04界面显示样式的表. 函数名:TH_USER_INFO作用:可以得到当前特定用户的机器名.当前活动窗口数.IP地址等信息
- Force.com微信开发系列(一) 后台配置
为寻找国内免费云资源作为微信后台,花了一天时间试用SinaAppEngine(SAE),调试太不方便用户体验差.新浪作为媒体公司技术功底经不起考验,亚马逊能推出AWS,新浪还不行!更好选项是百度Bai ...
