项目SpringMVC+Spring+Mybatis 整合环境搭建(1)-> Spring+Mybatis搭建
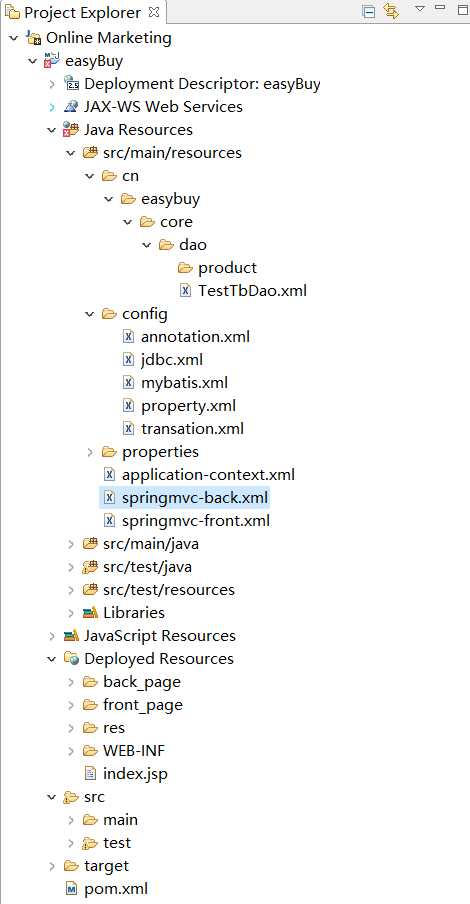
目录结构
第一步:web.xml 先配置contextConfigLocation 对应的application-context.xml文件
打开webapp\WEB-INF\web.xml, 配置spring监听器和上下文
<?xml version="1.0" encoding="UTF-8"?>

<web-app xmlns:xsi="http://www.w3.org/2001/XMLSchema-instance"

	xmlns="http://java.sun.com/xml/ns/j2ee" xmlns:javaee="http://java.sun.com/xml/ns/javaee"

	xmlns:web="http://java.sun.com/xml/ns/javaee/web-app_2_5.xsd"

	xsi:schemaLocation="http://java.sun.com/xml/ns/j2ee http://java.sun.com/xml/ns/j2ee/web-app_2_4.xsd"

	id="WebApp_ID" version="2.4">

	<context-param>

		<param-name>contextConfigLocation</param-name>

		<param-value>classpath:application-context.xml</param-value>

	</context-param>

	<listener>

	<listener-class>org.springframework.web.context.ContextLoaderListener</listener-class>

	</listener>
第二步:在application-context.xml中配置
<?xml version="1.0" encoding="UTF-8"?>

<beans xmlns="http://www.springframework.org/schema/beans"

	xmlns:xsi="http://www.w3.org/2001/XMLSchema-instance" xmlns:aop="http://www.springframework.org/schema/aop"

	xmlns:tx="http://www.springframework.org/schema/tx" xmlns:jdbc="http://www.springframework.org/schema/jdbc"

	xmlns:context="http://www.springframework.org/schema/context"

	xsi:schemaLocation="

     http://www.springframework.org/schema/context http://www.springframework.org/schema/context/spring-context-3.0.xsd

     http://www.springframework.org/schema/beans http://www.springframework.org/schema/beans/spring-beans-3.0.xsd

     http://www.springframework.org/schema/jdbc http://www.springframework.org/schema/jdbc/spring-jdbc-3.0.xsd

     http://www.springframework.org/schema/tx http://www.springframework.org/schema/tx/spring-tx-3.0.xsd

     http://www.springframework.org/schema/aop http://www.springframework.org/schema/aop/spring-aop-3.0.xsd">

	<import resource="config/*.xml" />

</beans>
这样配置可以XML文件的解耦,以后我们可以根据需要在创建相应的XML放在config目录下就可以,不会影响到其他配置
第三步:在classpath:config/目录下配置扫描标签,取名annotation.xml
<?xml version="1.0" encoding="UTF-8"?>

<beans xmlns="http://www.springframework.org/schema/beans"

	xmlns:xsi="http://www.w3.org/2001/XMLSchema-instance" xmlns:aop="http://www.springframework.org/schema/aop"

	xmlns:tx="http://www.springframework.org/schema/tx" xmlns:jdbc="http://www.springframework.org/schema/jdbc"

	xmlns:context="http://www.springframework.org/schema/context"

	xsi:schemaLocation="

     http://www.springframework.org/schema/context http://www.springframework.org/schema/context/spring-context-3.0.xsd

     http://www.springframework.org/schema/beans http://www.springframework.org/schema/beans/spring-beans-3.0.xsd

     http://www.springframework.org/schema/jdbc http://www.springframework.org/schema/jdbc/spring-jdbc-3.0.xsd

     http://www.springframework.org/schema/tx http://www.springframework.org/schema/tx/spring-tx-3.0.xsd

     http://www.springframework.org/schema/aop http://www.springframework.org/schema/aop/spring-aop-3.0.xsd">

	<!--spring 扫包   @Service .....-->

	<context:component-scan base-package="cn.easybuy">

		<context:exclude-filter type="annotation" expression="org.springframework.stereotype.Controller"/>

	</context:component-scan>

    <context:annotation-config/>

</beans>
这里配置我们需要扫描的组件,指定扫描cn.easybuy 目录下的包,由于该项目希望 SpringMVC去管理 Controller,Spring去管理Service 达到一个三层解耦的效果,Mybatis去管理Dao ,所以我们不希望spring去扫Controller注解下的类,这里需要用到<context:exclude-filter /> 标签去排除。
第四步:在classpath:config/目录下配置读取property标签,取名property.xml
<?xml version="1.0" encoding="UTF-8"?>

<beans xmlns="http://www.springframework.org/schema/beans"

	xmlns:xsi="http://www.w3.org/2001/XMLSchema-instance" xmlns:aop="http://www.springframework.org/schema/aop"

	xmlns:tx="http://www.springframework.org/schema/tx" xmlns:jdbc="http://www.springframework.org/schema/jdbc"

	xmlns:context="http://www.springframework.org/schema/context"

	xsi:schemaLocation="

     http://www.springframework.org/schema/context http://www.springframework.org/schema/context/spring-context-3.0.xsd

     http://www.springframework.org/schema/beans http://www.springframework.org/schema/beans/spring-beans-3.0.xsd

     http://www.springframework.org/schema/jdbc http://www.springframework.org/schema/jdbc/spring-jdbc-3.0.xsd

     http://www.springframework.org/schema/tx http://www.springframework.org/schema/tx/spring-tx-3.0.xsd

     http://www.springframework.org/schema/aop http://www.springframework.org/schema/aop/spring-aop-3.0.xsd">

	<!-- 读取jdbc配置 -->

	<bean class="org.springframework.beans.factory.config.PropertyPlaceholderConfigurer">

		<property name="locations">

			<list>

				<!-- jdbc配置 -->

				<value>classpath:properties/jdbc.properties</value>

			</list>

		</property>

	</bean>

</beans>
这里用到PropertyPlaceholderConfigurer 可以帮我们去加载N个配置文件,以后我们还需要加载其他配置文件,只需要在里面添加即可,这里的jdbc.properties是存放我们数据库连接的一些信息
第五步:在classpath:config/目录下配置数据源C3p0标签,取名jdbc.xml
<?xml version="1.0" encoding="UTF-8"?>

<beans xmlns="http://www.springframework.org/schema/beans"

	xmlns:xsi="http://www.w3.org/2001/XMLSchema-instance" xmlns:aop="http://www.springframework.org/schema/aop"

	xmlns:tx="http://www.springframework.org/schema/tx" xmlns:jdbc="http://www.springframework.org/schema/jdbc"

	xmlns:context="http://www.springframework.org/schema/context"

	xsi:schemaLocation="

     http://www.springframework.org/schema/context http://www.springframework.org/schema/context/spring-context-3.0.xsd

     http://www.springframework.org/schema/beans http://www.springframework.org/schema/beans/spring-beans-3.0.xsd

     http://www.springframework.org/schema/jdbc http://www.springframework.org/schema/jdbc/spring-jdbc-3.0.xsd

     http://www.springframework.org/schema/tx http://www.springframework.org/schema/tx/spring-tx-3.0.xsd

     http://www.springframework.org/schema/aop http://www.springframework.org/schema/aop/spring-aop-3.0.xsd">

	<!-- c3p0-->

	<bean id="dataSource" class="com.mchange.v2.c3p0.ComboPooledDataSource">

		<property name="driverClass" value="${driverClass}"/>

		<property name="jdbcUrl" value="${jdbcUrl}"></property>

		<property name="user" value="${user}" />

		<property name="password" value="${password}"/>

	</bean>

</beans>
项目为什么用c3p0而不直接用jdbc?因为c3p0是一个数据库连接池,有两个优点:1.可以连接多个数据库 2.加入连接中断,会帮我们自动重连
第六步:在classpath:config/目录下配置Mybatis配置标签,取名mybatis.xml
<?xml version="1.0" encoding="UTF-8"?>

<beans xmlns="http://www.springframework.org/schema/beans"

	xmlns:xsi="http://www.w3.org/2001/XMLSchema-instance" xmlns:aop="http://www.springframework.org/schema/aop"

	xmlns:tx="http://www.springframework.org/schema/tx" xmlns:jdbc="http://www.springframework.org/schema/jdbc"

	xmlns:context="http://www.springframework.org/schema/context"

	xsi:schemaLocation="

     http://www.springframework.org/schema/context http://www.springframework.org/schema/context/spring-context-3.0.xsd

     http://www.springframework.org/schema/beans http://www.springframework.org/schema/beans/spring-beans-3.0.xsd

     http://www.springframework.org/schema/jdbc http://www.springframework.org/schema/jdbc/spring-jdbc-3.0.xsd

     http://www.springframework.org/schema/tx http://www.springframework.org/schema/tx/spring-tx-3.0.xsd

     http://www.springframework.org/schema/aop http://www.springframework.org/schema/aop/spring-aop-3.0.xsd">

	<!--mybatis  sessionFactory配置-->

	<bean id="sqlSessionFactory" class="org.mybatis.spring.SqlSessionFactoryBean">

		<property name="dataSource" ref="dataSource"/>

		<property name="mapperLocations" value="classpath:cn/easybuy/core/dao/*.xml"/>

		<property name="typeAliasesPackage" value="cn.easybuy.core.bean"/>

	</bean>

	<!-- 扫包  -->

	<bean class="org.mybatis.spring.mapper.MapperScannerConfigurer">

		<property name="basePackage"  value="cn.easybuy.core.dao"/>

	</bean>

</beans>
这里配置sessionFactory,用来帮我们创建session, mapperLocations 的值就是我们以后dao需要用的映射文件, typeAliasesPackage 的值是我们持久化用到的实体类,MapperScannerConfigurer会帮我们扫描cn.easybuy.core,dao下的所有类
第七步:classpath:config/目录下配置事务,取名transation.xml
<?xml version="1.0" encoding="UTF-8"?>

<beans xmlns="http://www.springframework.org/schema/beans"

	xmlns:xsi="http://www.w3.org/2001/XMLSchema-instance" xmlns:aop="http://www.springframework.org/schema/aop"

	xmlns:tx="http://www.springframework.org/schema/tx" xmlns:jdbc="http://www.springframework.org/schema/jdbc"

	xmlns:context="http://www.springframework.org/schema/context"

	xsi:schemaLocation="

     http://www.springframework.org/schema/context http://www.springframework.org/schema/context/spring-context-3.0.xsd

     http://www.springframework.org/schema/beans http://www.springframework.org/schema/beans/spring-beans-3.0.xsd

     http://www.springframework.org/schema/jdbc http://www.springframework.org/schema/jdbc/spring-jdbc-3.0.xsd

     http://www.springframework.org/schema/tx http://www.springframework.org/schema/tx/spring-tx-3.0.xsd

     http://www.springframework.org/schema/aop http://www.springframework.org/schema/aop/spring-aop-3.0.xsd">

	<!-- spring 事务 -->

	<bean id="transactionManager" class="org.springframework.jdbc.datasource.DataSourceTransactionManager">

		<property name="dataSource" ref="dataSource"/>

	</bean>

	<!-- 开启事务注解 -->

	<tx:annotation-driven transaction-manager="transactionManager"/>

</beans>
这里配置spring的事务,dataSource是我们上面配置的数据源,因为我们全程用注解操作,所以需要开启事务注解
第八步:在classpath:properties/目录下配置数据库信息,取名jdbc.properties
driverClass=com.mysql.jdbc.Driver

jdbcUrl=jdbc:mysql://localhost:3306/easyBuy?characterEncoding=UTF-8

user=root

password=root
这里存放一些我们数据库连接的信息,这里用到的是Mysql
项目SpringMVC+Spring+Mybatis 整合环境搭建(1)-> Spring+Mybatis搭建的更多相关文章
- Struts2+Spring+Hibernate整合开发(Maven多模块搭建)
Struts2+Spring+Hibernate整合开发(Maven多模块搭建) 0.项目结构 Struts2:web层 Spring:对象的容器 Hibernate:数据库持久化操作 1.父模块导入 ...
- mybatis整合hikariCP(非spring)
mybatis整合hikariCP(非spring) 一.配置hikariCP典型的配置文件hikariPool.properties jdbcUrl=jdbc:mysql://localhost:3 ...
- JavaEE权限管理系统的搭建(三)--------springmvc和mabatis整合环境搭建
本节介绍如何环境的搭建和配置: 首先要在父工程引入jar包依赖: <!-- 通过属性定义指定jar的版本 --> <properties> <spring.version ...
- 项目SpringMVC+Spring+Mybatis 整合环境搭建(2)-> 测试Spring+Mybatis 环境
测试前期准备 第一步:创建easybuy数据库,设置utf-8格式 第二步:创建表test_tb CREATE TABLE `test_tb` ( `id` int(11) NOT NULL AUTO ...
- Spring+SpringMVC+MyBatis整合基础篇(三)搭建步骤
作者:13GitHub:https://github.com/ZHENFENG13版权声明:本文为原创文章,未经允许不得转载. 框架介绍 Spring SpringMVC MyBatis easyUI ...
- Spring学习总结(五)——Spring整合MyBatis(Maven+MySQL)一
MyBatis-Spring 会帮助你将 MyBatis 代码无缝地整合到 Spring 中. 使用这个类库中的类, Spring 将会加载必要的MyBatis工厂类和 session 类. 这个类库 ...
- 【Spring 持久层】Spring 与 Mybatis 整合
持久层整合总述 1.Spring 框架为什么要与持久层技术进行整合? JavaEE开发需要持久层进行数据库的访问操作 JDBC.Hibernate.MyBatis 进行持久开发过程存在大量的代码冗余 ...
- IDEA环境下SSM整合------环境配置
声明:本文纯为个人笔记整理,如有不妥之处还望及时指出,欢迎转载! 只为解决操作问题,可以从第二幅图往后看! 一.做不出详细的概念叙述和文本设计,本文主要以实战步骤为主,少量解释为辅助,下面请大家牢记两 ...
- Spring Boot 整合 Dubbo和Zookeeper
Spring Boot 整合 Dubbo和Zookeeper Spring Boot 整合 Dubbo和Zookeeper 环境介绍 Zookeeper 安装 启动 Dubbo admin 搭建 创建 ...
随机推荐
- 018 Ceph的mon和osd的删除和添加
一.OSD管理 1.1 移出故障osd 查看当前节点的osd的id [root@ceph2 ceph]# df -hT Filesystem Type Size Used Avail Use% Mou ...
- 洛谷$P$2252 取石子游戏 博弈论
正解:博弈论 解题报告: 传送门! 威佐夫博弈板子昂$QwQ$ 关于这一类问题也有个结论,是说,先手必败的状态一定形如$(\left \lfloor i+\phi \right \rfloor,\le ...
- selenium自动化测试之--验证码处理
由于登录反爬措施的越来越麻烦,甚至出现了12306这种看图识物的无敌验证码,我只能说,我选择死亡.这就衍生出了使用selenium来获取获取cookies. 因为经常会出现验证码,导致我们ui自动化测 ...
- redis 为什么是单线程,为什么速度快。
redis 5中存储方式 String.List.Set.Hash.ZSet这5种 数据库的工作模式按存储方式可分为: 硬盘数据库和内存数据库.Redis 将数据储存在内存里面,读写数据的时候都不会受 ...
- .gitignore使用
一.简绍 我们做的每个Git项目中都需要一个".gitignore"文件,这个文件的作用就是告诉Git哪些文件不需要添加到版本管理中.比如我们项目中的npm包(node_modul ...
- css常用单词
<!-- type = circle表示空心圆 --> <!-- type = disc 表示实心圆 --> <!-- type = square表示方块 ...
- HashMap 源码赏析 JDK8
一.简介 HashMap源码看过无数遍了,但是总是忘,好记性不如烂笔头. 本文HashMap源码基于JDK8. 文章将全面介绍HashMap的源码及HashMap存在的诸多问题. 开局一张图,先来看看 ...
- 低功耗蓝牙(BLE)——概述
1. 概述 蓝牙协议是由SIG制定并维护的无线通信协议,蓝牙协议栈是蓝牙协议的具体实现.各厂商都根据蓝牙协议实现了自己的一套函数库--蓝牙协议栈,所以不同厂商的蓝牙协议栈之间虽然存在差别,但是都遵 ...
- 在浏览器窗口内移动的div
------------今天研究了一个最简单的屏保效果----------- 效果图如下:效果很神奇,就是这个div在浏览器窗口不断的灵活移动 代码却很简单 <!DOCTYPE html> ...
- .Net Core使用分布式缓存Redis:Lua脚本
一.前言 运行环境window,redis版本3.2.1.此处暂不对Lua进行详细讲解,只从Redis的方面讲解. 二.Redis的Lua脚本 在Redis的2.6版本推出了脚本功能,允许开发者使用L ...