SUSE Ceph 快速部署 - Storage6
学习 SUSE Storage 系列文章
(1)SUSE Storage6 实验环境搭建详细步骤 - Win10 + VMware WorkStation
(2)SUSE Linux Enterprise 15 SP1 系统安装
(4)SUSE Ceph 增加节点、减少节点、 删除OSD磁盘等操作 - Storage6
(5)深入理解 DeepSea 和 Salt 部署工具 - Storage6
一、安装环境描述
整个环境采用VMware workstation搭建,一共5台虚拟机,所有虚拟机安装SLES15SP1系统,其中一台安装apache作为仓库使用,剩余4台用于搭建Storage6集群。
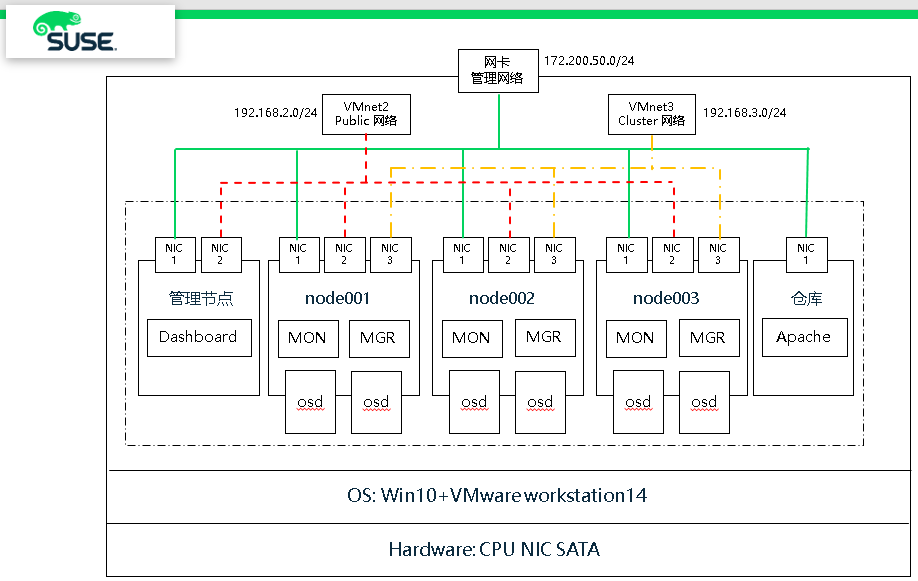 (1)硬件环境:
- 笔记本一台,CPU、内存和磁盘空间足够
- 笔记本上建立一块环回接口用于分布式存储管理网络
(2)软件环境:
- 笔记本安装 Win10 操作系统
- 虚拟环境:VMware Workstation 14 Pro
使用VMnet2和VMnet3 作为分布式存储 public和cluster网络
- 虚拟机操作系统:SLES15SP1 企业版操作系统
1、网络
主机名      public网络       管理网络         集群网络        描述

smt                       172.200.50.19                   SUSE仓库

admin     192.168.2.39    172.200.50.39   192.168.3.39    管理主机

node001   192.168.2.41    172.200.50.41   192.168.3.41    MON

node002   192.168.2.42    172.200.50.42   192.168.3.42    MON

node003   192.168.2.43    172.200.50.43   192.168.3.43    MON
2、磁盘
每个节点系统有2块 OSD 盘和1块 NVME 磁盘
 # lsblk

 NAME            MAJ:MIN RM  SIZE RO TYPE MOUNTPOINT

 sda               :       20G   disk              # 操作系统盘

 ├─sda1            :        1G   part /boot

 └─sda2            :       19G   part

   ├─vgoo-lvroot :       17G   lvm  /

   └─vgoo-lvswap :        2G   lvm  [SWAP]

 sdb               :      10G   disk              # osd 数据盘

 sdc               :      10G   disk              # osd 数据盘

 nvme0n1         :       20G   disk              # wal db
二、操作系统初始化安装
1、临时IP地址设置
 ip link set eth0 up

 ip addr add 172.200.50.50/ dev eth0
连接上了设置永久地址
yast lan list
yast lan edit id=0 ip=192.168.2.40 netmask=255.255.255.0
2、设置bash环境变量和别名
# vim /root/.bash_profile

alias cd..='cd ..'

alias dir='ls -l'

alias egrep='egrep --color=auto'

alias fgrep='fgrep --color=auto'

alias grep='grep --color=auto'

alias l='ls -alF'

alias la='ls -la'

alias ll='ls -l'

alias ls-l='ls -l'
3、配置after.local文件
touch /etc/init.d/after.local

chmod  /etc/init.d/after.local
复制该内容进去
#! /bin/sh

#

# Copyright (c)  SuSE LINUX Products GmbH, Germany.  All rights reserved.

#

# Author: Werner Fink,

#

# /etc/init.d/after.local

#

# script with local commands to be executed from init after all scripts

# of a runlevel have been executed.

#

# Here you should add things, that should happen directly after

# runlevel has been reached.

#
4、仓库配置(所有节点和admin)
## Pool

zypper ar http://172.200.50.19/repo/SUSE/Products/SLE-Product-SLES/15-SP1/x86_64/product/    SLE-Product-SLES15-SP1-Pool

zypper ar http://172.200.50.19/repo/SUSE/Products/SLE-Module-Basesystem/15-SP1/x86_64/product/ SLE-Module-Basesystem-SLES15-SP1-Pool

zypper ar http://172.200.50.19/repo/SUSE/Products/SLE-Module-Server-Applications/15-SP1/x86_64/product/ SLE-Module-Server-Applications-SLES15-SP1-Pool

zypper ar http://172.200.50.19/repo/SUSE/Products/SLE-Module-Legacy/15-SP1/x86_64/product/  SLE-Module-Legacy-SLES15-SP1-Pool

zypper ar  http://172.200.50.19/repo/SUSE/Products/Storage/6/x86_64/product/ SUSE-Enterprise-Storage-6-Pool

## Update

zypper ar http://172.200.50.19/repo/SUSE/Updates/SLE-Product-SLES/15-SP1/x86_64/update/ SLE-Product-SLES15-SP1-Updates

zypper ar http://172.200.50.19/repo/SUSE/Updates/SLE-Module-Basesystem/15-SP1/x86_64/update/  SLE-Module-Basesystem-SLES15-SP1-Upadates

zypper ar http://172.200.50.19/repo/SUSE/Updates/SLE-Module-Server-Applications/15-SP1/x86_64/update/ SLE-Module-Server-Applications-SLES15-SP1-Upadates

zypper ar http://172.200.50.19/repo/SUSE/Updates/SLE-Module-Legacy/15-SP1/x86_64/update/ SLE-Module-Legacy-SLES15-SP1-Updates

zypper ar http://172.200.50.19/repo/SUSE/Updates/Storage/6/x86_64/update/ SUSE-Enterprise-Storage-6-Updates
# zypper lr

#  | Alias                                              | Name

---+----------------------------------------------------+----------------------------------------------------

 1 | SLE-Module-Basesystem-SLES15-SP1-Pool              | SLE-Module-Basesystem-SLES15-SP1-Pool

 2 | SLE-Module-Basesystem-SLES15-SP1-Upadates          | SLE-Module-Basesystem-SLES15-SP1-Upadates

 3 | SLE-Module-Legacy-SLES15-SP1-Pool                  | SLE-Module-Legacy-SLES15-SP1-Pool

 4 | SLE-Module-Legacy-SLES15-SP1-Updates               | SLE-Module-Legacy-SLES15-SP1-Updates

 5 | SLE-Module-Server-Applications-SLES15-SP1-Pool     | SLE-Module-Server-Applications-SLES15-SP1-Pool

 6 | SLE-Module-Server-Applications-SLES15-SP1-Upadates | SLE-Module-Server-Applications-SLES15-SP1-Upadates

 7 | SLE-Product-SLES15-SP1-Pool                        | SLE-Product-SLES15-SP1-Pool

 8 | SLE-Product-SLES15-SP1-Updates                     | SLE-Product-SLES15-SP1-Updates

 9 | SUSE-Enterprise-Storage-6-Pool                     | SUSE-Enterprise-Storage-6-Pool

10 | SUSE-Enterprise-Storage-6-Updates                  | SUSE-Enterprise-Storage-6-Updates
5、安装基本软件 (所有节点和admin)
zypper in -y -t pattern yast2_basis base

zypper in -y net-tools vim man sudo tuned irqbalance

zypper in -y ethtool rsyslog iputils less supportutils-plugin-ses

zypper in -y net-tools-deprecated tree wget
6、关闭IPV6 (所有节点和admin)
# vim /etc/sysctl.conf

net.ipv6.conf.all.disable_ipv6 =                  # 关闭 IPV6

net.ipv6.conf.default.disable_ipv6 =

net.ipv6.conf.lo.disable_ipv6 =

vm.min_free_kbytes =                        # 128GB的RAM,系统预留2GB

kernel.pid_max =                            # 线程数设置最大
执行生效
# sysctl -p
7、调整网络优化参数 (所有节点和admin)
# tuned-adm profile throughput-performance

# tuned-adm active

# systemctl start tuned.service

# systemctl enable tuned.service
8、编辑hosts文件 (所有节点和admin)
# vim /etc/hosts

192.168.2.39    admin.example.com admin

192.168.2.40    node001.example.com node001

192.168.2.41    node002.example.com node002

192.168.2.42    node003.example.com node003
9、执行更新操作系统,并重启 (所有节点和admin)
# zypper ref

# zypper -n update

# reboot
三、安装Storage6集群
1、安装 salt(admin节点)
zypper -n in deepsea

systemctl restart salt-master.service

systemctl enable salt-master.service

systemctl status salt-master.service
osd节点 和 admin节点
zypper -n in salt-minion

sed -i '17i\master: 192.168.2.39' /etc/salt/minion

systemctl restart salt-minion.service

systemctl enable salt-minion.service

systemctl status salt-minion.service
接受所有请求(admin节点)
salt-key

salt-key --accept-all

salt-key

salt '*' test.ping
2、Admin节点,配置NTP服务
如果没有ntp服务器,默认以admin节点为ntp server
Admin节点:
# vim /etc/chrony.conf

# Sync to local clock        # 添加本地时钟源

server 127.0.0.1

allow 127.0.0.0/

allow 192.168.2.0/

allow 172.200.50.0/

local stratum
systemctl restart chronyd.service

systemctl enable chronyd.service

systemctl status chronyd.service
# chronyc sources

 Number of sources =

MS Name/IP address         Stratum Poll Reach LastRx Last sample

===============================================================================

^* 127.127.1.0                               +1461ns[+3422ns] +/-  166us

# chronyc -n sources -v
3、修改组(admin节点)
cp -p /srv/pillar/ceph/deepsea_minions.sls /tmp/

sed -i "4c # deepsea_minions: 'G@deepsea:*'" /srv/pillar/ceph/deepsea_minions.sls

sed -i "6c deepsea_minions: '*'" /srv/pillar/ceph/deepsea_minions.sls
4、远程连接终端监控(admin节点)
该程序监控提供一个详细的,实时的可视化操作行为,当在执行运行salt-run state.orch时,监控执行期间运行了什么
# deepsea monitor
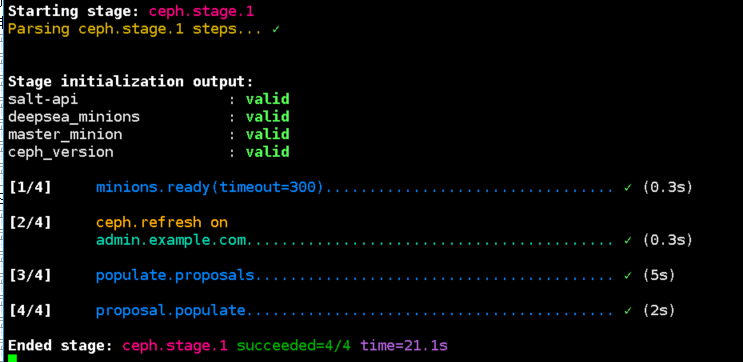
5、更新补丁,并收集硬件信息(admin节点)
salt-run state.orch ceph.stage.

salt-run state.orch ceph.stage.
报错信息可忽略
No minions matched the target. No command was sent, no jid was assigned.

No minions matched the target. No command was sent, no jid was assigned.

[ERROR   ] Exception during resolving address: [Errno ] Host name lookup failure

[ERROR   ] Exception during resolving address: [Errno ] Host name lookup failure

[WARNING ] /usr/lib/python3./site-packages/salt/grains/core.py:: DeprecationWarning: This server_id is

computed nor by Adler32 neither by CRC32. Please use "server_id_use_crc" option and define algorithm youprefer (

default "Adler32"). The server_id will be computed withAdler32 by default.
GitHub
SUSE Ceph 快速部署 - Storage6的更多相关文章
- 分布式文件系统ceph快速部署
架构图 配置ceph-deploy节点 管理节点配置ceph yum源 vim /etc/yum.repos.d/ceph.repo [ceph-noarch] name=Ceph noarch pa ...
- SUSE Ceph 增加节点、减少节点、 删除OSD磁盘等操作 - Storage6
一.测试环境描述 之前我们已快速部署好一套Ceph集群(3节点),现要测试在现有集群中在线方式增加节点 如下表中可以看到增加节点node004具体配置 主机名 Public网络 管理网络 集群网络 说 ...
- Centos7下使用Ceph-deploy快速部署Ceph分布式存储-操作记录
之前已详细介绍了Ceph分布式存储基础知识,下面简单记录下Centos7使用Ceph-deploy快速部署Ceph环境: 1)基本环境 192.168.10.220 ceph-admin(ceph-d ...
- Centos7下使用Ceph-deploy快速部署Ceph分布式存储-操作记录(转)
之前已详细介绍了Ceph分布式存储基础知识,下面简单记录下Centos7使用Ceph-deploy快速部署Ceph环境:1)基本环境 1 2 3 4 5 6 7 8 9 10 11 12 13 14 ...
- Ubuntu CEPH快速安装
一.CEPH简介 不管你是想为云平台提供Ceph 对象存储和/或 Ceph 块设备,还是想部署一个 Ceph 文件系统或者把 Ceph 作为他用,所有 Ceph 存储集群的部署都始于部署一个个 Cep ...
- 使用kubeadm快速部署一套K8S集群
一.Kubernetes概述 1.1 Kubernetes是什么 Kubernetes是Google在2014年开源的一个容器集群管理系统,Kubernetes简称K8S. K8S用于容器化应用程序的 ...
- Linux上oracle精简版客户端快速部署
RHEL6 + Oracle 11g客户端快速部署 需求:只是用到客户端的sqlplus, sqlldr功能. 方案:用精简版实现客户端的快速部署 1.上传oracle精简版客户端到服务器/tmp目录 ...
- 2.快速部署MySQL主从复制
1.快速部署MySQL主从复制 [root@mysql ~]# mysql -uroot -p123456 -S /data/3307/mysql.sock -e "show slave ...
- 如何利用脚本实现MySQL的快速部署以及一机多实例的部署
MySQL有三个版本:二进制,源码包,RPM. 下面讲讲二进制包的安装过程 下载地址: http://dev.mysql.com/downloads/mysql/ 选择Linux-Generic 我这 ...
随机推荐
- 基于Taro与Typescript开发的网易云音乐小程序
基于Taro与网易云音乐api开发,技术栈主要是:typescript+taro+taro-ui+redux,目前主要是着重小程序端的展示,主要也是借此项目强化下上述几个技术栈的使用,通过这个项目也可 ...
- ImportError: cannot import name '_obtain_input_shape' from 'keras.applications.imagenet_utils'
报错 Using TensorFlow backend. Traceback (most recent call last): File "D:/PyCharm 5.0.3/WorkSpac ...
- 【selenium】- 自动化测试必备工具FireBug&FirePath
本文由小编根据慕课网视频亲自整理,转载请注明出处和作者. 1. FireBug FireBug的安装: 如果使用Firefox浏览器的话,推荐使用较低版本,比如27-32.否则会报错. 点击右上角的菜 ...
- 2019nc#5
题号 标题 已通过代码 题解/讨论 通过率 团队的状态 A digits 2 点击查看 1017/2384 通过 B generator 1 点击查看 567/3692 通过 C generato ...
- hdu2222 Keywords Search (AC自动机板子
https://vjudge.net/problem/HDU-2222 题意:给几个模式串和一个文本串,问文本串中包含几个模式串. 思路:贴个板子不解释. #include<cstdio> ...
- bzoj 4025 二分图 lct
题目传送门 题解: 首先关于二分图的性质, 就是没有奇环边. 题目其实就是让你判断每个时段之内有没有奇环. 其次 lct 只能维护树,(反正对于我这种菜鸟选手只会维护树), 那么对于一棵树来说, 填上 ...
- 2017福建省赛 L Tic-Tac-Toe 模拟
Kim likes to play Tic-Tac-Toe. Given a current state, and now Kim is going to take his next move. Pl ...
- poj 1753 Flip Game(暴力枚举)
Flip Game Time Limit: 1000MS Memory Limit: 65536K Total Submissions: 52279 Accepted: 22018 Des ...
- hdu 3038 How Many Answers Are Wrong(并查集的思想利用)
题目链接:http://acm.hdu.edu.cn/showproblem.php?pid=3038 题意:就是给出n个数和依次m个问题,每个问题都是一个区间的和,然后问你这些问题中有几个有问题,有 ...
- ThreadPoolTaskExecutor介绍
ThreadPoolTaskExecutor是一个spring的线程池技术,其实,它的实现方式完全是使用ThreadPoolExecutor进行实现.对于ThreadPoolExecutor,有一些重 ...