android 55
智能家居:可以联网可以用指令操作可以返回状态。智能微波炉智能眼镜智能手表。
Android作者Andy Rubin,2007年正式由谷歌推广,开源的。
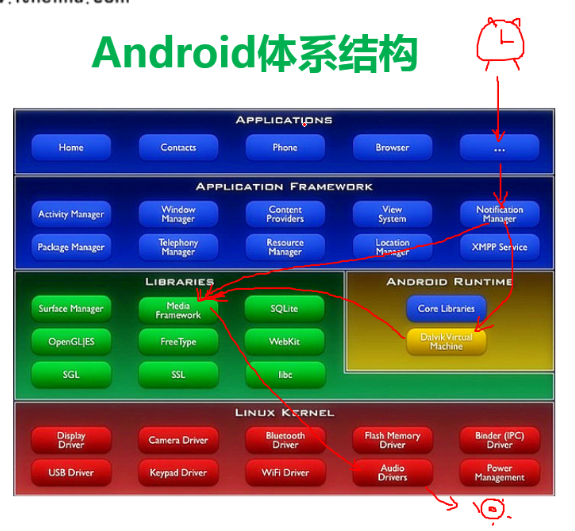
安卓体系结构和开发一个闹钟的调用结构图:
安卓和ios都是基于linux内核开发的。
开发工具:
Eclips+ADT,
Intel模拟器加速器虚拟化cpu提高模拟器的速度,可以提高十多倍。
System.out.println("hahahah,我被点击了.");打印到logCat控制台。

#Android体系结构

* 底层Linux操作系统

* library c/c++的函数库

* 应用程序框架层 java提供的函数库

* 应用程序

#jvm和dvm的区别

* 版权问题

* 效率问题

#下载Android开发的sdk

* 什么是sdk

> standard develop kits 标准开发工具集

下载选择32位或者64位的版本

直接解压下载下来的zip包

#Android sdk的目录结构

* eclipse  开发工具ide 订制版本的eclipse

* sdk 开发工具集合

* SDK Manager.exe sdk管理器,提供sdk的更新

#sdk文件夹的目录结构(打开SDK Manager.exe看到的)

* Extras 额外的工具

    * Android support library 向下兼容提供的函数库

    * Google usb driver 真实手机的驱动(只有谷歌的亲儿子才可用 nexus s)

    * intel HAM intel的硬件加速(只有是intel的处理器,adm处理器不可用)

* 模拟器要想在电脑上运行需要有系统的镜像

    * arm system image (arm系统平板,在电脑上模拟运行速度比较慢)

    * x86 system image (x86电脑处理器,在电脑上模拟运行速度比较快)

* doc 离线文档(包含全部的api的说明)

* platforms 不同版本sdk的开发android.jar包

* platform-tools 平台工具

    * adb.exe Android debug bridge(安卓开发调试桥)

    * dx.bat 把.class的字节码转化成.dex的字节码

* samples 开发用的示例代码

* sources sdk的全套源码

* system-images 系统镜像

* tools 模拟器的应用程序就存放在这个文件夹里面

##强烈推荐使用4.1.2版本的模拟器.最稳定.

##千万不要使用4.2版本的模拟器,bug非常多

##常见分辨率

* VGA 640x480

* HVGA 480x320

* QVGA 320x240

* WVGA 800x480

* FWVGA 854x480

##模拟器名称

*5554 端口号 一个模拟器占用两个端口号

##DDMS

* dalvik debug manager system

##ADT

>Android Developer Tools 安卓开发工具集(eclipse的一个插件)

>21.1.0.v20130206 不要升级adt的版本

>会帮着我们自动创建Android的工程结构,帮我们编译应用程序-->生成apk--->部署手机-->运行

##Android工程磁盘的目录结构

* .settings eclipse创建的文件夹 记录工程的配置信息

* assets 资产目录 打包一些文件到应用程序里面(数据库文件,网页文件,配置文件,图片)

* bin eclipse编译的二进制文件,把java-->class--->dex-->res打包-->.apk,apk是zip文件,可以把后缀名改为zip后用解压缩软件打开。

* gen 自动生成的代码

* libs android-support-v4.jar 安卓的支持jar包

* res 应用程序的资源目录 图标 文本 颜色资源

    * drawable 存放应用程序的图片资源

    * layout 存放应用程序的布局文件 xml文件

    *

* src 我们编写的java代码

* .classpath eclipse配置文件

* .project eclipse配置文件

* manifest.xml 非常重要是应用程序的清单文件 配置应用程序的版本号,图标,名称

* project.properties 工程的配置文件

##Android应用程序开发的步骤

1. 创建工程,配置应用程序工程名称,包名,图标.

2. 编写应用程序的ui界面, res-->layout--->main_activity.xml

> 布局都是xml文件编写的,支持图形化的拖拽

3. 写java代码.在src目录下 MainActivity.java

           @Override

            protected void onCreate(Bundle savedInstanceState) {

                super.onCreate(savedInstanceState);

            //设置应用程序显示的界面

                setContentView(R.layout.activity_main);

            //TODO:查找我们关心的控件,实现控件的点击事件

            }

4. 必须给关心的控件设置id. 这个id会在R.java文件里面生成一个引用

5. 在java代码 findViewById(R.id.xxxx);

6. 设置控件的点击事件

         bt_click.setOnClickListener(new MyButtonListener());

7. 打印土司

        Toast.makeText(MainActivity.this, "hahahah,我被点击了.", Toast.LENGTH_SHORT).show();

##应用程序编译安装的过程(磁盘里面查看).

一. 把所有的.java文件编译成.class文件 ,bin/class文件夹下面

> jdk 的 javac.exe

二. 把所有的.class字节码文件打包合成一个文件 classes.dex

> sdk中的dx.bat文件 把.class -->.dex

三. 根据资源的id,生成一个资源文件resources.ap_ 保存全部的资源文件的信息

四. 把.dex文件,res目录下的资源文件,resources.ap_的引用, asset目录下的文件

合成在一起打成一个apk的压缩包

>使用的是 aapt.exe

五. adb.exe 负责把生成好的apk文件上传安装到手机里面.

> Android debug bridge 安卓调试桥,负责上传安装apk

##常见的adb命令
ctrl+shift+鼠标右键:快速打开命令行窗口。
路径加入环境变量是在path里面添加adb.exe的路径。
* 安装一个应用程序
> adb install xxx.apk * 卸载一个应用程序
> adb uninstall com.itheima.clickme<包名> * 进入到手机终端里面
> adb shell
> 进入手机终端之后就可以执行Linux命令 kill 杀死一个进程 ps 列出来进程 ls 列出来文件 * 杀死adb的调试桥
>adb kill-server
>adb的调试桥不稳定,经常掉线,如果掉线了,执行adb kill-server把调试桥杀死 * 启动adb的调试桥
>adb start-server * 查看连接在电脑上的设备
>adb devices
>adb start-server这个方法比较笨,如果一次启动不成功,就不启动了.通常使用adb devices来代替adb start-server * 指定设备执行adb指令
>adb -s emulator-5556 install xxx.apk ##URI && URL
* URL 统一资源定位符(网址,ftp,rtsp)
> http://www.baidu.com
> http://www.itheima.com * URI 统一资源标识符(范围更加广泛)
> tel://110
> content://
##权限模型的目的,例如拨打电话权限:
<uses-permission android:name="android.permission.CALL_PHONE"/>
* 给用户一个提醒,让用户知道你安装的软件需要干什么操作.
* 只有敏感操作才需要申请权限(钱,设备安全,隐私)
* 避免潜在法律诉讼
##点击事件的四种写法
* 内部类
* 匿名内部类
* 让activity实现onclickListener接口
* 在布局xml文件里面绑定点击事件
##常见的布局
* LinearLayout 线性布局
> 线性布局的朝向 vertical|horizontal
> 线性布局的权重 weight 和 0dip一起使用
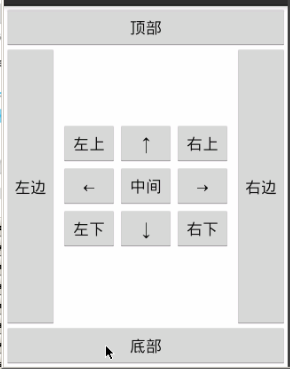
* RelativeLayout 相对布局 都是按照相对位置排列的
* FrameLayout 帧布局
> 布局层层叠加覆盖的
> DIV
拨打电话:
private class MyButtonListener implements OnClickListener{

        @Override

        public void onClick(View v) {

            //2.当用户点击按钮的时候 获取里面的电话号码

            String phone = et_phone.getText().toString().trim();

            if("".equals(phone)){//LENGTH_SHORT时长

                Toast.makeText(MainActivity.this, "电话号码不能为空", Toast.LENGTH_SHORT).show();

            }else{

                //拨打电话....调用系统的应用程序让系统帮我们拨打电话.

                //机器打孔-->汇编语言(要对处理器非常了解)-->c语言-->c++(有内存泄漏问题) -->java(c+++)--->c#(++++)---> 第五代编程语言(自然语言)

                //1.创建一个意图对象. 打(action) 贱人(data)   泡(action)红茶(data)

                Intent intent = new Intent();

                //dail是启动拨号界面, call直接拨打号码

                intent.setAction(Intent.ACTION_CALL);//设置动作action, 拨打电话

                //3.指定动作的数据

                intent.setData(Uri.parse("tel://"+phone));//parse将字符串转换为Uri

                //调用系统播发电话

                startActivity(intent);

            }

        }

}

系统描述文件:

<uses-permission android:name="android.permission.CALL_PHONE"/>  permission是权限节点

点击事件:

<!--     只要在布局文件指定了onclick的属性,

代表就是当这个按钮被点击的时候,会执行activity里面的方法

    方法名 haha -->

    <Button

        android:onClick="gaga"

        android:layout_width="wrap_content"

        android:layout_height="wrap_content"

        android:layout_alignParentLeft="true"

        android:layout_below="@+id/button1"

        android:layout_marginTop="40dp"

        android:text="按钮02" />

//点击事件的第四种写法 直接在布局xml文件里面指定点击事件的方法名

    public void gaga(View view){

        Toast.makeText(MainActivity.this, "嘎嘎", 0).show();

    }
相对布局:
<?xml version="1.0" encoding="utf-8"?>

<RelativeLayout xmlns:android="http://schemas.android.com/apk/res/android"

    android:layout_width="match_parent"

    android:layout_height="match_parent" >

    <Button

        android:id="@+id/bt_middle"

        android:layout_width="wrap_content"  宽度为包裹内容

        android:layout_height="wrap_content"

        android:layout_centerHorizontal="true"   父窗口水平居中

        android:layout_centerVertical="true"      父窗口垂直居中

        android:text="中间" />

    <Button

        android:id="@+id/up"

        android:layout_width="wrap_content"

        android:layout_height="wrap_content"

        android:layout_above="@id/bt_middle"   在"中间"按钮的上方

        android:layout_centerHorizontal="true"   水平居中

        android:text="上" />

    <Button

        android:id="@+id/down"

        android:layout_width="wrap_content"

        android:layout_height="wrap_content"

        android:layout_below="@id/bt_middle"       在"中间"按钮的下方

        android:layout_centerHorizontal="true"   水平居中

        android:text="下" />

    <Button

        android:id="@+id/left"

        android:layout_width="wrap_content"

        android:layout_height="wrap_content"

        android:layout_centerVertical="true"     水平居中

        android:layout_toLeftOf="@id/bt_middle" 在"中间"按钮的左方

        android:text="左" />

    <Button

        android:id="@+id/right"

        android:layout_width="wrap_content"

        android:layout_height="wrap_content"

        android:layout_centerVertical="true"   水平居中

        android:layout_toRightOf="@id/bt_middle" 在"中间"按钮的右方

        android:text="右" />

    <Button

        android:layout_above="@id/left"

        android:layout_toLeftOf="@id/up"

        android:layout_width="wrap_content"

        android:layout_height="wrap_content"

        android:text="左上" />

    <Button

        android:layout_below="@id/left"     left下面

        android:layout_toLeftOf="@id/up"   up左边

        android:layout_width="wrap_content"

        android:layout_height="wrap_content"

        android:text="左下" />

    <Button

        android:layout_above="@id/right"

        android:layout_toRightOf="@id/up"

        android:layout_width="wrap_content"

        android:layout_height="wrap_content"

        android:text="右上" />

    <Button

        android:layout_below="@id/right"

        android:layout_toRightOf="@id/up"

        android:layout_width="wrap_content"

        android:layout_height="wrap_content"

        android:text="右下" />

    <Button

        android:layout_alignParentTop="true"   父亲的顶部对其

        android:layout_width="fill_parent"        宽度为填充父窗口

        android:layout_height="wrap_content"   高度为包裹内容

        android:text="顶部" />

 <Button

        android:layout_alignParentBottom="true"

        android:layout_width="fill_parent"

        android:layout_height="wrap_content"

        android:text="底部" />

  <Button

        android:layout_marginTop="45dip"    与顶部距离

        android:layout_marginBottom="45dip" 与底部距离

        android:layout_alignParentLeft="true"  与parent左边对其

        android:layout_width="60dip"

        android:layout_height="fill_parent"   高度填充父窗体

        android:text="左边" />

   <Button

        android:layout_marginTop="45dip"

        android:layout_marginBottom="45dip"

        android:layout_alignParentRight="true"    与parent右边对其

        android:layout_width="60dip"

        android:layout_height="fill_parent"

        android:text="右边" />

</RelativeLayout>
桢布局:FrameLayout 帧布局,布局层层叠加覆盖的

<?xml version="1.0" encoding="utf-8"?>

<FrameLayout xmlns:android="http://schemas.android.com/apk/res/android"

    android:layout_width="match_parent"

    android:layout_height="match_parent"

    android:background="#ff0000" >            布局背景颜色为红色

    <TextView                                       将会覆盖上面的桢布局

        android:layout_gravity="center"       对其方式居中对其,水平垂直居中对其

        android:layout_width="200dip"

        android:layout_height="200dip"

        android:background="#00ff00" />

     <TextView

           android:layout_gravity="center"

        android:layout_width="100dip"

        android:layout_height="100dip"

        android:background="#0000ff" />

      <TextView

           android:layout_gravity="center"

        android:layout_width="50dip"

        android:layout_height="50dip"

        android:background="#ff00ff" />

 <TextView

           android:layout_gravity="center"

        android:layout_width="20dip"

        android:layout_height="20dip"

        android:background="#ffff00" />

</FrameLayout>
绝对布局:
<?xml version="1.0" encoding="utf-8"?>

<AbsoluteLayout xmlns:android="http://schemas.android.com/apk/res/android"

    android:layout_width="match_parent"

    android:layout_height="match_parent" >

    <Button

        android:id="@+id/button1"

        android:layout_width="wrap_content"

        android:layout_height="wrap_content"

        android:layout_x="36dp"

        android:layout_y="222dp"

        android:text="Button" />

    <TextView

        android:id="@+id/textView1"

        android:layout_width="wrap_content"

        android:layout_height="wrap_content"

        android:layout_x="48dp"

        android:layout_y="95dp"

        android:text="Large Text"

        android:textAppearance="?android:attr/textAppearanceLarge" />

</AbsoluteLayout>
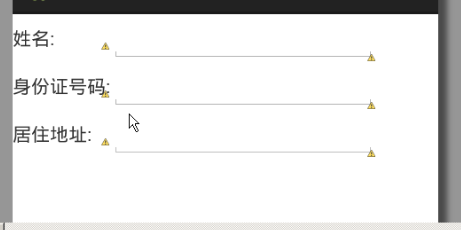
表格布局:
<?xml version="1.0" encoding="utf-8"?>

<TableLayout xmlns:android="http://schemas.android.com/apk/res/android"

    android:layout_width="fill_parent"   宽度填充父窗体和match_parent一样

    android:layout_height="match_parent" >

    <TableRow                           一行

        android:layout_width="match_parent"

        android:layout_height="wrap_content" >    高度为包裹的内容,里面控件有多高就多高

        <TextView                         第一列

            android:layout_width="wrap_content"   宽度为包裹内容

            android:layout_height="wrap_content"

            android:text="姓名:" />

        <EditText                        第二列

            android:layout_width="200dip"

            android:layout_height="wrap_content" />

    </TableRow>

    <TableRow                        二行

        android:layout_width="match_parent"

        android:layout_height="wrap_content" >

        <TextView

            android:layout_width="wrap_content"

            android:layout_height="wrap_content"

            android:text="身份证号码:" />

        <EditText

            android:layout_width="200dip"

            android:layout_height="wrap_content" />

    </TableRow>

    <TableRow

        android:layout_width="match_parent"

        android:layout_height="wrap_content" >

        <TextView

            android:layout_width="wrap_content"

            android:layout_height="wrap_content"

            android:text="居住地址:" />

        <EditText

            android:layout_width="200dip"

            android:layout_height="wrap_content" />

    </TableRow>

</TableLayout>
android 55的更多相关文章
- Android 6.0一个完整的native service
上一篇博客<Android 6.0 如何添加完整的系统服务(app-framework-kernel)>http://www.cnblogs.com/hackfun/p/7418902. ...
- Android零基础入门第55节:ImageSwitcher和TextSwitcher使用
原文:Android零基础入门第55节:ImageSwitcher和TextSwitcher使用 上一期我们了解了ViewAnimator组件和ViewSwitcher组件的使用,你都掌握了吗?本期一 ...
- 55.Android之AsyncTask介绍 (转)
AsyncTask和Handler对比 1 ) AsyncTask实现的原理,和适用的优缺点 AsyncTask,是android提供的轻量级的异步类,可以直接继承AsyncTask,在类中实现异步操 ...
- android学习笔记55——ContentProvider_2
实现ContentProvider 创建ContentProvider的步骤: 1.开发一个ContentProvider的子类,该子类需要实现增.删.改.查等方法: 2.在AndroidMainfe ...
- 【Android Developers Training】 55. 序言:高效显示位图
注:本文翻译自Google官方的Android Developers Training文档,译者技术一般,由于喜爱安卓而产生了翻译的念头,纯属个人兴趣爱好. 原文链接:http://developer ...
- 55、Android网络图片 加载缓存处理库的使用
先来一个普通的加载图片的方法. import android.annotation.SuppressLint; import android.app.Activity; import and ...
- Android(java)学习笔记55:LayoutInflater 和 findViewById
1. 在实际开发中LayoutInflater这个类还是非常有用的,它的作用类似于findViewById(). 不同点是LayoutInflater是用来找res/layout/下的xml布局文件, ...
- 55、android app借助友盟实现微信授权登录
一.去微信开放平台的管理中心申请移动设备的审核(需进行开发者资质认证,每年300元) 1.获取应用的签名 2.在微信开放平台申请移动应用 两个注意点:①签名要填对 ②应用的包名要写对(tips: co ...
- Gradle 实现 Android 多渠道定制化打包
Gradle 实现 Android 多渠道定制化打包 版权声明:本文为博主原创文章,未经博主允许不得转载. 最近在项目中遇到需要实现 Apk 多渠道.定制化打包, Google .百度查找了一些资料, ...
随机推荐
- Apache 禁止访问目录
1.打开apache配置文件httpd.conf 2.找到 <Directory /> Options Indexes AllowOverride None Order allow,den ...
- android sdk api的层次结构
一.系统级:android.accounts android.app 1.OS 相关 android.os android.os.storage ...
- "System.Web" 中不存在类型或命名空间
System.Web”中不存在类型或命名空间名称script /找不到System.Web.Extensions.dll引用 添加引用就行了...“添加引用→.Net→System.Web.Ente ...
- Scut 上线后遇到的问题
1. 上线后的大并发问题: var sem = new Semaphore(_accepts, _accepts); while (true) { sem.WaitOne(); #pragma war ...
- jackson学习----解析豆瓣的图书信息
异常一. org.codehaus.jackson.map.JsonMappingException: No suitable constructor found for type [simple ...
- Contest 20141027 总结
这次考试主要问题出在第一题,由于考试期间没有看清题意,少看了一句 “a=A/1e9" 导致在考试结束最后5分钟发现时修改过于匆忙,改出问题了.另外,这道题同时告诉我long double 在 ...
- 用POLL的方式,没有跑出结果来,立此存照
咦,这些内容,和我以前看内核时的东东,对应起来了.. SELECT,POLL,EPOLL,非阻塞,异步之类的... 但我没有调出来.回家有空了可以看看,不用再敲打代码啦... #!/usr/bin/e ...
- c++ new带括号和不带括号
在new对象的时候有加上(),有不加(),不知道这个到底是什么区别?比如:CBase *base = new CDerived();CBase *base = new CDeviced; 很多人都说, ...
- latch free
latch free 等待事件: latch: cache buffers chains 这个等待事件其实还有另外一个重要的原因,那么就是逻辑读太高,SQL执行计划走错了导致的. 当进程想要获取锁存器 ...
- 在unity3d中连接sql server
虽然在Unity3D中能够通过PlayerPrefs类来保存和读取数据,但是一旦数据量增大,仅仅通过代码的方式存取数据,这样的工作量是非常大的.那么如何通过使用Sql Server数据库来存取数据呢? ...