Angular 个人深究(四)【生命周期钩子】
Angular 个人深究(四)【生命周期钩子】
定义:
每个组件都有一个被 Angular 管理的生命周期。
Angular 创建它,渲染它,创建并渲染它的子组件,在它被绑定的属性发生变化时检查它,并在它从 DOM 中被移除前销毁它。
Angular 提供了生命周期钩子,把这些关键生命时刻暴露出来,赋予你在它们发生时采取行动的能力。
除了那些组件内容和视图相关的钩子外,指令有相同生命周期钩子。
概览:
| ngOnChanges() |
当 Angular(重新)设置数据绑定输入属性时响应。 该方法接受当前和上一属性值的 SimpleChanges 对象 当被绑定的输入属性的值发生变化时调用,首次调用一定会发生在 |
| ngOnInit() |
在 Angular 第一次显示数据绑定和设置指令/组件的输入属性之后,初始化指令/组件。 在第一轮 |
| ngDoCheck() |
检测,并在发生 Angular 无法或不愿意自己检测的变化时作出反应。 在每个 Angular 变更检测周期中调用, |
| ngAfterContentInit() |
当把内容投影进组件之后调用。 第一次 |
| ngAfterContentChecked() |
每次完成被投影组件内容的变更检测之后调用。
|
| ngAfterViewInit() |
初始化完组件视图及其子视图之后调用。 第一次 |
| ngAfterViewChecked() |
每次做完组件视图和子视图的变更检测之后调用。
|
| ngOnDestroy() |
当 Angular 每次销毁指令/组件之前调用并清扫。 在这儿反订阅可观察对象和分离事件处理器,以防内存泄漏。 在 Angular 销毁指令/组件之前调用。 |
范例:
ngOnChanges()、ngInit
test2.component.ts
// test2.component.ts:

import { Component, OnInit,Input } from '@angular/core';

@Component({

  selector: 'app-test2',

  templateUrl: './test2.component.html',

  styleUrls: ['./test2.component.css']

})
//需要继承 OnInit、OnChanges 接口

export class Test2Component implements OnInit OnChanges{
// 两个input 来自 父组件 test1

	@Input() test2_value1: string;

	@Input() test2_value2: string;

  constructor() { }

  ngOnInit() {
          //判断 ngOnInit的执行顺序

		console.log("这里执行ngOnInit");

  }

	ngOnChanges(changes:SimpleChanges){

		console.log(changes);

		for (let propName in changes) {

			let chng = changes[propName];

			let cur  = JSON.stringify(chng.currentValue);

			let prev = JSON.stringify(chng.previousValue);

			console.log(`${propName}: 新值 = ${cur}, 旧值 = ${prev}`);

		}

	}

}
test1.component.html
<!-- test1.component.html -->

<p>

  test1 works!

</p>

<label> test1 value</label>

<input  type="text" [(ngModel)]="test1_value1" >

<input  type="text" [(ngModel)]="test1_value2" >

<!-- 将test1_value1的值给test2_value1... -->

<app-test2 [test2_value1]="test1_value1" [test2_value2]="test1_value2"></app-test2>
结果:

说明:
- 刚刷新页面时,将test2_value1、test2_value2的值 从 undefined 变成 1、2。
- 页面更改test1_value1,将test2_value1的值 从 1 变成 11。
- 以此类推, 可以使用 ngOnChanges对值发生变化时进行处理。
- ngInit 的执行顺序在 ngOnChanges之后,可以做一下初始化的工作
ngDoCheck()
test2.component.ts
import { Component, OnInit,Input,OnChanges,DoCheck} from '@angular/core';

@Component({

  selector: 'app-test2',

  templateUrl: './test2.component.html',

  styleUrls: ['./test2.component.css']

})
//需要实现 DoCheck 接口

export class Test2Component implements OnInit OnChanges DoCheck{

	@Input() test2_value1: string;

	@Input() test2_value2: string;

	constructor() { }

	ngOnInit() {

		//console.log("这里执行ngOnInit");

	}

	ngOnChanges(changes:SimpleChanges){

		//console.log(changes);

		for (let propName in changes) {

			let chng = changes[propName];

			let cur  = JSON.stringify(chng.currentValue);

			let prev = JSON.stringify(chng.previousValue);

			//console.log(`${propName}: 新值 = ${cur}, 旧值 = ${prev}`);

		}

	}

	ngDoCheck(){

    console.log("执行ngDoCheck");

  }

}
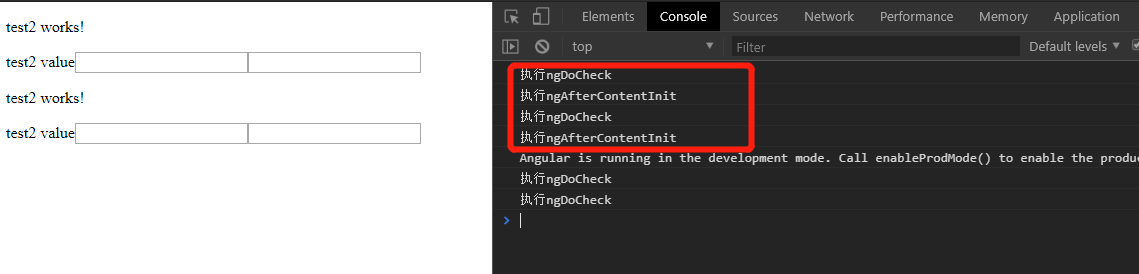
结果:

说明:
- 刷新页面的时候,执行了两次。
- 每次鼠标放到,input框上就会执行一次
- 更改input值,也会执行一次,开销非常大。慎用!
ngAfterContentInit()
app.component.ts
import { Component } from '@angular/core';

@Component({

  selector: 'app-root',

  //templateUrl: './app.component.html',

  //在app主组价中,将test2组件放到test1组件中,

  template: `<app-test1>

    <app-test2></app-test2>

    </app-test1>`,

  styleUrls: ['./app.component.css']

})

export class AppComponent {

  title = 'app';

}
test1.component.ts
import { Component, OnInit,OnChanges} from '@angular/core';

@Component({

  selector: 'app-test1',

  //templateUrl: './test1.component.html',

  //ng-content指定的是外来的组件 在组件app中定义的 test2组件

  //同样在test1组件中,也增加test2 组件

  template: `<div> <ng-content></ng-content> <app-test2></app-test2> </div>`,

  styleUrls: ['./test1.component.css']

})

export class Test1Component implements OnInit, OnChanges{

    test1_value1:string;

    test1_value2:string;

  constructor() { }

  ngOnInit() {

        this.test1_value1="1"

        this.test1_value2="2"

  }

    ngOnChanges(){

        console.log("onchange");

    }

}
test2.component.ts
import { Component, OnInit,Input ,OnChanges,DoCheck,SimpleChanges,AfterContentInit} from '@angular/core';

@Component({

  selector: 'app-test2',

  templateUrl: './test2.component.html',

  styleUrls: ['./test2.component.css']

})

export class Test2Component implements OnInit,OnChanges,DoCheck,AfterContentInit{

    @Input() test2_value1: string;

    @Input() test2_value2: string;

    constructor() { }

    ngOnInit() {

        //console.log("这里执行ngOnInit");

    }

    ngOnChanges(changes:SimpleChanges){

        //console.log(changes);

        for (let propName in changes) {

            let chng = changes[propName];

            let cur  = JSON.stringify(chng.currentValue);

            let prev = JSON.stringify(chng.previousValue);

            //console.log(`${propName}: 新值 = ${cur}, 旧值 = ${prev}`);

        }

    }

    ngDoCheck(){

    console.log("执行ngDoCheck");

  }

    ngAfterContentInit(){

        console.log("执行ngAfterContentInit");

    }

}
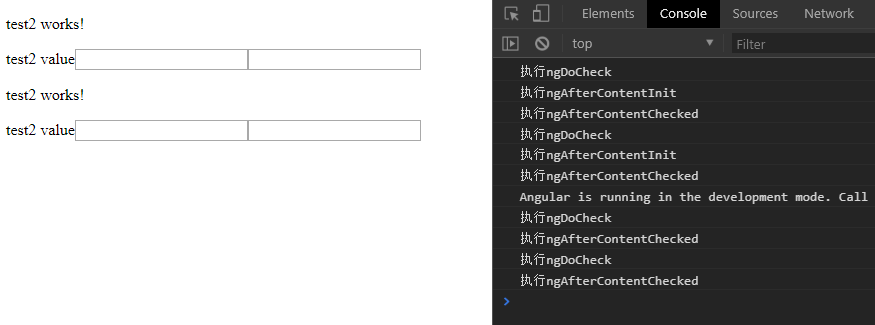
结果:
说明:
- ngAfterContentInit会在外来内容被投影到组件中之后 调用,也就是说当test2组件以html的形式投影到test1组件之后执行,
- 因为使用两种方式进行投影了两次,所以ngAfterContentInit执行了两次
- 其他操作只会增加ngDoCheck的次数,并没有增加ngAfterContentInit的次数
ngAfterContentCheck()
test2.component.ts
import { Component, OnInit,Input ,OnChanges,DoCheck,SimpleChanges,AfterContentInit,AfterContentCheck} from '@angular/core';

@Component({

  selector: 'app-test2',

  templateUrl: './test2.component.html',

  styleUrls: ['./test2.component.css']

})

export class Test2Component implements OnInit,OnChanges,DoCheck,AfterContentInit,AfterContentCheck{

    @Input() test2_value1: string;

    @Input() test2_value2: string;

    constructor() { }

    ngOnInit() {

        //console.log("这里执行ngOnInit");

    }

    ngOnChanges(changes:SimpleChanges){

        //console.log(changes);

        for (let propName in changes) {

            let chng = changes[propName];

            let cur  = JSON.stringify(chng.currentValue);

            let prev = JSON.stringify(chng.previousValue);

            //console.log(`${propName}: 新值 = ${cur}, 旧值 = ${prev}`);

        }

    }

    ngDoCheck(){

    console.log("执行ngDoCheck");

  }

    ngAfterContentInit(){

        console.log("执行ngAfterContentInit");

    }

    ngAfterContentChecked(){

        console.log("执行ngAfterContentChecked");

    }

}
结果:
说明:
- 在执行ngDoCheck之后 一定会执行一次ngAfterContentInit
- 每次完成被投影组件内容的变更检测之后调用
- 其他代码没贴出来,就是跟上一个是一样的
ngAfterViewInit()
test1.component.ts
import { Component, OnInit,OnChanges,ViewChild} from '@angular/core';

import {Test2Component} from "../test2/test2.component"

@Component({

  selector: 'app-test1',

  //templateUrl: './test1.component.html',

  template: `<div>  <input  type="text" [(ngModel)]="test1_value1" >

<input  type="text" [(ngModel)]="test1_value2" ><ng-content></ng-content>

<app-test2 [test2_value1]="test1_value1" [test2_value2]="test1_value2"></app-test2> </div>`,

  styleUrls: ['./test1.component.css']

})

export class Test1Component implements OnInit, OnChanges{

    test1_value1:string;

    test1_value2:string;

  constructor() { }

    @ViewChild(Test2Component);

  ngOnInit() {

        this.test1_value1="1"

        this.test1_value2="2"

  }

    ngOnChanges(){

        console.log("onchange");

    }

}
test2.component.ts
import { Component, OnInit,Input ,OnChanges,DoCheck,SimpleChanges,AfterContentInit,AfterContentCheck, AfterViewChecked, AfterViewInit} from '@angular/core';

@Component({

  selector: 'app-test2',

  templateUrl: './test2.component.html',

  styleUrls: ['./test2.component.css']

})

export class Test2Component implements OnInit,OnChanges,DoCheck,AfterContentInit,AfterContentCheck ,AfterViewChecked, AfterViewInit{

    @Input() test2_value1: string;

    @Input() test2_value2: string;

    constructor() { }

    ngOnInit() {

        //console.log("这里执行ngOnInit");

    }

    ngOnChanges(changes:SimpleChanges){

        //console.log(changes);

        for (let propName in changes) {

            let chng = changes[propName];

            let cur  = JSON.stringify(chng.currentValue);

            let prev = JSON.stringify(chng.previousValue);

            //console.log(`${propName}: 新值 = ${cur}, 旧值 = ${prev}`);

        }

    }

    ngDoCheck(){

    console.log("执行ngDoCheck");

  }

    ngAfterContentInit(){

        console.log("执行ngAfterContentInit");

    }

    ngAfterContentChecked(){

        console.log("执行ngAfterContentChecked");

    }

    ngAfterViewInit(){

        console.log("执行ngAfterViewInit");

    }

}
结果:
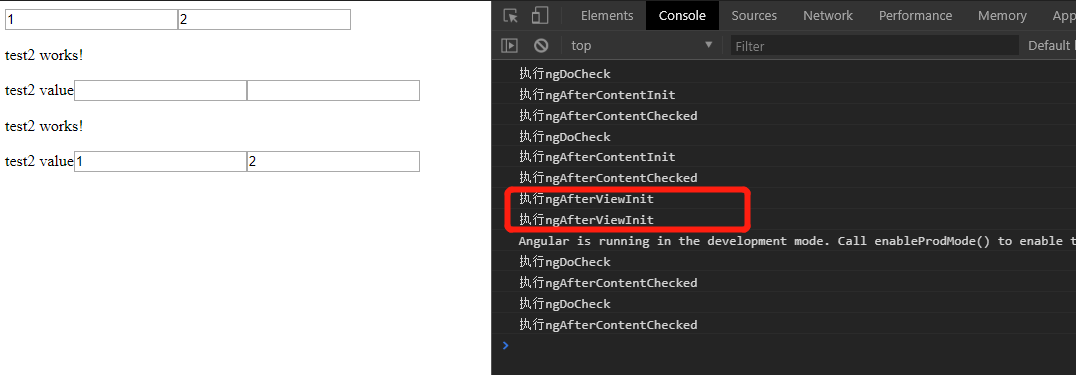
说明:
- 在每次创建了组件的子视图后调用,每次在test1组件中创建test2组件时都会调用,
- 在test1组件中,需要使用@ChildView 装饰器,将test2component装饰一下
ngAfterViewChecked
test2.component.ts
import { Component, OnInit,Input ,OnChanges,DoCheck,SimpleChanges,AfterContentInit,AfterContentCheck, AfterViewChecked, AfterViewInit} from '@angular/core';

@Component({

  selector: 'app-test2',

  templateUrl: './test2.component.html',

  styleUrls: ['./test2.component.css']

})

export class Test2Component implements OnInit,OnChanges,DoCheck,AfterContentInit,AfterContentCheck ,AfterViewChecked, AfterViewInit{

    @Input() test2_value1: string;

    @Input() test2_value2: string;

    constructor() { }

    ngOnInit() {

        //console.log("这里执行ngOnInit");

    }

    ngOnChanges(changes:SimpleChanges){

        //console.log(changes);

        for (let propName in changes) {

            let chng = changes[propName];

            let cur  = JSON.stringify(chng.currentValue);

            let prev = JSON.stringify(chng.previousValue);

            //console.log(`${propName}: 新值 = ${cur}, 旧值 = ${prev}`);

        }

    }

    ngDoCheck(){

    console.log("执行ngDoCheck");

  }

    ngAfterContentInit(){

        console.log("执行ngAfterContentInit");

    }

    ngAfterContentChecked(){

        console.log("执行ngAfterContentChecked");

    }

    ngAfterViewInit(){

        console.log("执行ngAfterViewInit");

    }

    ngAfterViewChecked(){

        console.log("执行ngAfterViewChecked");

    }

}
结果:
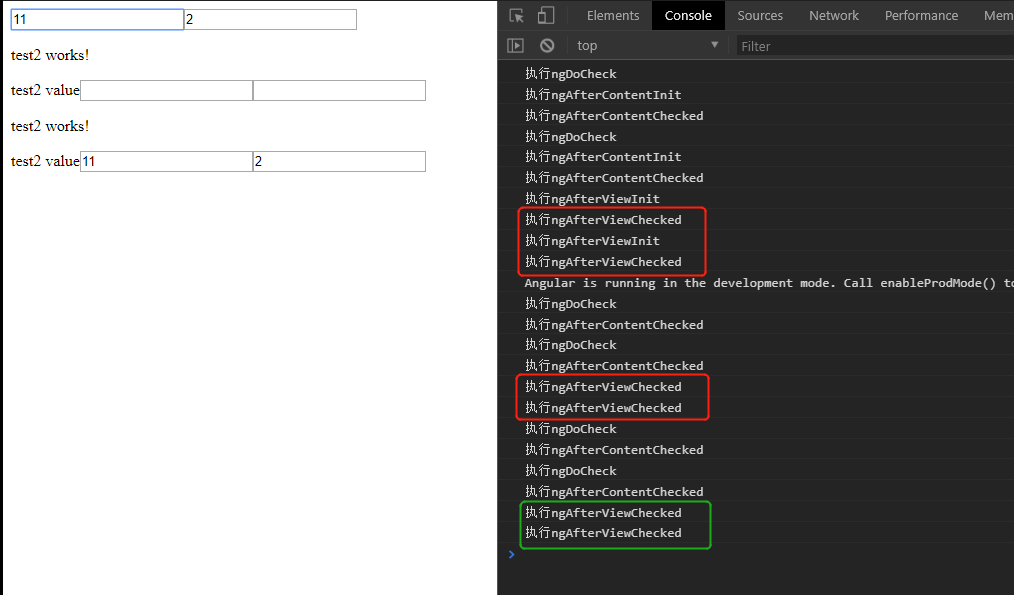
说明:
- 上图红色框是,页面刷新完后执行的ngAfterViewChecked,前两次是伴随init一起的,后面两个是,test1给test2赋值导致的
- 上图绿色框是,更改test1中的一个值,导致了更改了test2的值执行的ngAfterViewChecked
- 我再test1组件的两个input上,鼠标焦点来回切换时,同样也会执行ngAfterViewChecked,还是慎用这个钩子函数吧
OnDestroy
test1.component.ts
import { Component, OnInit,OnChanges,ViewChild} from '@angular/core';

import {Test2Component} from "../test2/test2.component"

@Component({

  selector: 'app-test1',

  //templateUrl: './test1.component.html',

  template: `

        <div>

            <input  type="text" [(ngModel)]="test1_value1" >

            <input  type="text" [(ngModel)]="test1_value2" >

            <ng-content></ng-content>

            <app-test2 [test2_value1]="test1_value1" [test2_value2]="test1_value2">

            </app-test2>

              <div *ngFor="let test of tests" appTest4 class="tests">

            {{test}}

        </div>

            <input type="button"value="add" (click)="addDiv()">

            <input type="button"value="delete"(click)="deleteDiv()">

        </div>`,

  styleUrls: ['./test1.component.css']

})

export class Test1Component implements OnInit, OnChanges{

    test1_value1:string;

    test1_value2:string;

    tests:any;

  constructor() { }

    @ViewChild(Test2Component) viewChild:Test2Component;

  ngOnInit() {

        this.test1_value1="1"

        this.test1_value2="2"

        this.tests=[1,2,3]

  }

    ngOnChanges(){

        console.log("onchange");

    }

    addDiv(){

        this.tests.push("1212");

    }

    deleteDiv(){

        this.tests=[];

    }

}
test4.directive.ts
import { Directive, OnInit, OnDestroy  } from '@angular/core';

@Directive({

  selector: '[appTest4]'

})

export class Test4Directive implements OnInit, OnDestroy{

  constructor() { }

  ngOnInit()    { console.log("test4 directive ngOnInit")}

  ngOnDestroy() { console.log("test4 directive ngDestroy");}

}
结果:
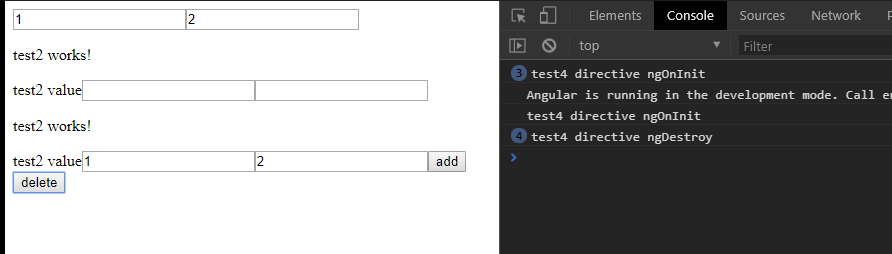
说明:
- 建立一个directive来 监测test1 组件中的 div的生成与销毁
- 开始有默认的三个值,所有ngOnInit执行了三次
- 添加一个值,又执行一次ngOnInit
- 删除所有的值,执行了4次ngDestroy
总结:
由于生命周期的存在,angular提供了众多的生命周期的钩子,让我们能够很好的在发生变化的时候进行处理。
Angular 个人深究(四)【生命周期钩子】的更多相关文章
- Angular 组件通讯、生命周期钩子 小结
本文为原创,转载请注明出处: cnzt 文章:cnzt-p http://www.cnblogs.com/zt-blog/p/7986858.html http://www.cnblogs ...
- angular 生命周期钩子 ngOnInit() 和 ngAfterViewInit() 的区别
angular 生命周期钩子的详细介绍在 https://angular.cn/guide/lifecycle-hooks 文档中做了介绍. ngOnInit() 在 Angular 第一次显示数据 ...
- Angular 5.x 学习笔记(2) - 生命周期钩子 - 暂时搁浅
Angular 5.x Lifecycle Hooks Learn Note Angular 5.x 生命周期钩子学习笔记 标签(空格分隔): Angular Note on cnblogs.com ...
- Angular组件生命周期——生命周期钩子
生命周期钩子介绍: 1.ngOnChange:响应组件输入值发生变化时触发的事件. 2.ngOnInit:用于数据绑定输入属性之后初始化组件,在第一次ngOnChange之后被调用. a. 组件构造后 ...
- Vue学习之生命周期钩子小结(四)
一.生命周期钩子(函数): 1.每个 Vue 实例在被创建时都要经过一系列的初始化过程——例如,需要设置数据监听.编译模板.将实例挂载到 DOM 并在数据变化时更新 DOM 等.同时在这个过程中也会运 ...
- vue 项目实战 (生命周期钩子)
开篇先来一张图 下图是官方展示的生命周期图 Vue实例的生命周期钩子函数(8个) 1. beforeCreate 刚 new了一个组件,无法访问到数据和真实的do ...
- Angular4学习笔记(九)- 生命周期钩子简介
简介 Angular 指令的生命周期,它是用来记录指令从创建.应用及销毁的过程.Angular 提供了一系列与指令生命周期相关的钩子,便于我们监控指令生命周期的变化,并执行相关的操作.Angular ...
- Angular2 -- 生命周期钩子
组件生命周期钩子 指令和组件的实例有一个生命周期:新建.更新和销毁. 每个接口都有唯一的一个钩子方法,它们的名字是由接口名加上 ng前缀构成的.比如,OnInit接口的钩子方法叫做ngOnInit. ...
- Angular25 组件的生命周期钩子
1 生命周期钩子概述 组件共有9个生命周期钩子 1.1 生命周期的执行顺序 技巧01:测试时父组件传递对子组件的输入属性进行初始化操作 import { Component, Input, Simpl ...
随机推荐
- quartz开源插件(定时心跳后台执行)
定时心跳,一般应用场景都是服务或者exe控制台程序来搜集数据推送等,供其他页面来调用或者向服务推送等,但又不限于此. 1.先来介绍下quartz吧. 2.quartz用法: 3.我写个小例子来巩固下q ...
- TypeError: view must be a callable or a list/tuple in the case of include()
原文连接: http://www.imooc.com/qadetail/98920 我是这么写的就好了 from django.conf.urls import url from django.con ...
- [转]python 装饰器
以前你有没有这样一段经历:很久之前你写过一个函数,现在你突然有了个想法就是你想看看,以前那个函数在你数据集上的运行时间是多少,这时候你可以修改之前代码为它加上计时的功能,但是这样的话是不是还要大体读读 ...
- oracle建包,函数demo
create table BOOK ( BOOK_ID NUMBER(10), BOOK_NAME VARCHAR2(10) ); create or replace package chen_pac ...
- Ajax文件上传并添加Bootstrap进度条
1.项目中需要用到文件上传和显示进度,网上各种插件搞得头晕,决定自己实现一个 三个步骤:Ajax上传文件,获取上传进度,显示进度 html: <!DOCTYPE HTML> <htm ...
- android camera(一):camera模组CMM介绍【转】
转自:https://blog.csdn.net/kevinx_xu/article/details/8821818 androidcmm图像处理工作手机三星 关键词:android camera ...
- Python3学习笔记07-List
Python有6个序列的内置类型,但最常见的是列表和元 序列都可以进行的操作包括索引,切片,加,乘,检查成员. 此外,Python已经内置确定序列的长度以及确定最大和最小的元素的方法. 创建一个列表, ...
- adb启动和停止android app方法
一.启动app adb shell am start 包名/MainActivity 上面涉及到的包名及mainactivity获取办法 方法一: 1.adb shell 2.dumpsys act ...
- nagios系列(六)之nagios实现对服务器cpu温度的监控
1.安装硬件传感器监控软件sensors yum install -y lm_sensors* 2.运行sensors-detect进行传感器检测 ##一路回车即可 Do you want to ov ...
- 使用 CSS overscroll-behavior 控制滚动行为:自定义下拉刷新和溢出效果
CSS 的新属性 overscroll-behavior 允许开发者覆盖默认的浏览器滚动行为,一般用在滚动到顶部或者底部. 背景 滚动边界和滚动链接(boundary & chaining) ...