Web3D编程入门总结——面向对象的基础Web3D框架
本篇主要通过分析Tony Parisi的sim.js库(原版代码托管于:https://github.com/tparisi/WebGLBook/tree/master/sim),总结基础Web3D框架的编写方法。在上一篇的基础上,要求读者具有简短英文阅读或者查字典的能力。
限于水平和时间,本文难免出现错误与遗漏,您在阅读过程中如果遇到错误或者疑问请在评论区中指出,我将尽快回复。
为提高JavaScript编程效率,建议使用WebStorm工具进行网页程序编写,WebStorm官网:http://www.jetbrains.com/webstorm/。
上一篇中,我们把程序的所有文件放在同一个目录下,这种文件组织方式适用于简单的功能测试,但当文件数量更多时则会变得混乱不堪,我们在编写一般规模的Web3D程序时可参考下图进行文件组织:

该组织方式把JavaScript文件分为LIB和PAGE两部分,LIB保存一般不做修改的库文件,PAGE保存为特定页面编写的js文件,如果页面js较多可在PAGE中再分离出子文件夹。
MODEL下的每个文件夹都是一个JSON类型的模型,可以看到其中有保存纹理信息的jpg文件和保存顶点数组、法线向量、纹理坐标的文本文件。
上一篇的代码中,我们把所有需要多次调用的对象设为了全局变量和全局函数,当代码量增多时这种“全局管理”方式将面临巨大的挑战,随然我们可以用规范的变量命名或者变量数组来尽可能避免变量名重复,但全局管理方式仍缺少对变量间关系的描述方法,这时使用“面向对象”的变量管理方法似乎是唯一的选择。
下面进入正题:
- //代码截取自https://github.com/tparisi/WebGLBook/tree/master/sim,在那里Tony Parisi的Sim库依照旧版Three.js库编写,为了使用新版本Three.js库我对Sim.js进行了部分修改,修改点附近以“@@”标记
- // Sim.js - A Simple Simulator for WebGL (based on Three.js)
- //Sim.js是一个基于Three.js的WebGL简单框架
- Sim = {};//Sim是一个自包含对象,库中的其他变量和函数都是这个自包含对象的属性,可以在库的外部通过“Sim.”的方式调用库内的方法。
- // Sim.Publisher - base class for event publishers
- //Publish/Subscribe消息通信,用来优化多个对象之间的消息传递,事实上Tony Parisi的WebGL著作里并没有真正使用这种消息传递方法,关于Publish/Subscribe的简单例程可以参考:http://www.mamicode.com/info-detail-502782.html
- Sim.Publisher = function() {
- this.messageTypes = {};
- }
- Sim.Publisher.prototype.subscribe = function(message, subscriber, callback) {
- var subscribers = this.messageTypes[message];
- if (subscribers)
- {
- if (this.findSubscriber(subscribers, subscriber) != -1)
- {
- return;
- }
- }
- else
- {
- subscribers = [];
- this.messageTypes[message] = subscribers;
- }
- subscribers.push({ subscriber : subscriber, callback : callback });
- }
- Sim.Publisher.prototype.unsubscribe = function(message, subscriber, callback) {
- if (subscriber)
- {
- var subscribers = this.messageTypes[message];
- if (subscribers)
- {
- var i = this.findSubscriber(subscribers, subscriber, callback);
- if (i != -1)
- {
- this.messageTypes[message].splice(i, 1);
- }
- }
- }
- else
- {
- delete this.messageTypes[message];
- }
- }
- Sim.Publisher.prototype.publish = function(message) {
- var subscribers = this.messageTypes[message];
- if (subscribers)
- {
- for (var i = 0; i < subscribers.length; i++)
- {
- var args = [];
- for (var j = 0; j < arguments.length - 1; j++)
- {
- args.push(arguments[j + 1]);
- }
- subscribers[i].callback.apply(subscribers[i].subscriber, args);
- }
- }
- }
- Sim.Publisher.prototype.findSubscriber = function (subscribers, subscriber) {
- for (var i = 0; i < subscribers.length; i++)
- {
- if (subscribers[i] == subscriber)
- {
- return i;
- }
- }
- return -1;
- }
- // Sim.App - application class (singleton)
- //Sim.App属性对“绘制环境”的封装(这里认为一个canvas里只有一个绘制环境)
- Sim.App = function()
- {
- Sim.Publisher.call(this);
- //call表示this(Sim.App)继承自Sim.Publisher,意指在Sim.App的上下文环境使用Sim.Publisher的“构造方法”,也就是使用Sim.App与Sim.Publisher重叠的属性(这里没有)执行了this.messageTypes = {};语句,为App对象建立了消息一个队列。
- this.renderer = null;
- this.scene = null;
- this.camera = null;
- this.objects = [];
- //可见App对象包含了canvas的上下文、与显卡的交互接口、相机设置、物体数组
- }
- Sim.App.prototype = new Sim.Publisher;
- //prototype表示Sim.App扩展自new Sim.Publisher,当调用Sim.App中的某个未定义的方法时,编译器会尝试到prototype中去寻找,如App.subscribe
- //prototype.init表示使用init方法对Sim.App进行原型拓展,这样所有的var myApp=new Sim.App都会自动具有init方法(找不到时去prototype中找);这与"Sim.App.init"是不同的,如果后着的init不在App的“构造方法”中定义,myApp是不会具有init方法的。
- Sim.App.prototype.init = function(param)//绘图环境初始化
- {
- param = param || {};
- var container = param.container;
- var canvas = param.canvas;
- // Create the Three.js renderer, add it to our div
- //@@这一段是我自己改的,加入了没有显卡时的软件渲染选择,可惜CanvasRenderer只支持部分的Three.js功能,并且没有找到去除图元边线的方法。
- function webglAvailable()//是否可用webgl
- {
- try{
- var canvas=document.createElement("canvas");
- return !!(window.WebGLRenderingContext
- &&(canvas.getContext("webgl")||canvas.getContext("experimental-webgl"))
- );
- }catch(e){
- return false;
- }
- }
- if(webglAvailable()){
- var renderer=new THREE.WebGLRenderer({ antialias: true, canvas: canvas });
- }else{
- var renderer=new THREE.CanvasRenderer({ antialias: true, canvas: canvas });//对于支持html5但不支持webgl的情况,使用更慢一些的2Dcanvas来软件实现webgl的效果
- }
- //var renderer = new THREE.WebGLRenderer( { antialias: true, canvas: canvas } );
- //@@
- renderer.setClearColor( 0xffffff );//@@旧版本中这个是默认的
- renderer.setSize(container.offsetWidth, container.offsetHeight);
- container.appendChild( renderer.domElement );
- container.onfocus=function(){
- renderer.domElement.focus();//@@保持焦点!!
- }
- //在部分浏览器中canvas不具备保持焦点的能力,点击canvas时焦点会被设置在外面的container上,影响交互效果
- // Create a new Three.js scene
- var scene = new THREE.Scene();
- scene.add( new THREE.AmbientLight( 0x505050 ) );
- scene.data = this;
- // Put in a camera at a good default location
- camera = new THREE.PerspectiveCamera( 45, container.offsetWidth / container.offsetHeight, 1, 10000 );
- camera.position.set( 0, 0, 3.3333 );
- scene.add(camera);
- // Create a root object to contain all other scene objects
- //建立了一个“根物体”,来存放场景中的其他物体,也就是根物体移动时所有其他物体会和它一同移动
- var root = new THREE.Object3D();
- scene.add(root);
- // Create a projector to handle picking
- //建立一个“投影器”来处理三维空间中的点选,@@新版本中去掉了这个属性,这里的定义是多余的
- var projector = new THREE.Projector();
- // Save away a few things
- //把上面的属性设为App对象的“公有”属性,var则是App对象的“私有”属性
- this.container = container;
- this.renderer = renderer;
- this.scene = scene;
- this.camera = camera;
- this.projector = projector;
- this.root = root;
- // Set up event handlers
- //启动事件响应功能
- this.initMouse();
- this.initKeyboard();
- this.addDomHandlers();
- }
- //Core run loop
- //核心循环
- Sim.App.prototype.run = function()
- {
- this.update();
- this.renderer.render( this.scene, this.camera );
- var that = this;//之所以使用that是为了保存此时的this状态,requestAnimationFrame会在“浏览器认为合适”的时候重调,而那时的“this”可能已经发生变化了。
- //requestAnimationFrame(function() { that.run(); });
- requestAnimFrame(function() { that.run(); });//@@换用了另一个帧动画库
- }
- // Update method - called once per tick
- //场景更新方法,这里的代码逻辑运行在浏览器端,是CPU资源的主要消耗者
- Sim.App.prototype.update = function()
- {
- var i, len;
- len = this.objects.length;
- for (i = 0; i < len; i++)
- {//将App的update转化为其所包含的objects的update
- this.objects[i].update();
- }
- }
- // Add/remove objects
- //在场景中添加或删除一个物体
- //添加
- Sim.App.prototype.addObject = function(obj)
- {
- this.objects.push(obj);//将物体对象添加到前面建立的物体数组里
- // If this is a renderable object, add it to the root scene
- //Three.js对于场景中object3D类型的对象提供了“parent/children ”式的关联链,Sim.js封装了这一关联
- if (obj.object3D)
- {
- this.root.add(obj.object3D);
- }
- }
- //删除
- Sim.App.prototype.removeObject = function(obj)
- {
- var index = this.objects.indexOf(obj);
- if (index != -1)
- {
- this.objects.splice(index, 1);
- // If this is a renderable object, remove it from the root scene
- if (obj.object3D)
- {
- this.root.remove(obj.object3D);
- }
- }
- }
- // Event handling
- //事件处理
- //初始化鼠标响应
- Sim.App.prototype.initMouse = function()
- {
- var dom = this.renderer.domElement;//取得canvas
- //添加监听
- var that = this;
- dom.addEventListener( 'mousemove',
- function(e) { that.onDocumentMouseMove(e); }, false );
- dom.addEventListener( 'mousedown',
- function(e) { that.onDocumentMouseDown(e); }, false );
- dom.addEventListener( 'mouseup',
- function(e) { that.onDocumentMouseUp(e); }, false );
- //中键滚动
- $(dom).mousewheel(
- function(e, delta) {
- that.onDocumentMouseScroll(e, delta);
- }
- );
- //鼠标悬停的物体
- this.overObject = null;
- //被点击到的物体
- this.clickedObject = null;
- }
- //初始化键盘响应
- Sim.App.prototype.initKeyboard = function()
- {
- var dom = this.renderer.domElement;
- var that = this;
- dom.addEventListener( 'keydown',
- function(e) { that.onKeyDown(e); }, false );
- dom.addEventListener( 'keyup',
- function(e) { that.onKeyUp(e); }, false );
- dom.addEventListener( 'keypress',
- function(e) { that.onKeyPress(e); }, false );
- // so it can take focus
- //这样设置之后canvas可以通过Tab键获得焦点,@@但这个设置并不完美,仍需要修改
- dom.setAttribute("tabindex", 1);
- dom.style.outline='none';
- dom.focus();
- }
- Sim.App.prototype.addDomHandlers = function()
- {
- var that = this;
- //监听浏览器窗口大小的变化
- window.addEventListener( 'resize', function(event) { that.onWindowResize(event); }, false );
- }
- //如果监听到鼠标移动
- Sim.App.prototype.onDocumentMouseMove = function(event)
- {
- event.preventDefault();//阻止浏览器的默认响应
- if (this.clickedObject && this.clickedObject.handleMouseMove)
- {//如果已经有选中的物体,并且被选中的物体具有自己的handleMouseMove方法
- var hitpoint = null, hitnormal = null;//三维空间中的“点击点”和“点击法线”(鼠标在3D物体上的点击方向)设为空
- var intersected = this.objectFromMouse(event.pageX, event.pageY);
- //在三维空间中通过浏览器中的二维坐标,找到鼠标所在的物体,稍后详细分析该方法
- if (intersected.object == this.clickedObject)
- {//如果鼠标所在的物体确实是被选中的物体,
- hitpoint = intersected.point;
- hitnormal = intersected.normal;
- }
- this.clickedObject.handleMouseMove(event.pageX, event.pageY, hitpoint, hitnormal);
- //执行这个被选中的物体的鼠标移动方法,比如拖拽变形之类
- }
- else
- {//如果没有被选中的物体
- var handled = false;
- var oldObj = this.overObject;//暂存旧的“悬停物体”
- var intersected = this.objectFromMouse(event.pageX, event.pageY);
- this.overObject = intersected.object;//将悬停物体设为鼠标所在的物体
- if (this.overObject != oldObj)//如果这是一个新物体,也就是说鼠标从一个物体上移到另一物体上
- {
- if (oldObj)
- {//如果存在旧的物体,则要触发旧物体的“鼠标移出”事件
- this.container.style.cursor = 'auto';//取巧用CSS来处理光标变化,是2D网页和3Dcanvas的结合运用
- if (oldObj.handleMouseOut)
- {
- oldObj.handleMouseOut(event.pageX, event.pageY);
- }
- }
- if (this.overObject)
- {
- if (this.overObject.overCursor)
- {
- this.container.style.cursor = this.overObject.overCursor;//光标设置
- }
- if (this.overObject.handleMouseOver)
- {
- this.overObject.handleMouseOver(event.pageX, event.pageY);
- }
- }
- handled = true;//表示物体的handleMouseOver执行完毕
- }
- if (!handled && this.handleMouseMove)
- {
- this.handleMouseMove(event.pageX, event.pageY);
- //如果物体没有执行handleMouseOver,且环境(App)能够响应handleMouseOver,则执行环境的鼠标移动响应,在应用中可体现为移动视角之类
- }
- }
- }
- //鼠标按下
- Sim.App.prototype.onDocumentMouseDown = function(event)
- {
- event.preventDefault();
- var handled = false;
- var intersected = this.objectFromMouse(event.pageX, event.pageY);
- if (intersected.object)
- {
- if (intersected.object.handleMouseDown)
- {
- intersected.object.handleMouseDown(event.pageX, event.pageY, intersected.point, intersected.normal);
- this.clickedObject = intersected.object;
- handled = true;
- }
- }
- if (!handled && this.handleMouseDown)
- {
- this.handleMouseDown(event.pageX, event.pageY);
- }
- }
- Sim.App.prototype.onDocumentMouseUp = function(event)
- {
- event.preventDefault();
- var handled = false;
- var intersected = this.objectFromMouse(event.pageX, event.pageY);
- if (intersected.object)
- {
- if (intersected.object.handleMouseUp)
- {
- intersected.object.handleMouseUp(event.pageX, event.pageY, intersected.point, intersected.normal);
- handled = true;
- }
- }
- if (!handled && this.handleMouseUp)
- {
- this.handleMouseUp(event.pageX, event.pageY);
- }
- this.clickedObject = null;
- }
- Sim.App.prototype.onDocumentMouseScroll = function(event, delta)
- {
- event.preventDefault();
- if (this.handleMouseScroll)
- {
- this.handleMouseScroll(delta);
- }
- }
- Sim.App.prototype.objectFromMouse = function(pagex, pagey)
- {
- // Translate page coords to element coords
- //把浏览器页面中的位置转化为canvas中的坐标
- var offset = $(this.renderer.domElement).offset();
- var eltx = pagex - offset.left;
- var elty = pagey - offset.top;
- // Translate client coords into viewport x,y
- //把canvas中的坐标转化为3D场景中的坐标
- var vpx = ( eltx / this.container.offsetWidth ) * 2 - 1;
- var vpy = - ( elty / this.container.offsetHeight ) * 2 + 1;
- var vector = new THREE.Vector3( vpx, vpy, 0.5 );//补充一个z轴坐标,形成三维空间中靠原点外侧的一个点(在Three.js中“点”分为Points和Vector两种,前者具有颜色、大小、材质是真正可以被显示出来的物体,后着是数学意义上的点或者向量)
- //this.projector.unprojectVector( vector, this.camera );
- vector.unproject(this.camera);//@@新版本中去掉投影矩阵影响的方法,不要忘记3D场景中看到的东西都是经过投影矩阵变形过的,所以要先把“看到的位置”转化为“实际的位置”再进行位置计算
- //@@这里是Sim.js中版本差异最大的地方
- //在三维空间中取得物体的原理:从相机到“鼠标所在的点”画一条射线,通过Three.js封装的方法取得这条射线穿过的所有物体,第一个穿过的物体被认为是“鼠标所在的物体”
- //var ray = new THREE.Ray( this.camera.position, vector.subSelf( this.camera.position ).normalize() );
- //var intersects = ray.intersectScene( this.scene );
- var raycaster = new THREE.Raycaster(this.camera.position,vector.subVectors(vector,this.camera.position).normalize());
- //@@Raycaster是新版Three.js专门为“穿过检测”定义的一种对象,与Ray分别开来,第一个参数是射线的端点,第二个参数是一个标准化(长度为一)的向量
- var intersects = raycaster.intersectObjects(this.scene.children,true);
- //true表示考虑物体的子物体,这里必须加上,被“穿过到”的物体被存入了一个数组
- if ( intersects.length > 0 ) {
- /*var i = 0;
- while(!intersects[i].object.visible)
- {
- i++;
- }
- var intersected = intersects[i];
- var mat = new THREE.Matrix4().getInverse(intersected.object.matrixWorld);
- var point = mat.multiplyVector3(intersected.point);
- return (this.findObjectFromIntersected(intersected.object, intersected.point, intersected.face.normal)); */
- //@@
- for(var i=0;i<intersects.length;i++)
- {
- if(intersects[i].object.visible&&intersects[i].face)
- {//物体可见并且”有面“(剔除了穿过线物体和点物体的情况)
- var intersected = intersects[i];
- var mat = new THREE.Matrix4().getInverse(intersected.object.matrixWorld);
- var point=intersected.point.applyMatrix4( mat );//可见intersected.point是相对坐标,加上物体所在的姿态矩阵之后变成了3D空间中的绝对坐标
- return (this.findObjectFromIntersected(intersected.object, intersected.point, intersected.face.normal));
- }
- }
- return { object : null, point : null, normal : null };//没有找到符合条件的物体
- }
- else
- {
- return { object : null, point : null, normal : null };
- }
- }
- Sim.App.prototype.findObjectFromIntersected = function(object, point, normal)
- {//回溯子物体的parent/children链,找到距它最近的具有data属性的父物体,这样的物体是使用Sim.Object定义的。这种回溯保持了复杂物体的整体性:拉一个人的手使得整个人移动,而非手脱离了人自己移动。
- if (object.data)
- {
- return { object: object.data, point: point, normal: normal };
- }
- else if (object.parent)
- {
- return this.findObjectFromIntersected(object.parent, point, normal);
- }
- else
- {
- return { object : null, point : null, normal : null };
- }
- }
- //键盘按键被按下
- Sim.App.prototype.onKeyDown = function(event)
- {
- // N.B.: Chrome doesn't deliver keyPress if we don't bubble... keep an eye on this
- //作者说的是浏览器兼容性的问题,是否可用JQuery弥补?
- event.preventDefault();
- if (this.handleKeyDown)
- {
- this.handleKeyDown(event.keyCode, event.charCode);
- }
- }
- Sim.App.prototype.onKeyUp = function(event)
- {
- // N.B.: Chrome doesn't deliver keyPress if we don't bubble... keep an eye on this
- event.preventDefault();
- if (this.handleKeyUp)
- {
- this.handleKeyUp(event.keyCode, event.charCode);
- }
- }
- Sim.App.prototype.onKeyPress = function(event)
- {
- // N.B.: Chrome doesn't deliver keyPress if we don't bubble... keep an eye on this
- event.preventDefault();
- if (this.handleKeyPress)
- {
- this.handleKeyPress(event.keyCode, event.charCode);
- }
- }
- //浏览器窗口大小变化
- Sim.App.prototype.onWindowResize = function(event) {
- this.renderer.setSize(this.container.offsetWidth, this.container.offsetHeight);
- this.camera.aspect = this.container.offsetWidth / this.container.offsetHeight;//宽高比
- this.camera.updateProjectionMatrix();//投影矩阵
- }
- //给环境定义了一个取得焦点的方法
- Sim.App.prototype.focus = function()
- {
- if (this.renderer && this.renderer.domElement)
- {
- this.renderer.domElement.focus();
- }
- }
- // Sim.Object - base class for all objects in our simulation
- //物体的“基类”
- Sim.Object = function()
- {
- Sim.Publisher.call(this);
- this.object3D = null;
- this.children = [];
- }
- Sim.Object.prototype = new Sim.Publisher;
- Sim.Object.prototype.init = function()//物体本身没有init时,才会到“基类”里找
- {
- }
- Sim.Object.prototype.update = function()
- {
- this.updateChildren();//驱动子物体的update
- }
- // setPosition - move the object to a new position
- //把物体移到到另一个位置
- Sim.Object.prototype.setPosition = function(x, y, z)
- {
- if (this.object3D)
- {
- this.object3D.position.set(x, y, z);
- }
- }
- //setScale - scale the object
- //成比例的放大缩小这个物体
- Sim.Object.prototype.setScale = function(x, y, z)
- {
- if (this.object3D)
- {
- this.object3D.scale.set(x, y, z);
- }
- }
- //setScale - scale the object
- //用递归的方式设置物体及其子物体的可见性
- Sim.Object.prototype.setVisible = function(visible)
- {
- function setVisible(obj, visible)
- {
- obj.visible = visible;
- var i, len = obj.children.length;
- for (i = 0; i < len; i++)
- {
- setVisible(obj.children[i], visible);
- }
- }
- if (this.object3D)
- {
- setVisible(this.object3D, visible);
- }
- }
- //@@写到这里作者也累了,所以附近出现了错误代码
- // updateChildren - update all child objects
- Sim.Object.prototype.updateChildren = function()
- {
- var i, len;
- len = this.children.length;
- for (i = 0; i < len; i++)
- {
- this.children[i].update();
- }
- }
- Sim.Object.prototype.setObject3D = function(object3D)
- {
- object3D.data = this;//建立双向链表,可以相互调用
- this.object3D = object3D;//将这个我们自己定义的Sim.Object和Three.js的object3D对象关联在一起
- }
- //Add/remove children
- //添加/删除子物体
- Sim.Object.prototype.addChild = function(child)
- {
- this.children.push(child);//Sim.js设置
- // If this is a renderable object, add its object3D as a child of mine
- if (child.object3D)//Three.js设置
- {
- this.object3D.add(child.object3D);
- }
- }
- Sim.Object.prototype.removeChild = function(child)
- {
- var index = this.children.indexOf(child);
- if (index != -1)
- {
- this.children.splice(index, 1);
- // If this is a renderable object, remove its object3D as a child of mine
- if (child.object3D)
- {
- this.object3D.remove(child.object3D);
- }
- }
- }
- // Some utility methods
- //从物体返回到场景,如果没有这个方法就只能用全局变量去引用camera了
- Sim.Object.prototype.getScene = function()
- {
- var scene = null;
- if (this.object3D)
- {
- var obj = this.object3D;
- while (obj.parent)
- {
- obj = obj.parent;
- }
- scene = obj;
- }
- return scene;
- }
- Sim.Object.prototype.getApp = function()
- {
- var scene = this.getScene();
- return scene ? scene.data : null;//如果scene不具备data属性,说明scene不对应App
- }
- // Some constants
- /* key codes
- 37: left
- 38: up
- 39: right
- 40: down
- */
- Sim.KeyCodes = {};
- Sim.KeyCodes.KEY_LEFT = 37;
- Sim.KeyCodes.KEY_UP = 38;
- Sim.KeyCodes.KEY_RIGHT = 39;
- Sim.KeyCodes.KEY_DOWN = 40;
- //几个常用按键的键值
下面通过部分示例代码演示Sim框架的使用方法。原始示例引用自(T)的第三章,时间有限,我并没有对全部代码进行Three.js新版本修改,选取的两个JS文件主要用来体现这种面向对象的调用方法。如果需要旧版本的完整示例代码请到(T)的github下载(https://github.com/tparisi/WebGLBook),如果想研究新版本方法请到Three.js官网阅读官方文档(http://threejs.org/docs/index.html#Manual/Introduction/Creating_a_scene)。
Sim.App的示例代码:
- //这是一个模拟太阳系的3D场景,这里是solarSystem2.js文件
- // Constructor
- SolarSystemApp = function()
- {
- Sim.App.call(this);//用Sim.App构造SolarSystemApp
- }
- // Subclass Sim.App
- SolarSystemApp.prototype = new Sim.App();//原型扩展
- // Our custom initializer
- //“太阳系对象”的初始化方法(“构造”是“初始化”的基础)
- SolarSystemApp.prototype.init = function(container)
- {
- // Call superclass init code to set up scene, renderer, default camera
- //在this的情况下调用Sim.js库中的Sim.App.prototype.init方法,实现了代码重用,container是init方法的参数
- Sim.App.prototype.init.call(this, container);
- //除了调用库中的init,初始化还要做这些:
- this.planets = [];//行星数组
- this.orbits = [];//行星轨道
- this.lastX = 0;
- this.lastY = 0;
- this.mouseDown = false;
- this.lastTime = 0;//上次渲染时间
- this.currentlyPressedKeys=[];//当前键盘数组
- // Let there be light!
- var sun = new Sun();//建立Sun对象
- sun.init();//sun对象的初始化方法
- this.addObject(sun);//很自然的把Sun对象添加到SolarSystemApp的objects数组中
- // Are the stars out tonight...?
- var stars = new Stars();//太阳系外的遥远恒星
- // Push the stars out past Pluto
- //括号里是到太阳的最小距离
- stars.init(Sun.SIZE_IN_EARTHS + SolarSystemApp.EARTH_DISTANCE * SolarSystemApp.PLUTO_DISTANCE_IN_EARTHS);
- this.addObject(stars);
- // And on the third day...
- this.createPlanets();//建立行星
- // Move the camera back so we can see our Solar System
- this.camera.position.set(0, 0, Sun.SIZE_IN_EARTHS * 8);//将相机向外移动一些,看到太阳系的全貌
- var amb = new THREE.AmbientLight(0x676767);//环境光
- this.scene.add(amb);
- // Tilt the whole solar system toward the camera a bit
- //将整个太阳系绕x轴旋转一些
- this.root.rotation.x = Math.PI / 8;
- }
- //下面是对鼠标键盘的响应,其中的监听配置由Sim库完成
- //SolarSystemApp对象的鼠标移动处理
- SolarSystemApp.prototype.handleMouseMove = function(x, y)
- {
- if (this.mouseDown)//如果现在鼠标是按下的状态
- {
- var dx = x - this.lastX;//鼠标在x轴上相对于原位置的位移
- if (Math.abs(dx) > SolarSystemApp.MOUSE_MOVE_TOLERANCE)//这个位移大于一定程度才能够生效,避免了鼠标微小震动的影响
- {
- this.root.rotation.y -= (dx * 0.01);//太阳系绕y轴旋转一定角度
- }
- this.lastX = x;//更新x轴原位置
- //return;
- var dy = y - this.lastY;
- if (Math.abs(dy) > SolarSystemApp.MOUSE_MOVE_TOLERANCE)
- {
- this.root.rotation.x += (dy * 0.01);
- // Clamp to some outer boundary values
- if (this.root.rotation.x < 0)
- this.root.rotation.x = 0;
- if (this.root.rotation.x > SolarSystemApp.MAX_ROTATION_X)//达到一定角度之后禁止继续旋转
- this.root.rotation.x = SolarSystemApp.MAX_ROTATION_X;
- }
- this.lastY = y;
- }
- }
- SolarSystemApp.prototype.handleMouseDown = function(x, y)
- {
- this.lastX = x;
- this.lastY = y;
- this.mouseDown = true;
- }
- SolarSystemApp.prototype.handleMouseUp = function(x, y)
- {
- this.lastX = x;
- this.lastY = y;
- this.mouseDown = false;
- }
- SolarSystemApp.prototype.handleMouseScroll = function(delta)
- {//鼠标滚轮控制相机远近
- var dx = delta;
- this.camera.position.z -= dx*10;
- // Clamp to some boundary values
- if (this.camera.position.z < SolarSystemApp.MIN_CAMERA_Z)
- this.camera.position.z = SolarSystemApp.MIN_CAMERA_Z;
- if (this.camera.position.z > SolarSystemApp.MAX_CAMERA_Z)
- this.camera.position.z = SolarSystemApp.MAX_CAMERA_Z;
- }
- //用currentlyPressedKeys数组保存键盘所有按键的状态
- SolarSystemApp.prototype.handleKeyDown= function(keyCode,charCode)
- {
- this.currentlyPressedKeys[keyCode] = true;
- }
- SolarSystemApp.prototype.handleKeyUp= function(keyCode,charCode)
- {
- this.currentlyPressedKeys[keyCode] = false;
- }
- SolarSystemApp.prototype.update = function()
- {
- showFocus();
- var speed=0//前后速度
- var adspeed=0//左右速度
- if (this.currentlyPressedKeys[65]) {
- // A键-横向左
- adspeed = -0.009;
- } else if ( this.currentlyPressedKeys[68]) {
- // D键-横向右
- adspeed = +0.009;
- }
- if (this.currentlyPressedKeys[87]) {
- // W键-纵向上
- speed = 0.003;
- } else if ( this.currentlyPressedKeys[83]) {
- // S键-纵向下
- speed = -0.003;
- }
- var timeNow = new Date().getTime();
- if (this.lastTime != 0) {
- var elapsed = timeNow - this.lastTime;
- if (speed != 0||adspeed!=0) {
- this.camera.position.x+=adspeed* elapsed;
- this.camera.position.y+=speed* elapsed;
- }
- // adjust yaw and pitch by their respective rates of change
- }
- this.lastTime = timeNow;
- Sim.App.prototype.update.call(this);//驱动Sim中的“this.objects[i].update();”
- }
- //按照planet_specs数组批量生成行星
- SolarSystemApp.prototype.createPlanets = function ()
- {
- var i, len = SolarSystemApp.planet_specs.length;
- for (i = 0; i < len; i++)
- {
- var spec = SolarSystemApp.planet_specs[i];//这个行星的参数
- var planet = spec.type ? new spec.type : new Planet;//除了地球和土星比较特殊,其他星球都创建为Planet对象,Planet继承自Sim.Object
- planet.init({animateOrbit:true, animateRotation: true, showOrbit:true,
- distance:spec.distance * SolarSystemApp.EARTH_DISTANCE + Sun.SIZE_IN_EARTHS,
- size:spec.size * SolarSystemApp.EXAGGERATED_PLANET_SCALE,
- period : spec.period,
- revolutionSpeed : 0.002,
- map : spec.map});
- this.addObject(planet);
- this.planets.push(planet);
- var orbit = new Orbit();//行星轨道
- orbit.init(spec.distance * SolarSystemApp.EARTH_DISTANCE + Sun.SIZE_IN_EARTHS);
- this.addObject(orbit);
- this.orbits.push(orbit);
- }
- }
- SolarSystemApp.MOUSE_MOVE_TOLERANCE = 4;
- SolarSystemApp.MAX_ROTATION_X = Math.PI / 2;
- SolarSystemApp.MAX_CAMERA_Z = Sun.SIZE_IN_EARTHS * 50;
- SolarSystemApp.MIN_CAMERA_Z = Sun.SIZE_IN_EARTHS * 2;//镜头最小z值
- SolarSystemApp.EARTH_DISTANCE = 50;
- SolarSystemApp.PLUTO_DISTANCE_IN_EARTHS = 77.2;
- SolarSystemApp.EARTH_DISTANCE_SQUARED = 45000;
- SolarSystemApp.EXAGGERATED_PLANET_SCALE = 5.55;
- SolarSystemApp.planet_specs = [
- //大小,距离,周期,纹理图片
- // Mercury
- { size : 1 / 2.54, distance : 0.4, period : 0.24, map : "../IMAGE/SOLAR/Mercury.jpg" },
- // Venus
- { size : 1 / 1.05, distance : 0.7, period : 0.62, map : "../IMAGE/SOLAR/venus.jpg" },
- // Earth
- { type : Earth, size : 1 , distance : 1, period : 1, map : "../IMAGE/SOLAR/earth_surface_2048.jpg" },
- // Mars
- { size : 1 / 1.88, distance : 1.6, period : 1.88, map : "../IMAGE/SOLAR/MarsV3-Shaded-2k.jpg" },
- // Jupiter
- { size : 11.1, distance : 5.2, period : 11.86, map : "../IMAGE/SOLAR/realj2k.jpg" },
- // Saturn
- { type : Saturn, size : 9.41, distance : 10, period : 29.46, map : "../IMAGE/SOLAR/saturn_bjoernjonsson.jpg" },
- // Uranus
- { size : 4, distance : 19.6, period : 84.01, map : "../IMAGE/SOLAR/uranus.jpg" },
- // Neptune
- { size : 3.88, distance : 38.8, period : 164.8, map : "../IMAGE/SOLAR/neptune.jpg" },
- // Pluto - have to exaggerate his size or we'll never see the little guy
- { size : 10 / 5.55, distance : 77.2, period : 247.7, map : "../IMAGE/SOLAR/pluto.jpg" },
- ];
接下来是Sim.Object的示例代码:
- //Sim.Object的使用方式
- // Custom Planet class
- Planet = function()
- {
- Sim.Object.call(this);
- }
- Planet.prototype = new Sim.Object();
- Planet.prototype.init = function(param)
- {
- param = param || {};
- // Create an orbit group to simulate the orbit - this is the top-level Planet group
- var planetOrbitGroup = new THREE.Object3D();//planetOrbitGroup是一个Three.js中的3D对象,Three.js为它准备了各种相关的方法和属性
- // Tell the framework about our object
- this.setObject3D(planetOrbitGroup);//将Sim.js定义的Sim.object与Three.js定义的Object3D关联起来
- // Create a group to contain Planet and Clouds meshes
- var planetGroup = new THREE.Object3D();
- var distance = param.distance || 0;
- var distsquared = distance * distance;
- planetGroup.position.set(Math.sqrt(distsquared/2), 0, -Math.sqrt(distsquared/2));//设置行星位置
- planetOrbitGroup.add(planetGroup);//planetGroup是planetOrbitGroup在Three.js层面的子物体
- this.planetGroup = planetGroup;
- var size = param.size || 1;
- this.planetGroup.scale.set(size, size, size);//设置大小比例
- var map = param.map;//纹理图片
- this.createGlobe(map);//使用纹理图片建立行星
- this.animateOrbit = param.animateOrbit;//行星是否沿着轨道运动
- this.period = param.period;//公转周期
- this.revolutionSpeed = param.revolutionSpeed ? param.revolutionSpeed : Planet.REVOLUTION_Y;//公转速度
- }
- Planet.prototype.createGlobe = function(map)
- {
- // Create our Planet with nice texture
- var geometry = new THREE.SphereGeometry(1, 32, 32);//建立一个多面体(球)
- //var texture = THREE.ImageUtils.loadTexture(map);
- //@@新版加载纹理方法
- var texture = new THREE.TextureLoader().load(map);
- //var material = new THREE.MeshPhongMaterial( {map: texture, ambient: 0x333333} );
- //@@
- var material = new THREE.MeshPhongMaterial( {map: texture} );
- var globeMesh = new THREE.Mesh( geometry, material );
- // Add it to our group
- this.planetGroup.add(globeMesh);//globeMesh是planetGroup的子物体
- // Save it away so we can rotate it
- this.globeMesh = globeMesh;
- }
- Planet.prototype.update = function() //物体的update
- {
- // Simulate the orbit
- if (this.animateOrbit)
- {
- this.object3D.rotation.y += this.revolutionSpeed / this.period;
- }
- Sim.Object.prototype.update.call(this);
- }
- Planet.REVOLUTION_Y = 0.003;
最终效果:
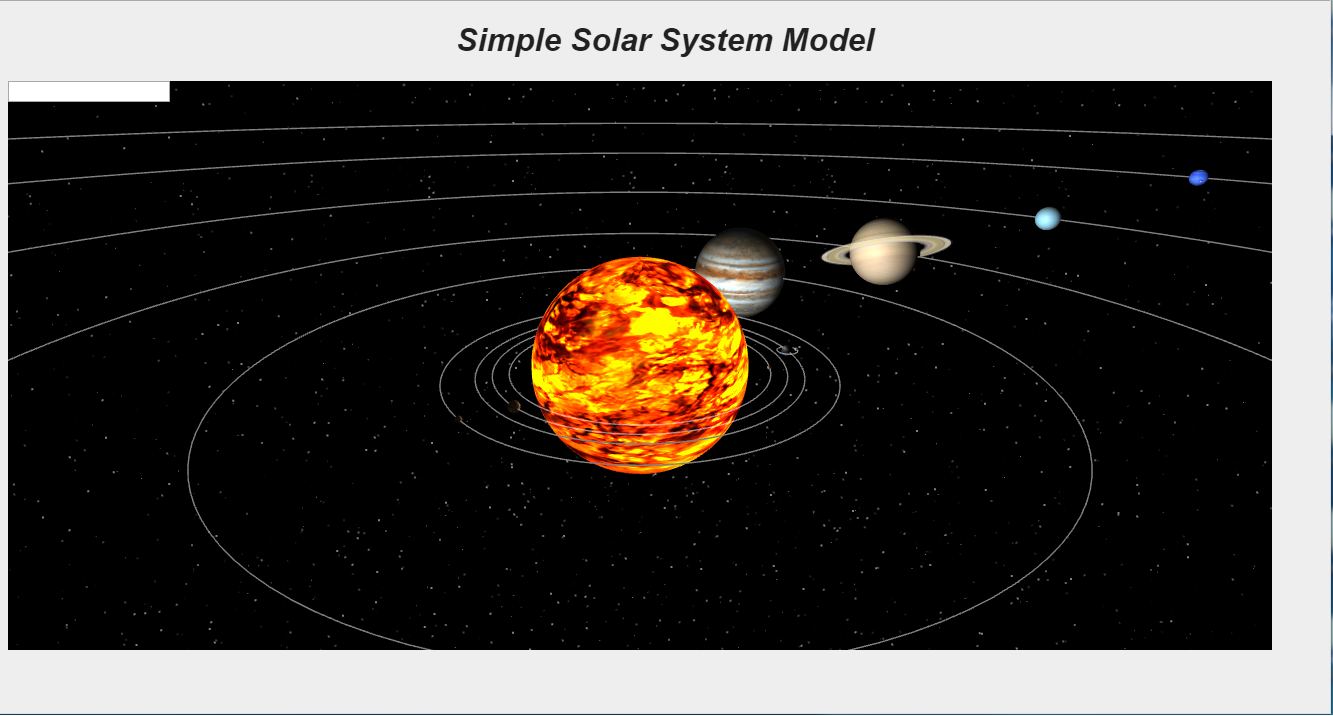
上面的代码简单演示了基于Three.js的面向对象框架使用方法,在使用过程中我们发现Three.js的更倾向于3D场景构建,其本身并不具备作为“游戏引擎”的完整功能,很多功能需要用户自己编写。与其相对babylon.js是一个面向3D游戏应用编写的WebGL封装(http://www.babylonjs.com/),具有碰撞检测、物理模拟等功能,但渲染性能较Three.js略低。
下一步准备编写基于Three.js的3D碰撞检测功能。
Web3D编程入门总结——面向对象的基础Web3D框架的更多相关文章
- VS2010/MFC编程入门之四(MFC应用程序框架分析)
VS2010/MFC编程入门之四(MFC应用程序框架分析)-软件开发-鸡啄米 http://www.jizhuomi.com/software/145.html 上一讲鸡啄米讲的是VS2010应用 ...
- Web三维编程入门总结之二:面向对象的基础Web3D框架
本篇主要通过分析Tony Parisi的sim.js库(原版代码托管于:https://github.com/tparisi/WebGLBook/tree/master/sim),总结基础Web3D框 ...
- Web3D编程入门总结——WebGL与Three.js基础介绍
/*在这里对这段时间学习的3D编程知识做个总结,以备再次出发.计划分成“webgl与three.js基础介绍”.“面向对象的基础3D场景框架编写”.“模型导入与简单3D游戏编写”三个部分,其他零散知识 ...
- Python快速编程入门,打牢基础必须知道的11个知识点 !
Python被誉为全世界高效的编程语言,同时也被称作是“胶水语言”,那它为何能如此受欢迎,下面我们就来说说Python入门学习的必备11个知识点,也就是它为何能够如此受欢迎的原因. Python 简介 ...
- kotlin函数式编程入门及图片处理
函数式编程入门: 对于面向对象编程[OOP]和函数式编程[FP] 由于在JAVA8的学习中系统的学习过了,所以这里对其概念就不过多解释了,下面直接用代码来看下在kotlin中函数式编程是如何编写的: ...
- VS2010/MFC编程入门教程之目录和总结
鸡啄米的这套VS2010/MFC编程入门教程到此就全部完成了,虽然有些内容还未涉及到,但帮助大家进行VS2010/MFC的入门学习业已足够.以此教程的知识为基础,学习VS2010/MFC较为深入的内容 ...
- (转)VS2010-MFC编程入门教程之目录和总结
目前该教程可以到鸡啄米编程课堂去学习,阅读体验更好,更适合在线学习. 原文目录及链接: 一.VS2010/MFC编程入门教程之目录 第一部分:VS2010/MFC开发环境 VS2010/MFC编程入 ...
- [Java入门笔记] 面向对象编程基础(二):方法详解
什么是方法? 简介 在上一篇的blog中,我们知道了方法是类中的一个组成部分,是类或对象的行为特征的抽象. 无论是从语法和功能上来看,方法都有点类似与函数.但是,方法与传统的函数还是有着不同之处: 在 ...
- JavaScript基础入门12 - 面向对象编程
目录 JavaScript 面向对象编程 前言 构造函数创建对象 instanceof constructor 返回值 原型对象 关于对象的属性查找 in hasOwnProperty() JS当中实 ...
随机推荐
- 关于C# WinForm 边框阴影窗体(一)
using System;using System.Collections.Generic;using System.ComponentModel;using System.Data;using Sy ...
- petapoco定制,比较SQL事务,存储过程,分布式事务(MSDTC)的区别和场景
使用分布式事务时 就锁死了,而且是只锁编辑的行 使用.netSQL事务一定要执行了一个CUD的SQL才会锁死,而且也是锁行,但是也锁读的行 .netSQL事务要在这里才锁死 结论,对于产品要求细粒度的 ...
- 【Go语言】集合与文件操作
本文目录 1.数据集合的主要操作 1_1.字典的声明 1_2.字典的初始化和创建 1_3.字典的访问和操作 1_4.其他类型的数据集 2.文件操作 2_1.文件操作概述os包和path包 2_2.文件 ...
- jquery输入框按下回车提交表单
jQuery on()方法是官方推荐的绑定事件的一个方法 $('#password').on('keydown', function(e) { // 短路语法,当e.keyCode == 13成立的时 ...
- EhCache WebCache 与 SpringMVC集成时 CacheManager冲突的问题
转自:点击打开链接 http://www.cnblogs.com/daxin/p/3560989.html EhCache WebCache 与 SpringMVC集成时 CacheManager冲突 ...
- Server Tomcat v7.0 Server at localhost was unable to start within 45 seconds 解决方法
Server Tomcat v6.0 Server at localhost was unable to start within 45 seconds. If the server requires ...
- apache中.htaccess不起作用
找到apache的配置文件httpd.conf文件,找到: 代码如下 复制代码 #LoadModule rewrite_module modules/mod_rewrite.so 去掉前面的#号. ...
- HDU4325 树状数组
Flowers Time Limit: 4000/2000 MS (Java/Others) Memory Limit: 65536/65536 K (Java/Others)Total Sub ...
- "我爱记单词"测试报告兼功能展示
"我爱记单词"测试报告兼功能展示 前言: 我们大部分的测试都是一边开发一边完成的,这里给出软件开发基本完成后在使用时的一些测试例子. 一.背景介绍 我们的数据库中一共有10个表: ...
- spring security 匿名登录
匿名登录,即用户尚未登录系统,系统会为所有未登录的用户分配一个匿名用户,这个用户也拥有自己的权限,不过他是不能访问任何被保护资源的. 设置一个匿名用户的好处是,我们在进行权限判断时,可以保证Secur ...