CSS负边距margin的应用
原文
简书原文:https://www.jianshu.com/p/75a178e65207
相关文章
CSS负margin的影响:https://www.cnblogs.com/shcrk/p/9310834.html
大纲
1、实战:利用负边距在文档流中的作用——实现选项卡上边框消失
2、实战:利用负边距改变自身高度——实现下边框消失的效果
3、实战:利用负边距影响自身高度——实现多列等高布局
4、实战:利用负边距增加自身宽度——实现多列等宽布局
1、实战:利用负边距在文档流中的作用——实现选项卡上边框消失
- <!--
- 第一个ul设置了margin-bottom为负值,将后一个ul往上方拉,覆盖之前的ul元素
- 给li设置背景色,利用背景色掩埋后一个ul的框,之所以可以这样,是因为li设置了
- float,浮动在文档流上方,可以认为元素层级比后一个ul来的高,所以可以覆盖后一个ul,
- 并且后一个ul需得是block才可以
- 换句话说,后一个元素上拉,但是被前一个元素的子元素覆盖的情况,需要后一个元素
- 是div,前一个元素的子元素为浮动元素,这样的情况才可以实现
- 初始代码:
- div{
- width:100px;
- height:100px;
- vertical-align:bottom;
- }
- .box{
- background:black;
- }
- .box1{
- background:red;
- }
- .box3{
- width:100%;
- background:blue;
- }
- <div class="box">
- <div class="box1">
- </div>
- </div>
- <div class="box3">
- </div>
- 效果代码
- .box{
- margin-bottom:-20px;/*将后一个div往上拉*/
- }
- .box1{
- float:left;/*让子元素浮动,这样其背景色才可以覆盖后一个div的边框*/
- }
- -->
- <!DOCTYPE html>
- <html>
- <head>
- <meta http-equiv="Content-Type" content="text/html; charset=utf-8" />
- <title>负margin的应用</title>
- <style type="text/css">
- * {padding:0;margin:0;}
- li {list-style-type:none}
- .demoTab{
- width:400px;
- margin:20px auto;
- font:14px/1.5 Microsoft YaHei,verdana,Helvetica,Arial,sans-serif;
- }
- .demoTab .demoTabNav{
- height:28px;
- overflow:hidden;
- *zoom:1;
- margin-bottom:-1px;
- border-left:1px solid red;
- }
- .demoTab .demoTabList{
- float:left;
- padding:0 22px;
- line-height:28px;
- border-right:1px solid red;
- border-top:1px solid red;
- font-weight:bold;
- color:#005590;
- text-align:center;
- cursor:pointer;
- }
- .demoTab .demoTabList.current{
- position:relative;
- background:#EAF0FD;
- }
- .demoTabList:hover{
- background:#EAF0FD;
- }
- .demoTab .demoTabBd{
- border:1px solid red;
- padding:15px;
- }
- .demoTab .demoTabContent{display:none;}
- .demoTab .demoTabContent.current{display:block;}
- </style>
- </head>
- <body>
- <div id="demoTab" class="demoTab">
- <ul class="demoTabNav clearfix">
- <li class="demoTabList current">前端</li>
- <li class="demoTabList">实战</li>
- <li class="demoTabList">交互</li>
- <li class="demoTabList">优化</li>
- </ul>
- <ul class="demoTabBd">
- <li class="demoTabContent current">这是第一个选项卡的内容。</li>
- <li class="demoTabContent">这是第二个选项卡的内容。</li>
- <li class="demoTabContent">这是第三个选项卡的内容。</li>
- <li class="demoTabContent">这是第四个选项卡的内容。</li>
- </ul>
- </div>
- </body>
- </html>

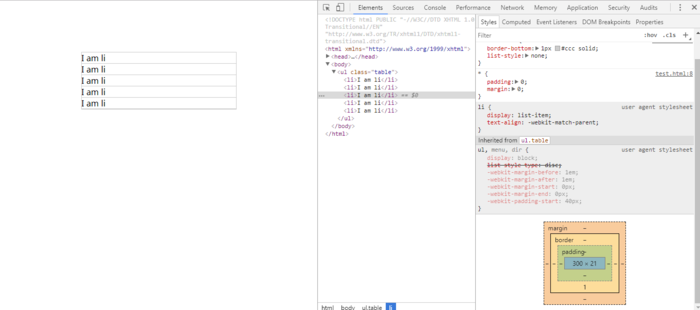
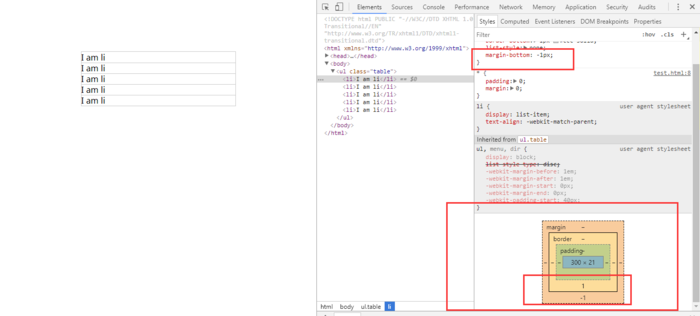
2、实战:利用负边距改变自身高度——实现下边框消失的效果
- <!--
- 通过添加负边距从而将盒子模型的内容的高度减少,负边距掩盖了下边框
- -->
- <!DOCTYPE html PUBLIC "-//W3C//DTD XHTML 1.0 Transitional//EN" "http://www.w3.org/TR/xhtml1/DTD/xhtml1-transitional.dtd">
- <html xmlns="http://www.w3.org/1999/xhtml">
- <head>
- <meta charset="utf-8">
- <meta http-equiv="X-UA-Compatible" content="IE=edge,chrome=1">
- <title>负margin</title>
- <style type="text/css">
- *{
- padding:0;
- margin:0;
- }
- ul{
- margin:100px auto;
- width:300px;
- }
- ul.table{
- border:1px #ccc solid;
- }
- ul.table li{
- border-bottom: 1px #ccc solid;
- list-style: none;
- }
- </style>
- <ul class="table">
- <li>I am li</li>
- <li>I am li</li>
- <li>I am li</li>
- <li>I am li</li>
- <li>I am li</li>
- </ul>
- </body>
- </html>


3、实战:利用负边距影响自身高度——实现多列等高布局
- <!DOCTYPE html PUBLIC "-//W3C//DTD XHTML 1.0 Transitional//EN" "http://www.w3.org/TR/xhtml1/DTD/xhtml1-transitional.dtd">
- <html xmlns="http://www.w3.org/1999/xhtml">
- <head>
- <meta charset="utf-8">
- <meta http-equiv="X-UA-Compatible" content="IE=edge,chrome=1">
- <title>负margin</title>
- <style type="text/css">
- *{
- padding:0;
- margin:0;
- }
- .container{
- margin:0 auto;
- width: 100%;
- overflow: hidden;
- }
- .left{
- height: 50px;
- width: 33.33%;
- margin-bottom: -5000px;
- padding-bottom: 5000px;
- float: left;
- background-color: rgba(33, 114, 214, 0.8);
- }
- .main{
- height:100px;
- margin-bottom: -5000px;
- width: 33.33%;
- float: left;
- padding-bottom: 5000px;
- background-color: rgba(255, 82, 0, 0.8);
- }
- .right{
- height:30px;
- width: 33.33%;
- float: left;
- margin-bottom: -5000px;
- padding-bottom: 5000px;
- background-color: rgba(90, 243, 151, 0.8)
- }
- </style>
- <div class="container">
- <div class="left"> height:50px</div>
- <div class="main">height:100px</div>
- <div class="right">height:30px</div>
- </div>
- </body>
- </html>

4、实战:利用负边距增加自身宽度——实现多列等宽布局
- <!DOCTYPE html PUBLIC "-//W3C//DTD XHTML 1.0 Transitional//EN" "http://www.w3.org/TR/xhtml1/DTD/xhtml1-transitional.dtd">
- <html xmlns="http://www.w3.org/1999/xhtml">
- <head>
- <meta charset="utf-8">
- <meta http-equiv="X-UA-Compatible" content="IE=edge,chrome=1">
- <title>负margin</title>
- <style type="text/css">
- body,ul,li{
- padding:0;
- margin:0;
- }
- ul,li{
- list-style:none;
- }
- .container{
- height:210px;
- width:460px;
- border:5px solid #000;
- }
- ul{
- height:210px;
- overflow:hidden;
- margin-right:-20px;
- }/*一个负的margin-right,相当于把ul的宽度增加了20px*/
- li{
- height:100px;
- width:100px;
- background:#09F;
- float:left;
- margin-right:20px;
- margin-bottom:10px;
- }
- </style>
- <div class="container">
- <ul>
- <li>子元素1</li>
- <li>子元素2</li>
- <li>子元素3</li>
- <li>子元素4</li>
- <li>子元素5</li>
- <li>子元素6</li>
- <li>子元素7</li>
- <li>子元素8</li>
- </ul>
- </div>
- </body>
- </html>

CSS负边距margin的应用的更多相关文章
- (转)CSS布局-负边距-margin
css中的负边距(negative margin)是布局中的一个常用技巧,只要运用得合理常常会有意想不到的效果.很多特殊的css布局方法都依赖于负边距,所以掌握它的用法对于前端的同学来说,那是必须的. ...
- css负边距自适应布局
单列定宽单列自适应布局: <!DOCTYPE HTML> <html> <head> <meta charset="UTF-8"> ...
- CSS 负边距读后感
最近看到一篇讲解CSS 负边距的文章: http://segmentfault.com/a/1190000003750411?utm_source=Weibo&utm_medium=share ...
- IE6 IE7 IE8(Q) 负边距 (margin) 导致元素溢出 hasLayout 容器时显示异常
标准参考 根据W3C CSS2.1规范第8.3节中的描述,边距属性设置了一个框的边距区的宽度.'margin' 缩写属性设置所有四边的边距,而其它的边距属性( 'margin-top' ,'margi ...
- RB1001: IE6 IE7 IE8(Q) 负边距 (margin) 导致元素溢出 hasLayout 容器时显示异常
标准参考 根据W3C CSS2.1规范第8.3节中的描述,边距属性设置了一个框的边距区的宽度.'margin' 缩写属性设置所有四边的边距,而其它的边距属性( 'margin-top' ,'margi ...
- css负边距之详解
自从1998年CSS2作为推荐以来,表格的使用渐渐退去,成为历史.正因为此,从那以后CSS布局成为了优雅代码的代名词. 对于所有设计师使用过的CSS概念,负边距作为最少讨论到的定位方式要记上一功.这就 ...
- css 负边距 小记
水平格式化 当我们在元素上设置width的时候,影响的是内容区的宽度 但是当我们又为元素指定指定了内边距 边框 外边距 还是会增加宽度值 (IE传统盒模型 内边距 边框 会在元素的宽度内扩展 ma ...
- 浅析CSS负边距
本文主要讨论两点,1.左右负边距对元素宽度的影响:2.负边距对浮动元素的影响. 在讨论这两点前,首先要理解盒模型.文档流. 盒模型,见下图,简单明了. 文档流,将窗体自上而下分成一行行, 并在每行中按 ...
- css负边距之详解(子绝父相)
来源 | http://segmentfault.com 原文 | The Definitive Guide to Using Negative Margins 自从1998年CSS2作为推荐以 ...
随机推荐
- 【习题 8-13 UVA - 10570】Meeting with Aliens
[链接] 我是链接,点我呀:) [题意] 在这里输入题意 [题解] 枚举1的位置在i 往右摆成一排. a[i+1]..a[n]..a[1]..a[i-1]变为有序的 ->寻找循环节,每个循环节的 ...
- JavaScript学习总结(10)——实用JS代码大全
事件源对象 event.srcElement.tagName event.srcElement.type 捕获释放 event.srcElement.setCapture(); event. ...
- ANSI-X99MAC算法和PBOC的3DES MAC算法
仅仅要有标准的DES加密和解密算法.类似ANSI-X99MAC算法和PBOC3DES算法就非常好实现.他们都是用DES算法再经过一层算法实现的.实现原理看图就能看明确.3DES算法实现就更简单了.就是 ...
- oracle 10g standby database 实时应用 redo 数据
-------physical standby database: real-time apply 须要配置 standby redo log: 启用实时应用, 日志应用服务会直接应用接收的redo ...
- Codefroces 784 愚人节题目(部分)
A. Numbers Joke time limit per test 2 seconds memory limit per test 64 megabytes input standard inpu ...
- php学习笔记3
1.PHP 定界符 EOF 的作用就是按照原样,包括换行格式什么的,输出在其内部的东西: 2.在 PHP 定界符 EOF 中的任何特殊字符都不需要转义: 3.PHP 定界符 EOF
- Mybatis批量插入,是否能够返回id列表
第1次代码 void batchAdd(List<Photo> list); <insert id="batchAdd" parameterType=" ...
- 洛谷 P1054 等价表达式
洛谷 P1054 等价表达式 题目描述 明明进了中学之后,学到了代数表达式.有一天,他碰到一个很麻烦的选择题.这个题目的题干中首先给出了一个代数表达式,然后列出了若干选项,每个选项也是一个代数表达式, ...
- css 0.5px
1. 利用css3新属性scale(好用推荐) 其实现的关键就是利用before或after伪元素,宽高同时设为200%,然后再缩放0.5,自然就是0.5px了 代码如下: div { positon ...
- .vsdc和.svf用于formal verification tools
svf:Setup Verification for Formality
