[python标准库]XML模块
1.什么是XML
XML是可扩展标记语言(Extensible Markup Language)的缩写,其中的 标记(markup)是关键部分。您可以创建内容,然后使用限定标记标记它,从而使每个单词、短语或块成为可识别、可分类的信息。
XML有以下几个特点。
XML的设计宗旨是传输数据,而非显示数据。
XML标签没有被预定义。您需要自行定义标签。
XML被设计为具有自我描述性。
XML是W3C的推荐标准。
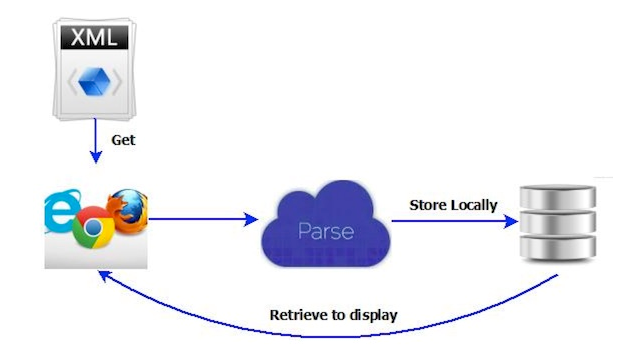
其解析流程如下图:
2.常用解析XML的Python包
Python的标准库中,提供了6种可以用于处理XML的包。
xml.dom
xml.dom实现的是W3C制定的DOM API。DOM解析器在任何处理开始之前,必须把基于XML文件生成的树状数据放在内存,所以DOM解析器的内存使用量完全根据输入资料的大小。
xml.dom.minidom
xml.dom.minidom是DOM API的极简化实现,比完整版的DOM要简单的多,而且这个包也小的多。
xml.dom.pulldom
与其他模块不同,xml.dom.pulldom模块提供的是一个“pull解析器”,其背后的基本概念指的是从XML 流中pull事件,然后进行处理。虽然与SAX一样采用事件驱动模型(event-driven processing model),但是不同的是,使用pull解析器时,使用者需要明确地从XML流中pull事件,并对这些事件遍历处理,直到处理完成或者出现错误。
xml.sax
xml.sax模块实现的是SAX API,这个模块牺牲了便捷性来换取速度和内存占用。SAX是Simple API for XML的缩写,它并不是由W3C官方所提出的标准。它是事件驱动的,并不需要一次性读入整个文档,而文档的读入过程也就是SAX的解析过程。所谓事件驱动,是指一种基于回调(callback)机制的程序运行方法。
xml.parser.expat
xml.parser.expat提供了对C语言编写的expat解析器的一个直接的、底层API接口。expat接口与SAX类似,也是基于事件回调机制,但是这个接口并不是标准化的,只适用于expat库。expat是一个面向流的解析器。您注册的解析器回调(或handler)功能,然后开始搜索它的文档。当解析器识别该文件的指定的位置,它会调用 该部分相应的处理程序(如果您已经注册的一个)。该文件被输送到解析器,会被分割成多个片断,并分段装到内存中。因此expat可以解析那些巨大的文件。
xml.etree.ElementTree(以下简称ET)
xml.etree.ElementTree模块提供了一个轻量级、Pythonic的API,同时还有一个高效的C语言实现,即xml.etree.cElementTree。与DOM相比,ET的速度更快,API使用更直接、方便。与SAX相比,ET.iterparse函数同样提供了按需解析的功能,不会一次性在内存中读入整个文档。ET的性能与SAX模块大致相仿,但是它的API更加高层次,用户使用起来更加便捷。Python标准库中,提供了ET的两种实现。一个是纯Python实现的xml.etree.ElementTree,另一个是速度更快的C语言实现xml.etree.cElementTree。请记住始终使用C语言实现,因为它的速度要快很多,而且内存消耗也要少很多。如果你所使用的Python版本中没有cElementTree所需的加速模块,你可以这样导入模块:
try:
    import xml.etree.cElementTree as ET
except ImportError:
    import xml.etree.ElementTree as ET
如果某个API存在不同的实现,上面是常见的导入方式。当然,很可能你直接导入第一个模块时,并不会出现问题。请注意,自Python 3.3之后,就不用采用上面的导入方法,因为ElemenTree模块会自动优先使用C加速器,如果不存在C实现,则会使用Python实现。因此,使用Python 3.3+的朋友,只需要import xml.etree.ElementTree即可。
3.将XML文档解析为树(tree)
XML是一种结构化、层级化的数据格式,最适合体现XML的数据结构就是树。ET提供了两个对象:ElementTree将整个XML文档转化为树,Element则代表着树上的单个节点。对整个XML文档的交互(读取,写入,查找需要的元素),一般是在ElementTree层面进行的。对单个XML元素及其子元素,则是在Element层面进行的。
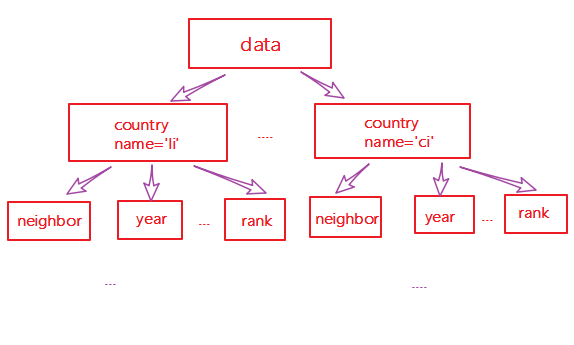
XML是各种应用程序之间进行数据传输的最常用的工具,并且在信息存储和描述领域变得越来越流行。XML文件格式如下:
<data>
    <country name="Liechtenstein">
        <rank updated="yes">2</rank>
        <year>2023</year>
        <gdppc>141100</gdppc>
        <neighbor direction="E" name="Austria" />
        <neighbor direction="W" name="Switzerland" />
    </country>
    <country name="Singapore">
        <rank updated="yes">5</rank>
        <year>2026</year>
        <gdppc>59900</gdppc>
        <neighbor direction="N" name="Malaysia" />
    </country>
    <country name="Panama">
        <rank updated="yes">69</rank>
        <year>2026</year>
        <gdppc>13600</gdppc>
        <neighbor direction="W" name="Costa Rica" />
        <neighbor direction="E" name="Colombia" />
    </country>
</data>
1、解析XML(两种方式)
a.利用ElementTree.XML将字符串解析成xml对象
from xml.etree import ElementTree as ET

# 打开文件,读取XML内容
str_xml = open('xo.xml', 'r').read()

# 将字符串解析成xml特殊对象,root代指xml文件的根节点
root = ET.XML(str_xml)
b.利用ElementTree.parse将文件直接解析成xml对象
from xml.etree import ElementTree as ET

# 直接解析xml文件
tree = ET.parse("xo.xml")

# 获取xml文件的根节点
root = tree.getroot()
2、操作XML
XML格式类型是节点嵌套节点,对于每一个节点均有以下功能,以便对当前节点进行操作:
class Element:
    """An XML element.

    This class is the reference implementation of the Element interface.

    An element's length is its number of subelements.  That means if you
    want to check if an element is truly empty, you should check BOTH
    its length AND its text attribute.

    The element tag, attribute names, and attribute values can be either
    bytes or strings.

    *tag* is the element name.  *attrib* is an optional dictionary containing
    element attributes. *extra* are additional element attributes given as
    keyword arguments.

    Example form:
        <tag attrib>text<child/>...</tag>tail

    """

    当前节点的标签名
    tag = None
    """The element's name."""

    当前节点的属性

    attrib = None
    """Dictionary of the element's attributes."""

    当前节点的内容
    text = None
    """
    Text before first subelement. This is either a string or the value None.
    Note that if there is no text, this attribute may be either
    None or the empty string, depending on the parser.

    """

    tail = None
    """
    Text after this element's end tag, but before the next sibling element's
    start tag.  This is either a string or the value None.  Note that if there
    was no text, this attribute may be either None or an empty string,
    depending on the parser.

    """

    def __init__(self, tag, attrib={}, **extra):
        if not isinstance(attrib, dict):
            raise TypeError("attrib must be dict, not %s" % (
                attrib.__class__.__name__,))
        attrib = attrib.copy()
        attrib.update(extra)
        self.tag = tag
        self.attrib = attrib
        self._children = []

    def __repr__(self):
        return "<%s %r at %#x>" % (self.__class__.__name__, self.tag, id(self))

    def makeelement(self, tag, attrib):
        创建一个新节点
        """Create a new element with the same type.

        *tag* is a string containing the element name.
        *attrib* is a dictionary containing the element attributes.

        Do not call this method, use the SubElement factory function instead.

        """
        return self.__class__(tag, attrib)

    def copy(self):
        """Return copy of current element.

        This creates a shallow copy. Subelements will be shared with the
        original tree.

        """
        elem = self.makeelement(self.tag, self.attrib)
        elem.text = self.text
        elem.tail = self.tail
        elem[:] = self
        return elem

    def __len__(self):
        return len(self._children)

    def __bool__(self):
        warnings.warn(
            "The behavior of this method will change in future versions.  "
            "Use specific 'len(elem)' or 'elem is not None' test instead.",
            FutureWarning, stacklevel=2
            )
        return len(self._children) != 0 # emulate old behaviour, for now

    def __getitem__(self, index):
        return self._children[index]

    def __setitem__(self, index, element):
        # if isinstance(index, slice):
        #     for elt in element:
        #         assert iselement(elt)
        # else:
        #     assert iselement(element)
        self._children[index] = element

    def __delitem__(self, index):
        del self._children[index]

    def append(self, subelement):
        为当前节点追加一个子节点
        """Add *subelement* to the end of this element.

        The new element will appear in document order after the last existing
        subelement (or directly after the text, if it's the first subelement),
        but before the end tag for this element.

        """
        self._assert_is_element(subelement)
        self._children.append(subelement)

    def extend(self, elements):
        为当前节点扩展 n 个子节点
        """Append subelements from a sequence.

        *elements* is a sequence with zero or more elements.

        """
        for element in elements:
            self._assert_is_element(element)
        self._children.extend(elements)

    def insert(self, index, subelement):
        在当前节点的子节点中插入某个节点,即:为当前节点创建子节点,然后插入指定位置
        """Insert *subelement* at position *index*."""
        self._assert_is_element(subelement)
        self._children.insert(index, subelement)

    def _assert_is_element(self, e):
        # Need to refer to the actual Python implementation, not the
        # shadowing C implementation.
        if not isinstance(e, _Element_Py):
            raise TypeError('expected an Element, not %s' % type(e).__name__)

    def remove(self, subelement):
        在当前节点在子节点中删除某个节点
        """Remove matching subelement.

        Unlike the find methods, this method compares elements based on
        identity, NOT ON tag value or contents.  To remove subelements by
        other means, the easiest way is to use a list comprehension to
        select what elements to keep, and then use slice assignment to update
        the parent element.

        ValueError is raised if a matching element could not be found.

        """
        # assert iselement(element)
        self._children.remove(subelement)

    def getchildren(self):
        获取所有的子节点(废弃)
        """(Deprecated) Return all subelements.

        Elements are returned in document order.

        """
        warnings.warn(
            "This method will be removed in future versions.  "
            "Use 'list(elem)' or iteration over elem instead.",
            DeprecationWarning, stacklevel=2
            )
        return self._children

    def find(self, path, namespaces=None):
        获取第一个寻找到的子节点
        """Find first matching element by tag name or path.

        *path* is a string having either an element tag or an XPath,
        *namespaces* is an optional mapping from namespace prefix to full name.

        Return the first matching element, or None if no element was found.

        """
        return ElementPath.find(self, path, namespaces)

    def findtext(self, path, default=None, namespaces=None):
        获取第一个寻找到的子节点的内容
        """Find text for first matching element by tag name or path.

        *path* is a string having either an element tag or an XPath,
        *default* is the value to return if the element was not found,
        *namespaces* is an optional mapping from namespace prefix to full name.

        Return text content of first matching element, or default value if
        none was found.  Note that if an element is found having no text
        content, the empty string is returned.

        """
        return ElementPath.findtext(self, path, default, namespaces)

    def findall(self, path, namespaces=None):
        获取所有的子节点
        """Find all matching subelements by tag name or path.

        *path* is a string having either an element tag or an XPath,
        *namespaces* is an optional mapping from namespace prefix to full name.

        Returns list containing all matching elements in document order.

        """
        return ElementPath.findall(self, path, namespaces)

    def iterfind(self, path, namespaces=None):
        获取所有指定的节点,并创建一个迭代器(可以被for循环)
        """Find all matching subelements by tag name or path.

        *path* is a string having either an element tag or an XPath,
        *namespaces* is an optional mapping from namespace prefix to full name.

        Return an iterable yielding all matching elements in document order.

        """
        return ElementPath.iterfind(self, path, namespaces)

    def clear(self):
        清空节点
        """Reset element.

        This function removes all subelements, clears all attributes, and sets
        the text and tail attributes to None.

        """
        self.attrib.clear()
        self._children = []
        self.text = self.tail = None

    def get(self, key, default=None):
        获取当前节点的属性值
        """Get element attribute.

        Equivalent to attrib.get, but some implementations may handle this a
        bit more efficiently.  *key* is what attribute to look for, and
        *default* is what to return if the attribute was not found.

        Returns a string containing the attribute value, or the default if
        attribute was not found.

        """
        return self.attrib.get(key, default)

    def set(self, key, value):
        为当前节点设置属性值
        """Set element attribute.

        Equivalent to attrib[key] = value, but some implementations may handle
        this a bit more efficiently.  *key* is what attribute to set, and
        *value* is the attribute value to set it to.

        """
        self.attrib[key] = value

    def keys(self):
        获取当前节点的所有属性的 key

        """Get list of attribute names.

        Names are returned in an arbitrary order, just like an ordinary
        Python dict.  Equivalent to attrib.keys()

        """
        return self.attrib.keys()

    def items(self):
        获取当前节点的所有属性值,每个属性都是一个键值对
        """Get element attributes as a sequence.

        The attributes are returned in arbitrary order.  Equivalent to
        attrib.items().

        Return a list of (name, value) tuples.

        """
        return self.attrib.items()

    def iter(self, tag=None):
        在当前节点的子孙中根据节点名称寻找所有指定的节点,并返回一个迭代器(可以被for循环)。
        """Create tree iterator.

        The iterator loops over the element and all subelements in document
        order, returning all elements with a matching tag.

        If the tree structure is modified during iteration, new or removed
        elements may or may not be included.  To get a stable set, use the
        list() function on the iterator, and loop over the resulting list.

        *tag* is what tags to look for (default is to return all elements)

        Return an iterator containing all the matching elements.

        """
        if tag == "*":
            tag = None
        if tag is None or self.tag == tag:
            yield self
        for e in self._children:
            yield from e.iter(tag)

    # compatibility
    def getiterator(self, tag=None):
        # Change for a DeprecationWarning in 1.4
        warnings.warn(
            "This method will be removed in future versions.  "
            "Use 'elem.iter()' or 'list(elem.iter())' instead.",
            PendingDeprecationWarning, stacklevel=2
        )
        return list(self.iter(tag))

    def itertext(self):
        在当前节点的子孙中根据节点名称寻找所有指定的节点的内容,并返回一个迭代器(可以被for循环)。
        """Create text iterator.

        The iterator loops over the element and all subelements in document
        order, returning all inner text.

        """
        tag = self.tag
        if not isinstance(tag, str) and tag is not None:
            return
        if self.text:
            yield self.text
        for e in self:
            yield from e.itertext()
            if e.tail:
                yield e.tail
由于 每个节点 都具有以上的方法,并且在上一步骤中解析时均得到了root(xml文件的根节点),所以可以利用以上方法进行操作xml文件。
a. 遍历XML文档的所有内容
from xml.etree import ElementTree as ET

############ 解析方式一 ############
"""
# 打开文件,读取XML内容
str_xml = open('xo.xml', 'r').read()

# 将字符串解析成xml特殊对象,root代指xml文件的根节点
root = ET.XML(str_xml)
"""
############ 解析方式二 ############

# 直接解析xml文件
tree = ET.parse("xo.xml")

# 获取xml文件的根节点
root = tree.getroot()

### 操作

# 顶层标签
print(root.tag)

# 遍历XML文档的第二层
for child in root:
    # 第二层节点的标签名称和标签属性
    print(child.tag, child.attrib)
    # 遍历XML文档的第三层
    for i in child:
        # 第二层节点的标签名称和内容
        print(i.tag,i.text)
b.遍历XML中指定的节点
from xml.etree import ElementTree as ET

############ 解析方式一 ############
"""
# 打开文件,读取XML内容
str_xml = open('xo.xml', 'r').read()

# 将字符串解析成xml特殊对象,root代指xml文件的根节点
root = ET.XML(str_xml)
"""
############ 解析方式二 ############

# 直接解析xml文件
tree = ET.parse("xo.xml")

# 获取xml文件的根节点
root = tree.getroot()

### 操作

# 顶层标签
print(root.tag)

# 遍历XML中所有的year节点
for node in root.iter('year'):
    # 节点的标签名称和内容
    print(node.tag, node.text)
c.修改节点内容
由于修改的节点时,均是在内存中进行,其不会影响文件中的内容。所以,如果想要修改,则需要重新将内存中的内容写到文件。
from xml.etree import ElementTree as ET

############ 解析方式一 ############

# 打开文件,读取XML内容
str_xml = open('xo.xml', 'r').read()

# 将字符串解析成xml特殊对象,root代指xml文件的根节点
root = ET.XML(str_xml)

############ 操作 ############

# 顶层标签
print(root.tag)

# 循环所有的year节点
for node in root.iter('year'):
    # 将year节点中的内容自增一
    new_year = int(node.text) + 1
    node.text = str(new_year)

    # 设置属性
    node.set('name', 'alex')
    node.set(')
    # 删除属性
    del node.attrib['name']

############ 保存文件 ############
tree = ET.ElementTree(root)
tree.write("newnew.xml", encoding='utf-8')
解析字符串方式,修改,保存
from xml.etree import ElementTree as ET

############ 解析方式二 ############

# 直接解析xml文件
tree = ET.parse("xo.xml")

# 获取xml文件的根节点
root = tree.getroot()

############ 操作 ############

# 顶层标签
print(root.tag)

# 循环所有的year节点
for node in root.iter('year'):
    # 将year节点中的内容自增一
    new_year = int(node.text) + 1
    node.text = str(new_year)

    # 设置属性
    node.set('name', 'alex')
    node.set(')
    # 删除属性
    del node.attrib['name']

############ 保存文件 ############
tree.write("newnew.xml", encoding='utf-8')
解析文件方式打开,修改,保存
d.删除节点
from xml.etree import ElementTree as ET

############ 解析字符串方式打开 ############

# 打开文件,读取XML内容
str_xml = open('xo.xml', 'r').read()

# 将字符串解析成xml特殊对象,root代指xml文件的根节点
root = ET.XML(str_xml)

############ 操作 ############

# 顶层标签
print(root.tag)

# 遍历data下的所有country节点
for country in root.findall('country'):
    # 获取每一个country节点下rank节点的内容
    rank = int(country.find('rank').text)

    if rank > 50:
        # 删除指定country节点
        root.remove(country)

############ 保存文件 ############
tree = ET.ElementTree(root)
tree.write("newnew.xml", encoding='utf-8')
解析字符串方式打开,删除,保存
from xml.etree import ElementTree as ET

############ 解析方式二 ############

# 直接解析xml文件
tree = ET.parse("xo.xml")

# 获取xml文件的根节点
root = tree.getroot()

############ 操作 ############

# 顶层标签
print(root.tag)

# 循环所有的year节点
for node in root.iter('year'):
    # 将year节点中的内容自增一
    new_year = int(node.text) + 1
    node.text = str(new_year)

    # 设置属性
    node.set('name', 'alex')
    node.set(')
    # 删除属性
    del node.attrib['name']

############ 保存文件 ############
tree.write("newnew.xml", encoding='utf-8')

解析文件方式,修改,保存
解析文件方式打开,删除,保存
3、创建XML文档
from xml.etree import ElementTree as ET

# 创建根节点
root = ET.Element("famliy")

# 创建节点大儿子
son1 = ET.Element('son', {'name': '儿1'})
# 创建小儿子
son2 = ET.Element('son', {"name": '儿2'})

# 在大儿子中创建两个孙子
grandson1 = ET.Element('grandson', {'name': '儿11'})
grandson2 = ET.Element('grandson', {'name': '儿12'})
son1.append(grandson1)
son1.append(grandson2)

# 把儿子添加到根节点中
root.append(son1)
root.append(son1)

tree = ET.ElementTree(root)
tree.write('oooo.xml',encoding='utf-8', short_empty_elements=False)
创建方式一
from xml.etree import ElementTree as ET

# 创建根节点
root = ET.Element("famliy")

# 创建大儿子
# son1 = ET.Element('son', {'name': '儿1'})
son1 = root.makeelement('son', {'name': '儿1'})
# 创建小儿子
# son2 = ET.Element('son', {"name": '儿2'})
son2 = root.makeelement('son', {"name": '儿2'})

# 在大儿子中创建两个孙子
# grandson1 = ET.Element('grandson', {'name': '儿11'})
grandson1 = son1.makeelement('grandson', {'name': '儿11'})
# grandson2 = ET.Element('grandson', {'name': '儿12'})
grandson2 = son1.makeelement('grandson', {'name': '儿12'})

son1.append(grandson1)
son1.append(grandson2)

# 把儿子添加到根节点中
root.append(son1)
root.append(son1)

tree = ET.ElementTree(root)
tree.write('oooo.xml',encoding='utf-8', short_empty_elements=False)
创建方式二
from xml.etree import ElementTree as ET

# 创建根节点
root = ET.Element("famliy")

# 创建节点大儿子
son1 = ET.SubElement(root, "son", attrib={'name': '儿1'})
# 创建小儿子
son2 = ET.SubElement(root, "son", attrib={"name": "儿2"})

# 在大儿子中创建一个孙子
grandson1 = ET.SubElement(son1, "age", attrib={'name': '儿11'})
grandson1.text = '孙子'

et = ET.ElementTree(root)  #生成文档对象
et.write("test.xml", encoding="utf-8", xml_declaration=True, short_empty_elements=False)
创建方式三
由于原生保存的XML时默认无缩进,如果想要设置缩进的话, 需要修改保存方式:
from xml.etree import ElementTree as ET
from xml.dom import minidom

def prettify(elem):
    """将节点转换成字符串,并添加缩进。
    """
    rough_string = ET.tostring(elem, 'utf-8')
    reparsed = minidom.parseString(rough_string)
    return reparsed.toprettyxml(indent="\t")

# 创建根节点
root = ET.Element("famliy")

# 创建大儿子
# son1 = ET.Element('son', {'name': '儿1'})
son1 = root.makeelement('son', {'name': '儿1'})
# 创建小儿子
# son2 = ET.Element('son', {"name": '儿2'})
son2 = root.makeelement('son', {"name": '儿2'})

# 在大儿子中创建两个孙子
# grandson1 = ET.Element('grandson', {'name': '儿11'})
grandson1 = son1.makeelement('grandson', {'name': '儿11'})
# grandson2 = ET.Element('grandson', {'name': '儿12'})
grandson2 = son1.makeelement('grandson', {'name': '儿12'})

son1.append(grandson1)
son1.append(grandson2)

# 把儿子添加到根节点中
root.append(son1)
root.append(son1)

raw_str = prettify(root)

f = open("xxxoo.xml",'w',encoding='utf-8')
f.write(raw_str)
f.close()
4、命名空间
XML 命名空间提供避免元素命名冲突的方法。在 XML 中,元素名称是由开发者定义的,当两个不同的文档使用相同的元素名时,就会发生命名冲突。
<table>
   <tr>
   <td>Apples</td>
   <td>Bananas</td>
   </tr>
</table>

<table>
   <name>African Coffee Table</name>
   <width>80</width>
   <length>120</length>
</table>

假如这两个 XML 文档被一起使用,由于两个文档都包含带有不同内容和定义的 <table> 元素,就会发生命名冲突。
XML 解析器无法确定如何处理这类冲突。
要解决上述办法:采用命名空间
<h:table xmlns:h="http://www.w3.org/TR/html4/">
   <h:tr>
   <h:td>Apples</h:td>
   <h:td>Bananas</h:td>
   </h:tr>
</h:table>

<f:table xmlns:f="http://www.w3school.com.cn/furniture">
   <f:name>African Coffee Table</f:name>
   <f:width>80</f:width>
   <f:length>120</f:length>
</f:table>
在python中的解决办法:
from xml.etree import ElementTree as ET

ET.register_namespace('com',"http://www.company.com") #some name

# build a tree structure
root = ET.Element("{http://www.company.com}STUFF")
body = ET.SubElement(root, "})
body.text = "STUFF EVERYWHERE!"

# wrap it in an ElementTree instance, and save as XML
tree = ET.ElementTree(root)

tree.write("page.xml",
           xml_declaration=True,
           encoding='utf-8',
           method="xml")
5.说明事项
- 不要使用xml.py作为文件名,否则此时会发生如下错误:ImportError: No module named 'xml.etree'; 'xml' is not a package.注意:删除xml.py后仍然不能成功解释,那是因为当前路径中还生成了xml.pyc,而该文件的优先级要高于xml.py,因此解释器还是优先在xml.pyc中寻找,因此必须将该文件也删除掉,成功解决问题。
- ElementTree模块中提供的很多解析函数都需要预先将整个XML文档读入内存中,这对于大型XML解析而言,不是一件好事,尤其是当我们从网络、管道中读取XML时,非阻塞式的解析非常重要。此时,我们可以使用ElementTree模块中的XMLPullParse类来处理。当然我们也可以选择ElementTree模块的iterparse()来代替,该方法在解析大型XML时也不需要全部读入内存。参考以下代码
count = 0
for event, elem in ET.iterparse(sys.argv[2]):
    if event == 'end':
        if elem.tag == 'location' and elem.text == 'Zimbabwe':
            count += 1
    elem.clear() # 将元素废弃

print count
[python标准库]XML模块的更多相关文章
- python标准库xml.etree.ElementTree的bug
使用python生成或者解析xml的方法用的最多的可能就数python标准库xml.etree.ElementTree和lxml了,在某些环境下使用xml.etree.ElementTree更方便一些 ...
- [python标准库]Pickle模块
Pickle-------python对象序列化 本文主要阐述以下几点: 1.pickle模块简介 2.pickle模块提供的方法 3.注意事项 4.实例解析 1.pickle模块简介 The pic ...
- Python 标准库 ConfigParser 模块 的使用
Python 标准库 ConfigParser 模块 的使用 demo #!/usr/bin/env python # coding=utf-8 import ConfigParser import ...
- Python标准库——collections模块的Counter类
1.collections模块 collections模块自Python 2.4版本开始被引入,包含了dict.set.list.tuple以外的一些特殊的容器类型,分别是: OrderedDict类 ...
- 【python】Python标准库defaultdict模块
来源:http://www.ynpxrz.com/n1031711c2023.aspx Python标准库中collections对集合类型的数据结构进行了很多拓展操作,这些操作在我们使用集合的时候会 ...
- Python标准库--os模块
这个模块包含普遍的操作系统功能.如果你希望你的程序能够与平台无关的话,这个模块是尤为重要的.即它允许一个程序在编写后不需要任何改动,也不会发生任何问题,就可以在Linux和Windows下运行.一个例 ...
- python标准库 bisect模块
# -*- coding: utf-8 -*- # python:2.x __author__ = 'Administrator' #bisect #作用:维护有序列表,而不必在每次向列表增加一个元素 ...
- python标准库 sysconfig模块
# -*- coding: utf-8 -*-# python:2.x__author__ = 'Administrator'import sysconfig#sysconfig:解释器编译时配置#作 ...
- Python标准库 -- UUID模块(生成唯一标识)
UUID是什么: UUID: 通用唯一标识符 ( Universally Unique Identifier ),对于所有的UUID它可以保证在空间和时间上的唯一性,也称为GUID,全称为: UUID ...
随机推荐
- Linux 系统管理04--账号管理
Linux系统管理04--账号管理 一.用户账号管理 1.用户账号概述 (1)用户账号的常见分类: 1>超级用户:root uid=0 gid=0 权限最大. 2>普通用户:uid> ...
- keil5之32环境配置
终于配置好了!!又是经过一下午加晚上的奋战,终于把环境配置好了,多亏了我强大的资料整理能力(哈哈). 真是不容易啊,本来打算放弃的,去问问别人吧.但是想想,还是靠自己吧,靠谁都不如靠自己,真是的,慢慢 ...
- Elasticserach学习笔记-01基础概念
本文系本人根据官方文档的翻译,能力有限.水平一般,如果对想学习Elasticsearch的朋友有帮助,将是本人的莫大荣幸. 原文出处:https://www.elastic.co/guide/en/e ...
- HDU 2080 夹角有多大II (数学) atan(y/x)分类求角度
夹角有多大II Problem Description 这次xhd面临的问题是这样的:在一个平面内有两个点,求两个点分别和原点的连线的夹角的大小.注:夹角的范围[0,180],两个点不会在圆心出现. ...
- 调用startActivityForResult后,onActivityResult为什么立刻响应
现象 今天在编写代码的时候,涉及到两个Activity通过Intent来传值的问题.具体描述为:activity A调用startActivityForResult()函数启动Activit ...
- C# 在iis windows authentication身份验证下,如何实现域用户自动登录
前言: 该博文产生的背景是有个项目在客户那部署方式为iis windows身份验证,而客户不想每次登录系统都要输入帐号和密码来登录. 因此需要得到域用户,然后进行判断该用户是否可以进入系统. 解决方法 ...
- java中的引用传递(同样适用于JS)
1 java中的数据类型: 有8种基本数据类型,分别为:byte(1),boolean(1),char(2),short(2),int(4),long(8),float(4),double(8) ...
- JavaScript中的DOM函数与关键字汇总
DOM节点的属性 属性 描述 attributes数组 获取某个节点的所有属性子节点(实际是一个NodeList对象) childNodes数组 获取某个节点的所有子节点,可以按数组方式访问子节 ...
- [刷题]Codeforces 746G - New Roads
Description There are n cities in Berland, each of them has a unique id - an integer from 1 to n, th ...
- Java学习笔记——排序算法之快速排序
会当凌绝顶,一览众山小. --望岳 如果说有哪个排序算法不能不会,那就是快速排序(Quick Sort)了 快速排序简单而高效,是最适合学习的进阶排序算法. 直接上代码: public class Q ...