基于TQ2440的SPI驱动学习(OLED)
平台简介
开发板:TQ2440 (NandFlash:256M 内存:64M)
u-boot版本:u-boot-2015.04
内核版本:Linux-3.14
作者:彭东林
摘要
这篇博客的目的是简要分析两种spi驱动的实现,一种是利用Samsung的S3C2440自带的硬件SPI控制器,另一种是利用Linux内核已经写好的用GPIO模拟SPI时序,实现一个软件SPI控制器。操作的外设是韦东山的SPI视频教程中提供的OLED模块,同时分享一下在使用逻辑分析仪Saleae16调试SPI时遇到的问题。
相关的内核代码已经上传:git@code.csdn.net:pengdonglin137/linux-3-14-y.git
可以看看代码提交记录。
正文
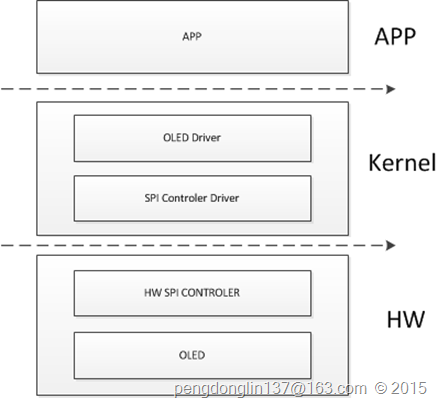
SPI驱动实现之硬件控制器
一、驱动框架
二、代码
SPI硬件控制器
这里采用的是platform架构,分为device和driver两个部分。
1、platform_device
文件:arch/arm/plat-samsung/devs.c
1: static struct resource s3c_spi0_resource[] = {
2: [0] = DEFINE_RES_MEM(S3C24XX_PA_SPI, SZ_32),
3: [1] = DEFINE_RES_IRQ(IRQ_SPI0),
4: };
5:
6: static void s3c24xx_spi_set_cs(struct s3c2410_spi_info *spi, int cs, int pol)
7: {
8: gpio_set_value(cs, pol);
9: }
10:
11: static struct s3c2410_spi_info s3c_spi_info[] = {
12: {
13: .num_cs = S3C_GPIO_END,
14: .bus_num = 0,
15: .set_cs = s3c24xx_spi_set_cs,
16: }
17: };
18:
19: struct platform_device s3c_device_spi0 = {
20: .name = "s3c2410-spi",
21: .id = 0,
22: .num_resources = ARRAY_SIZE(s3c_spi0_resource),
23: .resource = s3c_spi0_resource,
24: .dev = {
25: .dma_mask = &samsung_device_dma_mask,
26: .coherent_dma_mask = DMA_BIT_MASK(32),
27: .platform_data = (void *)s3c_spi_info,
28: }
29: };
第15行是片选函数,它的第二个参数cs来自spi从设备的板级信息,表示这个从设备的片选引脚;
第14行表示spi控制器的编号是0,将来在spi从设备的板级信息中有体现,意思是将来这个spi从设备挂载在编号为0的spi总线下面;
第27行,在linux原生的代码中没有实现platform_data,在调用probe函数的时候会报错;
2、platform_driver
文件:drivers/spi/spi-s3c24xx.c
1: MODULE_ALIAS("platform:s3c2410-spi");
2: static struct platform_driver s3c24xx_spi_driver = {
3: .probe = s3c24xx_spi_probe,
4: .remove = s3c24xx_spi_remove,
5: .driver = {
6: .name = "s3c2410-spi",
7: .owner = THIS_MODULE,
8: .pm = S3C24XX_SPI_PMOPS,
9: },
10: };
11: module_platform_driver(s3c24xx_spi_driver);
12:
OLED 板级信息
这里调用了spi子系统提供的函数接口。
1、板级信息
文件:arch/arm/mach-s3c24xx/mach-tq2440.c
1: /* SPI OLED */
2: static struct spi_board_info tq2440_spi_board_info[] __initdata = {
3: {
4: .modalias = "oled",
5: .max_speed_hz = 10000000,
6: .bus_num = 0,
7: .mode = SPI_MODE_0,
8: .chip_select = S3C2410_GPG(1),
9: .platform_data = (const void *)S3C2410_GPF(3),
10: },
11: };
12:
13: static struct platform_device *tq2440_devices[] __initdata = {
14: ......
15: &s3c_device_spi0,
16: };
17:
18: static void __init tq2440_machine_init(void)
19: {
20: ......
21: spi_register_board_info(tq2440_spi_board_info, ARRAY_SIZE(tq2440_spi_board_info));
22: ......
23: }
24:
25: MACHINE_START(TQ2440, "TQ2440")
26: ......
27: .init_machine = tq2440_machine_init,
28: ......
29: MACHINE_END
第4行,将来会跟驱动中的name进行匹配;
第5行,表示通信速率,这里设置的是10MHz;
第6行,表示使用的spi总线的编号是0;
第7行,表示使用的spi模式是0,这里要根据oled的芯片手册(SSD1306-Revision 1.1 (Charge Pump).pdf)
第8行,oled使用的片选引脚;
第9行,用于区分命令和数据模式的GPIO资源,这个会在驱动中解析;
第21行,注册spi从设备板级信息;
2、oled驱动
文件:drivers/spi/oled/spi_oled_drv.c
1: #include <linux/init.h>
2: #include <linux/fs.h>
3: #include <linux/slab.h>
4: #include <linux/module.h>
5: #include <linux/kernel.h>
6: #include <linux/device.h>
7: #include <sound/core.h>
8: #include <linux/spi/spi.h>
9: #include <asm/uaccess.h>
10:
11: #include <mach/hardware.h>
12: #include <mach/regs-gpio.h>
13:
14: #include <linux/gpio.h>
15: #include <plat/gpio-cfg.h>
16:
17: /* 构造注册 spi_driver */
18:
19: static int major;
20: static struct class *class;
21:
22: static int spi_oled_dc_pin;
23: static struct spi_device *spi_oled_dev;
24: static unsigned char *ker_buf;
25:
26: static void OLED_Set_DC(char val)
27: {
28: gpio_set_value(spi_oled_dc_pin, val);
29: }
30:
31: static void OLEDWriteCmd(unsigned char cmd)
32: {
33: OLED_Set_DC(0); /* command */
34: spi_write(spi_oled_dev, &cmd, 1);
35: OLED_Set_DC(1); /* */
36: }
37:
38: static void OLEDWriteDat(unsigned char dat)
39: {
40: OLED_Set_DC(1); /* data */
41: spi_write(spi_oled_dev, &dat, 1);
42: OLED_Set_DC(1); /* */
43: }
44:
45: static void OLEDSetPageAddrMode(void)
46: {
47: OLEDWriteCmd(0x20);
48: OLEDWriteCmd(0x02);
49: }
50:
51: static void OLEDSetPos(int page, int col)
52: {
53: OLEDWriteCmd(0xB0 + page); /* page address */
54:
55: OLEDWriteCmd(col & 0xf); /* Lower Column Start Address */
56: OLEDWriteCmd(0x10 + (col >> 4)); /* Lower Higher Start Address */
57: }
58:
59:
60: static void OLEDClear(void)
61: {
62: int page, i;
63: for (page = 0; page < 8; page ++)
64: {
65: OLEDSetPos(page, 0);
66: for (i = 0; i < 128; i++)
67: OLEDWriteDat(0);
68: }
69: }
70:
71: void OLEDClearPage(int page)
72: {
73: int i;
74: OLEDSetPos(page, 0);
75: for (i = 0; i < 128; i++)
76: OLEDWriteDat(0);
77: }
78:
79: void OLEDInit(void)
80: {
81: /* 向OLED发命令以初始化 */
82: OLEDWriteCmd(0xAE); /*display off*/
83: OLEDWriteCmd(0x00); /*set lower column address*/
84: OLEDWriteCmd(0x10); /*set higher column address*/
85: OLEDWriteCmd(0x40); /*set display start line*/
86: OLEDWriteCmd(0xB0); /*set page address*/
87: OLEDWriteCmd(0x81); /*contract control*/
88: OLEDWriteCmd(0x66); /*128*/
89: OLEDWriteCmd(0xA1); /*set segment remap*/
90: OLEDWriteCmd(0xA6); /*normal / reverse*/
91: OLEDWriteCmd(0xA8); /*multiplex ratio*/
92: OLEDWriteCmd(0x3F); /*duty = 1/64*/
93: OLEDWriteCmd(0xC8); /*Com scan direction*/
94: OLEDWriteCmd(0xD3); /*set display offset*/
95: OLEDWriteCmd(0x00);
96: OLEDWriteCmd(0xD5); /*set osc division*/
97: OLEDWriteCmd(0x80);
98: OLEDWriteCmd(0xD9); /*set pre-charge period*/
99: OLEDWriteCmd(0x1f);
100: OLEDWriteCmd(0xDA); /*set COM pins*/
101: OLEDWriteCmd(0x12);
102: OLEDWriteCmd(0xdb); /*set vcomh*/
103: OLEDWriteCmd(0x30);
104: OLEDWriteCmd(0x8d); /*set charge pump enable*/
105: OLEDWriteCmd(0x14);
106:
107: OLEDSetPageAddrMode();
108:
109: OLEDClear();
110:
111: OLEDWriteCmd(0xAF); /*display ON*/
112: }
113:
114:
115: #define OLED_CMD_INIT 0x100001
116: #define OLED_CMD_CLEAR_ALL 0x100002
117: #define OLED_CMD_CLEAR_PAGE 0x100003
118: #define OLED_CMD_SET_POS 0x100004
119:
120: static long oled_ioctl(struct file *file, unsigned int cmd, unsigned long arg)
121: {
122: int page;
123: int col;
124:
125: switch (cmd)
126: {
127: case OLED_CMD_INIT:
128: {
129: OLEDInit();
130: break;
131: }
132: case OLED_CMD_CLEAR_ALL:
133: {
134: OLEDClear();
135: break;
136: }
137: case OLED_CMD_CLEAR_PAGE:
138: {
139: page = arg;
140: OLEDClearPage(page);
141: break;
142: }
143: case OLED_CMD_SET_POS:
144: {
145: page = arg & 0xff;
146: col = (arg >> 8) & 0xff;
147: OLEDSetPos(page, col);
148: break;
149: }
150: }
151: return 0;
152: }
153:
154: static ssize_t oled_write(struct file *file,
155: const char __user *buf,
156: size_t count, loff_t *ppos)
157: {
158: int ret;
159:
160: if (count > 4096)
161: return -EINVAL;
162: ret = copy_from_user(ker_buf, buf, count);
163: OLED_Set_DC(1); /* data */
164: spi_write(spi_oled_dev, ker_buf, count);
165: return 0;
166: }
167:
168:
169: static struct file_operations oled_ops = {
170: .owner = THIS_MODULE,
171: .unlocked_ioctl = oled_ioctl,
172: .write = oled_write,
173: };
174:
175: static int spi_oled_probe(struct spi_device *spi)
176: {
177: int ret;
178:
179: spi_oled_dev = spi;
180: spi_oled_dc_pin = (int)dev_get_platdata(&spi->dev);
181:
182: ret = devm_gpio_request(&spi->dev, spi_oled_dc_pin, "OLED_DC");
183: if (ret < 0)
184: return ret;
185: gpio_direction_output(spi_oled_dc_pin, 0);
186:
187: #ifndef CONFIG_TQ2440_USE_SPI_GPIO
188: ret = devm_gpio_request(&spi->dev, spi->chip_select, "OLED_CHIP_SELECT");
189: if (ret < 0)
190: return ret;
191: gpio_direction_output(spi->chip_select, 1);
192: #endif
193:
194: ker_buf = kmalloc(4096, GFP_KERNEL);
195:
196: /* 注册一个 file_operations */
197: major = register_chrdev(0, "oled", &oled_ops);
198:
199: class = class_create(THIS_MODULE, "oled");
200:
201: /* 为了让mdev根据这些信息来创建设备节点 */
202: device_create(class, NULL, MKDEV(major, 0), NULL, "oled"); /* /dev/oled */
203:
204: return 0;
205: }
206:
207: static int spi_oled_remove(struct spi_device *spi)
208: {
209: device_destroy(class, MKDEV(major, 0));
210: class_destroy(class);
211: unregister_chrdev(major, "oled");
212:
213: kfree(ker_buf);
214:
215: return 0;
216: }
217:
218: static struct spi_driver spi_oled_drv = {
219: .driver = {
220: .name = "oled",
221: .owner = THIS_MODULE,
222: },
223: .probe = spi_oled_probe,
224: .remove = spi_oled_remove,
225: };
226:
227: static int spi_oled_init(void)
228: {
229: return spi_register_driver(&spi_oled_drv);
230: }
231:
232: static void spi_oled_exit(void)
233: {
234: spi_unregister_driver(&spi_oled_drv);
235: }
236:
237: module_init(spi_oled_init);
238: module_exit(spi_oled_exit);
239: MODULE_DESCRIPTION("OLED SPI Driver");
240: MODULE_AUTHOR("weidongshan@qq.com,www.100ask.net");
241: MODULE_LICENSE("GPL");
第187行,如果使用的是gpio模拟的spi的话,这个宏CONFIG_TQ2440_USE_SPI_GPIO会配置,这里我们使用的不是gpio模拟的,所以这个宏没有配置;
第182行,申请gpio,这里使用的函数是devm_gpio_request,它的好处是你不用再考虑gpio资源的释放了,系统会自动帮助你完成,类似的还有devm_kmalloc;
内核配置
System Type --->
SAMSUNG S3C24XX SoCs Support --->
[ ] TQ2440 use spi gpio to communicate with peripherals
Device Drivers --->
[*] SPI support --->
<*> Samsung S3C24XX series SPI
<*> Support TQ2440 OLED (from 100ask.com)
应用
1、oled_test.c
1: #include <stdlib.h>
2: #include <stdio.h>
3: #include <string.h>
4: #include <sys/types.h>
5: #include <sys/stat.h>
6: #include <fcntl.h>
7: #include <unistd.h>
8: #include <sys/ioctl.h>
9:
10: #include "oledfont.h"
11:
12: /* oled_test init
13: * oled_test clear
14: * oled_test clear <page>
15: * oled_test <page> <col> <string>
16: */
17:
18: #define OLED_CMD_INIT 0x100001
19: #define OLED_CMD_CLEAR_ALL 0x100002
20: #define OLED_CMD_CLEAR_PAGE 0x100003
21: #define OLED_CMD_SET_POS 0x100004
22:
23:
24:
25: /* page: 0-7
26: * col : 0-127
27: * 字符: 8x16象素
28: */
29: void OLEDPutChar(int fd, int page, int col, char c)
30: {
31: int i = 0;
32: /* 得到字模 */
33: const unsigned char *dots = oled_asc2_8x16[c - ' '];
34:
35: /* 发给OLED */
36: //OLEDSetPos(page, col);
37: //ioctl(fd, OLED_CMD_CLEAR_PAGE, page);
38: ioctl(fd, OLED_CMD_SET_POS, page | (col << 8));
39: /* 发出8字节数据 */
40: //for (i = 0; i < 8; i++)
41: // OLEDWriteDat(dots[i]);
42: write(fd, &dots[0], 8);
43:
44: //OLEDSetPos(page+1, col);
45: //ioctl(fd, OLED_CMD_CLEAR_PAGE, page+1);
46: ioctl(fd, OLED_CMD_SET_POS, (page+1) | (col << 8));
47: /* 发出8字节数据 */
48: //for (i = 0; i < 8; i++)
49: // OLEDWriteDat(dots[i+8]);
50: write(fd, &dots[8], 8);
51: }
52:
53:
54:
55: /* page: 0-7
56: * col : 0-127
57: * 字符: 8x16象素
58: */
59: void OLEDPrint(int fd, int page, int col, char *str)
60: {
61: int i = 0;
62:
63: ioctl(fd, OLED_CMD_CLEAR_PAGE, page);
64: ioctl(fd, OLED_CMD_CLEAR_PAGE, page+1);
65: while (str[i])
66: {
67: OLEDPutChar(fd, page, col, str[i]);
68: col += 8;
69: if (col > 127)
70: {
71: col = 0;
72: page += 2;
73: ioctl(fd, OLED_CMD_CLEAR_PAGE, page);
74: ioctl(fd, OLED_CMD_CLEAR_PAGE, page+1);
75: }
76: i++;
77: }
78: }
79:
80:
81: void print_usage(char *cmd)
82: {
83: printf("Usage:\n");
84: printf("%s init\n", cmd);
85: printf("%s clear\n", cmd);
86: printf("%s clear <page>\n", cmd);
87: printf("%s <page> <col> <string>\n", cmd);
88: printf("eg:\n");
89: printf("%s 2 0 100ask.taobao.com\n", cmd);
90: printf("page is 0,1,...,7\n");
91: printf("col is 0,1,...,127\n");
92: }
93:
94: int main(int argc, char **argv)
95: {
96: int do_init = 0;
97: int do_clear = 0;
98: int do_show = 0;
99: int page = -1;
100: int col;
101:
102: int fd;
103:
104: if (argc == 2 && !strcmp(argv[1], "init"))
105: do_init = 1;
106: if ((argc == 2) && !strcmp(argv[1], "clear"))
107: {
108: do_clear = 1;
109: }
110: if ((argc == 3) && !strcmp(argv[1], "clear"))
111: {
112: do_clear = 1;
113: page = strtoul(argv[2], NULL, 0);
114: }
115: if (argc == 4)
116: {
117: do_show = 1;
118: page = strtoul(argv[1], NULL, 0);
119: col = strtoul(argv[2], NULL, 0);
120: }
121:
122: if (!do_init && !do_clear && !do_show)
123: {
124: print_usage(argv[0]);
125: return -1;
126: }
127:
128: fd = open("/dev/oled", O_RDWR);
129: if (fd < 0)
130: {
131: printf("can't open /dev/oled\n");
132: return -1;
133: }
134:
135: if (do_init)
136: ioctl(fd, OLED_CMD_INIT);
137: else if (do_clear)
138: {
139: if (page == -1)
140: ioctl(fd, OLED_CMD_CLEAR_ALL);
141: else
142: {
143: if (page < 0 || page > 7)
144: {
145: printf("page is 0,1,...,7\n");
146: return -1;
147: }
148: ioctl(fd, OLED_CMD_CLEAR_PAGE, page);
149: }
150: }
151: else if (do_show)
152: {
153: if (page < 0 || page > 7)
154: {
155: printf("page is 0,1,...,7\n");
156: return -1;
157: }
158: if (col < 0 || col > 127)
159: {
160: printf("col is 0,1,...,127\n");
161: return -1;
162: }
163:
164: OLEDPrint(fd, page, col, argv[3]);
165: }
166: return 0;
167: }
168:
SPI驱动实现之软件控制器
一、驱动框架
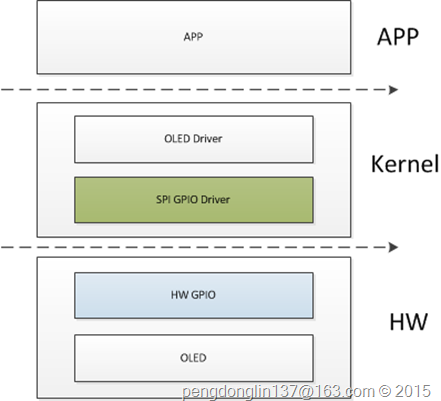
从图中可以看出,只替换了两个部分,在硬件上使用几个GPIO,不再使用SPI硬件控制器,所以在驱动上也需要做相应的变更,这部分在kernel中已经支持了。
二、代码
下面我们只列一下不同的部分。
SPI GPIO软件控制器
这里采用的也是platform架构。
1、platform_device
1: static struct spi_gpio_platform_data s3c_spi0_gpio_info = {
2: .num_chipselect = S3C_GPIO_END,
3: .miso = S3C2410_GPE(11),
4: .mosi = S3C2410_GPE(12),
5: .sck = S3C2410_GPE(13),
6: };
7:
8: static struct platform_device s3c_device_spi0_gpio = {
9: .name = "spi_gpio",
10: .id = 0,
11: .dev = {
12: .platform_data = (void *)&s3c_spi0_gpio_info,
13: }
14: };
15:
16: static struct platform_device *tq2440_devices[] __initdata = {
17: ......
18: &s3c_device_spi0_gpio
19: };
20:
21: static void __init tq2440_machine_init(void)
22: {
23: ......
24: platform_add_devices(tq2440_devices, ARRAY_SIZE(tq2440_devices));
25: ......
26: }
27:
28: MACHINE_START(TQ2440, "TQ2440")
29: ......
30: .init_machine = tq2440_machine_init,
31: ......
32: MACHINE_END
第3/4/5行,表示需要spi软件控制器需要使用的gpio引脚,至少需要MISO、SCK、MOSI;
第10行,表示模拟出的spi软件控制器的编号,也就是spi总线编号;
第9行,将来会跟驱动中的name进行匹配;
2、platform_driver
文件:drivers/spi/spi-gpio.c
1: #define DRIVER_NAME "spi_gpio"
2: ......
3:
4: static struct platform_driver spi_gpio_driver = {
5: .driver = {
6: .name = DRIVER_NAME,
7: .owner = THIS_MODULE,
8: .of_match_table = of_match_ptr(spi_gpio_dt_ids),
9: },
10: .probe = spi_gpio_probe,
11: .remove = spi_gpio_remove,
12: };
13: module_platform_driver(spi_gpio_driver);
OLED驱动
下面只列出需要注意的地方。
1、OLED板级信息
1: /* SPI OLED */
2: static struct spi_board_info tq2440_spi_board_info[] __initdata = {
3: {
4: .modalias = "oled",
5: .max_speed_hz = 10000000,
6: .bus_num = 0,
7: .mode = SPI_MODE_0,
8: .chip_select = S3C2410_GPG(1),
9: .platform_data = (const void *)S3C2410_GPF(3),
10: #ifdef CONFIG_TQ2440_USE_SPI_GPIO
11: .controller_data= (void *)S3C2410_GPG(1),
12: #endif
13: },
14: };
第11行,这个表示片选信号,具体参见drivers/spi/spi-gpio.c的实现;
内核配置
System Type --->
SAMSUNG S3C24XX SoCs Support --->
[*] TQ2440 use spi gpio to communicate with peripherals
Device Drivers --->
[*] SPI support --->
<*> GPIO-based bitbanging SPI Master
<*> Support TQ2440 OLED (from 100ask.com)
测试
编译app
arm-linux-gcc -Wall oled_test.c -o oled_test
操作
1: [root@TQ2440 sky]# ./oled_test init
2: [root@TQ2440 sky]# ./oled_test clear
3: [root@TQ2440 sky]# ./oled_test 0 0 "pengdonglin137"
4: [root@TQ2440 sky]#
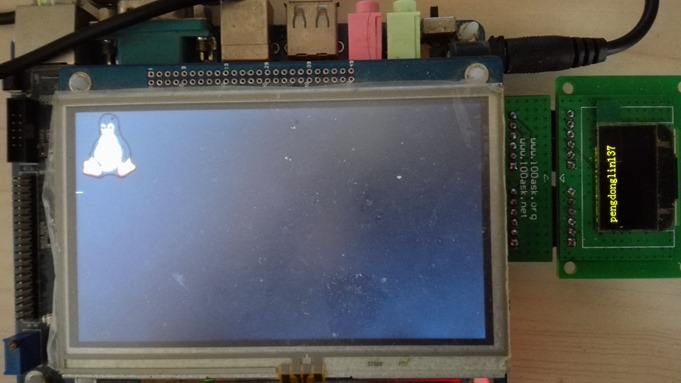
结果(使用SPI驱动的两种实现方式的实验现象是一样的,只是驱动的内部实现机理不同)
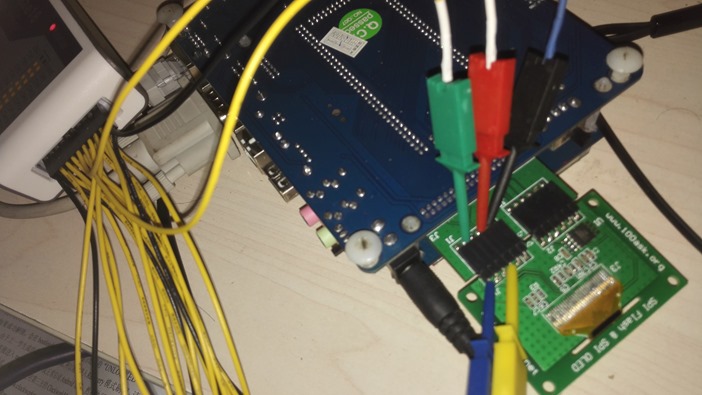
用Saleae16分析SPI时序
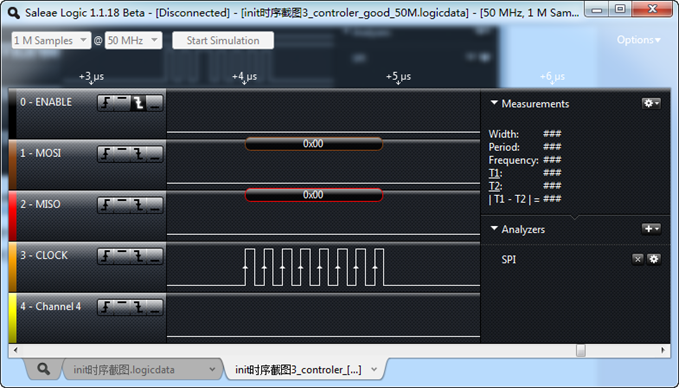
上面我们在设置oled板级信息的时候将spi通信的速率设置为了10MHz,我在抓取spi波形的时候,遇到了问题。
现象如下:
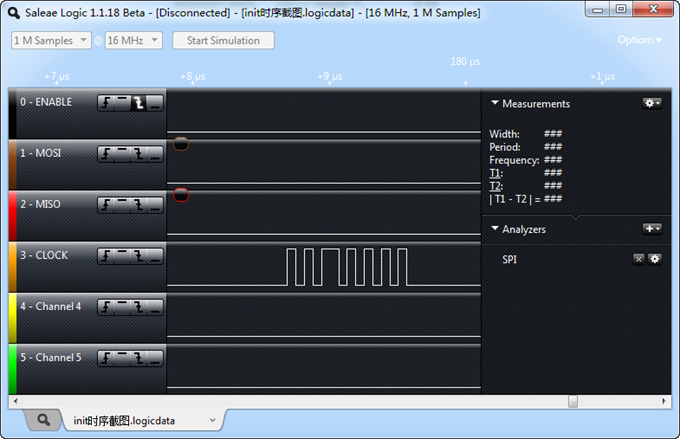
上面的图中,CLOCK时钟有些异常,可以看到只抓到7个波形,并且波形不是很均匀,出现很多类似的波形。刚开始我还以为spi控制器出问题了,后来发现,原来我把采样频率从16M提高到50M以后,全都正常了。
我想就是采用率太低的可能,记得有一个香农采样定理,采样信号的频率至少应该是被采信号的两倍。为了印证这个看法,我又做了下面几个测试。
1、将采样频率设置为25M,通信速率为10M
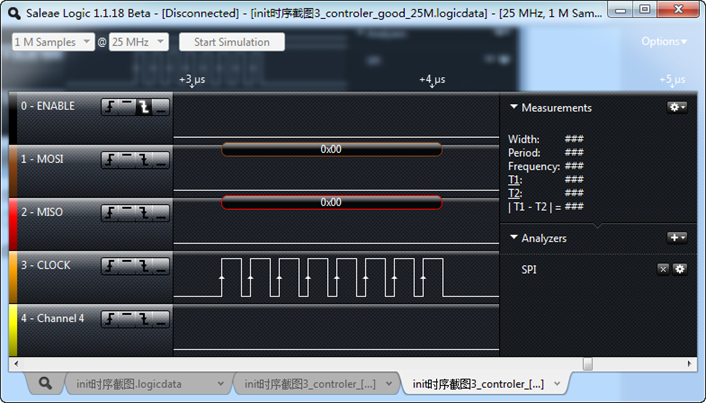
整个波形都没有问题。
2、将采样频率设置为16M,将通讯速率设置为7M
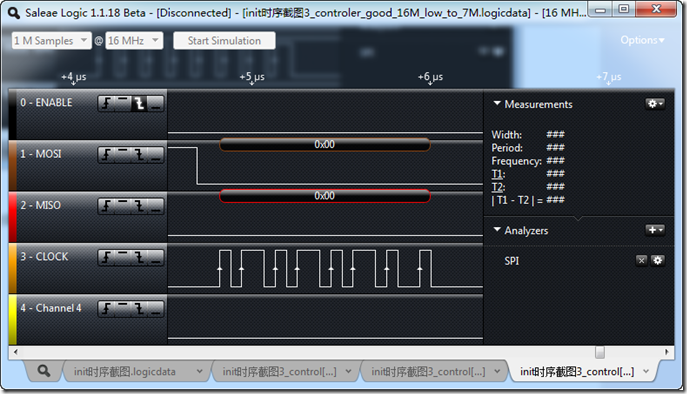
可以看到,至少抓到的还是8个波形,还算正常。
因此,基本验证了我的看法。
完。
基于TQ2440的SPI驱动学习(OLED)的更多相关文章
- STM32—4线SPI驱动SSD1306 OLED
文章目录 一.OLED简介 二.驱动SSD1306所需知识 1.引脚介绍 2.通信时序 3.显存GRAM 4.字库 5.SSD1306基本命令 三.代码讲解 1.相关引脚配置 2.模拟SPI通信 3. ...
- spi子系统之驱动SSD1306 OLED
spi子系统之驱动SSD1306 OLED 接触Linux之前,曾以为读源码可以更快的学习软件,于是前几个博客都是一边读源码一边添加注释,甚至精读到每一行代码,实际上效果并不理想,看过之后就忘记了.主 ...
- 联盛德 HLK-W806 (八): 4线SPI驱动SSD1306/SSD1315 128x64 OLED液晶屏
目录 联盛德 HLK-W806 (一): Ubuntu20.04下的开发环境配置, 编译和烧录说明 联盛德 HLK-W806 (二): Win10下的开发环境配置, 编译和烧录说明 联盛德 HLK-W ...
- spi驱动框架全面分析,从master驱动到设备驱动
内核版本:linux2.6.32.2 硬件资源:s3c2440 参考: 韦东山SPI视频教程 内容概括: 1.I2C 驱动框架回顾 2.SPI 框架简单介绍 3.maste ...
- 基于OMAPL138的字符驱动_GPIO驱动AD9833(三)之中断申请IRQ
基于OMAPL138的字符驱动_GPIO驱动AD9833(三)之中断申请IRQ 0. 导语 学习进入到了下一个阶段,还是以AD9833为例,这次学习是向设备申请中断,实现触发,在未来很多场景,比如做用 ...
- STC8H开发(十): SPI驱动Nokia5110 LCD(PCD8544)
目录 STC8H开发(一): 在Keil5中配置和使用FwLib_STC8封装库(图文详解) STC8H开发(二): 在Linux VSCode中配置和使用FwLib_STC8封装库(图文详解) ST ...
- linux 驱动学习笔记01--Linux 内核的编译
由于用的学习材料是<linux设备驱动开发详解(第二版)>,所以linux驱动学习笔记大部分文字描述来自于这本书,学习笔记系列用于自己学习理解的一种查阅和复习方式. #make confi ...
- 基于Mvc3,Ef,领域驱动电子商务系统的EShop开发
分享自己从代码小工一步步走向搭架子,ING... 简单了解UnitOfWork 摘要: UnitOfWorkUnit Of Work模式,即工作单元,它是一种数据访问模式.它是用来维护一个由已经被业务 ...
- 详解Linux2.6内核中基于platform机制的驱动模型 (经典)
[摘要]本文以Linux 2.6.25 内核为例,分析了基于platform总线的驱动模型.首先介绍了Platform总线的基本概念,接着介绍了platform device和platform dri ...
随机推荐
- php下载文件
$size=filesize($file);$file=fopen($file, "r");ob_start();header("Content-type: applic ...
- tornado上手
http://www.tornadoweb.org/en/stable/ http://www.cnblogs.com/fanweibin/p/5418697.html import tornado. ...
- 设计C/S架构应用程序的并发功能
C/S架构的ERP.CRM程序有的是以并发点(Concurrency)来销售,并发点是指同时在线人数.并发数量大时,理论上程序的运行速度会慢,软件供应商(vendor)也以控制并发的上限以解决客户对系 ...
- The .NET of Tomorrow
Ed Charbeneau(http://developer.telerik.com/featured/the-net-of-tomorrow/) Exciting times lie ahead f ...
- 创建SSH Key连接github或gitlab
mac下用SoureceTree下载github或gitlab上的项目时,需要进行ssh key验证.每次重装系统啥的都要重新弄,我在csdn上看到一篇不错的文章.转载一下,以后自己找起来也方便. 地 ...
- 设计模式(十):从电影院中认识"迭代器模式"(Iterator Pattern)
上篇博客我们从醋溜土豆丝与清炒苦瓜中认识了“模板方法模式”,那么在今天这篇博客中我们要从电影院中来认识"迭代器模式"(Iterator Pattern).“迭代器模式”顾名思义就是 ...
- 安卓Design包之超强控件CoordinatorLayout与SnackBar的简单使用
在前面的Design中,学习使用了TabLayout,NavigationView与DrawerLayout实现的神奇效果,今天就带来本次Design包中我认为最有意义的控件CoordinatorLa ...
- docker对数据卷容器进行备份
转载请注明出处 官网的数据以及各大博客都没有对这个的具体说明,本人也是理解了好久. 我们使用docker的过程中,使用共享的数据卷是经常的,那么.我们要怎么进行备份呢? 首先,我们得了解下面4个命 ...
- iOS: 为画板App增加 Undo/Redo(撤销/重做)操作
这个随笔的内容以上一个随笔为基础,(在iOS中实现一个简单的画板),上一个随笔实现了一个简单的画板: 今天我们要为这个画板增加Undo/Redo操作,当画错了一笔,可以撤销它,或者撤销之后后悔了, ...
- 调用webservice进行身份验证
因为同事说在调用webservice的时候会弹出身份验证的窗口,直接调用会返回401,原因是站点部署的时候设置了身份验证(账号名称自己配置).因而在调用的时候需要加入身份验证的凭证. 至于如何获取身份 ...