回炉Spring--Bean生命周期及AOP
Spring容器:
在基于Spring的应用中,你的应用对象生存于Spring容器(container)中,Spring容器负责创建对象,装配它们,配置它们并管理它们的整个生命周期,从生存到死亡。(在这里,可能就是从new()到finalize())。
容器是Spring框架的核心。Spring容器使用DI(依赖注入)管理构成应用的组件,它会创建相互协作的组件之间的关联。毫无疑问,这些对象更简单干净,更易于理解,更易于重用并且更易于进行单元测试。
1、使用应用上下文
Spring自带了多种类型的应用上下文:
AnnotationConfigApplicationContext: 从一个或多个基于Java的配置类中加载Spring应用上下文。
AnnotationConfigWebApplicationContext: 从一个或多个基于Java的配置类中加载Spring Web应用上下文。
ClassPathXmlApplicationContext: 从类路径下的一个或多个XML配置文件中加载上下文定义, 把应用上下文的定义文件作为类资源。
FileSystemXmlapplicationcontext: 从文件系统下的一个或多个XML配置文件中加载上下文定义。
XmlWebApplicationContext: 从Web应用下的一个或多个XML配置文件中加载上下文定义。
无论是从哪里装载应用上下文,将bean加载到bean工厂的过程都是类似的。
如果你想从Java配置中加载应用上下文, 那么可以使用AnnotationConfig-ApplicationContext:
AnnotationConfigApplicationContext context = new AnnotationConfigApplicationContext(ApplicationContextConfig.class);
在这里没有指定加载Spring应用上下文所需的XML文件, AnnotationConfig-ApplicationContext通过一个配置类加载bean。
应用上下文准备就绪之后, 我们就可以调用上下文的getBean()方法从Spring容器中获取bean。
Spring注解驱动开发
使用Java配置类代替XML配置文件来装配bean:
package com.yang.config;

import com.yang.domain.Person;

import com.yang.factory.StudentFactoryBean;

import com.yang.service.TestService;

import org.springframework.beans.factory.config.ConfigurableBeanFactory;

import org.springframework.context.annotation.Bean;

import org.springframework.context.annotation.ComponentScan;

import org.springframework.context.annotation.Configuration;

import org.springframework.context.annotation.Import;

import org.springframework.context.annotation.Lazy;

import org.springframework.context.annotation.Scope;

/**

 * Spring 基于Java类注解形式的配置

 *

 * @Configuration 使Spring容器知道这是一个配置类

 * @ComponentScan 启用组件扫描,默认扫描本文件所在的包及其子包下声明了@Component注解的类,并在Spring容器中为其创建一个bean

 * value属性指定要扫描的包

 * includeFilters 指定扫描的时候只需要包含哪些组件

 * excludeFilters 指定扫描的时候按照什么规则排除那些组件

 * 如:excludeFilters = @ComponentScan.Filter(type = FilterType.ANNOTATION, classes = Controller.class)排除Controller注解的类
 * @PropertySource 使用@PropertySource读取外部配置文件中的k/v保存到运行的环境变量Environment中;加载完外部的配置文件以后使用${key}取出配
 *  置文件的值。也可以用Spring容器获取Environment变量,然后getProperty获取到配置的value
 *  ConfigurableEnvironment environment = context.getEnvironment();
 *  String name = environment.getProperty("name");

 *

 */

@Import(TestService.class)

@Configuration

@ComponentScan(value = "com.yang")
@PropertySource(value = {"classpath:/applicationContext.properties"})

public class ApplicationContextConfig {

    /**

     * 向Spring容器中注册一个bean,默认作用域是单例的

     * 类型为方法的返回值

     * bean的id为方法名,也可以使用@Bean的name属性指定bean的名称。
   * JavaConfig如何实现注入依赖?
   *   1、直接引用创建依赖bean的方法,使用的是带参构造器。但是这种引用并不会创建多个依赖bean的对象,因为Spring将会拦截对它的调用,并确保直接返回
   *    该方法所创建的bean,而不是每次都对其进行实际的调用。

     *   2、将依赖的bean类型当成@Bean所在方法的一个参数。当Spring调用@Bean注解所在方法创建bean的时候,会自动装配一个参数类型bean到方法之中,然后
   *    方法体就可以按照合适的方式来使用它。这种方式不会像方式1那样要求将依赖bean的声明和当前bean在同一个配置类之中,甚至不要求依赖bean必须在JavaConfig
   *     类中声明。
   *      疑问,若有多个同一类型的依赖bean,Spring怎么选择装配?
   *      答案:先参数类型,后参数名称。源码在DefaultListableBeanFactory#doResolveDependency:1213
   *

     * @Scope bean的作用域,取值范围:

     * ConfigurableBeanFactory#SCOPE_PROTOTYPE singleton   单例,默认,Spring容器启动就会创建对象并放在容器中,以后每次获取都去map中取

     * ConfigurableBeanFactory#SCOPE_SINGLETON prototype   原型/多例,Spring容器启动时并不会去创建对象,每次获取的时候都回去创建一个新的对象

     * org.springframework.web.context.WebApplicationContext#SCOPE_REQUEST request 同一个请求创建一个对象

     * org.springframework.web.context.WebApplicationContext#SCOPE_SESSION session 同一个session创建一个对象

      问题?Spring为啥把bean默认设计成单例?
        优势:为了提高性能
          1、减少创建新实例的消耗
          2、减少JVM垃圾回收
          3、可以快速获取到bean
        劣势:不能做到线程安全,bean如果是有状态的话在并发环境下线程不安全

     *

     * @Lazy 即懒加载,针对单实例作用域的bean,默认值为true,即Spring容器启动的时候不创建,调用的时候才去创建

     *

     * @Conditional 按照一定的条件进行判断,满足条件给容器中注册bean,若用在配置类上,则此配置类上的所有的bean都满足条件在会去Spring容器中

     *  去注册。使用场景如只在linux系统中才创建bean

     *  Class<? extends Condition>[] value(); 接收一个实现Condition接口的类的class对象,需要自定义类实现Condition接口在matches方法中实

     *  现具体判断逻辑,返回true代表符合条件

     *

     */

    @Lazy(value = false)

    @Scope(value = ConfigurableBeanFactory.SCOPE_SINGLETON)

    @Bean

    public Person person() {

        return new Person("yangyongjie");

    }

/**   public class StudentFactoryBean implements FactoryBean<Student> {

        public Student getObject() throws Exception {

            return new Student();

        }

        public Class<?> getObjectType() {

            return Student.class;

        }

        public boolean isSingleton() {

            return false;//false 多例 true 单例

        }

    }

     实际是将Student对象注册到Spring容器中

 */

    @Bean

    public StudentFactoryBean studentFactoryBean(){

        return new StudentFactoryBean();

    }
}
 向Spring容器中注册组件的四种方式:

   1、包扫描+组件标注注解(@Component、@Controller、@Service、@Repository)

    2、@Bean,适合导入第三方包里面的组件

      3、@Import,快速给容器中导入一个组件

         1、@Import(要导入的组件的class对象),容器中就会自动注册这个bean,名称是全类名(com.yang.service.TestService)

         2、@Import(ImportSelector.class),在ImportSelector中返回需要导入的组件的全类名数组

         3、@Import(ImportBeanDefinitionRegistrar.class)手动注册bean到容器中(在ImportBeanDefinitionRegistrar中使用BeanDefinitionRegistry的registerBeanDefinition方法手动注册)

技巧:BeanDefinitionRegistry:接口,提供往Spring容器中注册bean,移除bean,获取容器中所有注册了的bean和判断Spring容器中是否注册了某个bean

   4、使用Spring提供的 FactoryBean(工厂Bean),与普通bean不同的是,普通bean是调用其无参构造器去创建对象然后注册到容器中,FactoryBean是调用其

     T getObject()方法,将返回的对象注册到Spring容器中

       1、默认获取的工厂bean调用getObject创建的对象

       2、注册到容器中工厂bean的id为 “&+bean名称”,如&studentFactoryBean

问题:BeanFactory和FactoryBean的区别
BeanFactory是IOC容器的核心接口,Spring使用BeanFactory来实例化、配置和管理bean,采用延迟加载的方式来注入bean,只有在getBean的时候才去加载创建bean
FactoryBean是创建bean的工厂,通过自定义类实现FactoryBean<T>接口,实现其getObject()方法创建bean对象,在配置文件中使用FactoryBean创建bean对象

BeanFactory和ApplicationContext的区别
ApplicationContext是完整的IOC容器,其由BeanFactory派生而来,具有BeanFactory的所有功能,可以通过配置实现,且额外提供了messageSource,资源访问,aop和web应用
,加载多种应用上下文。并可在启动的时候一次性创建所有需要的单实例bean

Spring容器中Bean的生命周期
  bean创建--初始化--销毁
   容器管理bean的生命周期,
    若是单例的bean,在Spring容器的启动后先创建对象,再初始化,容器关闭的时候销毁bean。
    若是多实例的bean,Spring容器在每次获取的时候才去创建对象,然后初始化,但是Spring容器关闭时并不会去销毁bean,需要手动去销毁。
bean初始化和销毁四种方式:
  1、指定在bean中自定义初始化和销毁方法,通过@Bean注解指定initMethod和destroyMethod
     @Bean(initMethod = "customInit",destroyMethod = "customDestory")
2、指定在bean中自定义初始化和销毁方法,然后使用javax提供的注解
            @PostConstruct标注在bean的初始化方法上,将在bean创建并属性赋值完成,调用此方法
               @PreDestroy标注在bean的销毁方法上,将在容器销毁对象之前调用

  3、通过使Bean实现InitializingBean和DisposableBean接口,在重写的afterPropertiesSet和destroy方法实现初始化和销毁逻辑

  4、bean的后置处理器,BeanPostProcessor接口,针对全局的bean,自定义bean实现了BeanPostProcessor接口,那么容器中其他所有bean(只针对单例的bean)在初始化方法之前之前
都会调用postProcessBeforeInitialization,在初始化方法执行之后都会调用postProcessAfterInitialization
      postProcessBeforeInitialization 在初始化之前调用
      postProcessAfterInitialization 在初始化之后调用

如果四种都写了,那么执行顺序为:
constructor 创建bean实例
postProcessBeforeInitialization BeanPostProcessor的初始化前置方法
PostConstruct javax注解定义的初始化方法
afterPropertiesSet 实现InitializingBean接口的初始化方法
customInit @Bean注解上自定义的初始化方法
postProcessAfterInitialization BeanPostProcessor的初始化后方法
PreDestroy javax注解定义的销毁方法
destroy 实现DisposableBean接口的销毁方法
customDestory @Bean注解上自定义的销毁方法
初始化和销毁的执行顺序都是 BeanPostProcessor-->javax提供的注解-->InitializingBean/DisposableBean-->@Bean custom

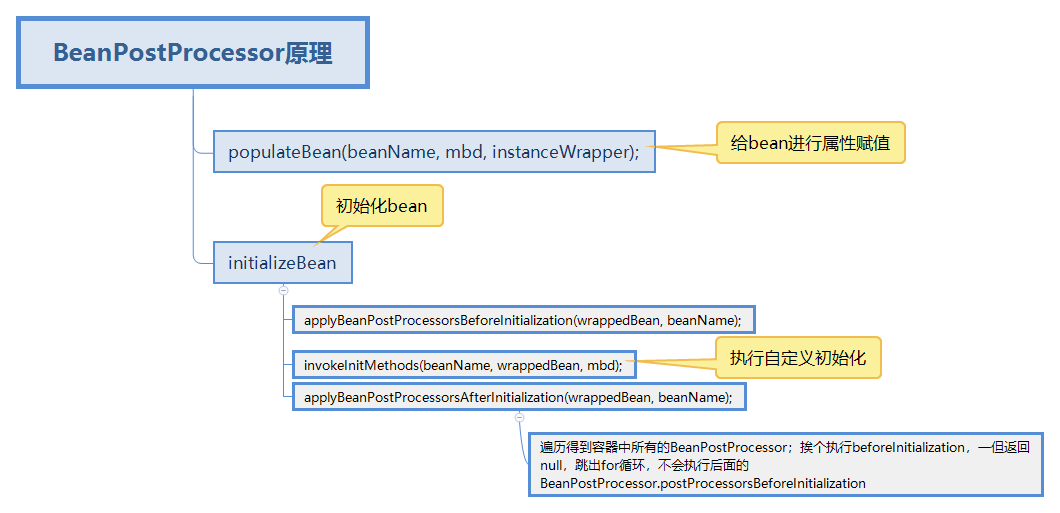
BeanPostProcessor原理
populateBean(beanName, mbd, instanceWrapper);给bean进行属性赋值
initializeBean
{
applyBeanPostProcessorsBeforeInitialization(wrappedBean, beanName);
invokeInitMethods(beanName, wrappedBean, mbd);执行自定义初始化
applyBeanPostProcessorsAfterInitialization(wrappedBean, beanName);
遍历得到容器中所有的BeanPostProcessor;挨个执行beforeInitialization,一但返回null,跳出for循环,不会执行后面的BeanPostProcessor.postProcessorsBeforeInitialization
}
Spring底层对BeanPostProcessor的使用:
1、其实现类ApplicationContextAwareProcessor可对实现了ApplicationContextAware接口的bean(对bean类型作了判断,只针对部分bean)注入容器ApplicationContext依赖对象,代码如下:
        if (System.getSecurityManager() != null &&

                (bean instanceof EnvironmentAware || bean instanceof EmbeddedValueResolverAware ||

                        bean instanceof ResourceLoaderAware || bean instanceof ApplicationEventPublisherAware ||

                        bean instanceof MessageSourceAware || bean instanceof ApplicationContextAware)) {

            acc = this.applicationContext.getBeanFactory().getAccessControlContext();

        }
2、其实现类InitDestroyAnnotationBeanPostProcessor,对bean中标注了@PostContruct和@PreDestory注解的方法进行调用执行
3、其实现类AutowiredAnnotationBeanPostProcessor,在对象创建完成以后,对所有标注了@Autowired注解的属性进行注入值
@Value
  使用@Value注解为属性赋值
  1、可以直接写基本数值
  2、可以写SPEL表达式#{}
  3、可以写${},取出在配置文件中配置的,容器启动放到环境变量Environment中的值
自动装配
  创建容器中对象协作关系的行为叫做装配,是DI的核心,即为容器中各个组件的依赖关系赋值
  1、@AutoWired,自动注入
    1)默认按照类型byType去容器中找对应的组件,然后注入;applicationContext.getBean(xxx.class)
    2)如果找到多个相同类型的组件,再将属性的名称作为组件的id去容器中查找
    3)@Qualifier("xxx"):执行需要装配的组件的id,而不是使用属性名
    4)自动装配默认一定要将属性赋值好,没有就会报错,可以使用@AutoWired(required=false),允许不注入
    5)@Primary:用在依赖的类上,让Spring进行自动装配的时候,默认首选装配它  2、@Resource
    和@AutoWired一样实现自动装配功能,默认是按照属性名称ByName进行装配的,按名称没有找到则再按类型进行装配,如果指定了name或者type则按照名称和类型进行装配,没有找到则报错
  3、Inject
    需要导入javax.inject的包,和Autowired的功能一样。没有required=false的功能
  4、自定义组件想要使用Spring容器底层的一些组件(ApplicationContext,BeanFactory,xxx);
    自定义组件实现xxxAware;在创建对象的时候,会调用接口规定的方法注入相关组件;Aware;
    把Spring底层一些组件注入到自定义的Bean中;
    xxxAware:功能使用xxxProcessor,是通过后置处理器来实现的。
    ApplicationContextAware==》ApplicationContextAwareProcessor;
技巧:自定义Bean实现xxxAware接口,重写其中的方法可为我们的自定义Bean注入Spring底层的组件xxx,原理是通过xxxProcessor,一个实现了后置处理器
BeanPostProcessor的类通过在Bean初始化前后做的事情来实现的。如下面所示的实现ApplicationContextAware 接口,为我们的Bean注入了ApplicationContext 对象
@Component

public class Child implements ApplicationContextAware {

    private ApplicationContext applicationContext;

    public void setApplicationContext(ApplicationContext applicationContext) throws BeansException {

        this.applicationContext = applicationContext;

    }

}
@Autowired:Spring定义的; @Resource、@Inject都是java规范
AutowiredAnnotationBeanPostProcessor:解析完成自动装配功能;
@Autowired:构造器,参数,方法,属性;都是从容器中获取参数组件的值
1)、[标注在方法位置]:@Bean+方法参数;参数从容器中获取;默认不写@Autowired效果是一样的;都能自动装配
2)、[标在构造器上]:如果组件只有一个有参构造器,这个有参构造器的@Autowired可以省略,参数位置的组件还是可以自动从容器中获取
3)、放在参数位置:
高级装配
@Profile(value = "env"):指定组件在哪个环境的情况下才能被注册到容器中。
1、加了环境标识的bean,只有在这个环境被激活的时候才能注册到容器中,默认激活环境是default
2、若标注在配置类上,则只有在执行的环境激活的时候,整个配置类里面的所有配置才生效
3、没有标注环境标识@Profile注解的bean在任何环境下都会注册的
如何激活Profile环境:
1、使用命令行动态参数:在虚拟机参数位置加载-Dspring.profiles.active=test
2、代码的方式激活某个环境变量,需要在启动Spring容器的时候使用无参构造不传配置文件的参数
        AnnotationConfigApplicationContext context = new AnnotationConfigApplicationContext();

        // 设置需要激活的环境

        context.getEnvironment().setActiveProfiles("pre");

        // 注册主配置类

        context.register(ApplicationContextConfig.class);

        // 启动刷新容器

        context.refresh();
AOP
实现一个AOP的步骤:
1、将业务逻辑组件和切面类都注入到Spring容器中,标注使Spring知道哪个是界面类,@Aspect(曾犯错,在切面类上没有标注@Component注解)
2、在切面类上的每一个通知方法上都标注通知注解(如@Around),并在注解中指明切入点表达式
3、开启基于注解的aop模式,在配置类上加上注解@EnableAspectJAutoProxy
@AfterReturning注解的returning可将方法的返回值映射到参数上
@AfterReturning(value = "pointCut()", returning = "result")

    public void afterReturning(Object result) throws Throwable {}
@AfterThrowing(value="pointCut()",throwing="exception")的throwing将异常信息映射到参数上
获取切入点方法名:joinPoint.getSignature().getName()
获取方法入参:joinPoint.getArgs()
    @Before("pointCut()")

    // 方法若有多个参数,JoinPoint一定要放在第一位

    public void before(JoinPoint joinPoint) {

        String name = joinPoint.getSignature().getName();

        Object[] args = joinPoint.getArgs();

    }
@EnableAspectJAutoProxy注解做了什么?
@Target(ElementType.TYPE)

@Retention(RetentionPolicy.RUNTIME)

@Documented

@Import(AspectJAutoProxyRegistrar.class)

public @interface EnableAspectJAutoProxy
往容器中导入了AspectJAutoProxyRegistrar,利用AspectJAutoProxyRegistrar自定义的往容器中注册了name为internalAutoProxyCreator,class
为AnnotationAwareAspectJAutoProxyCreator的bean。
技巧:如果看到了Enable开头的注解,就看这个注解有没有往容器中注册一些组件,如果注册组件了,这些组件的功能是什么,如果具体功能搞明白了,那么这个注解的原理就清楚了。
那么既然@EnableAspectJAutoProxy往Spring容器中注入了AnnotationAwareAspectJAutoProxyCreator这个bean(从名字看是:注解装配切面代理创造器),
那就看一下这个bean的功能是什么,源码走起:
class AnnotationAwareAspectJAutoProxyCreator extends AspectJAwareAdvisorAutoProxyCreator

  class AspectJAwareAdvisorAutoProxyCreator extends AbstractAdvisorAutoProxyCreator

    abstract class AbstractAdvisorAutoProxyCreator extends AbstractAutoProxyCreator

      abstract class AbstractAutoProxyCreator extends ProxyProcessorSupport implements SmartInstantiationAwareBeanPostProcessor, BeanFactoryAware

        interface SmartInstantiationAwareBeanPostProcessor extends InstantiationAwareBeanPostProcessor

          interface InstantiationAwareBeanPostProcessor extends BeanPostProcessor

其中:class ProxyProcessorSupport extends ProxyConfig implements Ordered, BeanClassLoaderAware, AopInfrastructureBean
看到其祖先类实现了InstantiationAwareBeanPostProcessor 接口,而此接口又实现了BeanPostProcessor接口,而这个接口我们知道叫做后置处理器,后置处理器
的功能就是在bean初始化的前后做一些工作。
抽象父类AbstractAutoProxyCreator 又实现了BeanFactoryAware,可以往代码中注入BeanFactory。
那么先重点看与setBeanFactory以及与后置处理器相关的逻辑,通过源码发现AbstractAutoProxyCreator有setBeanFactory()以及后置处理器相关的逻辑。而在
AbstractAutoProxyCreator的子抽象类AbstractAdvisorAutoProxyCreator又重写了setBeanFactory()方法
    public void setBeanFactory(BeanFactory beanFactory) {

        super.setBeanFactory(beanFactory);

        if (!(beanFactory instanceof ConfigurableListableBeanFactory)) {

            throw new IllegalArgumentException("AdvisorAutoProxyCreator requires a ConfigurableListableBeanFactory: " + beanFactory);

        } else {

            this.initBeanFactory((ConfigurableListableBeanFactory)beanFactory);

        }

    }
由于其子类AnnotationAwareAspectJAutoProxyCreator 重写了initBeanFactory方法,所以最终调用的是AnnotationAwareAspectJAutoProxyCreator 中的initBeanFactory方法中的逻辑:
  protected void initBeanFactory(ConfigurableListableBeanFactory beanFactory) {

        super.initBeanFactory(beanFactory);

        if (this.aspectJAdvisorFactory == null) {

            this.aspectJAdvisorFactory = new ReflectiveAspectJAdvisorFactory(beanFactory);

        }

        this.aspectJAdvisorsBuilder = new AnnotationAwareAspectJAutoProxyCreator.BeanFactoryAspectJAdvisorsBuilderAdapter(beanFactory, this.aspectJAdvisorFactory);

    }

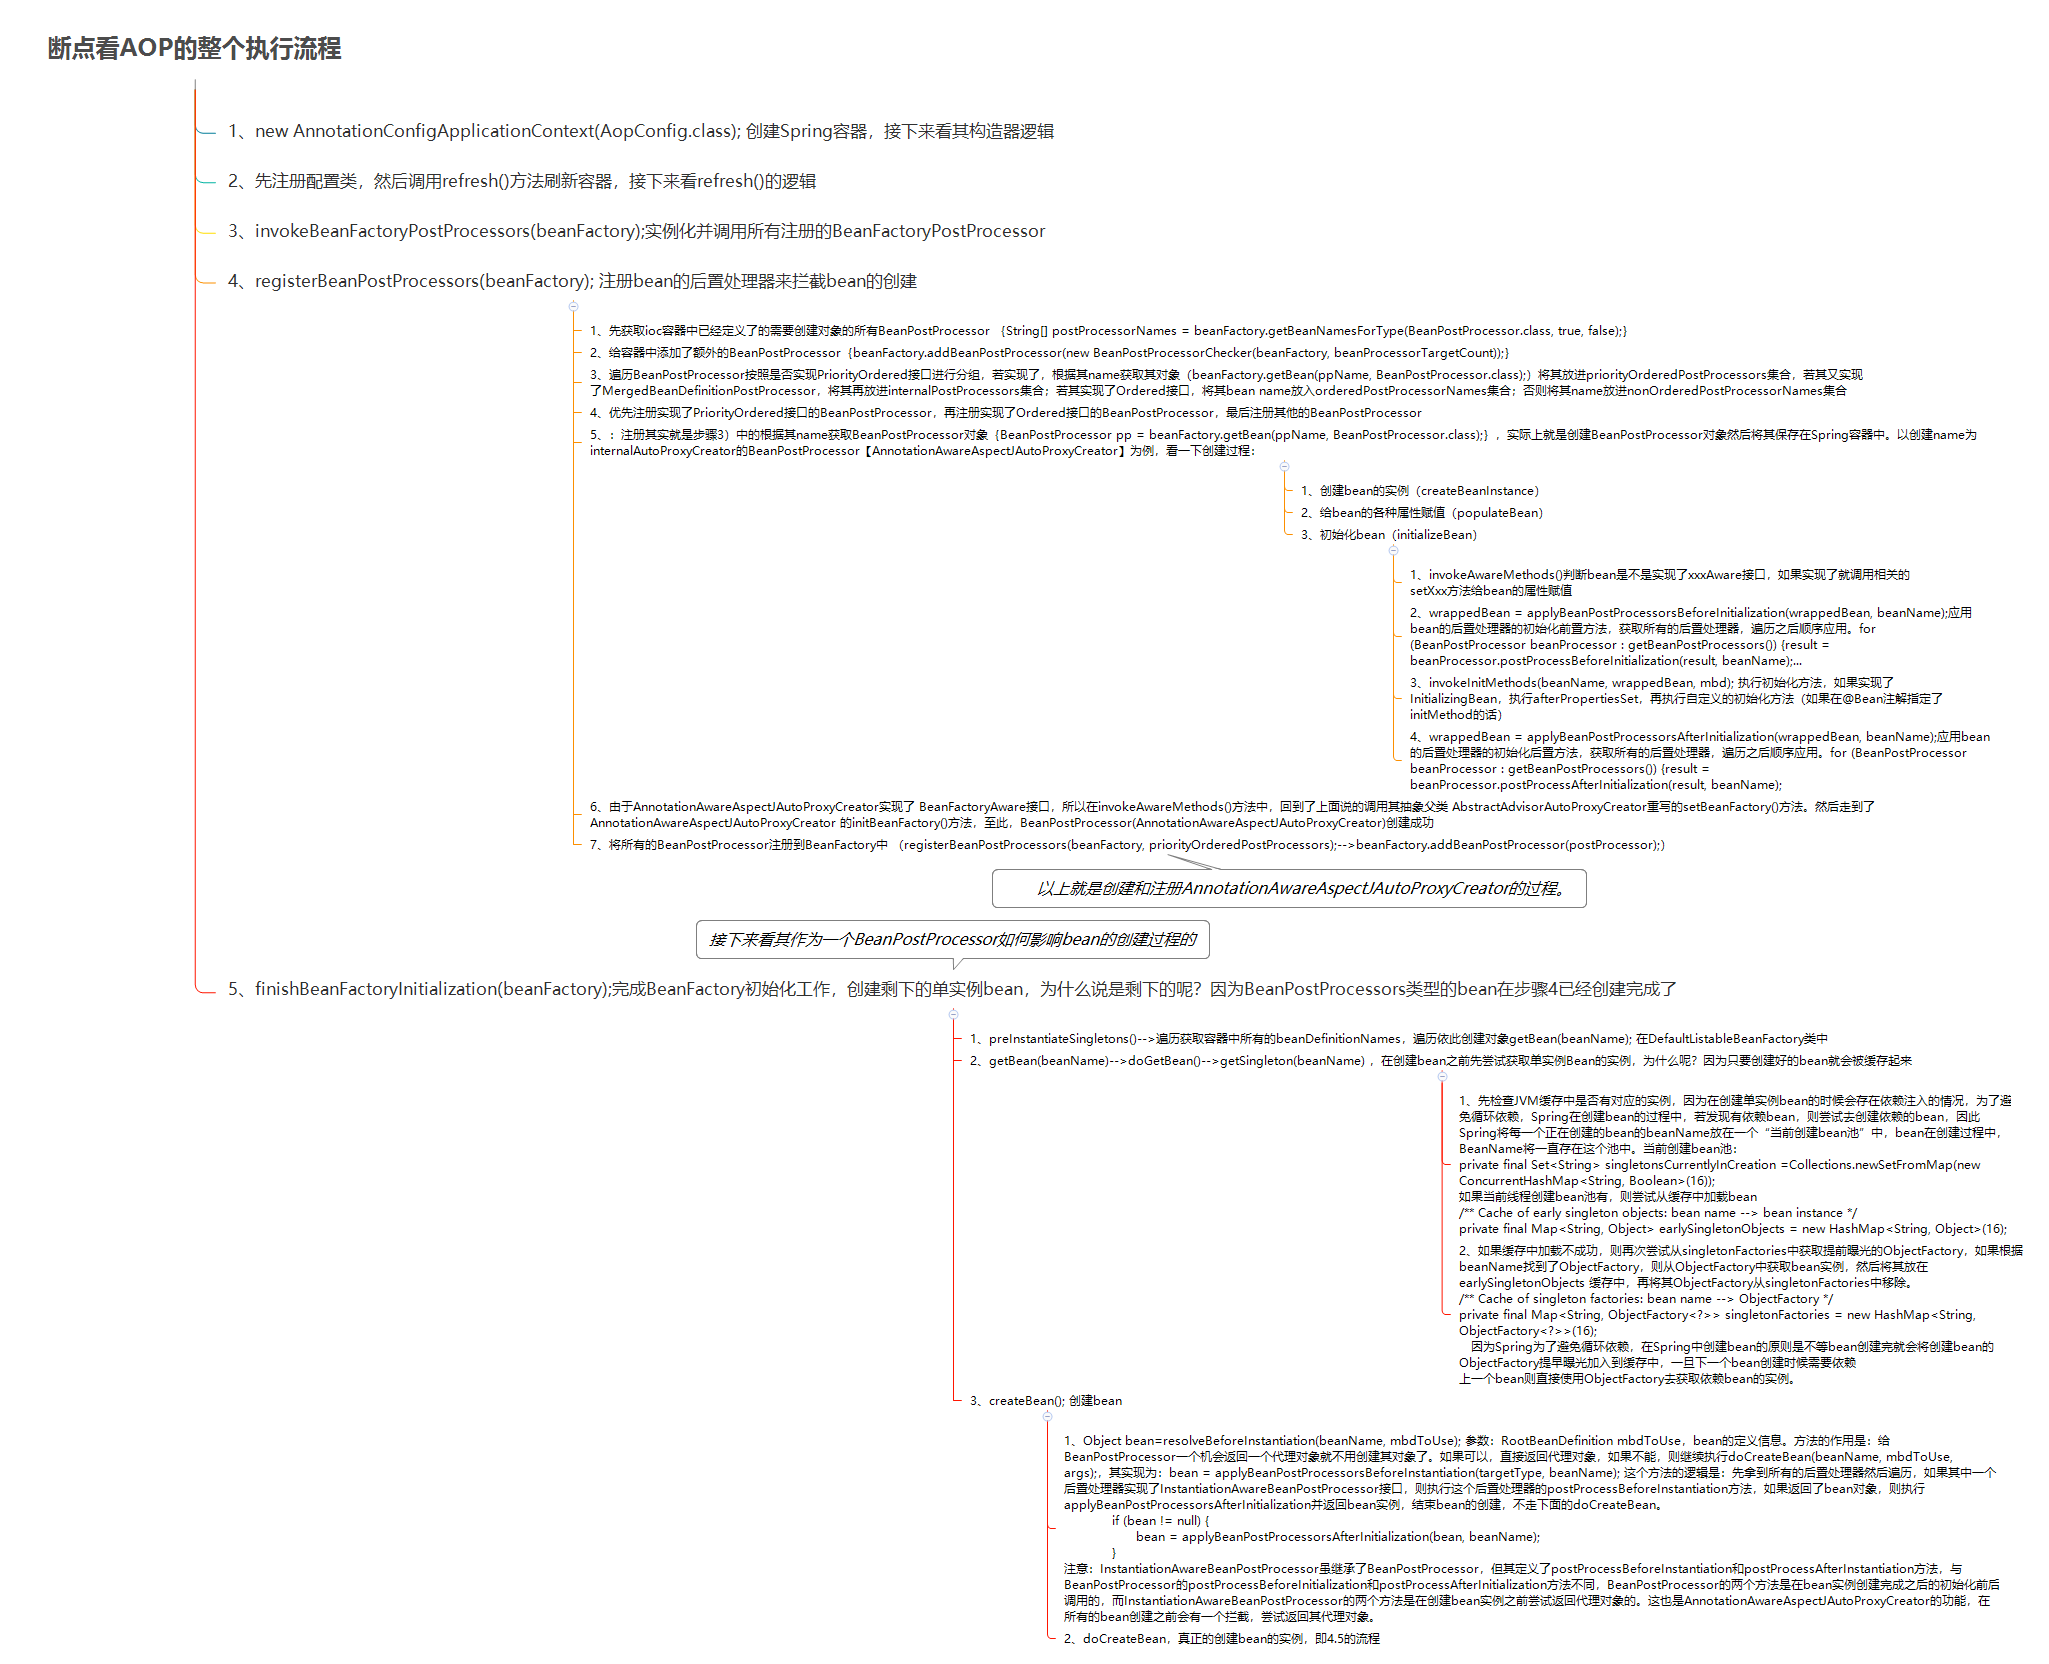
断点看AOP的整个执行流程:
1、new AnnotationConfigApplicationContext(AopConfig.class); 创建Spring容器,接下来看其构造器逻辑
2、先注册配置类,然后调用refresh()方法刷新容器,接下来看refresh()的逻辑
3、invokeBeanFactoryPostProcessors(beanFactory);实例化并调用所有注册的BeanFactoryPostProcessor
4、registerBeanPostProcessors(beanFactory); 注册bean的后置处理器来拦截bean的创建
1):先获取ioc容器中已经定义了的需要创建对象的所有BeanPostProcessor {String[] postProcessorNames = beanFactory.getBeanNamesForType(BeanPostProcessor.class, true, false);}
2):给容器中添加了额外的BeanPostProcessor{beanFactory.addBeanPostProcessor(new BeanPostProcessorChecker(beanFactory, beanProcessorTargetCount));}
3):遍历BeanPostProcessor按照是否实现PriorityOrdered接口进行分组,若实现了,根据其name获取其对象(beanFactory.getBean(ppName, BeanPostProcessor.class);)
将其放进priorityOrderedPostProcessors集合,若其又实现了MergedBeanDefinitionPostProcessor,将其再放进internalPostProcessors集合;若其实现了Ordered接口,
将其bean name放入orderedPostProcessorNames集合;否则将其name放进nonOrderedPostProcessorNames集合
4):优先注册实现了PriorityOrdered接口的BeanPostProcessor,再注册实现了Ordered接口的BeanPostProcessor,最后注册其他的BeanPostProcessor
5):注册其实就是步骤3)中的根据其name获取BeanPostProcessor对象{BeanPostProcessor pp = beanFactory.getBean(ppName, BeanPostProcessor.class);},实际上就是
创建BeanPostProcessor对象然后将其保存在Spring容器中。以创建name为internalAutoProxyCreator的BeanPostProcessor【AnnotationAwareAspectJAutoProxyCreator】为例,看
一下创建过程:
(1):创建bean的实例(createBeanInstance)
(2):给bean的各种属性赋值(populateBean)
(3):初始化bean(initializeBean)
(1):invokeAwareMethods()判断bean是不是实现了xxxAware接口,如果实现了就调用相关的setXxx方法给bean的属性赋值
(2):wrappedBean = applyBeanPostProcessorsBeforeInitialization(wrappedBean, beanName);应用bean的后置处理器的初始化前置方法,获取所有的后置处理器,
遍历之后顺序应用。for (BeanPostProcessor beanProcessor : getBeanPostProcessors()) {result = beanProcessor.postProcessBeforeInitialization(result, beanName);...
(3):invokeInitMethods(beanName, wrappedBean, mbd); 执行初始化方法,如果实现了InitializingBean,执行afterPropertiesSet,再执行自定义的初始化方法(如
果在@Bean注解指定了initMethod的话)
(4):wrappedBean = applyBeanPostProcessorsAfterInitialization(wrappedBean, beanName);应用bean的后置处理器的初始化后置方法,获取所有的后置处理器,
遍历之后顺序应用。for (BeanPostProcessor beanProcessor : getBeanPostProcessors()) {result = beanProcessor.postProcessAfterInitialization(result, beanName);
6):由于AnnotationAwareAspectJAutoProxyCreator实现了 BeanFactoryAware接口,所以在invokeAwareMethods()方法中,回到了上面说的调用其抽象父类
AbstractAdvisorAutoProxyCreator重写的setBeanFactory()方法。然后走到了AnnotationAwareAspectJAutoProxyCreator 的initBeanFactory()方法,至此,
BeanPostProcessor(AnnotationAwareAspectJAutoProxyCreator)创建成功
7):将所有的BeanPostProcessor注册到BeanFactory中 (registerBeanPostProcessors(beanFactory, priorityOrderedPostProcessors);-->beanFactory.addBeanPostProcessor(postProcessor);)
以上就是创建和注册AnnotationAwareAspectJAutoProxyCreator的过程。
接下来看其作为一个BeanPostProcessor如何影响bean的创建过程的:
5、finishBeanFactoryInitialization(beanFactory);完成BeanFactory初始化工作,创建剩下的单实例bean,为什么说是剩下的呢?因为BeanPostProcessors类型的bean在步骤4已经创建
完成了
1):preInstantiateSingletons()-->遍历获取容器中所有的beanDefinitionNames,遍历依此创建对象getBean(beanName); 在DefaultListableBeanFactory类中
2):getBean(beanName)-->doGetBean()-->getSingleton(beanName) ,在创建bean之前先尝试获取单实例Bean的实例,为什么呢?因为只要创建好的bean就会被缓存起来
(1)先检查JVM缓存中是否有对应的实例,因为在创建单实例bean的时候会存在依赖注入的情况,为了避免循环依赖,Spring在创建bean
的过程中,若发现有依赖bean,则尝试去创建依赖的bean,因此Spring将每一个正在创建的bean的beanName放在一个“当前创建
bean池”中,bean在创建过程中,BeanName将一直存在这个池中。当前创建bean池:
private final Set<String> singletonsCurrentlyInCreation =Collections.newSetFromMap(new ConcurrentHashMap<String, Boolean>(16));
如果当前线程创建bean池有,则尝试从缓存中加载bean
/** Cache of early singleton objects: bean name --> bean instance */
private final Map<String, Object> earlySingletonObjects = new HashMap<String, Object>(16);
(2)如果缓存中加载不成功,则再次尝试从singletonFactories中获取提前曝光的ObjectFactory,如果根据beanName找到了ObjectFactory,则从ObjectFactory中获取bean
实例,然后将其放在earlySingletonObjects 缓存中,再将其ObjectFactory从singletonFactories中移除。
/** Cache of singleton factories: bean name --> ObjectFactory */
private final Map<String, ObjectFactory<?>> singletonFactories = new HashMap<String, ObjectFactory<?>>(16);
因为Spring为了避免循环依赖,在Spring中创建bean的原则是不等bean创建完就会将创建bean的ObjectFactory提早曝光加入到缓存中,一旦下一个bean创建时候需要依赖
上一个bean则直接使用ObjectFactory去获取依赖bean的实例。
3):createBean(); 创建bean
(1):Object bean=resolveBeforeInstantiation(beanName, mbdToUse); 参数:RootBeanDefinition mbdToUse,bean的定义信息。方法的作用是:给BeanPostProcessor
一个机会返回一个代理对象就不用创建其对象了。如果可以,直接返回代理对象,如果不能,则继续执行doCreateBean(beanName, mbdToUse, args);,其实现为:
bean = applyBeanPostProcessorsBeforeInstantiation(targetType, beanName); 这个方法的逻辑是:先拿到所有的后置处理器然后遍历,如果其中一个后置处理器实现了
InstantiationAwareBeanPostProcessor接口,则执行这个后置处理器的postProcessBeforeInstantiation方法,如果返回了bean对象,则执行applyBeanPostProcessorsAfterInitialization
并返回bean实例,结束bean的创建,不走下面的doCreateBean。
if (bean != null) {
bean = applyBeanPostProcessorsAfterInitialization(bean, beanName);
}
注意:InstantiationAwareBeanPostProcessor虽继承了BeanPostProcessor,但其定义了postProcessBeforeInstantiation和postProcessAfterInstantiation方法,与BeanPostProcessor
的postProcessBeforeInitialization和postProcessAfterInitialization方法不同,BeanPostProcessor的两个方法是在bean实例创建完成之后的初始化前后调用的,而
InstantiationAwareBeanPostProcessor的两个方法是在创建bean实例之前尝试返回代理对象的。
这也是AnnotationAwareAspectJAutoProxyCreator的功能,在所有的bean创建之前会有一个拦截,尝试返回其代理对象。
(2):doCreateBean,真正的创建bean的实例,即4.5的流程
AnnotationAwareAspectJAutoProxyCreator做了什么事情?
1、每一个bean创建之前,都会调用postProcessBeforeInstantiation();其处理逻辑是:
1):判断当前bean是否在advisedBean(保存了所有增强过的bean)中
2): 判断当前bean是否是 基础类型的Advice、Pointcut、Advisor、AopInfrastructureBean或者是否是切面(是否有@Aspect注解)
3):或者是否需要跳过
(1):获取候选的增强器(切面里面的增强方法)[List<Advisor> candidateAdvisors = findCandidateAdvisors();]
(断点来看我们的每一个封装的通知方法的增强器类型是InstantiationModelAwarePointcutAdvisor);遍历然后判断每一个增强器是否是AspectJPointcutAdvisor类型的,
如果是,返回true,否则返回flase
2、postProcessAfterInstantiation和postProcessBeforeInitialization一个返回true,一个返回bean对象本身,什么都没做
3、postProcessAfterInitialization方法:创建完对象并初始化后,调用它。其逻辑是:
判断当前bean是否已经代理过,若没有则:return wrapIfNecessary(bean, beanName, cacheKey);这个方法的作用是,封装bean如果必要的话。
1):Object[] specificInterceptors = getAdvicesAndAdvisorsForBean(bean.getClass(), beanName, null);找到所有能应用到当前bean的增强方法
(1):获取配置的所有的切面增强方法
(2):找到所有的增强方法中能应用到当前bean方法中的
(3):获取到能在当前bean使用的增强方法的集合,并按照一定规则排序
(4):如果能在当前bean使用的增强方法的集合不为空,则转为数组返回,否则返回null
2):如果返回的数组不为空,则需要代理
(1):将bean的name作为key,值为true,放在advisedBeans(所有增强过的bean的ConcurrentHashMap)中
(2):创建代理对象
step1:如果能在当前bean使用的增强方法
step2:遍历将其添加到proxyFactory中
step3: DefaultAopProxyFactory中创建代理对象,Spring自动决定
JdkDynamicAopProxy(AdvisedSupport config)
ObjenesisCglibAopProxy(AdvisedSupport config)
(3):将bean作为key,代理对象的class对象作为value,保存到private final Map<Object, Class<?>> proxyTypes = new ConcurrentHashMap<Object, Class<?>>(16);中
(4):返回代理对象
(5):以后在容器中获取到的就是这个组件的代理对象,执行目标方法的时候,代理对象就会执行增强方法的流程
3)否则不需要代理,将bean的name作为key,值为false,放在advisedBeans中
执行目标对象Target中的切入点方法,即执行被增强的方法的流程:
从容器中获取的对象是代理对象,即容器中保存了组件的代理对象(cglib增强后的对象),这个对象里面保存了详细的信息(比如要应用的切面中的增强方法,也叫增强器,目标对象等)
1、CglibAopProxy.intercept();拦截目标方法的执行
2、根据ProxyFactory对象获取将要执行的目标方法拦截器链
List<Object> chain = this.advised.getInterceptorsAndDynamicInterceptionAdvice(method, targetClass);
1):List<Object> interceptorList = new ArrayList<Object>(config.getAdvisors().length); 集合长度为一个默认的 ExposeInvocationInterceptor.ADVISOR和其他被执行方法的增强器
2):遍历所有的增强器,将其转为MethodInterceptor 【MethodInterceptor[] interceptors = registry.getInterceptors(advisor);】
如果是MethodInterceptor,直接放入List<MethodInterceptor>集合中
如果不是,使用AdvisorAdapter将增强器转为MethodInterceptor,然后再放入List<MethodInterceptor>集合中
最后将集合转为数组返回
3、如果没有拦截器链,则直接执行目标方法(拦截器链,每一个通知方法又被包装为方法拦截器,利用MethodInterceptor机制)
4、如果有拦截器链,把需要执行的目标对象,目标方法,拦截器等信息作为参数创建一个CglibMethodInvocation对象并调用其proceed()方法
retVal = new CglibMethodInvocation(proxy, target, method, args, targetClass, chain, methodProxy).proceed();
CglibMethodInvocation对象:

拦截器列表:

5、拦截器的触发过程
1):如果没有拦截器执行目标方法,或者拦截器的索引和拦截器数组-1大小一样(即执行到了最后一个拦截器),则执行目标方法
2):链式获取每一个拦截器,拦截器执行invoke方法,每一个拦截器等待下一个拦截器执行完成返回后再去执行(类似于递归调用),
如上面拦截器的调用顺序是 Expose-->AfterReturning-->Around-->Before,然后前面的等待后面的返回再执行,最后实际执行顺
序是Before-->Around-->AfterReturning-->Expose
拦截器链的机制,保证通知方法与目标方法的执行顺序。
AOP总结
1、@EnableAspectJAutoProxy 开启AOP功能
2、@EnableAspectJAutoProxy 会给容器中注册一个组件 AnnotationAwareApectJAutoProxyCreator
3、AnnotationAwareApectJAutoProxyCreator是一个后置处理器
4、容器的创建流程
1):registerBeanPostProcessors(beanFactory); 注册后置处理器,创建AnnotationAwareApectJAutoProxyCreator对象
2):finishBeanFactoryInitialization(beanFactory); 初始化剩下的单实例bean
(1):创建业务逻辑自检和切面组件
(2):AnnotationAwareApectJAutoProxyCreator 拦截组件的创建过程
(3): 组件创建完成之后,作为后置处理器的AnnotationAwareApectJAutoProxyCreator在postProcessAfterInitialization
方法中判断组件是否需要增强,如果需要则 将需要应用到目标对象的切面中的通知方法,包装成增强器Advisor,然后
给业务逻辑组件创建一个代理对象。
5、执行目标方法
1):代理对象来执行目标方法
2):CglibAopProxy.intercept();拦截目标方法的执行
(1):得到目标方法执行的拦截器链
(2):利用拦截器的链式机制,依次进入每一个拦截器进行执行
(3):实际执行顺序:
正常执行:前置通知-->目标方法-->后置通知-->返回通知
出现异常:前置通知-->目标方法-->后置通知-->异常通知
回炉Spring--Bean生命周期及AOP的更多相关文章
- 大厂高频面试题Spring Bean生命周期最详解
Spring作为当前Java最流行.最强大的轻量级框架.Spring Bean的生命周期也是面试高频题,了解Spring Bean周期也能更好地帮助我们解决日常开发中的问题.程序员应该都知道Sprin ...
- spring bean 生命周期和 ? 作用域? spirng bean 相互依赖? jvm oom ? jvm 监控工具? ThreadLocal 原理
1. spring bean 生命周期 1. 实例化一个bean ,即new 2. 初始化bean 的属性 3. 如果实现接口 BeanNameAware ,调用 setBeanName 4. Bea ...
- Spring点滴四:Spring Bean生命周期
Spring Bean 生命周期示意图: 了解Spring的生命周期非常重要,我们可以利用Spring机制来定制Bean的实例化过程. -------------------------------- ...
- Spring Bean 生命周期之destroy——终极信仰
上一篇文章 Spring Bean 生命周期之我从哪里来 说明了我是谁? 和 我从哪里来? 的两大哲学问题,今天我们要讨论一下终极哲学我要到哪里去? 初始化 Spring Bean 有三种方式: @P ...
- 常见问题:Web/Servlet生命周期与Spring Bean生命周期
Servlet生命周期 init()初始化阶段 Servlet容器加载Servlet(web.xml中有load-on-startup=1;Servlet容器启动后用户首次向Servlet发请求;Se ...
- Spring Bean生命周期,好像人的一生。。
大家好,我是老三,上节我们手撸了一个简单的IOC容器五分钟,手撸一个Spring容器!,这节我们来看一看Spring中Bean的生命周期,我发现,和人的一生真的很像. 简单说说IoC和Bean IoC ...
- 睡前聊一聊"spring bean 生命周期"
spring bean 生命周期=实属初销+2个常见接口+3个Aware型接口+2个生命周期接口 实属初销:spring bean生命周期只有四个阶段,即实例化->属性赋值->初始化-&g ...
- Spring bean 生命周期验证
一.从源码注释看bean生命周期 从JDK源码上看,BeanFactory实现类需要支持Bean的完整生命周期,完整的初始化方法及其标准顺序(格式:接口 方法)为: 1.BeanNameAware s ...
- 【不懂】spring bean生命周期
完整的生命周期(牢记): 1.spring容器准备 2.实例化bean 3.注入依赖关系 4.初始化bean 5.使用bean 6.销毁bean Bean的完整生命週期可以認為是從容器建立初始化Bea ...
- 一步步剖析spring bean生命周期
关于spring bean的生命周期,是深入学习spring的基础,也是难点,本篇文章将采用代码+图文结论的方式来阐述spring bean的生命周期,方便大家学习交流. 一 项目结构及源码 1. ...
随机推荐
- Only variables should be passed by reference
报错位置代码: $status->type = array_pop(explode('\\',$status->type)) (此处$status->type值原本是 APP\ ...
- Linux 用户和组信息
linux系统是一个多用户多任务的分时操作系统,任何一个要使用系统资源的用户,都必须首先向系统管理员申请一个账号.在使用linux操作系统时候,通常我们会遇到对多用户进行管理.比如: 用户账号的添加. ...
- jsc2019_qualD Classified
题目大意 给你一个有n个点的完全图 求一种方案是的给边染色后任何一点不能沿一种颜色的边走奇数条边回到这个点 要求颜色数最少 分析 考场上输出格式打错见祖宗... 我们每次找一个最大二分图将其染一个新颜 ...
- STM32之光敏电阻传感器模块的使用
本实验配合2.2寸TFT液晶屏显示,当光弱的时候显示“昏暗”,光强时显示“明亮”. 实验使用的是下图所示的3线光敏电阻传感器模块,用途:光线亮度检测,光线亮度传感器,智能小车寻光模块.模块特色:比较器 ...
- delphi 获得时间戳 毫秒数
function DateTimeToMilliseconds(const ADateTime: TDateTime): Int64; //获得毫秒var LTimeStamp: TTimeStamp ...
- StringOfChar 将一个字符重复多次 形成一个 字符串
StringOfChar Returns a string with a specified number of repeating characters. In Delphi code, Strin ...
- quick BI 修改列名备注
有些列名太长了,所以造成些影响.注意修改即可.
- urllib.parse解析链接
1. urlparse() 解析链接,注意,返回值比3多一个params的属性 from urllib.parse import urlparse result = urlparse('http:// ...
- 排序算法二:归并排序(Merge sort)
归并排序(Merge sort)用到了分治思想,即分-治-合三步,算法平均时间复杂度是O(nlgn). (一)算法实现 private void merge_sort(int[] array, int ...
- vuejs基础-事件修饰符
事件修饰符: .stop 阻止冒泡 .prevent 阻止默认事件 .capture 添加事件侦听器时使用事件捕获模式 .self 只当事件在该元素本身(比如不是子元素)触发时触发回调 .once 事 ...
