从源码分析 SpringBoot 的 LoggingSystem → 它是如何绑定日志组件的
开心一刻
今天心情不好,想约哥们喝点
我:心情不好,给你女朋友说一声,来我家,过来喝点
哥们:行!我给她说一声
我:你想吃啥?我点外卖
哥们:你俩定吧,我已经让她过去了
我:???我踏马让你过来!和她说一声
哥们:哈哈哈,我踏马寻思让她过去呢

前情回顾
SpringBoot2.7 霸王硬上弓 Logback1.3 → 不甜但解渴 实现了 spring-boot 2.x.x 与 logback 1.3.x 的集成,分两步
- 关闭 Spring Boot 的 LoggingSystem
- 配置文件用 logback.xml
从示例看,集成是成功的;但有些问题是没有分析的,比如
- System.setProperty("org.springframework.boot.logging.LoggingSystem", "none") 是如何生效的
- Spring Boot 的 LoggingSystem 是如何与日志组件绑定的
- Spring Boot 默认依赖 3 个日志组件:logback、log4j、jul,为什么默认启用的是 logback,而非其它两个?
基于如上 3 个问题,我们一起去翻一翻 Spring Boot 的源码;在看源码之前,我先带大家回顾一些内容,方便下文的源码分析
-
讲了观察者模式的实现,以及在 JDK 中的应用(JDK 事件模型)、Spring 中的应用(事件机制);大家可以重点看下 Spring 的那个案例,使用非常简单,总结一句就是
SpringBoot 启动过程中发送的事件,所有 ApplicationListener 都会收到(即 onApplicationEvent 方法会被调用)
spring-boot-2.0.3启动源码篇一 - SpringApplication构造方法
大家不要通篇去读,重点看
getSpringFactoriesInstances,与本文息息相关的归纳成一句查找类路径下全部的 META-INF/spring.factories 的文件路径,并加载所有 spring.factories 中的内容到 SpringFactoriesLoader 的 cache 中,然后从缓存中获取 ApplicationListener 类型的类并进行实例化
下文是基于 Spring Boot 默认情况下的源码分析,而非集成 logback 1.3.x 的源码分析,大家注意下
集成 logback 1.3.x 需要关闭 Spring Boot 的 LoggingSystem,那还分析个毛
源码分析
问题来了,从哪开始跟?我就不绕圈子了,从 LoggingApplicationListener 开始跟,首先它在 META-INF/spring.factories 中

其次它实现了 ApplicationListener
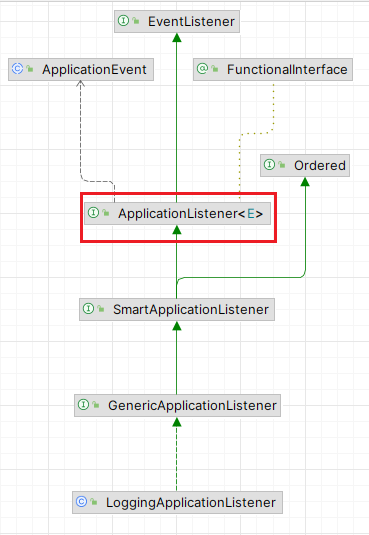
那么 Spring Boot 在启动过程中会实例化 LoggingApplicationListener,Spring Boot 启动过程中发送的事件都会来到 LoggingApplicationListener 的 onApplicationEvent 方法
@Override

public void onApplicationEvent(ApplicationEvent event) {

	if (event instanceof ApplicationStartingEvent) {

		onApplicationStartingEvent((ApplicationStartingEvent) event);

	}

	else if (event instanceof ApplicationEnvironmentPreparedEvent) {

		onApplicationEnvironmentPreparedEvent((ApplicationEnvironmentPreparedEvent) event);

	}

	else if (event instanceof ApplicationPreparedEvent) {

		onApplicationPreparedEvent((ApplicationPreparedEvent) event);

	}

	else if (event instanceof ContextClosedEvent) {

		onContextClosedEvent((ContextClosedEvent) event);

	}

	else if (event instanceof ApplicationFailedEvent) {

		onApplicationFailedEvent();

	}

}
Spring Boot 启动过程分不同的阶段,在每个阶段都会发送对应阶段的事件,LoggingApplicationListener 针对这些事件会有不同的处理,我们暂且只需要关注以下事件
ApplicationStartingEvent,对应的处理方法:onApplicationStartingEvent
ApplicationEnvironmentPreparedEvent,对应的处理方法:onApplicationEnvironmentPreparedEvent
ApplicationPreparedEvent,对应的处理方法:onApplicationPreparedEvent
onApplicationStartingEvent
private void onApplicationStartingEvent(ApplicationStartingEvent event) {

	this.loggingSystem = LoggingSystem.get(event.getSpringApplication().getClassLoader());

	this.loggingSystem.beforeInitialize();

}
方法很简单,获取日志系统,然后调用其 beforeInitialize 方法,我们跟进 LoggingSystem.get
public static LoggingSystem get(ClassLoader classLoader) {

	String loggingSystemClassName = System.getProperty(SYSTEM_PROPERTY);

	if (StringUtils.hasLength(loggingSystemClassName)) {

		if (NONE.equals(loggingSystemClassName)) {

			return new NoOpLoggingSystem();

		}

		return get(classLoader, loggingSystemClassName);

	}

	LoggingSystem loggingSystem = SYSTEM_FACTORY.getLoggingSystem(classLoader);

	Assert.state(loggingSystem != null, "No suitable logging system located");

	return loggingSystem;

}
打个断点调试下,你们就会发现 SYSTEM_PROPERTY 的值是 org.springframework.boot.logging.LoggingSystem

从系统属性中获取 org.springframework.boot.logging.LoggingSystem ,是不是和
System.setProperty("org.springframework.boot.logging.LoggingSystem", "none") 是如何生效的
对应上了?如果获取的值是 none,直接返回 NoOpLoggingSystem 实例
/**

 * {@link LoggingSystem} that does nothing.

 */

static class NoOpLoggingSystem extends LoggingSystem {

	@Override

	public void beforeInitialize() {

	}

	@Override

	public void setLogLevel(String loggerName, LogLevel level) {

	}

	@Override

	public List<LoggerConfiguration> getLoggerConfigurations() {

		return Collections.emptyList();

	}

	@Override

	public LoggerConfiguration getLoggerConfiguration(String loggerName) {

		return null;

	}

}
全是空实现,相当于关闭了 Spring Boot 的 LoggingSystem;org.springframework.boot.logging.LoggingSystem 还可以设置成其他值,但需要有对应的实现。默认情况下 loggingSystemClassName 的值是 null ,会跳过 if 来到 SYSTEM_FACTORY.getLoggingSystem(classLoader);
@Override

public LoggingSystem getLoggingSystem(ClassLoader classLoader) {

	List<LoggingSystemFactory> delegates = (this.delegates != null) ? this.delegates.apply(classLoader) : null;

	if (delegates != null) {

		for (LoggingSystemFactory delegate : delegates) {

			LoggingSystem loggingSystem = delegate.getLoggingSystem(classLoader);

			if (loggingSystem != null) {

				return loggingSystem;

			}

		}

	}

	return null;

}
这里推荐用断点调试去跟源码,按 F7 之后会来到 LoggingSystemFactory#fromSpringFactories
/**

 * Return a {@link LoggingSystemFactory} backed by {@code spring.factories}.

 * @return a {@link LoggingSystemFactory} instance

 */

static LoggingSystemFactory fromSpringFactories() {

	return new DelegatingLoggingSystemFactory(

			(classLoader) -> SpringFactoriesLoader.loadFactories(LoggingSystemFactory.class, classLoader));

}
SpringFactoriesLoader.loadFactories 是不是很眼熟?(不眼熟的去看:spring-boot-2.0.3启动源码篇一 - SpringApplication构造方法)此时它会做三件事
从 SpringFactoriesLoader#cache 中获取 LoggingSystemFactory 类型的工厂类的类名列表

之前已经加载到 SpringFactoriesLoader#cache 中,所以此时从缓存中获取;注意看三个实现类的顺序,
LogbackLoggingSystem.Factory在最前面实例化这些工厂类
对这些工厂类实例按 @Order 升序排序
这三个工厂类的 @Order 值是一样的,都是
@Order(Ordered.LOWEST_PRECEDENCE),所以顺序不变,LogbackLoggingSystem.Factory仍在最前面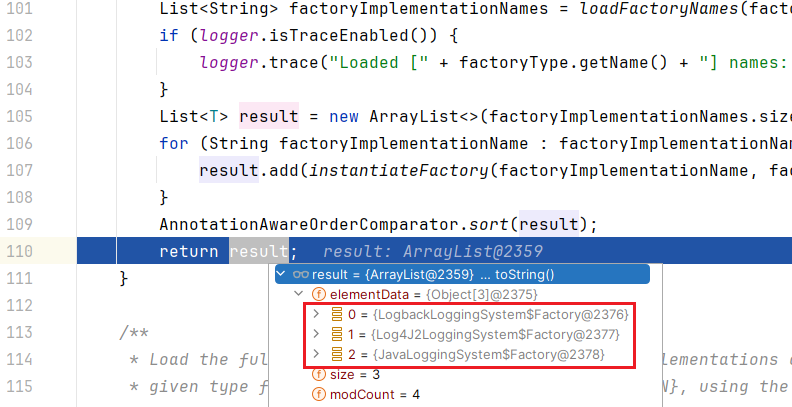
回到 DelegatingLoggingSystemFactory#getLoggingSystem,对这些工厂类实例逐个遍历,得到 LoggingSystem 立即返回,不再遍历后面的工厂实例;第一个遍历的的是 LogbackLoggingSystem.Factory,调用其 getLoggingSystem 方法
private static final boolean PRESENT = ClassUtils.isPresent("ch.qos.logback.classic.LoggerContext",

		Factory.class.getClassLoader());

@Override

public LoggingSystem getLoggingSystem(ClassLoader classLoader) {

	if (PRESENT) {

		return new LogbackLoggingSystem(classLoader);

	}

	return null;

}
ch.qos.logback.classic.LoggerContext 存在(即存在logback依赖),直接创建 LogbackLoggingSystem 实例并返回;至此 Spring Boot 的 LoggingSystem 确定将基于 logback,而非 log4j,也非 jul,问题
Spring Boot 的 LoggingSystem 是如何与日志组件绑定的
Spring Boot 默认依赖 3 个日志组件:logback、log4j、jul,为什么默认启用的是 logback,而非其它两个?
是不是清楚了?LoggingSystem 确定为 LogbackLoggingSystem 后回到 LoggingApplicationListener#onApplicationStartingEvent 方法的第二行,即调用 LogbackLoggingSystem#beforeInitialize 方法
@Override

public void beforeInitialize() {

	LoggerContext loggerContext = getLoggerContext();

	if (isAlreadyInitialized(loggerContext)) {

		return;

	}

	super.beforeInitialize();

	loggerContext.getTurboFilterList().add(FILTER);

}
主要初始化 LoggerContext,跟进 getLoggerContext()
private LoggerContext getLoggerContext() {

	ILoggerFactory factory = StaticLoggerBinder.getSingleton().getLoggerFactory();

	Assert.isInstanceOf(LoggerContext.class, factory,

			() -> String.format(

					"LoggerFactory is not a Logback LoggerContext but Logback is on "

							+ "the classpath. Either remove Logback or the competing "

							+ "implementation (%s loaded from %s). If you are using "

							+ "WebLogic you will need to add 'org.slf4j' to "

							+ "prefer-application-packages in WEB-INF/weblogic.xml",

					factory.getClass(), getLocation(factory)));

	return (LoggerContext) factory;

}
StaticLoggerBinder 有没有很熟悉?看下它的全类名:org.slf4j.impl.StaticLoggerBinder,在 logback-classic-1.2.12.jar 下 ,而 logback 1.3.x 没有这个类
所以 spring-boot 2.x.x 默认不支持 logback 1.3.x
总结下,onApplicationStartingEvent 方法确定了日志系统是 LogbackLoggingSystem
onApplicationEnvironmentPreparedEvent
private void onApplicationEnvironmentPreparedEvent(ApplicationEnvironmentPreparedEvent event) {

	SpringApplication springApplication = event.getSpringApplication();

	if (this.loggingSystem == null) {

		this.loggingSystem = LoggingSystem.get(springApplication.getClassLoader());

	}

	initialize(event.getEnvironment(), springApplication.getClassLoader());

}
很显然 loggingSystem 不为 null,我们直接跟 initialize 方法
protected void initialize(ConfigurableEnvironment environment, ClassLoader classLoader) {

	getLoggingSystemProperties(environment).apply();

	this.logFile = LogFile.get(environment);

	if (this.logFile != null) {

		this.logFile.applyToSystemProperties();

	}

	// 日志分组,暂不关注

	this.loggerGroups = new LoggerGroups(DEFAULT_GROUP_LOGGERS);

	// 设置早期日志级别,主要debug和trace之间的抉择

	initializeEarlyLoggingLevel(environment);

	// 初始化日志系统

	initializeSystem(environment, this.loggingSystem, this.logFile);

	// 设置最终日志级别

	initializeFinalLoggingLevels(environment, this.loggingSystem);

	registerShutdownHookIfNecessary(environment, this.loggingSystem);

}
我们暂时只关注 initializeSystem 方法

继续往下跟,来到 LogbackLoggingSystem#initialize

继续往下跟,来到 AbstractLoggingSystem#initialize

继续往下跟,来到 AbstractLoggingSystem#initializeWithConventions
private void initializeWithConventions(LoggingInitializationContext initializationContext, LogFile logFile) {

	String config = getSelfInitializationConfig();

	if (config != null && logFile == null) {

		// self initialization has occurred, reinitialize in case of property changes

		reinitialize(initializationContext);

		return;

	}

	if (config == null) {

		config = getSpringInitializationConfig();

	}

	if (config != null) {

		loadConfiguration(initializationContext, config, logFile);

		return;

	}

	loadDefaults(initializationContext, logFile);

}
其中 getSelfInitializationConfig() 就是从 classpath 下逐个寻找
logback-test.groovy, logback-test.xml, logback.groovy, logback.xml
这四个文件,一旦找到则直接返回;因为找到了 logback.xml,所以来到第一个 if
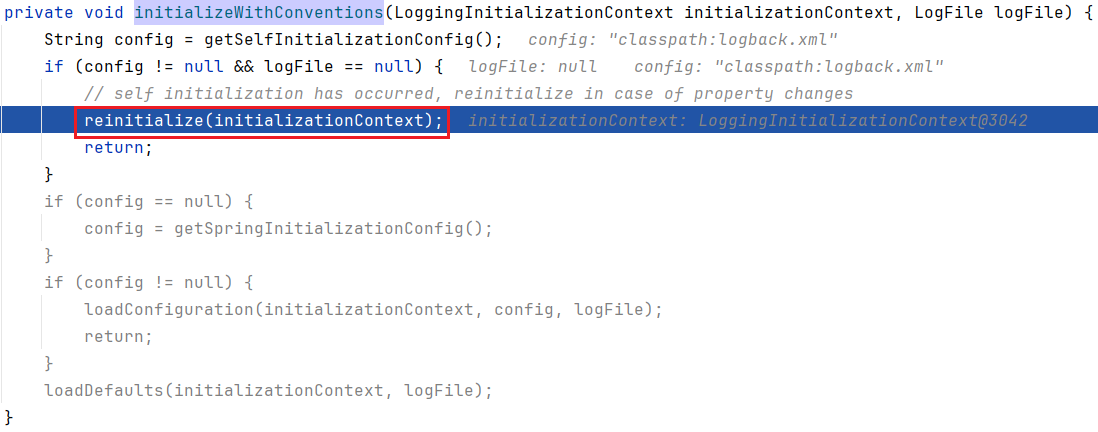
继续跟进,来到 LogbackLoggingSystem#reinitialize

将logback.xml 中的配置进行加载;至此,Spring Boot 的 LoggingSystem 与 Logback 的绑定就完成了,你们清楚了吗?
我们重新回到 AbstractLoggingSystem#initializeWithConventions ,如果 classpath 下
logback-test.groovy, logback-test.xml, logback.groovy, logback.xml
这四个文件都没有,会来到 config = getSpringInitializationConfig();,逐步跟下去会来到 AbstractLoggingSystem#getSpringConfigLocations
protected String[] getSpringConfigLocations() {

	String[] locations = getStandardConfigLocations();

	for (int i = 0; i < locations.length; i++) {

		String extension = StringUtils.getFilenameExtension(locations[i]);

		locations[i] = locations[i].substring(0, locations[i].length() - extension.length() - 1) + "-spring."

				+ extension;

	}

	return locations;

}
这个方法大家都能看懂吧,locations 的值
logback-test.groovy, logback-test.xml, logback.groovy, logback.xml
逐个遍历,然后进行拼接,最终得到
logback-test-spring.groovy, logback-test-spring.xml, logback-spring.groovy, logback-spring.xml
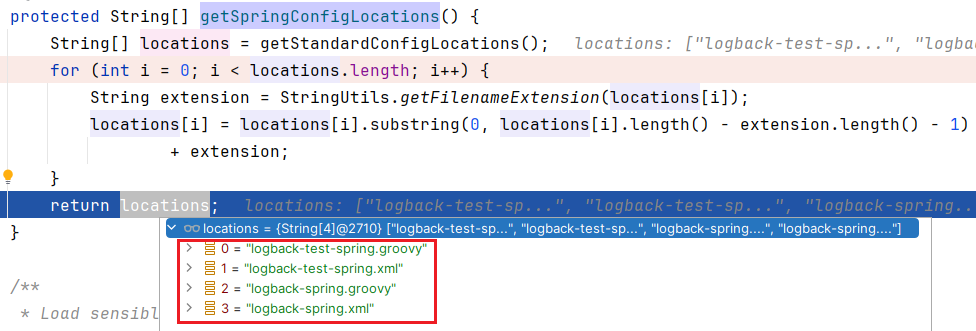
同样从 classpath 下逐个寻找,一旦找到直接返回;这也是为什么我们的日志配置文件是 logback-spring.xml 也能生效的原因。我们可以给 Spring Boot 的日志配置文件排个优先级
logback-test.groovy > logback-test.xml > logback.groovy > logback.xml > logback-test-spring.groovy > logback-test-spring.xml > logback-spring.groovy > logback-spring.xml
总结下,onApplicationEnvironmentPreparedEvent 完成了日志系统的初始化(日志配置文件的加载)
onApplicationPreparedEvent
private void onApplicationPreparedEvent(ApplicationPreparedEvent event) {

	ConfigurableApplicationContext applicationContext = event.getApplicationContext();

	ConfigurableListableBeanFactory beanFactory = applicationContext.getBeanFactory();

	if (!beanFactory.containsBean(LOGGING_SYSTEM_BEAN_NAME)) {

		beanFactory.registerSingleton(LOGGING_SYSTEM_BEAN_NAME, this.loggingSystem);

	}

	if (this.logFile != null && !beanFactory.containsBean(LOG_FILE_BEAN_NAME)) {

		beanFactory.registerSingleton(LOG_FILE_BEAN_NAME, this.logFile);

	}

	if (this.loggerGroups != null && !beanFactory.containsBean(LOGGER_GROUPS_BEAN_NAME)) {

		beanFactory.registerSingleton(LOGGER_GROUPS_BEAN_NAME, this.loggerGroups);

	}

	if (!beanFactory.containsBean(LOGGING_LIFECYCLE_BEAN_NAME) && applicationContext.getParent() == null) {

		beanFactory.registerSingleton(LOGGING_LIFECYCLE_BEAN_NAME, new Lifecycle());

	}

}
代码不复杂,就是注册了几个 Bean 到 Spring 容器,其中的 loggingSystem 是我们暂时比较关注的,默认情况下其类型是:LogbackLoggingSystem
日志打印
Spring Boot 的 LoggingSystem 完成与 Logback 的绑定后,它是如何使用然后打印日志的呢?是不是也像
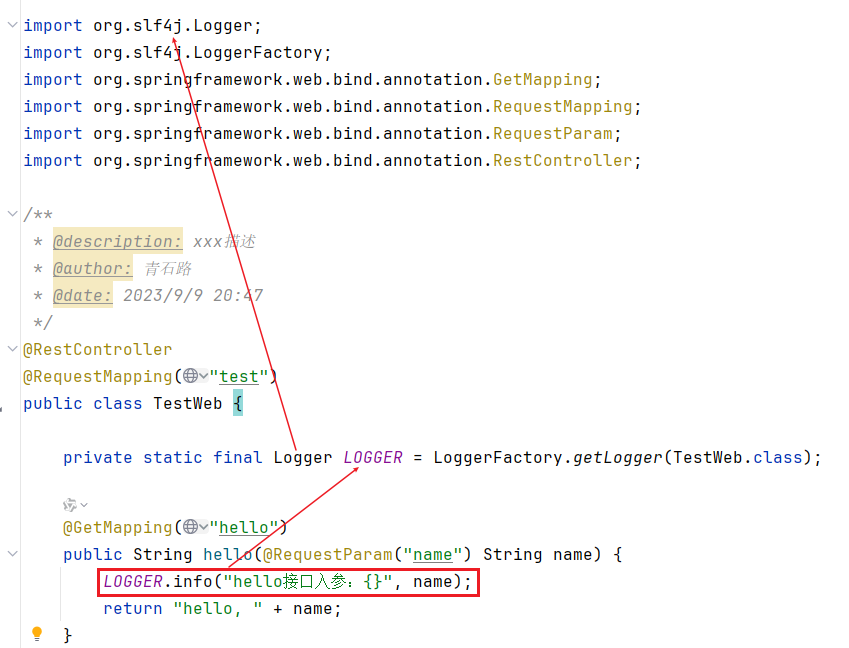
这样来使用的?那绝对不可能的!

这么使用的话,跟 Spring Boot 的 LoggingSystem 有鸡毛的关系?我们来看下 Spring Boot 中日志的使用,SpringApplication 179 行就用到了

我们会发现 Log、LogFactory 在 spring-jcl-5.3.31.jar 包下

spring-jcl 类似 slf4j,也是一个日志门面,本文不展开
跟进 LogFactory.getLog ,一路跟下去会来到 LogAdapter#createLog
public static Log createLog(String name) {

	switch (logApi) {

		case LOG4J:

			return Log4jAdapter.createLog(name);

		case SLF4J_LAL:

			return Slf4jAdapter.createLocationAwareLog(name);

		case SLF4J:

			return Slf4jAdapter.createLog(name);

		default:

			// Defensively use lazy-initializing adapter class here as well since the

			// java.logging module is not present by default on JDK 9. We are requiring

			// its presence if neither Log4j nor SLF4J is available; however, in the

			// case of Log4j or SLF4J, we are trying to prevent early initialization

			// of the JavaUtilLog adapter - e.g. by a JVM in debug mode - when eagerly

			// trying to parse the bytecode for all the cases of this switch clause.

			return JavaUtilAdapter.createLog(name);

	}

}
logApi 的值获取如下
private static final String LOG4J_SPI = "org.apache.logging.log4j.spi.ExtendedLogger";

private static final String LOG4J_SLF4J_PROVIDER = "org.apache.logging.slf4j.SLF4JProvider";

private static final String SLF4J_SPI = "org.slf4j.spi.LocationAwareLogger";

private static final String SLF4J_API = "org.slf4j.Logger";

private static final LogApi logApi;

static {

	if (isPresent(LOG4J_SPI)) {

		if (isPresent(LOG4J_SLF4J_PROVIDER) && isPresent(SLF4J_SPI)) {

			// log4j-to-slf4j bridge -> we'll rather go with the SLF4J SPI;

			// however, we still prefer Log4j over the plain SLF4J API since

			// the latter does not have location awareness support.

			logApi = LogApi.SLF4J_LAL;

		}

		else {

			// Use Log4j 2.x directly, including location awareness support

			logApi = LogApi.LOG4J;

		}

	}

	else if (isPresent(SLF4J_SPI)) {

		// Full SLF4J SPI including location awareness support

		logApi = LogApi.SLF4J_LAL;

	}

	else if (isPresent(SLF4J_API)) {

		// Minimal SLF4J API without location awareness support

		logApi = LogApi.SLF4J;

	}

	else {

		// java.util.logging as default

		logApi = LogApi.JUL;

	}

}
根据优先级逐个去类路径下寻找类,找到了直接返回;Spring Boot 默认情况下用的是 SLF4J + Logback,所以 logApi 的值是 SLF4J_SPI,那么 LogAdapter#createLog 的返回值的类型是 LogAdapter$Slf4jLocationAwareLog

相当于完成了 spring-jcl 到 slf4j 的适配;这么说来,Spring Boot 日志还是走的 SLF4J + Logback ?跟 Spring Boot 的 LoggingSystem 有什么关系呢?敬请期待下篇

总结
onApplicationStartingEvent
确定日志系统类型并创建对应的
LoggingSystem,默认情况下是LogbackLoggingSystemonApplicationEnvironmentPreparedEvent
完成日志配置文件的加载以及
LoggingSystem的初始化Spring Boot 的日志打印貌似与 LoggingSystem 没有关系?下篇分析
从源码分析 SpringBoot 的 LoggingSystem → 它是如何绑定日志组件的的更多相关文章
- asp.net mvc源码分析-DefaultModelBinder 自定义的普通数据类型的绑定和验证
原文:asp.net mvc源码分析-DefaultModelBinder 自定义的普通数据类型的绑定和验证 在前面的文章中我们曾经涉及到ControllerActionInvoker类GetPara ...
- 源码分析springboot自定义jackson序列化,默认null值个性化处理返回值
最近项目要实现一种需求,对于后端返回给前端的json格式的一种规范,不允许缺少字段和字段值都为null,所以琢磨了一下如何进行将springboot的Jackson序列化自定义一下,先看看如何实现,再 ...
- 源码分析SpringBoot启动
遇到一个问题,需要从yml文件中读取数据初始化到static的类中.搜索需要实现ApplicationRunner,并在其实现类中把值读出来再set进去.于是乎就想探究一下SpringBoot启动中都 ...
- jQuery-1.9.1源码分析系列(十) 事件系统——事件绑定
事件绑定的方式有很多种.使用了jQuery那么原来那种绑定方式(elem.click = function(){...})就不推荐了,原因? 最主要的一个原因是elem.click = fn这种方式只 ...
- xUtils3源码分析(一):view的绑定
概述 xUtils3是国人开发的一款功能丰富的Android快速开发框架,值得研究下.zip包下载:[ZIP]xutils主要分以下几个模块 视图绑定模块 网络请求模块 数据库模块 图片加载模块 我们 ...
- [WPF源码分析]ContentControl依赖项属性的双向绑定,two-way binding view's DependencyProperty and ViewModel's variable
问题:自定义控件的依赖项属性和VIewModel中的变量不能双向绑定 解决思路:对比.net源码 PresentationFramework / System.Windows.Controls ...
- antd源码分析之——标签页(tabs 2.Tabs关键组件功能实现)
由于ant Tabs组件结构较复杂,共分三部分叙述,本文为目录中第二部分(高亮) 目录 一.组件结构 antd代码结构 rc-ant代码结构 1.组件树状结构 2.Context使用说明 3.rc-t ...
- jQuery-1.9.1源码分析系列完毕目录整理
jQuery 1.9.1源码分析已经完毕.目录如下 jQuery-1.9.1源码分析系列(一)整体架构 jQuery-1.9.1源码分析系列(一)整体架构续 jQuery-1.9.1源码分析系列(二) ...
- NIO-SocketChannel源码分析
目录 NIO-SocketChannel源码分析 目录 前言 ServerSocketChannelImpl 创建ServerSocketChannel 绑定和监听 接收 SocketChannelI ...
- Spring笔记(5) - 声明式事务@EnableTransactionManagement注解源码分析
一.背景 前面详解了实现Spring事务的两种方式的不同实现:编程式事务和声明式事务,对于配置都使用到了xml配置,今天介绍Spring事务的注解开发,例如下面例子: 配置类:注册数据源.JDBC模板 ...
随机推荐
- 基于 Cloudflare Workers 和 cloudflare-docker-proxy 搭建镜像加速服务
本文主要介绍了如何基于 Cloudflare Workers 和 cloudflare-docker-proxy 搭建 dockerhub.gcr.quay 等镜像加速服务. 最近,受限于各种情况,部 ...
- Linux 内核:设备驱动模型(3)class与device
Linux 内核:设备驱动模型(3)class与device 背景 前面我们知道了设备如何通过总线与驱动匹配,也了解了设备插拔时与用户空间是如何通过uevent基于环境变量进行交互的. 前面看过了设备 ...
- python基础-基本语句
1 条件语句 在进行逻辑判断时,我们需要用到条件语句,Python 提供了 if.elif.else 来进行逻辑判断.格式如下所示: 1 if 判断条件1: 2 执行语句1... 3 elif 判断条 ...
- HIVE从入门到精通------(1)hive的基本操作
1.开启hive 1.首先在master的/usr/local/soft/下启动hadoop: master : start-all.sh start-all.sh 2.在另一个master(2)上监 ...
- docker-compose的使用和常用命令
Docker简介 Docker 是一个开源的应用容器引擎,让开发者可以打包他们的应用以及依赖包到一个可移植的镜像中,然后发布到任何流行的 Linux或Windows操作系统的机器上,也可以实现虚拟化. ...
- Java 集合元素排序接口Comparable
什么是Comparable public interface Comparable<T> { /** * Compares this object with the specified o ...
- Java 集合框架迭代器(Iterator)
什么是迭代器 使用循环遍历集合 普通for循环 for(int i=0;i<10;i++){} 增强for循环 for(String str:list){} 什么是迭代器Iterator Ite ...
- CF414B
这道题dp状态表示需要一点思维,而且会卡到时间复杂度 之前题主用的是试除法,时间复杂度为n^2.5,然后被卡了,但是换一种写法就是对的 #include <iostream> #inclu ...
- leetcode 中等(设计):[146, 155, 208, 211, 284, 304, 307, 341, 355, 380]
目录 146. LRU 缓存 155. 最小栈 208. 实现 Trie (前缀树) 211. 添加与搜索单词 - 数据结构设计 284. 顶端迭代器 304. 二维区域和检索 - 矩阵不可变 307 ...
- Packer构建openStack镜像
目录 使用Packer自动化构建镜像 使用Packer自动化构建镜像 openstack插件安装:OpenStack | Integrations | Packer | HashiCorp Devel ...
