卷积神经网络中nn.Conv2d()和nn.MaxPool2d()以及卷积神经网络实现minist数据集分类
卷积神经网络中nn.Conv2d()和nn.MaxPool2d()
卷积神经网络之Pythorch实现:
nn.Conv2d()就是PyTorch中的卷积模块
参数列表
| 参数 | 作用 |
|---|---|
| in_channels | 输入数据体的深度 |
| out_channels | 输出数 据体的深度 |
| kernel_size | 滤波器(卷积核)的大小 注1 |
| stride | 滑动的步长 |
| padding | 零填充的圈数 注2 |
| bias | 是否启用偏置,默认是True,代表启用 |
| groups | 输出数据体深度上和输入数 据体深度上的联系 注3 |
| dilation | 卷积对于输入数据体的空间间隔 注4 |
注:1. 可以使用一 个数字来表示高和宽相同的卷积核,比如 kernel_size=3,也可以使用 不同的数字来表示高和宽不同的卷积核,比如 kernel_size=(3, 2);
padding=0表示四周不进行零填充,而 padding=1表示四周进行1个像素点的零填充;
groups表示输出数据体深度上和输入数 据体深度上的联系,默认 groups=1,也就是所有的输出和输入都是相 关联的,如果 groups=2,这表示输入的深度被分割成两份,输出的深 度也被分割成两份,它们之间分别对应起来,所以要求输出和输入都 必须要能被 groups整除。
默认dilation=1详情见 nn.Conv2d()中dilation参数的作用或者CSDN
nn.MaxPool2d()表示网络中的最大值池化
参数列表:
| 参数 | 作用 |
|---|---|
| kernel_size | 与上面nn.Conv2d()相同 |
| stride | 与上面nn.Conv2d()相同 |
| padding | 与上面nn.Conv2d()相同 |
| dilation | 与上面nn.Conv2d()相同 |
| return_indices | 表示是否返回最大值所处的下标,默认 return_indices=False |
| ceil_mode | 表示使用一些方格代替层结构,默认 ceil_mode=False |
注:一般不会去设置return_indices和ceil_mode参数
import torch.nn as nn

class SimpleCNN(nn.Module):

    def __init__(self):

        super(SimpleCNN, self).__init__()

        layer1 = nn.Sequential()

        # 把一个三通道的照片RGB三个使用32组卷积核卷积,每组三个卷积核,组内卷积后相加得出32组输出

        layer1.add_module('conv1', nn.Conv2d(3, 32, (3, 3), (1, 1), padding=1))

        layer1.add_module('relu1', nn.ReLU(True))

        layer1.add_module('pool1', nn.MaxPool2d(2, 2))

        self.layer1 = layer1

        layer2 = nn.Sequential()

        layer2.add_module('conv2', nn.Conv2d(32, 64, (3, 3), (1, 1), padding=1))

        layer2.add_module('relu2', nn.ReLU(True))

        layer2.add_module('pool2', nn.MaxPool2d(2, 2))

        self.layer2 = layer2

        layer3 = nn.Sequential()

        layer3.add_module('conv3', nn.Conv2d(64, 128, (3, 3), (1, 1), padding=1))

        layer3.add_module('relu3', nn.ReLU(True))

        layer3.add_module('pool3', nn.MaxPool2d(2, 2))

        self.layer3 = layer3

        layer4 = nn.Sequential()

        layer4.add_module('fc1', nn.Linear(2048, 512))

        layer4.add_module('fc_relu1', nn.ReLU(True))

        layer4.add_module('fc2', nn.Linear(512, 64))

        layer4.add_module('fc_relu2', nn.ReLU(True))

        layer4.add_module('f3', nn.Linear(64, 10))

        self.layer4 = layer4

    def forward(self, x):

        conv1 = self.layer1(x)

        conv2 = self.layer2(conv1)

        conv3 = self.layer3(conv2)

        fc_input = conv3.view(conv3.size(0), -1)

        fc_out = self.layer4(fc_input)

        return fc_out

model = SimpleCNN()

print(model)
输出
SimpleCNN(

  (layer1): Sequential(

    (conv1): Conv2d(3, 32, kernel_size=(3, 3), stride=(1, 1), padding=(1, 1))

    (relu1): ReLU(inplace=True)

    (pool1): MaxPool2d(kernel_size=2, stride=2, padding=0, dilation=1, ceil_mode=False)

  )

  (layer2): Sequential(

    (conv2): Conv2d(32, 64, kernel_size=(3, 3), stride=(1, 1))

    (relu2): ReLU(inplace=True)

    (pool2): MaxPool2d(kernel_size=2, stride=2, padding=0, dilation=1, ceil_mode=False)

  )

  (layer3): Sequential(

    (conv3): Conv2d(64, 128, kernel_size=(3, 3), stride=(1, 1), padding=(1, 1))

    (relu3): ReLU(inplace=True)

    (pool3): MaxPool2d(kernel_size=2, stride=2, padding=0, dilation=1, ceil_mode=False)

  )

  (layer4): Sequential(

    (fc1): Linear(in_features=2048, out_features=512, bias=True)

    (fc_relu1): ReLU(inplace=True)

    (fc2): Linear(in_features=512, out_features=64, bias=True)

    (fc_relu2): ReLU(inplace=True)

    (f3): Linear(in_features=64, out_features=10, bias=True)

  )

)
提取模型的层级结构
提取层级结构可以使用以下几个nn.Model的属性,第一个是children()属性,它会返回下一级模块的迭代器,在上面这个模型中,它会返回在self.layer1,self.layer2,self.layer4上的迭代器而不会返回它们内部的东西;modules()
会返回模型中所有的模块的迭代器,这样它就能访问到最内层,比如self.layer1.conv1这个模块;还有一个与它们相对应的是name_children()属性以及named_modules(),这两个不仅会返回模块的迭代器,还会返回网络层的名字。
提取出model中的前两层
nn.Sequential(*list(model.children())[:2])
输出:
Sequential(

  (0): Sequential(

    (conv1): Conv2d(3, 32, kernel_size=(3, 3), stride=(1, 1), padding=(1, 1))

    (relu1): ReLU(inplace=True)

    (pool1): MaxPool2d(kernel_size=2, stride=2, padding=0, dilation=1, ceil_mode=False)

  )

  (1): Sequential(

    (conv2): Conv2d(32, 64, kernel_size=(3, 3), stride=(1, 1), padding=(1, 1))

    (relu2): ReLU(inplace=True)

    (pool2): MaxPool2d(kernel_size=2, stride=2, padding=0, dilation=1, ceil_mode=False)

  )

)
提取出model中的所有卷积层
conv_model = nn.Sequential()

for layer in model.named_modules():

    if isinstance(layer[1], nn.Conv2d):

        conv_model.add_module(layer[0].split('.')[1] ,layer[1])

print(conv_model)
输出:
Sequential(

  (conv1): Conv2d(3, 32, kernel_size=(3, 3), stride=(1, 1), padding=(1, 1))

  (conv2): Conv2d(32, 64, kernel_size=(3, 3), stride=(1, 1), padding=(1, 1))

  (conv3): Conv2d(64, 128, kernel_size=(3, 3), stride=(1, 1), padding=(1, 1))

)
提取网络参数并对其初始化
nn.Moudel里面有两个特别重要的关于参数的属性,分别是named_parameters()和parameters()。前者会输出网络层的名字和参数的迭代器,后者会给出一个网络的全部参数的迭代器。
for param in model.named_parameters():

    print(param[0])

    # print(param[1])
输出:
layer1.conv1.weight

layer1.conv1.bias

layer2.conv2.weight

layer2.conv2.bias

layer3.conv3.weight

layer3.conv3.bias

layer4.fc1.weight

layer4.fc1.bias

layer4.fc2.weight

layer4.fc2.bias

layer4.f3.weight

layer4.f3.bias
案例:使用卷积神经网络实现对Minist数据集的预测
import matplotlib.pyplot as plt

import torch.utils.data

import torchvision.datasets

import os

import torch.nn as nn

from torchvision import transforms

class CNN(nn.Module):

    def __init__(self):

        super(CNN, self).__init__()

        self.layer1 = nn.Sequential(

            nn.Conv2d(1, 16, kernel_size=(3, 3)),

            nn.BatchNorm2d(16),

            nn.ReLU(inplace=True),

        )

        self.layer2 = nn.Sequential(

            nn.Conv2d(16, 32, kernel_size=(3, 3)),

            nn.BatchNorm2d(32),

            nn.ReLU(inplace=True),

            nn.MaxPool2d(kernel_size=2, stride=2),

        )

        self.layer3 = nn.Sequential(

            nn.Conv2d(32, 64, kernel_size=(3, 3)),

            nn.BatchNorm2d(64),

            nn.ReLU(inplace=True)

        )

        self.layer4 = nn.Sequential(

            nn.Conv2d(64, 128, kernel_size=(3, 3)),

            nn.BatchNorm2d(128),

            nn.ReLU(inplace=True),

            nn.MaxPool2d(kernel_size=2, stride=2)

        )

        self.fc = nn.Sequential(

            nn.Linear(128 * 4 * 4, 1024),

            nn.ReLU(inplace=True),

            nn.Linear(1024, 128),

            nn.Linear(128, 10)

        )

    def forward(self, x):

        x = self.layer1(x)

        x = self.layer2(x)

        x = self.layer3(x)

        x = self.layer4(x)

        x = x.view(x.size(0), -1)

        x = self.fc(x)

        return x

os.environ["KMP_DUPLICATE_LIB_OK"] = "TRUE"

data_tf = transforms.Compose(

    [transforms.ToTensor(),

     transforms.Normalize([0.5], [0.5])]

)

train_dataset = torchvision.datasets.MNIST(root='F:/机器学习/pytorch/书/data/mnist', train=True,

                                           transform=data_tf, download=True)

test_dataset = torchvision.datasets.MNIST(root='F:/机器学习/pytorch/书/data/mnist', train=False,

                                          transform=data_tf, download=True)

batch_size = 100

train_loader = torch.utils.data.DataLoader(

    dataset=train_dataset, batch_size=batch_size

)

test_loader = torch.utils.data.DataLoader(

    dataset=test_dataset, batch_size=batch_size

)

model = CNN()

model = model.cuda()

criterion = nn.CrossEntropyLoss()

criterion = criterion.cuda()

optimizer = torch.optim.Adam(model.parameters())

# 节约时间,三次够了

iter_step = 3

loss1 = []

loss2 = []

for step in range(iter_step):

    loss1_count = 0

    loss2_count = 0

    for images, labels in train_loader:

        images = images.cuda()

        labels = labels.cuda()

        images = images.reshape(-1, 1, 28, 28)

        output = model(images)

        pred = output.squeeze()

        optimizer.zero_grad()

        loss = criterion(pred, labels)

        loss.backward()

        optimizer.step()

        _, pred = torch.max(pred, 1)

        loss1_count += int(torch.sum(pred == labels)) / 100

# 测试

    else:

        test_loss = 0

        accuracy = 0

        with torch.no_grad():

            for images, labels in test_loader:

                images = images.cuda()

                labels = labels.cuda()

                pred = model(images.reshape(-1, 1, 28, 28))

                _, pred = torch.max(pred, 1)

                loss2_count += int(torch.sum(pred == labels)) / 100

    loss1.append(loss1_count / len(train_loader))

    loss2.append(loss2_count / len(test_loader))

    print(f'第{step}次训练:训练准确率:{loss1[len(loss1)-1]},测试准确率:{loss2[len(loss2)-1]}')

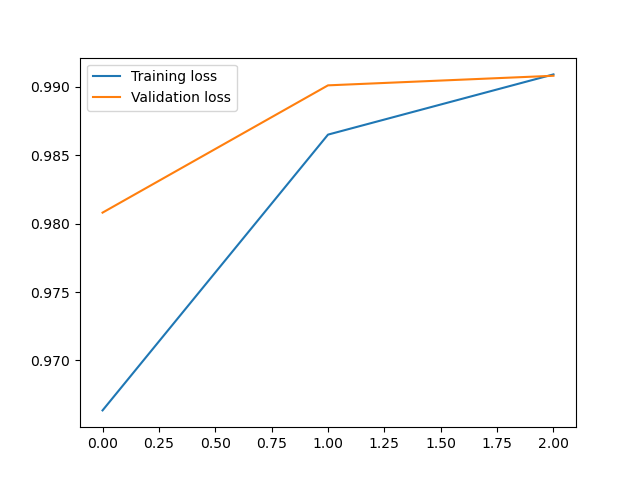
plt.plot(loss1, label='Training loss')

plt.plot(loss2, label='Validation loss')

plt.legend()
输出:
第0次训练:训练准确率:0.9646166666666718,测试准确率:0.9868999999999996

第1次训练:训练准确率:0.9865833333333389,测试准确率:0.9908999999999998

第2次训练:训练准确率:0.9917000000000039,测试准确率:0.9879999999999994

<matplotlib.legend.Legend at 0x21f03092fd0>

卷积神经网络中nn.Conv2d()和nn.MaxPool2d()以及卷积神经网络实现minist数据集分类的更多相关文章
- tf.nn.conv2d。卷积函数
tf.nn.conv2d是TensorFlow里面实现卷积的函数,参考文档对它的介绍并不是很详细,实际上这是搭建卷积神经网络比较核心的一个方法,非常重要 tf.nn.conv2d(input, fil ...
- 【TensorFlow】tf.nn.conv2d是怎样实现卷积的?
tf.nn.conv2d是TensorFlow里面实现卷积的函数,参考文档对它的介绍并不是很详细,实际上这是搭建卷积神经网络比较核心的一个方法,非常重要 tf.nn.conv2d(input, fil ...
- TF-卷积函数 tf.nn.conv2d 介绍
转自 http://www.cnblogs.com/welhzh/p/6607581.html 下面是这位博主自己的翻译加上测试心得 tf.nn.conv2d是TensorFlow里面实现卷积的函数, ...
- tf.nn.conv2d 参数介绍
tf.nn.conv2d是TensorFlow里面实现卷积的函数,参考文档对它的介绍并不是很详细,实际上这是搭建卷积神经网络比较核心的一个方法,非常重要 tf.nn.conv2d(input, fil ...
- Pytorch本人疑问(1) torch.nn和torch.nn.functional之间的区别
在写代码时发现我们在定义Model时,有两种定义方法: torch.nn.Conv2d()和torch.nn.functional.conv2d() 那么这两种方法到底有什么区别呢,我们通过下述代码看 ...
- AI芯片:高性能卷积计算中的数据复用
随着深度学习的飞速发展,对处理器的性能要求也变得越来越高,随之涌现出了很多针对神经网络加速设计的AI芯片.卷积计算是神经网络中最重要的一类计算,本文分析了高性能卷积计算中的数据复用,这是AI芯片设计中 ...
- 深度学习原理与框架-Tensorflow卷积神经网络-卷积神经网络mnist分类 1.tf.nn.conv2d(卷积操作) 2.tf.nn.max_pool(最大池化操作) 3.tf.nn.dropout(执行dropout操作) 4.tf.nn.softmax_cross_entropy_with_logits(交叉熵损失) 5.tf.truncated_normal(两个标准差内的正态分布)
1. tf.nn.conv2d(x, w, strides=[1, 1, 1, 1], padding='SAME') # 对数据进行卷积操作 参数说明:x表示输入数据,w表示卷积核, stride ...
- tf入门-tf.nn.conv2d是怎样实现卷积的?
转自:https://blog.csdn.net/mao_xiao_feng/article/details/78004522 实验环境:tensorflow版本1.2.0,python2.7 介绍 ...
- Pytorch中nn.Conv2d的用法
Pytorch中nn.Conv2d的用法 nn.Conv2d是二维卷积方法,相对应的还有一维卷积方法nn.Conv1d,常用于文本数据的处理,而nn.Conv2d一般用于二维图像. 先看一下接口定义: ...
- tf.nn.conv2d卷积函数之图片轮廓提取
一.tensorflow中二维卷积函数的参数含义:def conv2d(input, filter, strides, padding, use_cudnn_on_gpu=True, data_for ...
随机推荐
- 如何阅读 Paper
前言 论文(Paper)通常是新技术.算法.编程方法或软件工具的首次公布.通过阅读论文,我们可以了解最新的技术进展,保持自己的技能和知识是最新的. 同时,论文提供了对特定主题深入理解的机会.它们通常包 ...
- Golang 之 casbin(权限管理)
目录 1. 权限管理 官网 编辑器测试 1.1.1. 特征 Casbin的作用 Casbin不执行的操作 1.1.2. 怎么运行的 1.1.3. 安装 1. 示例代码 xormadapter 2. 示 ...
- flask注册功能
一个项目的简单结构划分 首先创建一个新项目 可以正常运行与访问 创建配置文件并添加配置. 将这里拆分到不同的文件中,让启动文件更加简洁. 创建一个apps包,导入配置模块,导入Flask,定义创建ap ...
- Web Service和Web API理解和使用场景
Web Service 理解:Web Service 是一种基于网络的服务,它使用标准化的消息传递协议,最典型的是基于 SOAP(Simple Object Access Protocol)协议.SO ...
- Django用户认证组件 (auth模块)
1.导入 auth 模块 # 认证模块 from django.contrib import auth # 对应数据库用户表,可以继承扩展 from django.contrib.auth.model ...
- 授权调用: 介绍 Transformers 智能体 2.0
简要概述 我们推出了 Transformers 智能体 2.0! ⇒ 在现有智能体类型的基础上,我们新增了两种能够 根据历史观察解决复杂任务的智能体. ⇒ 我们致力于让代码 清晰.模块化,并确保最终提 ...
- 用python字典统计CSV数据
1.用python字典统计CSV数据的步骤和代码示例 为了使用Python字典来统计CSV数据,我们可以使用内置的csv模块来读取CSV文件,并使用字典来存储统计信息.以下是一个详细的步骤和完整的代码 ...
- docker资源限制与数据持久化
1. docker简介和核心概念 Docker 是一个开源的应用容器引擎,让开发者可以打包他们的应用以及依赖包到一个可移植的容器中,然后发布到任何流行的Linux机器上,也可以实现虚拟化.容器是完全使 ...
- unaipp 发送验证码倒计时
view代码 <view class="margin-top" @tap="getCheckNum()"> <view class=" ...
- uniapp 拨打电话功能
phoneNumber进行动态调用时候一定要添加引号,否则会报错 1 call() { 2 uni.makePhoneCall({ 3 phoneNumber: 'this.leads.tel' // ...
