如何使用C++11实现C#属性概念设计
目录(原创博客,版权所有,转载请注明出处 http://www.cnblogs.com/feng-sc)
2.2、C++实现效果与C#效果对比(熟悉C#属性读者可从此小节开始)
3.1、property_rw介绍
3.2、property_r、property_w介绍
1、概述
在程序员的行业里,有一个有趣的说法,但我觉得这个说法在其他行业也同样适用:行业的一流高手都在制定标准和概念,二流高手都在实现标准和概念,三流高手的都在使用标准。
我们今天来做一次二流的高手做的事情:1、为c++引入一个概念标准;2、用c++实现这个概念。
2、C#属性的概念
本想略过对C#属性的介绍,但考虑到读者可能没使用过C#,也不知道C#的属性到底有什么用,因此还是稍微从使用的角度先解释一下C#中属性的概念(如果您对属性已经足够了解,可直接跳过本章或直接从下面第2点的“C++实现效果与C#效果对比”开始)。
一下内容包含如下部分:
1、简单示例代码介绍C#中的属性;
2、C++实现效果与C#效果对比;
1、简单示例代码介绍C#中的属性
我们来看第一段C#代码:
//示例代码1.0 http://www.cnblogs.com/feng-sc/p/5742689.html
class TestDemo

{

    public String Name

    {

        get;

        set;

    }

}

class Program

{

    static void Main(string[] args)

    {

        TestDemo test = new TestDemo();

        test.Name = "test";

        System.Console.WriteLine(test.Name);

    }

}
上面代码中,我们创建了一个String类型的属性Name,这个时候我们,我们的属性其实跟一个成员变量没啥区别,只是一个成员变量罢了。
另外,还需要读者了解的是,属性里的get和set分别控制属性的读写权限:
1、如果只有get,那么Name为只读模式;
2、如果只有set,那么Name为只写模式;
只读模式示例代码:
 //示例代码1.0 http://www.cnblogs.com/feng-sc/p/5742689.html

 class TestDemo

 {

     public String Name

     {

         get;

     }

 }

 class Program

 {

     static void Main(string[] args)

     {

         TestDemo test = new TestDemo();

         test.Name = "test";//只读属性,赋值不允许,编译出错
         System.Console.WriteLine(test.Name);

     }

 }
只写模式示例代码:
 //示例代码1.0 http://www.cnblogs.com/feng-sc/p/5742689.html

 class TestDemo

 {

     public String Name

     {

         set;

     }

 }

 class Program

 {

     static void Main(string[] args)

     {

         TestDemo test = new TestDemo();

         test.Name = "test";

         System.Console.WriteLine(test.Name);  //只写模式,test.Name取值不允许,编译失败

     }

 }
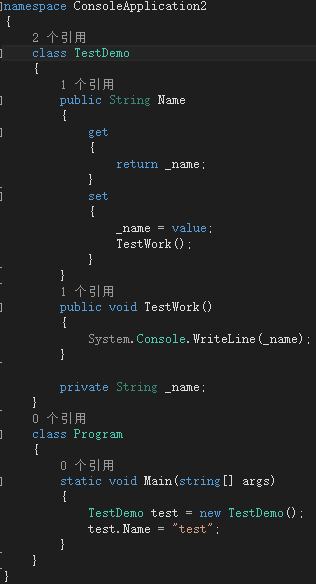
我们再来看一个复杂点的例子:
 //示例代码1.0 http://www.cnblogs.com/feng-sc/p/5742689.html

 class TestDemo

 {

     public String Name

     {

         get

         {

             return _name;

         }

         set

         {

             _name = value;

             TestWork();

         }

     }

     public void TestWork()

     {

         System.Console.WriteLine(_name);

     }

     private String _name;

 }

 class Program

 {

     static void Main(string[] args)

     {

         TestDemo test = new TestDemo();

         test.Name = "test";

     }

 }
以上代码中,我们运行到第28行的时候,会进入到第10行,最终运行结果打印出“test”。
是的,其实很简单,如果没有属性,我们完全可以用一个私有的成员函数,然后为每个成员函数添加一个get和set的方法(java下的通常做法),如下代码中的TestDemo完全能实现上面代码中属性的做法:
 //示例代码1.0 http://www.cnblogs.com/feng-sc/p/5742689.html

 class TestDemo

 {

     public String GetName()

     {

         return _name;

     }

     public void SetName(String value)

     {

         _name = value;

         TestWork();

     }

     public void TestWork()

     {

         System.Console.WriteLine(_name);

     }

     private String _name;

 }
……
OK,那为什么要有属性呢?
其实追求的真是一种书写方法吧,属性能让我们像访问成员变量一样访问直接赋值和取值,同时,在赋值和取值的时候,能根据需求调用相应的内部实现函数。
2、C++实现效果与C#效果对比
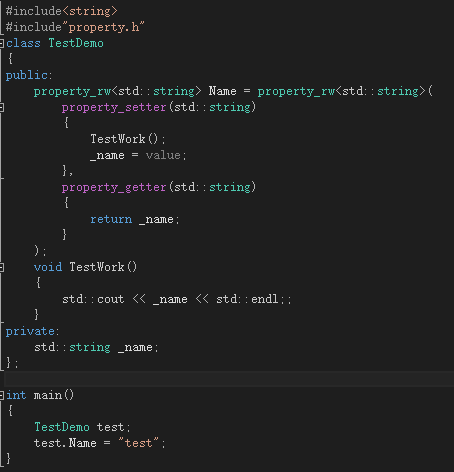
请读者对比下左右两边的属性Name的定义方式,C#里面的get和set方法在C++11实现中,使用了property_getter和property_setter实现,property_getter和property_setter中代码的实现方式与C#均一致。
OK,看完属性效果比较,如果您觉得对你的胃口,那么可以继续往下看,下面会有关于proerty_rw更详细的说明。
3、如何使用C++11实现C#属性的概念模式
本章我们将一步步介绍C++11实现属性三种形式分别是:
1、property_rw :对应C#的读写模式(get和set均有)
2、property_r :对应C#的只读模式(没有set)
3、property_w :对应C#的只写模式(没有get)
1、property_rw介绍
property_rw的实现代码很简单,但需要大家对C++11中的std::function和lamda表达式有所了解,如果您不是很了解或在下面介绍中觉得难懂,可以先看看我之前写的关于C++11的总结文章:【干货】C++11常用特性的使用经验总结,对您理解本章内容会有帮助。
proerty_rw源码:
 //示例代码1.0 http://www.cnblogs.com/feng-sc/p/5742689.html

 #include<functional>

 #define property_setter(variableType) [&](variableType value)

 #define property_getter(variableType) [&]()->variableType

 template <typename ValueType>

 class property_rw

 {

 public:

     typedef std::function<void(ValueType value)> Setter;

     typedef std::function<ValueType(void)> Getter;

     explicit property_rw(Setter setter, Getter getter) : m_setter(setter), m_getter(getter) {}

     property_rw& operator=(ValueType value)

     {

         this->value = value;

         m_setter(this->value);

         return *this;

     }

     property_rw& operator=(const property_rw & instance)

     {

         this->value = instance.m_getter();

         m_setter(this->value);

         return *this;

     }

     operator ValueType()

     {

         return m_getter();

     }

 private:

     ValueType value;

     Setter m_setter;

     Getter m_getter;

 };
上面代码我们可以看出,property_rw是一个模板类,ValueType为属性的类型名,因此大家可以想到,我们的属性其实是一个类对象。
因此,我们来看一个最简单的使用示例:
//示例代码1.0 http://www.cnblogs.com/feng-sc/p/5742689.html
#include<string>

#include"property.h"

class TestDemo

{

public:

    property_rw<std::string> Name;

};
需要注意:#include<string>需要放在#include"property.h"之前,同理,其他非基本数据类型引用头文件均需如此,这主要是由于proerty.h内部宏定义的property_setter和property_getter所导致,要保持属性的书写风格,目前暂时没有很好的解决这个问题。
上面的代码无法编译通过,但我们先看看形式,我们定义了一个string类型的属性Name。
从proerty_rw的构造函数看explicit property_rw(Setter setter, Getter getter),我们定义这个属性,需要给这个属性赋值两个参数,分别为Setter和Getter。Getter和Setter类型分别为std::function定义的两个可执行对象类型。在【干货】C++11常用特性的使用经验总结文章中,我们介绍了std::function定义的可执行对象可以有三种形式的赋值,分别是:
1、同形式(返回值和参数相同)函数指针;
2、同形式的类成员函数;
3、同形式的lamda表达式函数;
为了统一外面的使用形式,我们使用宏的方式定义(property_rw源码第3、4行)property_getter和proerty_setter,该宏定义其实是限制外部使用lamda表达式方式(当然,这没能从编译源头限制,其实外部还是可以使用第1、2两种方式)。我们来看下property_getter和proerty_setter的定义:
#define property_setter(variableType) [&](variableType value) //定义lamda表达式的头部,[&]表示对定义范围内的变量取值权限为引用形式,参数为variableType
#define property_getter(variableType) [&]()->variableType //property_getter的lamda表达式返回值为variableType
明白了property_getter和proerty_setter的定义,我们来看下Name的初始化:
//示例代码1.0 http://www.cnblogs.com/feng-sc/p/5742689.html
class TestDemo

{

public:

    property_rw<std::string> Name = property_rw<std::string>(

        property_setter(std::string)

        {

        },

        property_getter(std::string)

        {

            return "test";

        }

    );

};
这个时候我们来看Name的初始化就非常清晰了,其实就是给property_rw构造函数传递了两个lamda表达式定义的函数,经过我们的宏封装,使我们的属性使用风格看起来与C#形式很像。
我们再来看看property_rw中的函数,控制读取属性的函数:
//示例代码1.0 http://www.cnblogs.com/feng-sc/p/5742689.html
property_rw& operator=(ValueType value)

{

    this->value = value;

    m_setter(this->value);

    return *this;

}

property_rw& operator=(const property_rw & instance)

{

    this->value = instance.m_getter();

    m_setter(this->value);

    return *this;

}
加入我们现在有两个属性string类型的属性,名字分别为Name1,Name2,那么什么时候会调用上面两个函数呢?
TestDemo test;

test.Name1 = "test";   //调用第一个operator=()函数

test.Name2 = test.Name1; //调用第二个operator=()函数
property_rw中控制写熟悉的函数:
operator ValueType()

{

    return m_getter();

}
示例:
TestDemo test;

test.Name = "test";

std::string str = test.Name //调用写属性控制函数
小结:
property_rw的模板类实现简单吧,没有太多的逻辑代码,都是普通的类设计而已,关键需要大家有一些编码技巧。
2、property_r、property_w介绍
property_r和property_w就更加简单了,我么只需要把property_rw中的控制读或控制写的属性函数去掉,就可以变成只读或只写的属性类型。
property_r源码:
//示例代码1.0 http://www.cnblogs.com/feng-sc/p/5742689.html
template <typename ValueType>

class property_r

{

public:

    typedef std::function<void(ValueType value)> Setter;

    typedef std::function<ValueType(void)> Getter;

    explicit property_r(Getter getter) : m_getter(getter) {}

    operator ValueType()

    {

        return m_getter();

    }

private:

    ValueType value;

    Getter m_getter;

};
property_w源码:
//示例代码1.0 http://www.cnblogs.com/feng-sc/p/5742689.html
template <typename ValueType>

class property_w

{

public:

    typedef std::function<void(ValueType value)> Setter;

    explicit property_w(Setter setter) : m_setter(setter) {}

    property_w& operator=(ValueType value)

    {

        this->value = value;

        m_setter(this->value);

        return *this;

    }

    property_w& operator=(const property_w & instance)

    {

        this->value = instance.m_getter();

        m_setter(this->value);

        return *this;

    }

private:

    ValueType value;

    Setter m_setter;

};
property_r和property_w就没有什么可以介绍的了,基本和property_rw类似。
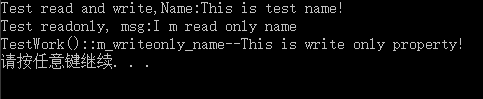
3、完整属性测试代码介绍
下面是一个比较完整的测试例子:
//示例代码1.0 http://www.cnblogs.com/feng-sc/p/5742689.html
#include<iostream>

#include<string>

#include"property.h"

class TestDemo

{

public:

    property_rw<std::string> Name = property_rw<std::string>(

        property_setter(std::string)

        {

            m_rw_name = value;

        },

        property_getter(std::string)

        {

            return m_rw_name;

        }

    );

    property_r<std::string> ReadOnlyName = property_r<std::string>(

        property_getter(std::string)

        {

            return m_readonly_name;

        }

    );

    property_w<std::string> WriteOnlyName = property_w<std::string>(

        property_setter(std::string)

        {

            m_writeonly_name = value;

            TestWork();

        }

    );

    void TestWork()

    {

        std::cout <<"TestWork()::m_writeonly_name--"<< m_writeonly_name << std::endl;

    }

private:

    std::string m_rw_name;

    std::string m_readonly_name = "I m read only name";

    std::string m_writeonly_name = "";

};

int main()

{

    TestDemo test;

    test.Name = "This is test name!";

    std::string str = test.Name;

    std::string readonly = test.ReadOnlyName;

    std::cout << "Test read and write,Name:" << str << std::endl;

    std::cout << "Test readonly, msg:" << readonly << std::endl;

    test.WriteOnlyName = "This is write only property!";

}
运行结果:
4、总结
本文我们首先介绍了C#属性概念,以及为什么使用属性,再一步一步引出我们如何使用C++11实现C#属性的效果。整篇文章所述没有太多逻辑的问题,单纯用我们所熟知的C++11知识加上我们的一些编码技巧,最后我们用很普通的做法实现了我们想要的效果。编程有时候给人的感觉就是这样,先要有一个好的概念(如本文中的属性概念),然后想办法用我们熟知的知识需完美地把它实现,这会让你蛮有成就感!
如何使用C++11实现C#属性概念设计的更多相关文章
- 文件系统取证分析(第11章:NTFS概念)
/* Skogkatt 开始翻译于2015-01-24,仅作为学习研究之用,谢绝转载. 2015-01-31更新MFT entry 属性概念. 2015-02-01翻译完成. 译注:我翻译这本书的这三 ...
- Hystrix概念设计
1. Hystrix概念设计 1.1. 大纲 1.2. 基本的容错模式 1.3. 断路器模式 1.4. 舱壁隔离模式 1.5. 容错理念 凡事依赖都可能失败 凡事资源都有限制 网络并不可靠 延迟是应用 ...
- 数据库设计理论与实践·<二>概念设计与逻辑设计
2一.概念设计 1.1 概念设计关键知识 1.2 辨析 实体与属性的区别: ①实体能进一步用多个属性来描述,属性却不能,属性是不可再细分/分割的原子项. ②实体内部或者多个实体之间存在联系,而属性无. ...
- 【转】从PowerDesigner概念设计模型(CDM)中的3种实体关系说起
PowerDesigner概念模型的relationship .inheritance. association 从PowerDesigner概念设计模型(CDM)中的3种实体关系说起
- Instagram的Material Design概念设计文章分享
近期開始研究最新的Android 5 Material Design,一加氢OS公布后,非常快就有一大批支持Android5原生风格的手机出来了,你的App还是UI帮设计的吗?该考虑升级到 Mater ...
- gradle入门(1-1)gradle的概念和使用
一.Gradle是什么 Gradle是一种Java应用构建工具,它采用领域特定语言 Groovy 语法实现配置. 1.Gradle的基本概念 项目:项目的配置 即 build.gradle. 任务:任 ...
- 【Spark深入学习-11】Spark基本概念和运行模式
----本节内容------- 1.大数据基础 1.1大数据平台基本框架 1.2学习大数据的基础 1.3学习Spark的Hadoop基础 2.Hadoop生态基本介绍 2.1Hadoop生态组件介绍 ...
- schema.xml属性概念
# schema 定义逻辑库 checkSQLschema 当该值设置为 true 时,如果我们执行语句**select * from TESTDB.travelrecord;**则 MyCat 会 ...
- 【Docker】(11)---Docker的网络概念
一.实现原理 1.实现原理 Docker使用Linux桥接,在宿主机虚拟一个Docker容器网桥(docker0),Docker启动一个容器时会根据Docker网桥的网段分配给容器一个IP地址,称为C ...
随机推荐
- C++连接Oracle之OCCI(windows)
上一节我们讲过了ADO连接Oracle,这一节我们尝试通过OCCI的方式,来在windows平台下连接Oracle数据库,下一节讨论在Linux环境下通过OCCI的方式连接远程的Oracle数据库. ...
- Numpy随机数
Numpy随机数 np.random随机数子库 1: 基本函数 .rand(d0,d1,..dn):创建d0-dn维度的随机数数组,浮点数,范围从0-1,均匀分布 .randn(d0,d1,..dn) ...
- redis lua 用来传输日志
2.8 Lua Script Redis2.6内置的Lua Script支持,可以在Redis的Server端一次过运行大量逻辑,就像存储过程一样,避免了海量中间数据在网路上的传输. Lua自称是在S ...
- 单点登录(SSO)解决方案之 CAS客户端与Spring Security集成
接上篇:单点登录(SSO)解决方案之 CAS服务端数据源设置及页面改造 Spring Security Spring Security是一个能够为基于Spring的企业应用系统提供声明式的安全访问控制 ...
- Java连接MySQL数据库及操作
Java操作MySQL数据库,需要驱动mysql-connector-java 来进行操作,去下载对应的jar包 一.导入需要的jar包 我用的是maven对包进行管理,在maven中添加如下内容 ...
- 关于oracle数据库
Oracle数据库是做什么的? oracle数据库和其他数据库一样,都是保存数据的,同时可以去查询,修改,删除等oracle和其他数据不一样的地方在于,它又复杂的机制可以保证在数据库服务器突然坏了的情 ...
- java并发:Semaphore
Semaphore是常见的同步工具类之一. Semaphore翻译成字面意思为 信号量,Semaphore可以控制同时访问的线程个数,也称为permit(许可). 在构造函数中指定permits个数. ...
- nyoj86-找球号(一) 【set 二分查找 hash】
http://acm.nyist.net/JudgeOnline/problem.php?pid=86 找球号(一) 时间限制:3000 ms | 内存限制:65535 KB 难度:3 描述 ...
- Island Transport
Island Transport http://acm.hdu.edu.cn/showproblem.php?pid=4280 Time Limit: 20000/10000 MS (Java/Oth ...
- python进程之间修改数据[Manager]与进程池[Pool]
#前面的队列Queue和管道Pipe都是仅仅能再进程之间传递数据,但是不能修改数据,今天我们学习的东西就可以在进程之间同时修改一份数据 #Mnager就可以实现 import multiprocess ...