Netty 源码 NioEventLoop(一)初始化
Netty 源码 NioEventLoop(一)初始化与启动
Netty 系列目录(https://www.cnblogs.com/binarylei/p/10117436.html)
相关文章:
Netty 基于事件驱动模型,使用不同的事件来通知我们状态的改变或者操作状态的改变。它定义了在整个连接的生命周期里当有事件发生的时候处理的核心抽象。
Channel:Netty 网络操作抽象类,EventLoop 主要是为 Channel 处理 I/O 操作,两者配合参与 I/O 操作。
EventLoopGroup:一个 EventLoop 的分组,它可以获取到一个或者多个 EventLoop 对象,因此它提供了迭代出 EventLoop 对象的方法。
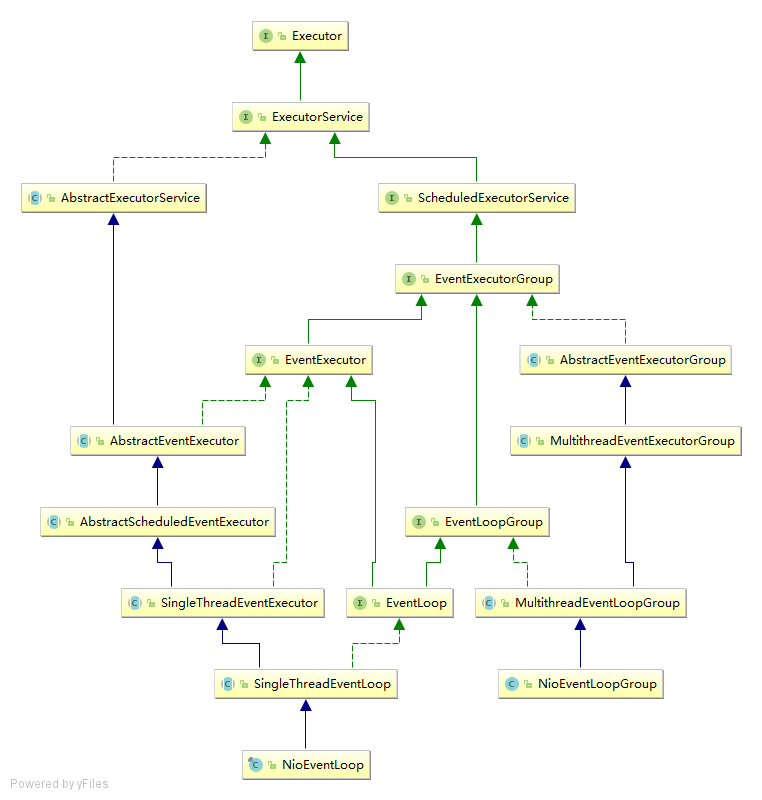
1. EventLoop 类图

其中 Executor、ExecutorService、AbstractExecutorService、ScheduledExecutorService 属于 JDK 定义的规范,Netty 实现了自己的自定义线程池。
EventExecutorGroup提供了 next() 方法,除此之外是线程池的生命周期方法,如 shutdownGracefully。EventLoopGroup提供了 register 方法,将 channel 绑定到线程上。EventExecutor继承自 EventExecutorGroup,提供了 inEventLoop 方法。EventLoop继承自 EventLoopGroup,提供了 register 注册和 parent 方法。MultithreadEventExecutorGroup基于多线程的 EventExecutor (事件执⾏行器)的分组抽象类ThreadPerTaskExecutor实现 Executor 接⼝口,每个任务一个线程的执行器实现类
2. NioEventLoopGroup 初始化

(1) NioEventLoopGroup
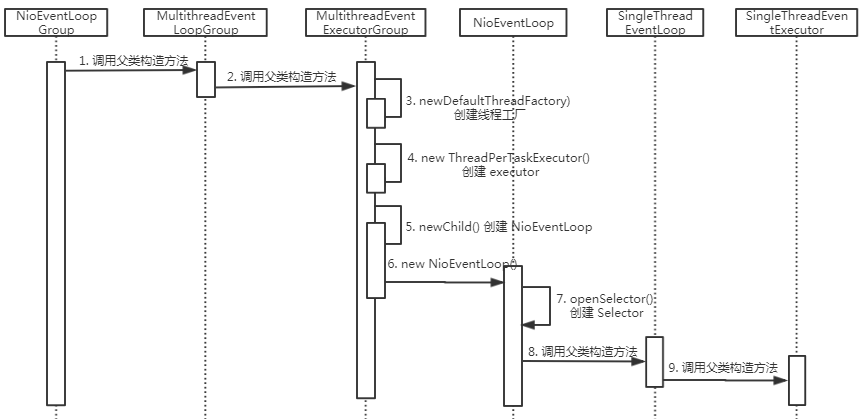
NioEventLoopGroup 构造方法中最重要的一件事是创建子线程 NioEventLoop,创建完成后子线程并未启动,该线程在 channel 注册时启动。
public NioEventLoopGroup(int nThreads, Executor executor, EventExecutorChooserFactory chooserFactory,

         final SelectorProvider selectorProvider, final SelectStrategyFactory selectStrategyFactory,

         final RejectedExecutionHandler rejectedExecutionHandler) {

    super(nThreads, executor, chooserFactory, selectorProvider, selectStrategyFactory, rejectedExecutionHandler);

}
nThreads, threadFactory前两个参数用于创建线程池,如果 nThreads=0 则默认为 CPU 核数的 2 倍chooserFactory用于循环获取 NioEventLoopGroup 中的下一个 NioEventLoop 的算法。2 的幂次方使用位运算selectorProvider, selectStrategyFactory后二个参数用于创建 selectorrejectedExecutionHandler异常处理的 Handler
(2) MultithreadEventExecutorGroup
protected MultithreadEventExecutorGroup(int nThreads, Executor executor,

        EventExecutorChooserFactory chooserFactory, Object... args) {

    // 1. executor 用于创建一个子线程

    if (executor == null) {

        executor = new ThreadPerTaskExecutor(newDefaultThreadFactory());

    }

    // 2. 创建所有的子线程 children

    children = new EventExecutor[nThreads];

    for (int i = 0; i < nThreads; i ++) {

        boolean success = false;

        try {

            children[i] = newChild(executor, args);

            success = true;

        } catch (Exception e) {

            throw new IllegalStateException("failed to create a child event loop", e);

        } finally {

            if (!success) {

                // 有异常则需要销毁资源

            }

        }

    }

    // 3. chooser 用于循环获取 children 中的下一个元素的算法。2 的幂次方使用位运算

    chooser = chooserFactory.newChooser(children);

    // 4. children 初始化完成则设置 setSuccess 为 true

    final FutureListener<Object> terminationListener = new FutureListener<Object>() {

        @Override

        public void operationComplete(Future<Object> future) throws Exception {

            if (terminatedChildren.incrementAndGet() == children.length) {

                terminationFuture.setSuccess(null);

            }

        }

    };

    for (EventExecutor e: children) {

        e.terminationFuture().addListener(terminationListener);

    }

    // 5. 返回一个只读的 children 暴露给开发者

    Set<EventExecutor> childrenSet = new LinkedHashSet<EventExecutor>(children.length);

    Collections.addAll(childrenSet, children);

    readonlyChildren = Collections.unmodifiableSet(childrenSet);

}
MultithreadEventExecutorGroup 创建了所有的子线程,其中最重要的方法是 newChild(executor, args)
(3) newChild
// NioEventLoopGroup 创建子线程 NioEventLoop

protected EventLoop newChild(Executor executor, Object... args) throws Exception {

    return new NioEventLoop(this, executor, (SelectorProvider) args[0],

        ((SelectStrategyFactory) args[1]).newSelectStrategy(), (RejectedExecutionHandler) args[2]);

}
(4) NioEventLoop
NioEventLoop 构造时就创建了一个 selector 对象。下面看一个 NioEventLoop 的创建过程。
// 创建了一个 selector 对象

NioEventLoop(NioEventLoopGroup parent, Executor executor, SelectorProvider selectorProvider,

             SelectStrategy strategy, RejectedExecutionHandler rejectedExecutionHandler) {

    super(parent, executor, false, DEFAULT_MAX_PENDING_TASKS, rejectedExecutionHandler);

    provider = selectorProvider;

    final SelectorTuple selectorTuple = openSelector();

    selector = selectorTuple.selector;

    unwrappedSelector = selectorTuple.unwrappedSelector;

    selectStrategy = strategy;

}

// 负责 channel 的注册

protected SingleThreadEventLoop(EventLoopGroup parent, Executor executor,

        boolean addTaskWakesUp, int maxPendingTasks, RejectedExecutionHandler rejectedExecutionHandler) {

    super(parent, executor, addTaskWakesUp, maxPendingTasks, rejectedExecutionHandler);

    tailTasks = newTaskQueue(maxPendingTasks);

}

// 负责执行任务

protected SingleThreadEventExecutor(EventExecutorGroup parent, Executor executor,

        boolean addTaskWakesUp, int maxPendingTasks, RejectedExecutionHandler rejectedHandler) {

    super(parent);

    this.addTaskWakesUp = addTaskWakesUp;

    this.maxPendingTasks = Math.max(16, maxPendingTasks);

    this.executor = ObjectUtil.checkNotNull(executor, "executor");

    taskQueue = newTaskQueue(this.maxPendingTasks);

    rejectedExecutionHandler = ObjectUtil.checkNotNull(rejectedHandler, "rejectedHandler");

}
通过以上步骤就创建了 NioEventLoop 对象,但这个线程并未启动。很显然在 channel 注册到 NioEventLoop 时会启动该线程。
3. NioEventLoop 启动过程
在 Channel 注册到 eventLoop 上时会执行 execute() 方法,启动线程。
// NioServerSocketChannel -> AbstractChannel.AbstractUnsafe

public final void register(EventLoop eventLoop, final ChannelPromise promise) {

    // 同一个 channel 的注册、读、写等都在 eventLoop 完成,避免多线程的锁竞争

    if (eventLoop.inEventLoop()) {

        // 将 channel 注册到 eventLoop 上

        register0(promise);

    } else {

        // 若 eventLoop 线程没有启动,启动该线程

        try {

            eventLoop.execute(new Runnable() {

                @Override

                public void run() {

                    register0(promise);

                }

            });

        } catch (Throwable t) {

            // 省略...

        }

    }

}
(1) execute
在 eventLoop 执行 execute 方法时,如果线程还未启动则需要先启动线程。
// SingleThreadEventExecutor

public void execute(Runnable task) {

    if (task == null) {

        throw new NullPointerException("task");

    }

    // 是否在 EventLoop 线程中

    boolean inEventLoop = inEventLoop();

    if (inEventLoop) {

        addTask(task);

    } else {

        startThread();

        // 启动线程

        addTask(task);

        if (isShutdown() && removeTask(task)) {

            reject();

        }

    }

    // 唤醒线程

    if (!addTaskWakesUp && wakesUpForTask(task)) {

        wakeup(inEventLoop);

    }

}
!addTaskWakesUp 表示“添加任务时,是否唤醒线程”?!但是,怎么使⽤用取反了。这样反倒变成了,“添加任务时,是否【不】唤醒线程”。具体的原因是为什么呢?
真正的意思是,“添加任务后,任务是否会自动导致线程唤醒”。为什么呢?
对于 Nio 使用的 NioEventLoop ,它的线程执行任务是基于 Selector 监听感兴趣的事件,所以当任务添加到 taskQueue 队列中时,线程是无感知的,所以需要调用 #wakeup(boolean inEventLoop) 方法,进行主动的唤醒。
对于 Oio 使用的 ThreadPerChannelEventLoop,它的线程执行是基于 taskQueue 队列列监听(阻塞拉取)事件和任务,所以当任务添加到 taskQueue 队列中时,线程是可感知的,相当于说,进行被动的唤醒。
(2) startThread 启动线程
private void startThread() {

    if (state == ST_NOT_STARTED) {

        if (STATE_UPDATER.compareAndSet(this, ST_NOT_STARTED, ST_STARTED)) {

            try {

                doStartThread();

            } catch (Throwable cause) {

                STATE_UPDATER.set(this, ST_NOT_STARTED);

                PlatformDependent.throwException(cause);

            }

        }

    }

}

// 真正启动线程,执行的是 NioEventLoop 中的 run 任务

private void doStartThread() {

    assert thread == null;

    executor.execute(new Runnable() {

        @Override

        public void run() {

            thread = Thread.currentThread();

            if (interrupted) {

                thread.interrupt();

            }

            boolean success = false;

            updateLastExecutionTime();

            try {

                // run 方法由子类 NioEventLoop 实现,是一个死循环

                SingleThreadEventExecutor.this.run();

                success = true;

            } catch (Throwable t) {

                logger.warn("Unexpected exception from an event executor: ", t);

            } finally {

                // 如果执行到这里,则说明需要关闭该线程

            }

        }

    });

}
executor 默认是在 MultithreadEventExecutorGroup 的构造方法完成初始化的,代码如下:
executor = new ThreadPerTaskExecutor(newDefaultThreadFactory());

public final class ThreadPerTaskExecutor implements Executor {

    private final ThreadFactory threadFactory;

    public ThreadPerTaskExecutor(ThreadFactory threadFactory) {

        if (threadFactory == null) {

            throw new NullPointerException("threadFactory");

        }

        this.threadFactory = threadFactory;

    }

    @Override

    public void execute(Runnable command) {

        threadFactory.newThread(command).start();

    }

}
ThreadPerTaskExecutor 通过线程工厂 threadFactory 创建一个线程并启动,至此 NioEventLoop 开始工作了。在这个简单的类中使用的代理模式和命令模式两种设计模式。
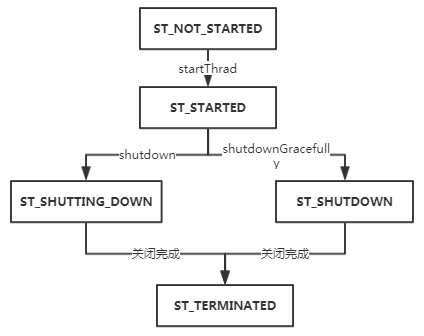
(3) 线程状态变化
SingleThreadEventExecutor 维护了线程的状态字段 state。

每天用心记录一点点。内容也许不重要,但习惯很重要!
Netty 源码 NioEventLoop(一)初始化的更多相关文章
- Netty 源码 NioEventLoop(三)执行流程
Netty 源码 NioEventLoop(三)执行流程 Netty 系列目录(https://www.cnblogs.com/binarylei/p/10117436.html) 上文提到在启动 N ...
- Netty 源码(二)NioEventLoop 之 Channel 注册
Netty 源码(二)NioEventLoop 之 Channel 注册 Netty 系列目录(https://www.cnblogs.com/binarylei/p/10117436.html) 一 ...
- Netty源码分析第2章(NioEventLoop)---->第3节: 初始化线程选择器
Netty源码分析第二章:NioEventLoop 第三节:初始化线程选择器 回到上一小节的MultithreadEventExecutorGroup类的构造方法: protected Multi ...
- Netty源码分析第1章(Netty启动流程)---->第3节: 服务端channel初始化
Netty源码分析第一章:Netty启动流程 第三节:服务端channel初始化 回顾上一小节的initAndRegister()方法: final ChannelFuture initAndRe ...
- Netty源码分析第2章(NioEventLoop)---->第1节: NioEventLoopGroup之创建线程执行器
Netty源码分析第二章: NioEventLoop 概述: 通过上一章的学习, 我们了解了Server启动的大致流程, 有很多组件与模块并没有细讲, 从这个章开始, 我们开始详细剖析netty的各个 ...
- Netty源码分析第2章(NioEventLoop)---->第2节: NioEventLoopGroup之NioEventLoop的创建
Netty源码分析第二章: NioEventLoop 第二节: NioEventLoopGroup之NioEventLoop的创建 回到上一小节的MultithreadEventExecutorG ...
- Netty源码分析第2章(NioEventLoop)---->第4节: NioEventLoop线程的启动
Netty源码分析第二章: NioEventLoop 第四节: NioEventLoop线程的启动 之前的小节我们学习了NioEventLoop的创建以及线程分配器的初始化, 那么NioEvent ...
- Netty源码分析第2章(NioEventLoop)---->第5节: 优化selector
Netty源码分析第二章: NioEventLoop 第五节: 优化selector 在剖析selector轮询之前, 我们先讲解一下selector的创建过程 回顾之前的小节, 在创建NioEv ...
- Netty源码分析第2章(NioEventLoop)---->第6节: 执行select操作
Netty源码分析第二章: NioEventLoop 第六节: 执行select操作 分析完了selector的创建和优化的过程, 这一小节分析select相关操作 跟到跟到select操作的入口 ...
随机推荐
- 超文本标记语言HTML
介绍html文档的基本结构,html常用标签的使用,理解html语言制作网页基本原理. html概述和基本结构 html概述 HTML是 HyperText Mark-up Language 的首字母 ...
- python正则表达式re库(自用)
经典例子: 1.由26个字母组成的字符串 ^[A-Za-z]+$ 2. 中国境内邮政编码 [1-9]\d{5} 3.IP地址 0-99:[1-9]?\d 100-199:1\d{2} 200-249: ...
- php iconv 函数
原型: $txtContent = iconv("utf-8",'GBK',$txtContent); 特殊参数:iconv("UTF-8","GB2 ...
- hibernate自带的注解和jpa注解的冠希
hibernate是实现了JPA规范,在我们使用hibernate框架的时候,我们引入了hibernate3或者4这个核心包.hibernate-jpa-2.0-api-1.0.0.Final.jar ...
- Servlet Request 请求转发
request.getRequestDispatcher("logined.jsp").forward(request, response); //登录用户在登录页面验证通过 ...
- 视频采集,存成avi
视频采集,存成aviunit Unit1; interface uses Windows, Messages, SysUtils, Classes, Graphics, Controls, Form ...
- Hadoop 3.0.0-alpha1几个值得关注的特性
1.支持纠删码:意味着更灵活的存储策略,即经常使用的数据利用备份方式存储(3倍存储消耗),冷数据利用纠删码容错(1.4倍存储消耗,但会造成额外的IO及CPU消耗): 2.MapReduce任务支持本地 ...
- Maven(Eclipse版)
前言: 由于最近工作学习,总是能碰到Maven的源码.虽然平时工作并不使用Maven,但是为了学习一些源码,还是必须要了解下.这篇文章不是一个全面的Maven解析,而是一个简单的介绍,包括Eclips ...
- 通过Chrome的inspect对手机webview进行调试
使用chrome的inspect可以对手机上的webview进行调试,因为真机没有什么比较好的调试工具,而chrome提供了这一个工具可以比较方便的查看真机上的元素,以及进行调试. 其实我对webvi ...
- spotlight
spotlight - 必应词典 美['spɑt.laɪt]英['spɒt.laɪt] n.聚光灯:聚光灯照亮的地方:聚光灯照明圈:媒体和公众的注意 v.用聚光灯照:突出报道(以使公众注意) 网络射灯 ...
