Netty学习笔记(2)ByteBuffer
1. 测试ByteBuffer
1.1 依赖
<dependencies>

        <dependency>

            <groupId>io.netty</groupId>

            <artifactId>netty-all</artifactId>

            <version>4.1.48.Final</version>

        </dependency>

        <dependency>

            <groupId>org.projectlombok</groupId>

            <artifactId>lombok</artifactId>

            <version>1.18.20</version>

        </dependency>

        <dependency>

            <groupId>com.google.code.gson</groupId>

            <artifactId>gson</artifactId>

            <version>2.8.6</version>

        </dependency>

        <dependency>

            <groupId>com.google.guava</groupId>

            <artifactId>guava</artifactId>

            <version>20.0</version>

        </dependency>

        <dependency>

            <groupId>ch.qos.logback</groupId>

            <artifactId>logback-classic</artifactId>

            <version>1.2.4</version>

        </dependency>

    </dependencies>
1.2 新建文本文件data.txt
15354154154aahbaj
1.3 使用 FileChannel 来读取文件内容
输入或输出流,或者RandomAccessFile获取FileChannel
public static void main(String[] args) {

        // 输入或输出流获得 ,或者RandomAccessFile获取FileChannel

        try (FileChannel channel = new FileInputStream("data.txt").getChannel()) {

            // 准备缓冲区  缓冲区10字节

            ByteBuffer buffer = ByteBuffer.allocate(10);

            int len = -1;

            while ((len = channel.read(buffer)) != -1) {

                log.debug("读取到的字节数{}", len);

                // 切换buffer为读模式就可以获取数据

                buffer.flip();

                while (buffer.remaining() > 0) {

                    byte b = buffer.get();

                    log.debug("读取到的字符{}", (char) b);

                }

                // 却换为写模式

                buffer.clear();

            }

        } catch (IOException e) {

        }

    }
2. ByteBuffer正确使用步骤
ByteBuffer初始是写状态
- 向 buffer 写入数据,例如调用 channel.read(buffer)
- 调用 flip() 切换至读模式
- 从 buffer 读取数据,例如调用 buffer.get()
- 调用 clear() 或 compact() 切换至写模式
- 重复 1~4 步骤
3. ByteBuffer 结构
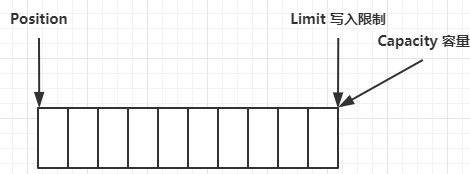
ByteBuffer 有以下重要属性
- capacity
- position
- limit
一开始
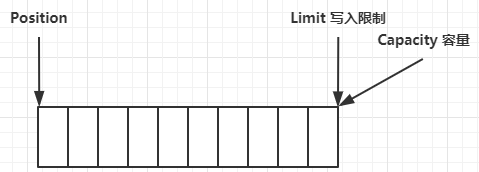
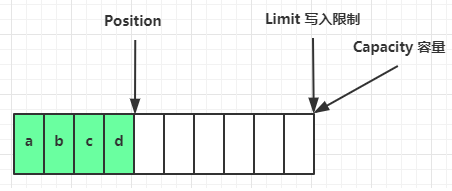
写模式下,position 是写入位置,limit 等于容量,下图表示写入了 4 个字节后的状态
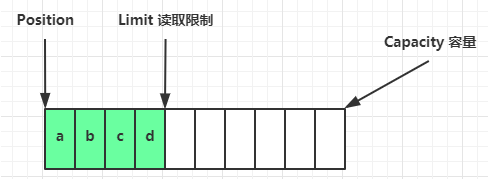
flip 动作发生后,position 切换为读取位置,limit 切换为读取限制
读取 4 个字节后,状态
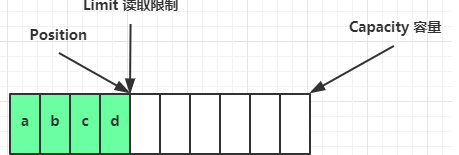
clear 动作发生后,状态
compact 方法,是把未读完的部分向前压缩,然后切换至写模式

4. ByteBuffer调试工具类
package com.wang.c1;

import io.netty.util.internal.StringUtil;

import java.nio.ByteBuffer;

import static io.netty.util.internal.MathUtil.isOutOfBounds;

import static io.netty.util.internal.StringUtil.NEWLINE;

public class ByteBufferUtil {

    private static final char[] BYTE2CHAR = new char[256];

    private static final char[] HEXDUMP_TABLE = new char[256 * 4];

    private static final String[] HEXPADDING = new String[16];

    private static final String[] HEXDUMP_ROWPREFIXES = new String[65536 >>> 4];

    private static final String[] BYTE2HEX = new String[256];

    private static final String[] BYTEPADDING = new String[16];

    static {

        final char[] DIGITS = "0123456789abcdef".toCharArray();

        for (int i = 0; i < 256; i++) {

            HEXDUMP_TABLE[i << 1] = DIGITS[i >>> 4 & 0x0F];

            HEXDUMP_TABLE[(i << 1) + 1] = DIGITS[i & 0x0F];

        }

        int i;

        // Generate the lookup table for hex dump paddings

        for (i = 0; i < HEXPADDING.length; i++) {

            int padding = HEXPADDING.length - i;

            StringBuilder buf = new StringBuilder(padding * 3);

            for (int j = 0; j < padding; j++) {

                buf.append("   ");

            }

            HEXPADDING[i] = buf.toString();

        }

        // Generate the lookup table for the start-offset header in each row (up to 64KiB).

        for (i = 0; i < HEXDUMP_ROWPREFIXES.length; i++) {

            StringBuilder buf = new StringBuilder(12);

            buf.append(NEWLINE);

            buf.append(Long.toHexString(i << 4 & 0xFFFFFFFFL | 0x100000000L));

            buf.setCharAt(buf.length() - 9, '|');

            buf.append('|');

            HEXDUMP_ROWPREFIXES[i] = buf.toString();

        }

        // Generate the lookup table for byte-to-hex-dump conversion

        for (i = 0; i < BYTE2HEX.length; i++) {

            BYTE2HEX[i] = ' ' + StringUtil.byteToHexStringPadded(i);

        }

        // Generate the lookup table for byte dump paddings

        for (i = 0; i < BYTEPADDING.length; i++) {

            int padding = BYTEPADDING.length - i;

            StringBuilder buf = new StringBuilder(padding);

            for (int j = 0; j < padding; j++) {

                buf.append(' ');

            }

            BYTEPADDING[i] = buf.toString();

        }

        // Generate the lookup table for byte-to-char conversion

        for (i = 0; i < BYTE2CHAR.length; i++) {

            if (i <= 0x1f || i >= 0x7f) {

                BYTE2CHAR[i] = '.';

            } else {

                BYTE2CHAR[i] = (char) i;

            }

        }

    }

    /**

     * 打印所有内容

     * @param buffer

     */

    public static void debugAll(ByteBuffer buffer) {

        int oldlimit = buffer.limit();

        buffer.limit(buffer.capacity());

        StringBuilder origin = new StringBuilder(256);

        appendPrettyHexDump(origin, buffer, 0, buffer.capacity());

        System.out.println("+--------+-------------------- all ------------------------+----------------+");

        System.out.printf("position: [%d], limit: [%d]\n", buffer.position(), oldlimit);

        System.out.println(origin);

        buffer.limit(oldlimit);

    }

    /**

     * 打印可读取内容

     * @param buffer

     */

    public static void debugRead(ByteBuffer buffer) {

        StringBuilder builder = new StringBuilder(256);

        appendPrettyHexDump(builder, buffer, buffer.position(), buffer.limit() - buffer.position());

        System.out.println("+--------+-------------------- read -----------------------+----------------+");

        System.out.printf("position: [%d], limit: [%d]\n", buffer.position(), buffer.limit());

        System.out.println(builder);

    }

    private static void appendPrettyHexDump(StringBuilder dump, ByteBuffer buf, int offset, int length) {

        if (isOutOfBounds(offset, length, buf.capacity())) {

            throw new IndexOutOfBoundsException(

                    "expected: " + "0 <= offset(" + offset + ") <= offset + length(" + length

                            + ") <= " + "buf.capacity(" + buf.capacity() + ')');

        }

        if (length == 0) {

            return;

        }

        dump.append(

                "         +-------------------------------------------------+" +

                        NEWLINE + "         |  0  1  2  3  4  5  6  7  8  9  a  b  c  d  e  f |" +

                        NEWLINE + "+--------+-------------------------------------------------+----------------+");

        final int startIndex = offset;

        final int fullRows = length >>> 4;

        final int remainder = length & 0xF;

        // Dump the rows which have 16 bytes.

        for (int row = 0; row < fullRows; row++) {

            int rowStartIndex = (row << 4) + startIndex;

            // Per-row prefix.

            appendHexDumpRowPrefix(dump, row, rowStartIndex);

            // Hex dump

            int rowEndIndex = rowStartIndex + 16;

            for (int j = rowStartIndex; j < rowEndIndex; j++) {

                dump.append(BYTE2HEX[getUnsignedByte(buf, j)]);

            }

            dump.append(" |");

            // ASCII dump

            for (int j = rowStartIndex; j < rowEndIndex; j++) {

                dump.append(BYTE2CHAR[getUnsignedByte(buf, j)]);

            }

            dump.append('|');

        }

        // Dump the last row which has less than 16 bytes.

        if (remainder != 0) {

            int rowStartIndex = (fullRows << 4) + startIndex;

            appendHexDumpRowPrefix(dump, fullRows, rowStartIndex);

            // Hex dump

            int rowEndIndex = rowStartIndex + remainder;

            for (int j = rowStartIndex; j < rowEndIndex; j++) {

                dump.append(BYTE2HEX[getUnsignedByte(buf, j)]);

            }

            dump.append(HEXPADDING[remainder]);

            dump.append(" |");

            // Ascii dump

            for (int j = rowStartIndex; j < rowEndIndex; j++) {

                dump.append(BYTE2CHAR[getUnsignedByte(buf, j)]);

            }

            dump.append(BYTEPADDING[remainder]);

            dump.append('|');

        }

        dump.append(NEWLINE +

                "+--------+-------------------------------------------------+----------------+");

    }

    private static void appendHexDumpRowPrefix(StringBuilder dump, int row, int rowStartIndex) {

        if (row < HEXDUMP_ROWPREFIXES.length) {

            dump.append(HEXDUMP_ROWPREFIXES[row]);

        } else {

            dump.append(NEWLINE);

            dump.append(Long.toHexString(rowStartIndex & 0xFFFFFFFFL | 0x100000000L));

            dump.setCharAt(dump.length() - 9, '|');

            dump.append('|');

        }

    }

    public static short getUnsignedByte(ByteBuffer buffer, int index) {

        return (short) (buffer.get(index) & 0xFF);

    }

}
5. ByteBuffer 常见方法
5.1 分配空间
- allocate()
- allocateDirect()
public static void main(String[] args) {

        System.out.println(ByteBuffer.allocate(16).getClass());

        System.out.println(ByteBuffer.allocateDirect(16).getClass());

        /**

         * class java.nio.HeapByteBuffer  使用堆内存 , 读写效率低, 受到gc影响

         * class java.nio.DirectByteBuffer  使用直接内存: 读写效率高, 不受到gc影响, 分配的效率低, 可能造成内存泄漏

         */

    }
5.2 向buffer中写入数据
- 调用 channel 的 read 方法
int readBytes = channel.read(buf);
- 调用 buffer 自己的 put 方法
 ByteBuffer byteBuffer = ByteBuffer.allocate(10);

 byteBuffer.put(new byte[] {'a', 'b', 'c', 'd'});
5.3 从 buffer 读取数据
    byteBuffer.flip();

    // 从头开始读

    byteBuffer.get(new byte[4]);
5.4 改变position 指针位置
5.4.1 rewind()
get 方法会让 position 读指针向后走,如果想重复读取数据
- 可以调用 rewind 方法将 position 重新置为 0
- 或者调用 get(int i) 方法获取索引 i 的内容,它不会移动读指针
		ByteBuffer byteBuffer = ByteBuffer.allocate(10);

        byteBuffer.put(new byte[] {'a', 'b', 'c', 'd'});

        byteBuffer.flip();

        // 从头开始读

        byteBuffer.get(new byte[4]);

        ByteBufferUtil.debugAll(byteBuffer);

        // 把position 改为零, 又可以重头读

        byteBuffer.rewind();

        ByteBufferUtil.debugAll(byteBuffer);
5.4.2 mark 和 reset
mark 是在读取时,做一个标记,即使 position 改变,只要调用 reset 就能回到 mark 的位置
rewind 和 flip 都会清除 mark 位置
 		ByteBuffer byteBuffer2 = ByteBuffer.allocate(10);

        byteBuffer2.put(new byte[] {'a', 'b', 'c', 'd'});

        byteBuffer2.flip();

        ByteBufferUtil.debugAll(byteBuffer2);

        byteBuffer2.get();

        // 下标为1位置标记

        byteBuffer2.mark();

        byteBuffer2.get();

        byteBuffer2.get();

        ByteBufferUtil.debugAll(byteBuffer2);

        byteBuffer2.reset();

        ByteBufferUtil.debugAll(byteBuffer2);

5.5 字符串与 ByteBuffer 互转
5.5.1 字符串转为ByteBuffer
5.5.1.1 put
 ByteBuffer byteBuffer = ByteBuffer.allocate(10);

 String str = "hello";

 byteBuffer.put(str.getBytes());

 ByteBufferUtil.debugAll(byteBuffer);
5.5.1.2 CharSet
CharSet , 自动切换到读模式
ByteBuffer byteBuffer1 = StandardCharsets.UTF_8.encode(str);

ByteBufferUtil.debugAll(byteBuffer1);
5.5.1.3 wrap
wrap, 自动切换到读模式
 ByteBuffer byteBuffer2 = ByteBuffer.wrap(str.getBytes());

 ByteBufferUtil.debugAll(byteBuffer2);
5.5.2 ByteBuffer转化为字符串
String s = StandardCharsets.UTF_8.decode(byteBuffer1).toString();
6. 分散读取和集中写入
6.1 分散读取
有一个文本文件 3parts.txt
onetwothree
使用如下方式读取,可以将数据填充至多个 buffer
public static void main(String[] args) {

        try (FileChannel channel = new RandomAccessFile("3parts.txt","r").getChannel()) {

            ByteBuffer b1 = ByteBuffer.allocate(3);

            ByteBuffer b2 = ByteBuffer.allocate(3);

            ByteBuffer b3 = ByteBuffer.allocate(5);

            channel.read(new ByteBuffer[] {b1, b2, b3});

            ByteBufferUtil.debugAll(b1);

            ByteBufferUtil.debugAll(b2);

            ByteBufferUtil.debugAll(b3);

        } catch (IOException e) {

        }

    }

6.2 集中写
    public static void main(String[] args) {

        ByteBuffer b1 = StandardCharsets.UTF_8.encode("hello");

        ByteBuffer b2 = StandardCharsets.UTF_8.encode("java");

        ByteBuffer b3 = StandardCharsets.UTF_8.encode("!");

        try (FileChannel channel = new RandomAccessFile("words.txt", "rw").getChannel()) {

            channel.write(new ByteBuffer[] {b1, b2, b3});

        } catch (IOException e) {

        }

    }
Netty学习笔记(2)ByteBuffer的更多相关文章
- Netty学习笔记-入门版
目录 Netty学习笔记 前言 什么是Netty IO基础 概念说明 IO简单介绍 用户空间与内核空间 进程(Process) 线程(thread) 程序和进程 进程切换 进程阻塞 文件描述符 文件句 ...
- Netty学习笔记(二) 实现服务端和客户端
在Netty学习笔记(一) 实现DISCARD服务中,我们使用Netty和Python实现了简单的丢弃DISCARD服务,这篇,我们使用Netty实现服务端和客户端交互的需求. 前置工作 开发环境 J ...
- Netty 学习笔记(1)通信原理
前言 本文主要从 select 和 epoll 系统调用入手,来打开 Netty 的大门,从认识 Netty 的基础原理 —— I/O 多路复用模型开始. Netty 的通信原理 Netty 底层 ...
- Netty学习笔记(二)——netty组件及其用法
1.Netty是 一个异步事件驱动的网络应用程序框架,用于快速开发可维护的高性能协议服务器和客户端. 原生NIO存在的问题 1) NIO的类库和API繁杂,使用麻烦:需要熟练掌握Selector.Se ...
- Netty学习笔记(六) 简单的聊天室功能之WebSocket客户端开发实例
在之前的Netty相关学习笔记中,学习了如何去实现聊天室的服务段,这里我们来实现聊天室的客户端,聊天室的客户端使用的是Html5和WebSocket实现,下面我们继续学习. 创建客户端 接着第五个笔记 ...
- 2018/1/19 Netty学习笔记(一)
这段时间学了好多好多东西,不过更多是细节和思想上的,比如分布式事物,二次提交,改善代码质量,还有一些看了一些源码什么的; 记录一下真正的技术学习,关于Netty的学习过程; 首先说Netty之前先说一 ...
- Netty学习笔记(一)
学习圣思园Netty笔记,个人理解 2.netty宏观理解-本节内容: 1.阶段性事件驱动,一个请求分为若干阶段处理,每个阶段根据情况合理分配线程去处理,各阶段间通信采用异步事件驱动方式. 2.net ...
- Netty学习笔记
一些类与方法说明 1)ByteBuf ByteBuf的API说明: Creation of a buffer It is recommended to create a new buffer usin ...
- Netty学习笔记(一):接收nodejs模拟表单上传的文件
好久不写博客了,也好久不写代码了,这两天临时遇上一个事情,觉得不难,加上觉得手有些生,就动手做了一下,结果遇上了不少坑,有新坑,有老坑,痛苦无比,现在总算差不多了,赶紧记录下来,希望以后不再重复这种痛 ...
随机推荐
- Hystrix集群及监控turbine
Hystrix集群及监控turbine 前面Dashboard演示的仅仅是单机服务监控,实际项目基本都是集群,所以这里集群监控用的是turbine. turbine是基于Dashboard的. 先搞个 ...
- Lucene入门及实际项目应用场景
导入maven依赖 <dependency> <groupId>org.apache.lucene</groupId> <artifactId>luce ...
- 前后端数据交互(五)——什么是 axios?
一.什么是 axios ? axios是基于 Promise 的 ajax 封装库,也是前端目前最流行的 ajax 请求库.简单地说发送 get.post 请求,是一个轻量级的库,使用时可直接引入. ...
- Linux 配置Maven(避免踩坑篇)
前言:请各大网友尊重本人原创知识分享,谨记本人博客:南国以南i 一.访问Maven官网下载压缩文件. 二.下载好的maven安装包放在磁盘的 /usr/local/ 目录下,如下图: 三.解压该压缩文 ...
- elementui table的新增,编辑和删除
\ 新增 this.tableData.unshift(data); 编辑 this.$set(this.tableData,data.index,data); 删除 rows.splice(inde ...
- String与基本类型,字符数组,字节数组的转换
String与基本数据类型 * 基本数据 --->字符串(String) * 1.基本数据类型值 +"" --->最简单 * 2.使用包装类中的toString(参数类 ...
- activemq启动错误UnsupportedClassVers rg/apache/activemq/console/Main:Unsupported major.minor version52.0
ActiveMQ与java的JDK是有版本对应匹配的. 下面提供一个匹配图: MQ版本号 Build-Jdk 依赖JDKapache-activemq-5.0.0 1.5.0_12 1.5+apach ...
- golang中的左值VS右值
对应关系 左值 可寻址 右值 不可寻址 可寻址:可以通过&取地址符,获取内存地址; 可寻址,也就是分配了内存; 不可寻址:根本没有分配内存; 常量const 常量通常只支持数字/字符串/布尔, ...
- Ubuntu中类似QQ截图的截图工具并实现鼠标右键菜单截图
@ 目录 简介: 安装: 设置快捷键: 实现鼠标右键菜单截图: 简介: 在Windows中用惯了强大易用的QQ截图,会不习惯Ubuntu中的截图工具. 软件名为火焰截图,功能类似QQ截图,可以设置快捷 ...
- CodeForce-791B Bear and Friendship Condition(并查集)
Bear Limak examines a social network. Its main functionality is that two members can become friends ...
