canvas 画线
一、canvas是基于状态的绘图环境
1、canvas是基于状态的绘制
context.moveTo(100,100);
context.lineTo(700,700);
context.lineWidth=10; //直线的宽度状态设置
context.strokeStyle="#058"; //直线的颜色状态设置
都是状态设置。
context.stroke()是绘制。
lineWidth和strokeStyle都是基于context的设置,而不是对线条设置的,说明canvas的绘制不是一个基于对象的绘制环境,不会创建线条对象,创建线条对象的各项属性,canvas是一个基于状态会绘制环境,基于canvas整体设置来状态后,最后来进行绘制。
2、一步步深入
画一条线:lineTo()
canvas.width=800;

canvas.height=800;

var context=canvas.getContext("2d");

context.moveTo(100, 100);

context.lineTo(700,700);

context.lineWidth=10;

context.strokeStyle="#058"

context.stroke();
画折线:
lineTo(),lineTo()以此连接
var canvas=document.getElementById("canvas");

canvas.width=800;

canvas.height=800;

var context=canvas.getContext("2d");

context.moveTo(100, 350);

context.lineTo(500,350);

context.lineTo(500,200);

context.lineTo(700,400);

context.lineTo(500,600);

context.lineTo(500,450);

context.lineTo(100,450);

context.lineWidth=10;

context.strokeStyle="#058"

context.stroke();
多条线段,不要首尾相连,要间断:
灵活使用moveTo()
var canvas=document.getElementById("canvas");

canvas.width=800;

canvas.height=800;

var context=canvas.getContext("2d");

context.moveTo(100, 200);

context.lineTo(300,400);

context.lineTo(100,600);

context.moveTo(300,200);

context.lineTo(500,400);

context.lineTo(300,600);

context.moveTo(500,200);

context.lineTo(700,400);

context.lineTo(500,600);

context.lineWidth=10;

context.strokeStyle="#058"

context.stroke();
绘制三条不同颜色的折线,
陷阱:
var canvas=document.getElementById("canvas");

canvas.width=800;

canvas.height=800;

var context=canvas.getContext("2d");

context.moveTo(100, 200);

context.lineTo(300,400);

context.lineTo(100,600);

context.lineWidth=10;

context.strokeStyle="blue";

context.stroke();

context.moveTo(300,200);

context.lineTo(500,400);

context.lineTo(300,600);

context.lineWidth=10;

context.strokeStyle="green";

context.stroke();

context.moveTo(500,200);

context.lineTo(700,400);

context.lineTo(500,600);

context.lineWidth=10;

context.strokeStyle="red"

context.stroke();
canvas是基于状态的绘制,绘制来3次,每次重制状态,即重制颜色和宽度再绘制全部线条。
第一次绘制来一条蓝色折线,第二次绘制两条绿色折线,第三次绘制三条红色折线。
新的API:
context.beginPath()开始全新的绘制。
正确代码如下:
var canvas=document.getElementById("canvas");

canvas.width=800;

canvas.height=800;

var context=canvas.getContext("2d");

context.lineWidth=10;

context.beginPath();

context.moveTo(100, 200);

context.lineTo(300,400);

context.lineTo(100,600);

context.strokeStyle="blue";

context.stroke();

context.beginPath();

context.moveTo(300,200);

context.lineTo(500,400);

context.lineTo(300,600);

context.strokeStyle="green";

context.stroke()

context.beginPath();

context.moveTo(500,200);

context.lineTo(700,400);

context.lineTo(500,600);

context.strokeStyle="red"

context.stroke();
- 对于beginPath()如果一个属性没有被改变,将一直使用属性值。属性值不会因为beginPath()的调用而回到默认状态,如lineWidth。strokeStyle一直被新值覆盖。
高级功能帮助开发者维持这些状态。
- 绘制第一条折线时候,由于之前没有任何的状态的定义,所以第一个beginPath()可以省略掉。为了维持代码的一致性还是建议写上。
- beginPath()表示开始一段全新的路径。而moveTo表示不从任何点开始,直接指定一个新的坐标点。lineTo是从上一个坐标点一直画到lineTo表示的坐标点。用beiginPath()后moveTo也可以用lineTo(),此时lineTo表示的上一个坐标点被beginPath清空了。清空不代表从(0,0)开始而是没有。所以beginPath和lineTo在一起相当于是一次moveTo的功能。
二、绘制封闭多边形的标准做法clothPath
1、绘制
第一种:
var canvas=document.getElementById("canvas");

canvas.width=800;

canvas.height=800;

var context=canvas.getContext("2d");

context.moveTo(100, 350);

context.lineTo(500,350);

context.lineTo(500,200);

context.lineTo(700,400);

context.lineTo(500,600);

context.lineTo(500,450);

context.lineTo(100,450);

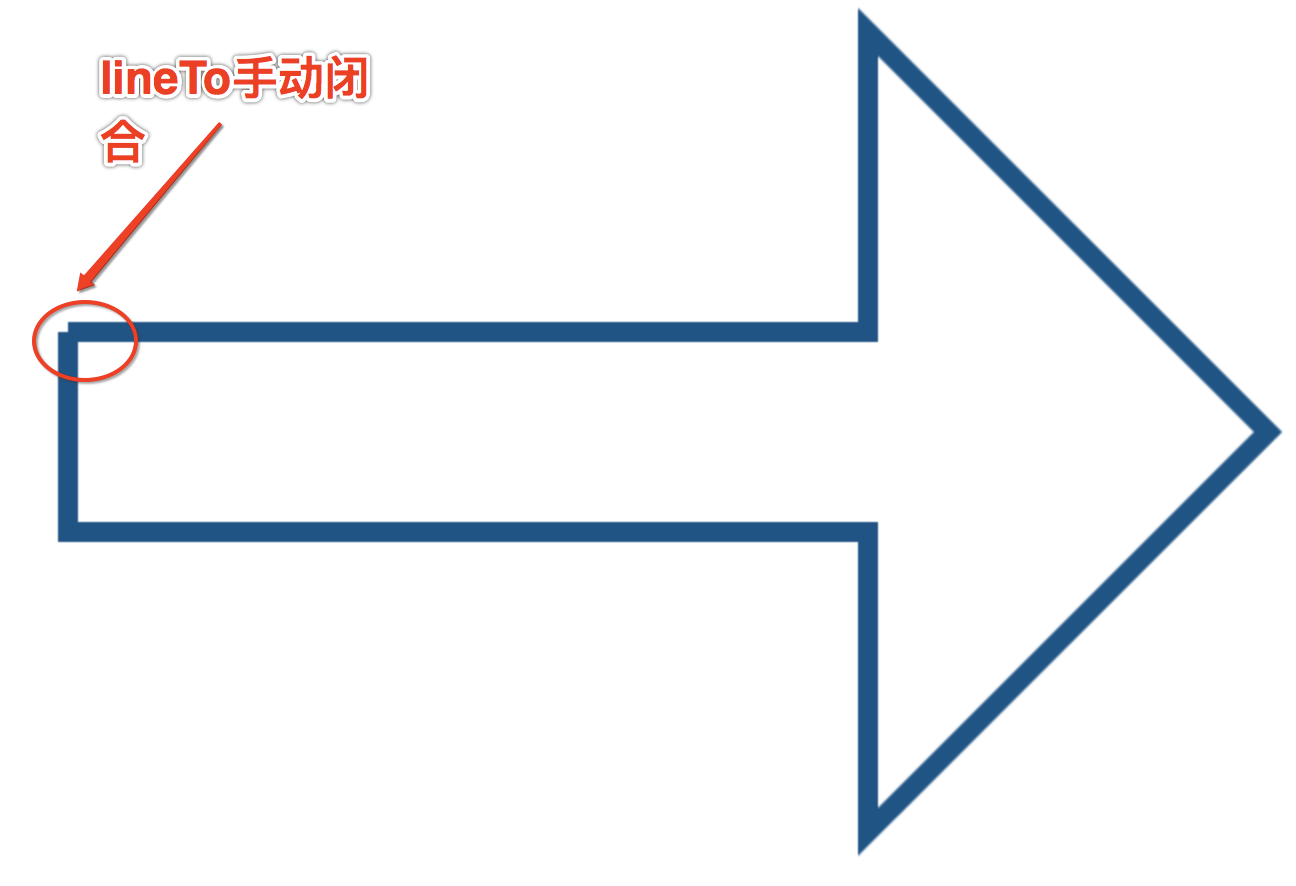
context.lineTo(100,350);

context.lineWidth=10;

context.strokeStyle="#058"

context.stroke();
问题:10px宽的线条闭合处有5px的缺口。
第二种:标准做法
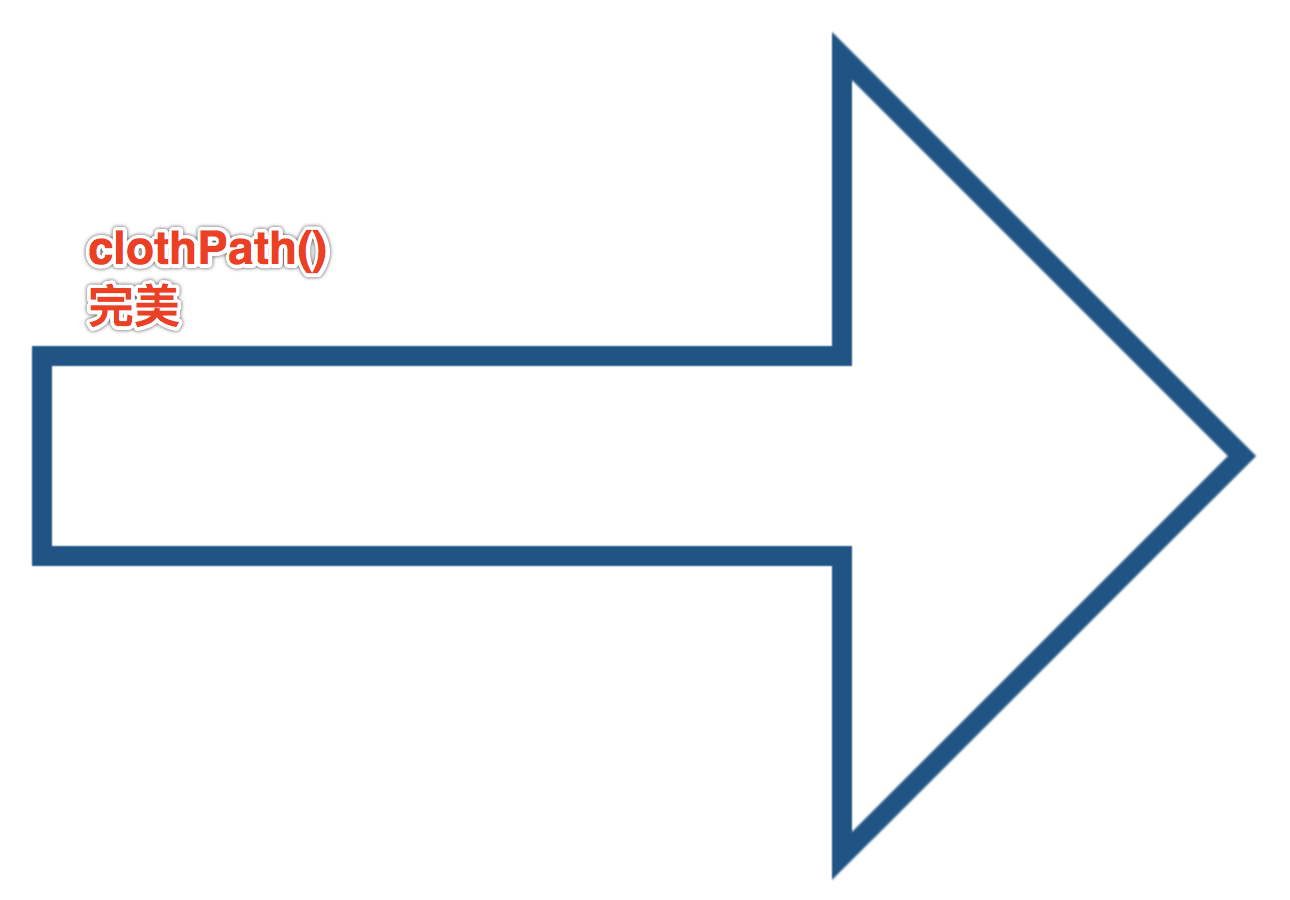
把整个多边形的路径放在context.beiginPath()和clothPath()之间。
clothPath()表示当前路径要被封闭并且结束。
var canvas=document.getElementById("canvas");

canvas.width=800;

canvas.height=800;

var context=canvas.getContext("2d");

context.beginPath();

context.moveTo(100, 350);

context.lineTo(500,350);

context.lineTo(500,200);

context.lineTo(700,400);

context.lineTo(500,600);

context.lineTo(500,450);

context.lineTo(100,450);

context.lineTo(100,350);

context.closePath();

context.lineWidth=10;

context.strokeStyle="#058"

context.stroke();
注意:
使用clothPath()的时候最后一个lineTo可以省略,canvas会自动从最后一个顶点连接到第一个顶点。
var canvas=document.getElementById("canvas");

canvas.width=800;

canvas.height=800;

var context=canvas.getContext("2d");

context.beginPath();

context.moveTo(100, 350);

context.lineTo(500,350);

context.lineTo(500,200);

context.lineTo(700,400);

context.lineTo(500,600);

context.lineTo(500,450);

context.lineTo(100,450);

//context.lineTo(100,350);

context.closePath();

context.lineWidth=10;

context.strokeStyle="#058"

context.stroke();
2、给封闭多边形填充颜色fill
使用context.fillStyle="yellow" 指定状态
使用context.fill()进行填充。
var canvas=document.getElementById("canvas");

canvas.width=800;

canvas.height=800;

var context=canvas.getContext("2d");

context.beginPath();

context.moveTo(100, 350);

context.lineTo(500,350);

context.lineTo(500,200);

context.lineTo(700,400);

context.lineTo(500,600);

context.lineTo(500,450);

context.lineTo(100,450);

//context.lineTo(100,350);

context.closePath();

context.lineWidth=10;

context.fillStyle="yellow";

context.fill();

context.strokeStyle="#058"

context.stroke();
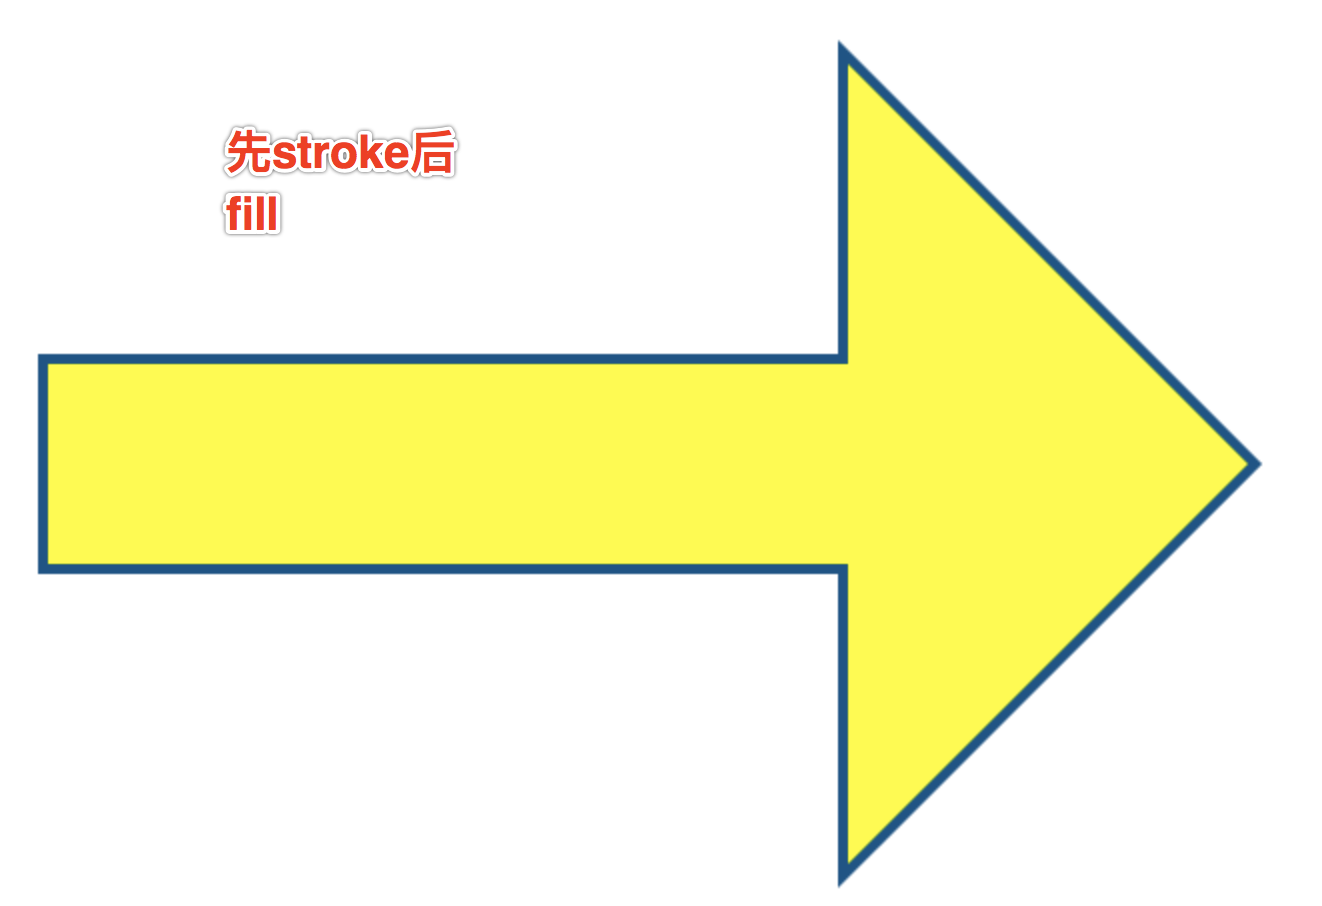
问题:先stroke后fill,10px边框内侧的5个px被填充色覆盖,解决办法先fill后stroke。
注意:绘制带有描边的填充图案时,先填充后描边。

注意:fillStyle和strokeStyle都是对状态的定义,fill和stroke是真正的绘制,建议写代码把所有的状态放在一起,所有的绘制放在一起。
var canvas=document.getElementById("canvas");

canvas.width=800;

canvas.height=800;

var context=canvas.getContext("2d");

context.beginPath();

context.moveTo(100, 350);

context.lineTo(500,350);

context.lineTo(500,200);

context.lineTo(700,400);

context.lineTo(500,600);

context.lineTo(500,450);

context.lineTo(100,450);

//context.lineTo(100,350);

context.closePath();

context.lineWidth=10;

context.fillStyle="yellow";

context.strokeStyle="#058"

context.fill();

context.stroke();
3、编写绘图函数
根据上面的绘图的结构化思想来编写绘图函数。
window.onload=function(){

    var canvas=document.getElementById("canvas");

    canvas.width=800;

    canvas.height=800;

    var context=canvas.getContext("2d");

    drawRect(context,10,10,200,200,10,"red","green");

}

function drawRect(ctx,x,y,width,height,borderWidth,borderColor,fillColor){

    ctx.beginPath();

    ctx.moveTo(x,y);

    ctx.lineTo(x+width,y);

    ctx.lineTo(x+width,y+height);

    ctx.lineTo(x,y+height);

    ctx.closePath();

    ctx.lineWidth=borderWidth;

    ctx.strokeStyle=borderColor;

    ctx.fillStyle=fillColor;

    ctx.fill();

    ctx.stroke();

}
三、矩形,覆盖和透明色
1、canvas自带绘制矩形的API.
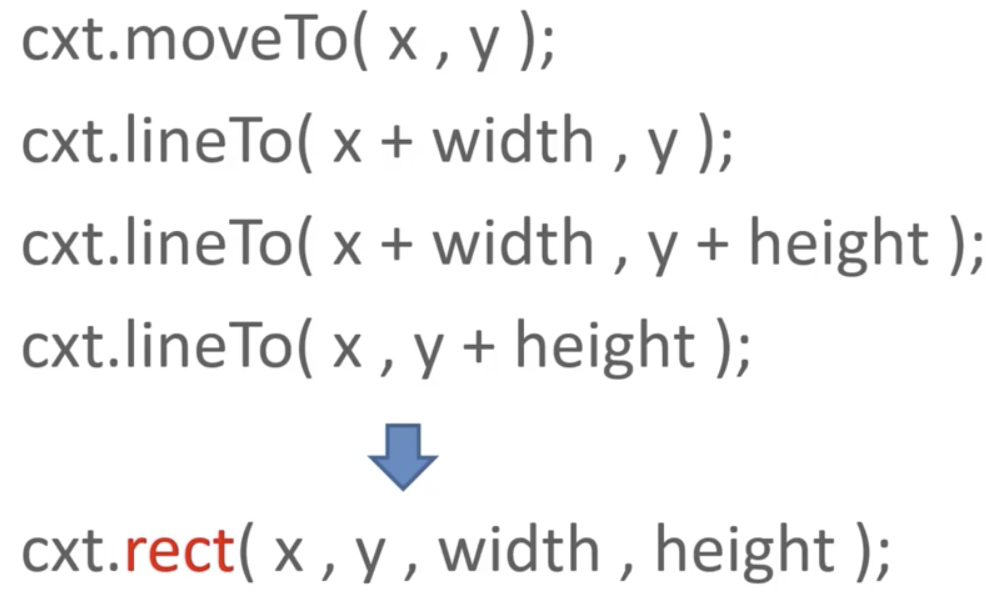
context.rect(x,y,width,height)给了我们一个更简洁的方法来规划矩形的路径。
window.onload=function(){

    var canvas=document.getElementById("canvas");

    canvas.width=800;

    canvas.height=800;

    var context=canvas.getContext("2d");

    drawRect(context,10,10,200,200,10,"red","green");

}

function drawRect(ctx,x,y,width,height,borderWidth,borderColor,fillColor){

    ctx.beginPath();

    ctx.rect(x,y,width,height);

    ctx.closePath();

    ctx.lineWidth=borderWidth;

    ctx.strokeStyle=borderColor;

    ctx.fillStyle=fillColor;

    ctx.fill();

    ctx.stroke();

}
还有两个API可以直接绘制出矩形。
ctx.fillRect(x,y,width,height);使用当前的fillStyle绘制出一个填充矩形。
ctx.strokeRect(x,y,width,height); 使用当前的strokeStyle绘制出一个矩形的边框。
对比rect,不止规划路径,而且绘制。
window.onload=function(){

    var canvas=document.getElementById("canvas");

    canvas.width=800;

    canvas.height=800;

    var context=canvas.getContext("2d");

    drawRect(context,10,10,200,200,10,"red","green");

    drawRect(context,100,100,200,200,10,"blue","yellow");

}

function drawRect(ctx,x,y,width,height,borderWidth,borderColor,fillColor){

    ctx.beginPath();

    ctx.rect(x,y,width,height);

    ctx.closePath();

    ctx.lineWidth=borderWidth;

    ctx.strokeStyle=borderColor;

    ctx.fillStyle=fillColor;

    ctx.fill();

    ctx.stroke();

}

function drawRect2(ctx,x,y,width,height,borderWidth,borderColor,fillColor){

    //不需要规划路径了

    ctx.lineWidth=borderWidth;

    ctx.strokeStyle=borderColor;

    ctx.fillStyle=fillColor;

    ctx.fillRect(x,y,width,height);

    ctx.strokeRect(x,y,width,height);

}
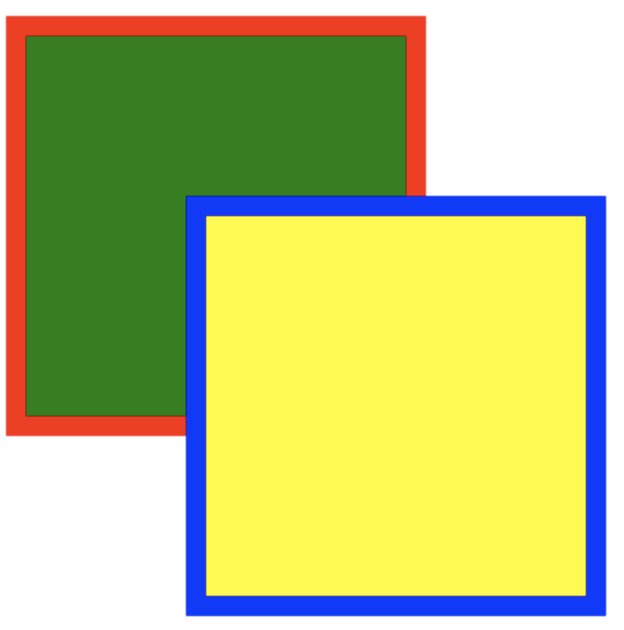
蓝色边框是strokeRect()绘制的,黄色正方形是fillRect()绘制的。
2、覆盖
上面黄色正方形遮挡住了部分绿色正方形,在canvas中图形重叠时后绘制的默认遮挡前面绘制的图形。
条件:
- 后面图形填充色是充实的填充色
- 重叠的合成模式是默认的。
3,fillStyle和strokeStyle赋值
css里的值都可以以字符串形式赋值给这两个style。

使用rgba来形式半透明覆盖效果
drawRect(context,10,10,200,200,10,"red","green");

drawRect(context,100,100,200,200,10,"blue","rgba(255,255,0,0.5)");
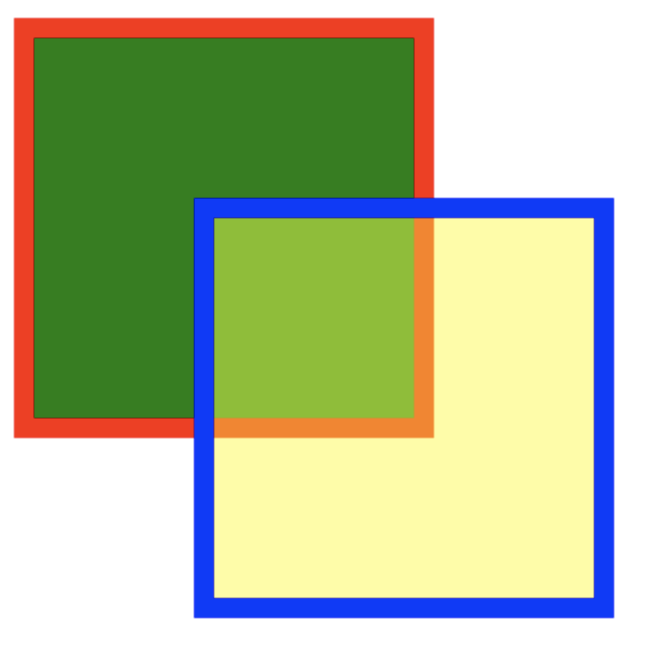
此时黄色正方形边框仍然是100%蓝色。
本文作者starof,因知识本身在变化,作者也在不断学习成长,文章内容也不定时更新,为避免误导读者,方便追根溯源,请诸位转载注明出处:http://www.cnblogs.com/starof/p/8597683.html 有问题欢迎与我讨论,共同进步。
canvas 画线的更多相关文章
- 兼容IE浏览器的canvas画线和圆圈
1.新建test.html文件,代码如下: <!DOCTYPE html><html><head> <meta charset="utf-8& ...
- HTML5自学笔记[ 12 ]canvas绘图小示例之鼠标画线
<!doctype html> <html> <head> <meta charset="utf-8"> <title> ...
- Android中Path类的lineTo方法和quadTo方法画线的区别
转载:http://blog.csdn.net/stevenhu_223/article/details/9229337 当我们需要在屏幕上形成画线时,Path类的应用是必不可少的,而Path类的li ...
- canvas 画圈 demo
html代码: <canvas id="clickCanvas2" width="180" height="180" data-to ...
- canvas画简单电路图
<!DOCTYPE html> <html lang="en"> <head> <meta charset="UTF-8&quo ...
- WPF画线问题,几千条以后就有明显的延迟了。
我现在是这么画的,class A { private GeometryGroup _lines; private Path _path; public A() { _path.Data = ...
- Android利用canvas画各种图形(点、直线、弧、圆、椭圆、文字、矩形、多边形、曲线、圆角矩形) .
1.首先说一下canvas类: Class Overview The Canvas class holds the "draw" calls. To draw something, ...
- 纯JS画点、画线、画圆的方法
<!DOCTYPE html PUBLIC "-//W3C//DTD XHTML 1.0 Transitional//EN" "http://www.w3.org/ ...
- Android 自定义View 画圆 画线
自定义一个DrawCircle继承View 实现构造方法: public DrawCircle(Context context) { super(context); this.mContext = c ...
随机推荐
- 034_nginx报错总结
一.nginx: [emerg] "client_header_timeout" directive is not allowed here in /opt/nginx/conf/ ...
- ansible笔记(9):常用模块之包管理模块
ansible笔记():常用模块之包管理模块 yum_repository模块 yum_repository模块可以帮助我们管理远程主机上的yum仓库. 此处我们介绍一些yum_repository模 ...
- Android获取本机号码及运营商
import android.content.Context; import android.telephony.TelephonyManager; import android.util.Log; ...
- 使用Gitblit 在Windows上部署Git Server
Windows平台下Git服务器搭建 首先要下载Java JDK,安装完成后设置环境变量,先把java环境配好,接下来才是下面的gitblit.关于java环境配置请看上一篇文章 gitblit下载 ...
- HomeBrew 安转beta版软件
今天想装测试版的cocoapods,用 brew install cocoapods 后,总是安装稳定版,就是1.1.0,不是最新的beta版,发现用下面这个命令可以装最新beta版 brew ins ...
- Bootstrap如何配合字体自适应
Bootstrap框架中,字体不会自适应,及时使用rem都不行,那么就只有使用媒体查询来做.这样可能会有点麻烦,但是这是我目前找到的一个方法直接上代码了 div { font-size: 12px; ...
- js——字符串处理
字符串不能修改,所以修改后的结果都是以一个新的字符串返回,原串不改变 1. 创建字符串和typeof - 空字符串 var str = ""; - " ...
- Confluence 6 "net.sf.hibernate.PropertyValueException: not-null" 相关问题解决
如果你遇到了下面的错误信息,例如: ERROR [Importing data task] [confluence.importexport.impl.ReverseDatabinder] endEl ...
- Confluence 6 配置一个数据源连接
这个指南指导你如何配置使用 JNDI 数据源来连接到你的数据库.使用这个类型的连接,Confluence 将会询问应用服务器(Tomcat)中你配置的连接信息. 如果你希望使用 JDBC 的数据库连接 ...
- SpringCloud注册中心(Eureka)
注册中心的作用就是用来方便接口暴露出来的一个管理工具,如果所有的接口只是暴露出来,没有一个同一的管理工具,又有谁知道你暴露了哪些接口了,Eureka是一个springcloud的服务注册和发现模块 搭 ...
