ansible自动化运维03
ansible自动化运维常用模块
常用模块实现的功能:安装软件包;修改配置文件;创建程序用户组;创建目录,并修改所属和权限;挂载;启动服务;测试。
command模块:
shell模块:
注意:command和shell模块功能类似,均不支持别名(命令),区别:command只能使用一条指令,shell可以使用管道!
例子1:
[root@host1 ~]# ansible test1 -m shell -a "df -h|grep /$"
192.168.132.163 | CHANGED | rc=0 >>
/dev/mapper/centos-root 17G 4.5G 13G 26% /
192.168.132.162 | CHANGED | rc=0 >>
/dev/mapper/centos-root 17G 4.4G 13G 26% /
例子2: 统一创建test11用户名,并且修改密码为123.
[root@host1 ~]# ansible test1 -m shell -a "useradd test11"
192.168.132.162 | CHANGED | rc=0 >>
192.168.132.163 | CHANGED | rc=0 >>
[root@host1 ~]# ansible test1 -m shell -a "echo 123|passwd --stdin test11"
192.168.132.163 | CHANGED | rc=0 >>
Changing password for user oldboy.
passwd: all authentication tokens updated successfully.
192.168.132.162 | CHANGED | rc=0 >>
Changing password for user oldboy.
passwd: all authentication tokens updated successfully.
拓展模块:chdir模块,creates模块
chdir模块是操作前切换目录,切换后的操作都会在切换后的目录下进行,比如切换创建文件,那么这个文件就会创建在切换后的目录下。
例子:
ansible主机:在客户端/tmp目录下创建文件test01
[root@host1 ~]# ansible 192.168.132.162 -m command -a "chdir=/tmp touch test01"
客户端(被控端):
[root@host2 tmp]# ll
-rw-r--r-- 1 root root 0 Dec 10 08:59 test01
creates模块:创建文件,如果文件存在就略过此操作
例子:创建文件test02在远程客户端192.168.132.162/tmp/目录下,如果存在则略过此操作
[root@host1 ~]# ansible 192.168.132.162 -m command -a "creates=/tmp/t1 chdir=/tmp touch test02"
yum模块:
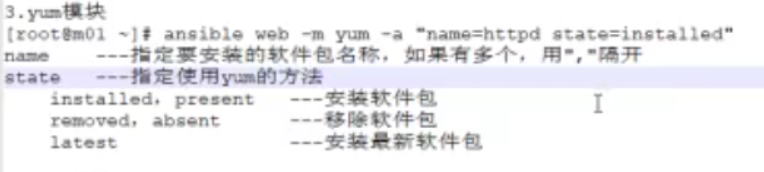
例子:安装httpd服务
[root@host1 ~]# ansible test1 -m yum -a "name=httpd state=installed"
192.168.132.163 | CHANGED => {
"ansible_facts": {
"discovered_interpreter_python": "/usr/bin/python"
},
"changed": true,
"changes": {
"installed": [
"httpd"
]
},
"msg": "",
"rc": 0,
"results": [
"Loaded plugins: fastestmirror, langpacks\nLoading mirror speeds from cached hostfile\n * base: mirrors.neusoft.edu.cn\n * extras: mirrors.neusoft.edu.cn\n * updates: mirrors.neusoft.edu.cn\nResolving Dependencies\n--> Running transaction check\n---> Package httpd.x86_64 0:2.4.6-90.el7.centos will be installed\n--> Processing Dependency: httpd-tools = 2.4.6-90.el7.centos for package: httpd-2.4.6-90.el7.centos.x86_64\n--> Running transaction check\n---> Package httpd-tools.x86_64 0:2.4.6-90.el7.centos will be installed\n--> Finished Dependency Resolution\n\nDependencies Resolved\n\n================================================================================\n Package Arch Version Repository Size\n================================================================================\nInstalling:\n httpd x86_64 2.4.6-90.el7.centos base 2.7 M\nInstalling for dependencies:\n httpd-tools x86_64 2.4.6-90.el7.centos base 91 k\n\nTransaction Summary\n================================================================================\nInstall 1 Package (+1 Dependent package)\n\nTotal download size: 2.8 M\nInstalled size: 9.5 M\nDownloading packages:\n--------------------------------------------------------------------------------\nTotal 532 kB/s | 2.8 MB 00:05 \nRunning transaction check\nRunning transaction test\nTransaction test succeeded\nRunning transaction\n Installing : httpd-tools-2.4.6-90.el7.centos.x86_64 1/2 \n Installing : httpd-2.4.6-90.el7.centos.x86_64 2/2 \n Verifying : httpd-tools-2.4.6-90.el7.centos.x86_64 1/2 \n Verifying : httpd-2.4.6-90.el7.centos.x86_64 2/2 \n\nInstalled:\n httpd.x86_64 0:2.4.6-90.el7.centos \n\nDependency Installed:\n httpd-tools.x86_64 0:2.4.6-90.el7.centos \n\nComplete!\n"
]
}
192.168.132.162 | CHANGED => {
"ansible_facts": {
"discovered_interpreter_python": "/usr/bin/python"
},
"changed": true,
"changes": {
"installed": [
"httpd"
]
},
"msg": "",
"rc": 0,
"results": [
"Loaded plugins: fastestmirror, langpacks\nLoading mirror speeds from cached hostfile\n * base: mirror.lzu.edu.cn\n * extras: mirror.lzu.edu.cn\n * updates: mirror.lzu.edu.cn\nResolving Dependencies\n--> Running transaction check\n---> Package httpd.x86_64 0:2.4.6-90.el7.centos will be installed\n--> Processing Dependency: httpd-tools = 2.4.6-90.el7.centos for package: httpd-2.4.6-90.el7.centos.x86_64\n--> Running transaction check\n---> Package httpd-tools.x86_64 0:2.4.6-90.el7.centos will be installed\n--> Finished Dependency Resolution\n\nDependencies Resolved\n\n================================================================================\n Package Arch Version Repository Size\n================================================================================\nInstalling:\n httpd x86_64 2.4.6-90.el7.centos base 2.7 M\nInstalling for dependencies:\n httpd-tools x86_64 2.4.6-90.el7.centos base 91 k\n\nTransaction Summary\n================================================================================\nInstall 1 Package (+1 Dependent package)\n\nTotal download size: 2.8 M\nInstalled size: 9.5 M\nDownloading packages:\n--------------------------------------------------------------------------------\nTotal 249 kB/s | 2.8 MB 00:11 \nRunning transaction check\nRunning transaction test\nTransaction test succeeded\nRunning transaction\n Installing : httpd-tools-2.4.6-90.el7.centos.x86_64 1/2 \n Installing : httpd-2.4.6-90.el7.centos.x86_64 2/2 \n Verifying : httpd-tools-2.4.6-90.el7.centos.x86_64 1/2 \n Verifying : httpd-2.4.6-90.el7.centos.x86_64 2/2 \n\nInstalled:\n httpd.x86_64 0:2.4.6-90.el7.centos \n\nDependency Installed:\n httpd-tools.x86_64 0:2.4.6-90.el7.centos \n\nComplete!\n"
]
}
copy模块:

例子1: 批量推送(复制)本地hosts文件给远端,并且备份远端源文件。
[root@host1 ~]# ansible test1 -m copy -a "src=/etc/hosts dest=/etc/hosts backup=yes"
192.168.132.162 | CHANGED => {
"ansible_facts": {
"discovered_interpreter_python": "/usr/bin/python"
},
"backup_file": "/etc/hosts.15364.2019-10-10@15:14:09~",
"changed": true,
"checksum": "35e756c648782271a53cef2b3f6da3058831d44f",
"dest": "/etc/hosts",
"gid": 0,
"group": "root",
"md5sum": "16f49d9e42dd5c20906f11c0a76b8626",
"mode": "0644",
"owner": "root",
"size": 224,
"src": "/root/.ansible/tmp/ansible-tmp-1570691646.54-3936729023517/source",
"state": "file",
"uid": 0
}
192.168.132.163 | CHANGED => {
"ansible_facts": {
"discovered_interpreter_python": "/usr/bin/python"
},
"backup_file": "/etc/hosts.29478.2019-10-10@15:14:09~",
"changed": true,
"checksum": "35e756c648782271a53cef2b3f6da3058831d44f",
"dest": "/etc/hosts",
"gid": 0,
"group": "root",
"md5sum": "16f49d9e42dd5c20906f11c0a76b8626",
"mode": "0644",
"owner": "root",
"size": 224,
"src": "/root/.ansible/tmp/ansible-tmp-1570691646.58-21560942432423/source",
"state": "file",
"uid": 0
}
例子2:批量向远端添加rsync认证文件。
[root@host1 ~]# ansible test1 -m copy -a "content='rsync_backup:1' dest=/etc/rsync.password owner=root group=root mode=600"
192.168.132.162 | CHANGED => {
"ansible_facts": {
"discovered_interpreter_python": "/usr/bin/python"
},
"changed": true,
"checksum": "c6e45d8d2843493d4eb37947d3a9f8df32079196",
"dest": "/etc/rsync.password",
"gid": 0,
"group": "root",
"md5sum": "70a0afc63f084920453ac5ac3e2d733f",
"mode": "0600",
"owner": "root",
"size": 14,
"src": "/root/.ansible/tmp/ansible-tmp-1570692587.41-43388984791069/source",
"state": "file",
"uid": 0
}
192.168.132.163 | CHANGED => {
"ansible_facts": {
"discovered_interpreter_python": "/usr/bin/python"
},
"changed": true,
"checksum": "c6e45d8d2843493d4eb37947d3a9f8df32079196",
"dest": "/etc/rsync.password",
"gid": 0,
"group": "root",
"md5sum": "70a0afc63f084920453ac5ac3e2d733f",
"mode": "0600",
"owner": "root",
"size": 14,
"src": "/root/.ansible/tmp/ansible-tmp-1570692587.47-144328961636524/source",
"state": "file",
"uid": 0
}
service模块:
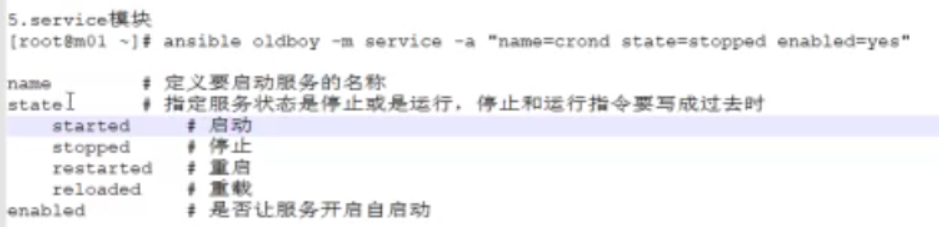
例子1:批量启动httpd服务,并且开启httpd服务开机自启动。
[root@host1 ~]# ansible test1 -m service -a "name=httpd state=started enabled=yes"
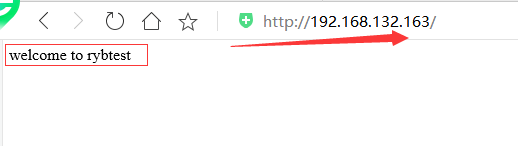
例子2:批量修改httpd服务首页页面内容为welcome to rybtest.
[root@host1 ~]# ansible test1 -m copy -a "content='welcome to rybtest' dest=/var/www/html/index.html"
group模块:

例子1:批量添加组名www,并且设置gid为666.
[root@host1 ~]# ansible test1 -m group -a "name=www gid=666"
例子2:批量修改组的gid为888
[root@host1 ~]# ansible test1 -m group -a "name=www gid=888"
例子3:批量删除www组
[root@host1 ~]# ansible test1 -m group -a "name=www gid=888 state=absent"
user模块:
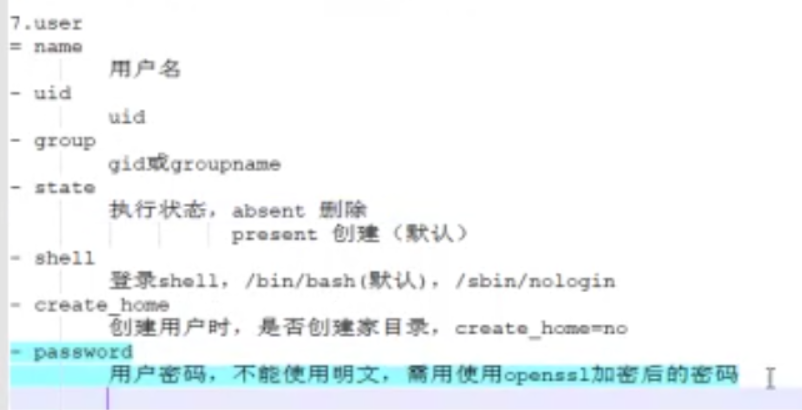
注意:user模块在centos7执行可能有点问题,研究待定!!!
例子1:批量创建用户test01,指定uid 60000,gid 666,并设置密码为123456。
例子2:创建一个程序用户www,指定uid 666,gid 666. 不让登陆,不创建家目录。
file模块:

例子1:创建目录 /data02和/backup,属主666,属组666,递归。
[root@host1 ~]# ansible test1 -m file -a "path=/data02 owner=666 group=666 recurse=yes state=directory"
例子2:创建文件 /etc/rsync.password,权限600。
[root@host1 ~]# ansible test1 -m file -a "path=/etc/rsync.password state=touch mode=600"
例子3:对/etc/hosts做软连接,到/tmp/hosts.
[root@host1 ~]# ansible test1 -m file -a "src=/etc/hosts path=/tmp/hosts state=link"
file模块小总结:file模块仅适合创建目录,修改所属和权限,创建链接,除了这些操作的其他文件管理都通过copy模块实现。
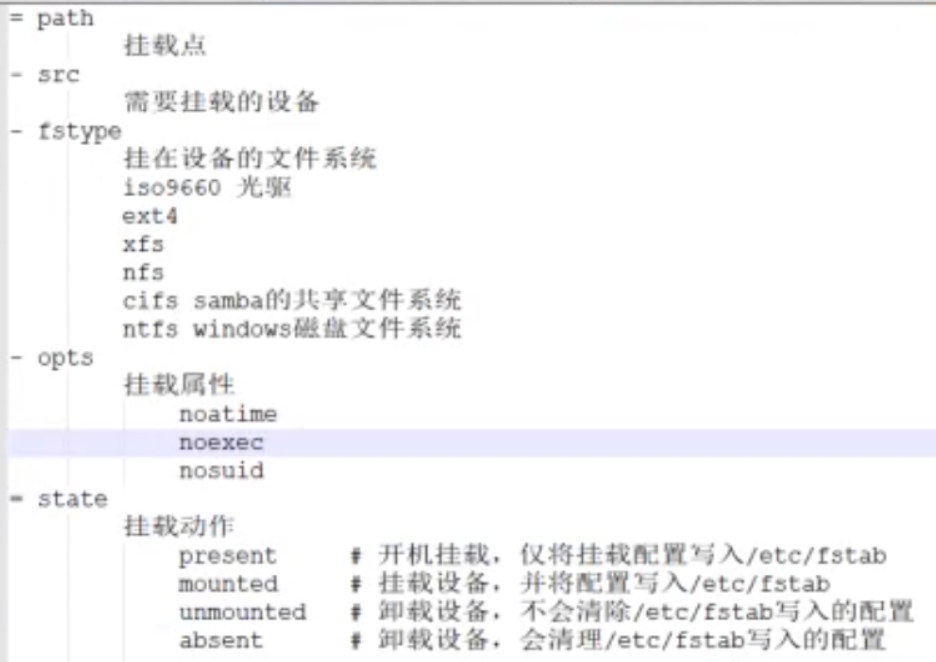
mount模块:
例4:创建多级目录/data1/test1,并且设置目录所有者,所属组。
ansible主机如下操作:
[root@host1 ~]# ansible 192.168.132.162 -m file -a "dest=/data1/test1 owner=www group=www state=directory"
去客户端主机查看:
[root@host2 test01]# ll /data1/
total 0
drwxr-xr-x 2 www www 6 Dec 11 15:46 test1
例子:通过nfs实现网络文件的共享
1)安装nfs
[root@host1 ~]# ansible test1 -m yum -a "name=nfs-utils state=installed"
2)启动服务
[root@host1 ~]# ansible test1 -m service -a "name=rpcbind state=started"
[root@host1 ~]# ansible test1 -m service -a "name=nfs state=started"
3)修改配置文件
4)创建目录,用户,并修改所属
5)重载配置文件
ansible自动化运维03的更多相关文章
- Ansible自动化运维工具-上
[Ansible特点] 1)Ansible与saltstack均是基于Python语言开发的 2)安装使用简单,基于不同插件和模块实现各种软件,平台,版本的管理以及支持虚拟容器多层级的部署 3)不需要 ...
- ansible 自动化运维
Ansible 自动化运维 ansible安装epel #yum list all *ansible*#yum install *ansible*#yum info ansible#rpm -ql a ...
- Ansible 自动化运维工具
Ansible 自动化运维工具 Ansible是什么? Ansible是一个"配置管理工具"也是一个"自动化运维工具" Ansible 作用: Ansible是 ...
- 简单聊一聊Ansible自动化运维
一.Ansible概述 Ansible是今年来越来越火的一款开源运维自动化工具,通过Ansible可以实现运维自动化,提高运维工程师的工作效率,减少人为失误.Ansible通过本身集成的非常丰富的模块 ...
- Ansible自动化运维工具的使用
Ansible自动化运维工具的使用 host lnventory 管理主机 ip root账号密码 ssh端口 core mod ...
- Ansible 自动化运维——剧本(playbook)
Ansible 自动化运维--剧本(playbook) 1.playbook介绍: playbook是ansible用于配置,部署,和管理被控节点的剧本.通过playbook的详细描述,执行其中的ta ...
- Ansible自动化运维工具及其常用模块
Ansible自动化运维工具及其常用模块 目录 Ansible自动化运维工具及其常用模块 一.Ansible简介 1. Ansible概述 2. Ansible作用 3. Ansible的工作模块 4 ...
- 一文详解 Ansible 自动化运维
开源Linux 一个执着于技术的公众号 一.Ansible 概述 Ansible 是近年来越来越火的一款开源运维自动化工具,通过Ansible可以实现运维自动化,提高运维工程师的工作效率,减少人为失误 ...
- Ansible自动化运维工具
ansible软件介绍 python语言是运维人员必会的语言! ansible是一个基于Python开发的自动化运维工具!(saltstack) 其功能实现基于SSH远程连接服务! ans ...
随机推荐
- Salesforce 自定义元数据类型
自定义元数据类型的优点 Salesforce中的设定都是以元数据(Metadata)存在的.在Salesforce中,用户可以新建自定义对象.自定义字段等,这些数据结构都以元数据的形式存储在系统中.当 ...
- minio select api 试用
对于minio 我们可以使用基于sql 的对象内容查询,特别适合进行特定文件内容的获取,强大方便. 以下是一个简单的试用 环境准备 集成了prometheus docker-compose 文件 ...
- Educational Codeforces Round 57 (Rated for Div. 2) D dp
https://codeforces.com/contest/1096/problem/D 题意 给一个串s,删掉一个字符的代价为a[i],问使得s的子串不含"hard"的最小代价 ...
- 第03组 Beta版本演示
队名:不等式方程组 组长博客 组员 340 张逸杰 组长 304 苏凯婷 312 鲍冰如 320 陈荣杰 331 杨锦镔 335 王嵚 336 林家伟 341 黄彬煌 342 黄智锋 343 吴智勇 ...
- B1047 编程团体赛 (20 分)
一.参考代码 #include<iostream> #include<cstring> using namespace std; int hashTable[1010]; in ...
- Linux性能优化实战学习笔记:第八讲
一.环境准备 1.在第6节的基础上安装dstat wget http://mirror.centos.org/centos/7/os/x86_64/Packages/dstat-0.7.2-12.el ...
- [LeetCode] 663. Equal Tree Partition 划分等价树
Given a binary tree with n nodes, your task is to check if it's possible to partition the tree to tw ...
- java导出标题多行且合并单元格的EXCEL
场景:项目中遇到有需要导出Excel的需求,并且是多行标题且有合并单元格的,参考网上的文章,加上自己的理解,封装成了可自由扩展的导出工具 先上效果,再贴代码: 调用工具类进行导出: public st ...
- pytorch的state_dict()拷贝问题
先说结论,model.state_dict()是浅拷贝,返回的参数仍然会随着网络的训练而变化.应该使用deepcopy(model.state_dict()),或将参数及时序列化到硬盘. 再讲故事,前 ...
- oracle--表空间故障
一,错误问题描述 ERROR: ORA: cannot identify - see DBWR trace file ORA: data : '/u01/oracle/TEST/oratmp01/te ...