三、SpringBoot整合Thymeleaf视图
3.1 Thymeleaf视图介绍
先看下官网的介绍:
Thymeleaf是适用于Web和独立环境的现代服务器端Java模板引擎。
Thymeleaf的主要目标是为您的开发工作流程带来优雅的自然模板 -HTML可以在浏览器中正确显示,也可以作为静态原型工作,从而可以在开发团队中加强协作。
Thymeleaf拥有适用于Spring Framework的模块,与您喜欢的工具的大量集成以及插入您自己的功能的能力,对于现代HTML5 JVM Web开发而言,Thymeleaf是理想的选择。
在SpringBoot中,SpringBoot对Thymeleaf提供了良好的支持,同时也提供了自动化配置,因此在SpringBoot中使用Thymeleaf非常快捷方便。
3.2 创建SpringBoot项目
创建方法建议使用IDEA快速创建SpringBoot项目,并选择web、Thymeleaf依赖:
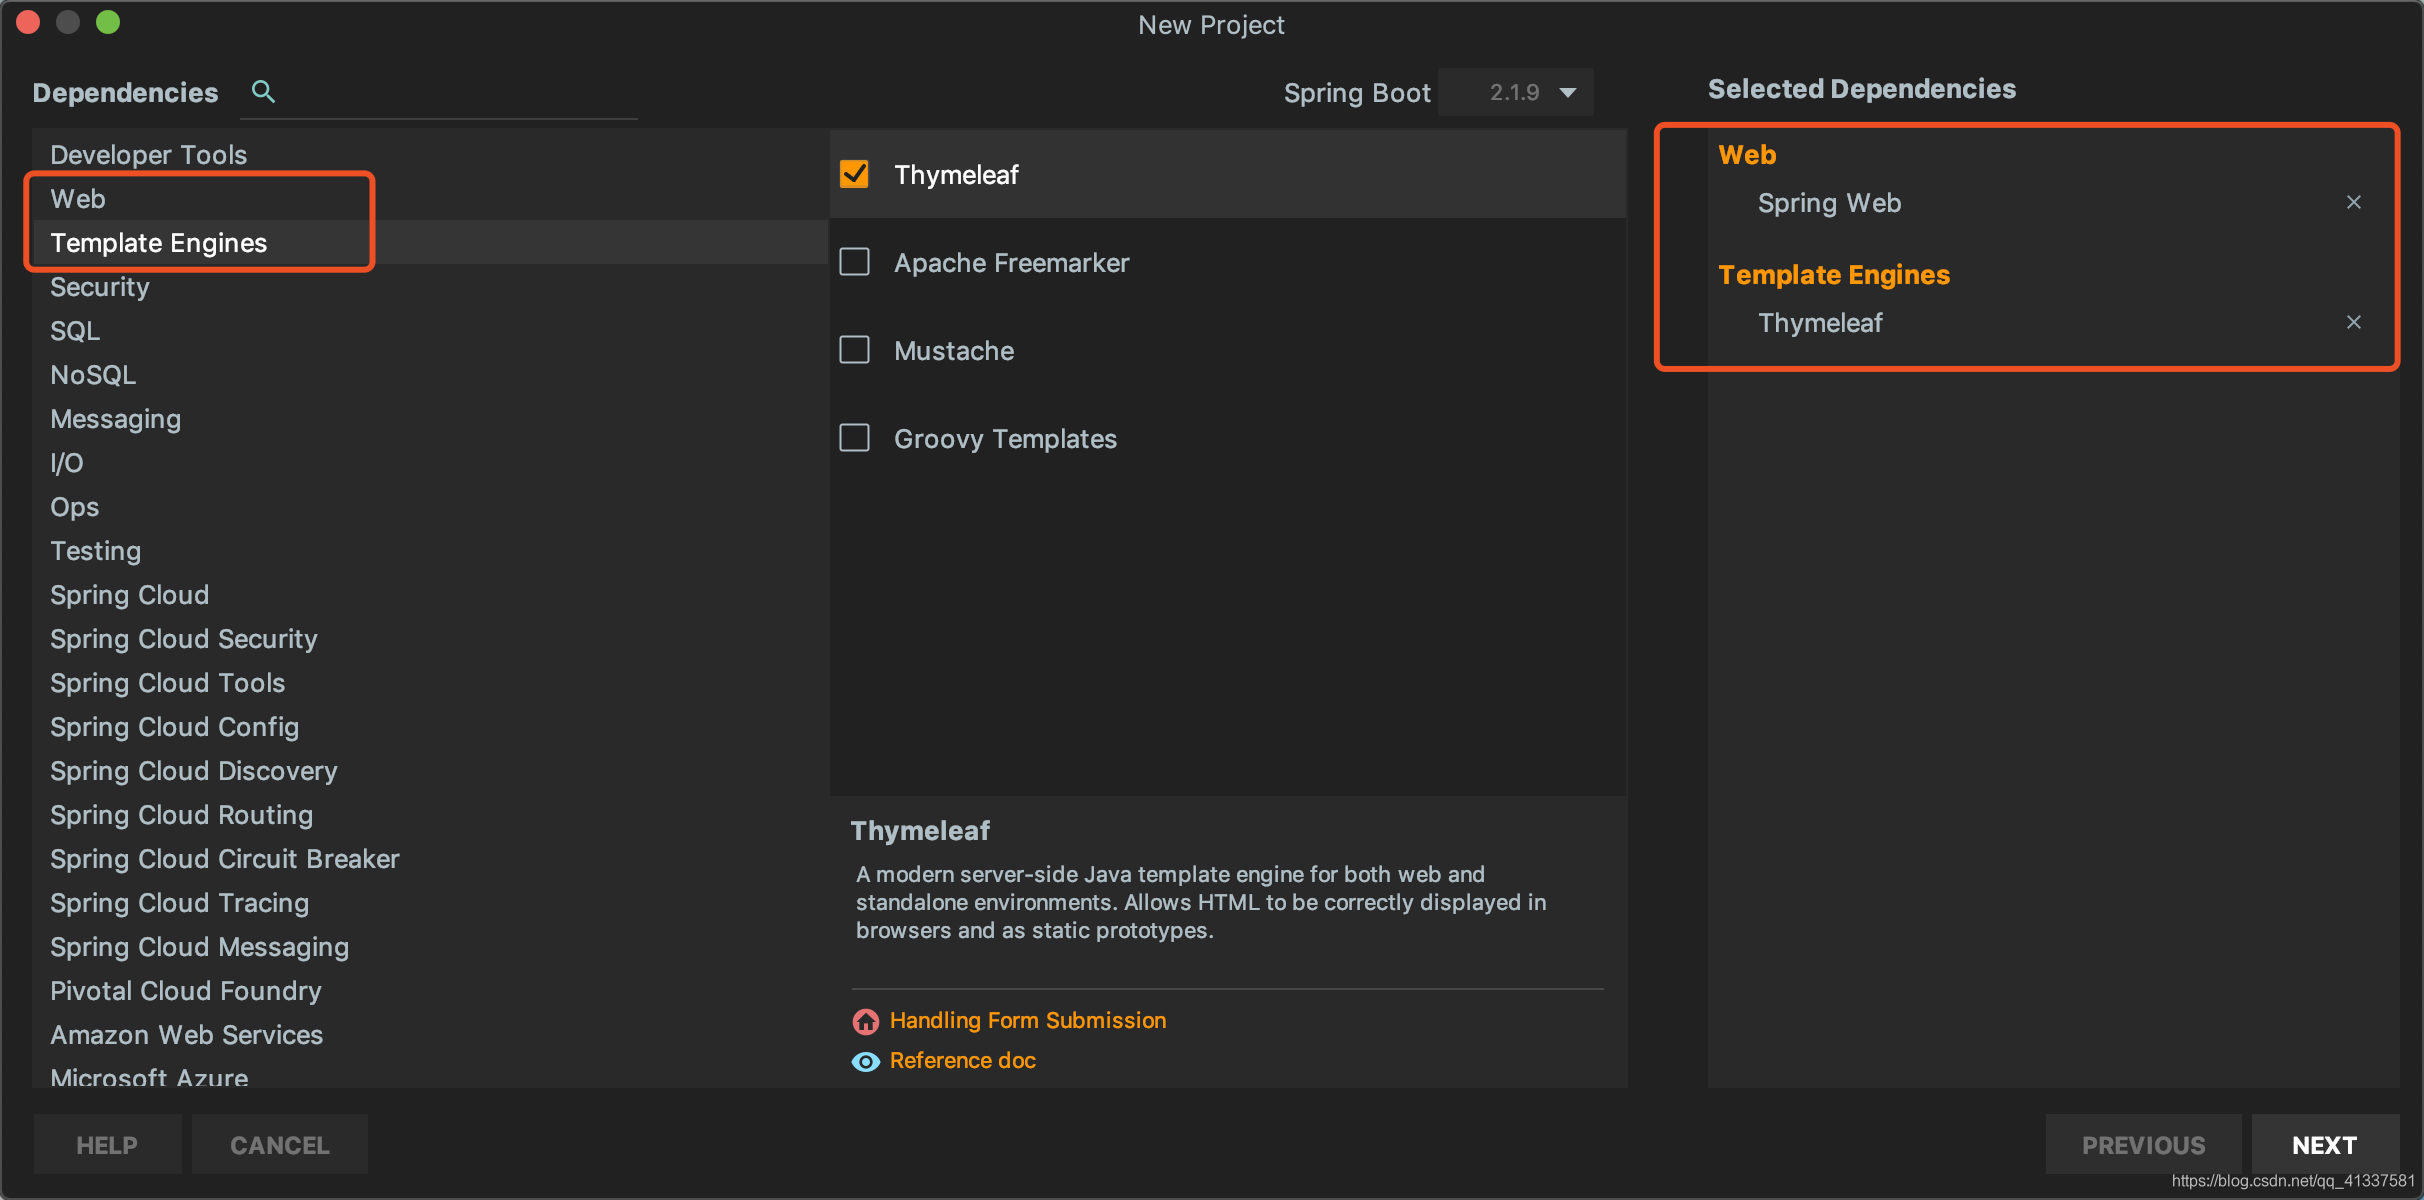
创建完成后,IDEA自动在pom中加入了web和Thymeleaf依赖管理,pom.xml:
    <dependencies>

        <dependency>

            <groupId>org.springframework.boot</groupId>

            <artifactId>spring-boot-starter-thymeleaf</artifactId>

        </dependency>

        <dependency>

            <groupId>org.springframework.boot</groupId>

            <artifactId>spring-boot-starter-web</artifactId>

        </dependency>

        <dependency>

            <groupId>org.springframework.boot</groupId>

            <artifactId>spring-boot-starter-test</artifactId>

            <scope>test</scope>

        </dependency>

    </dependencies>
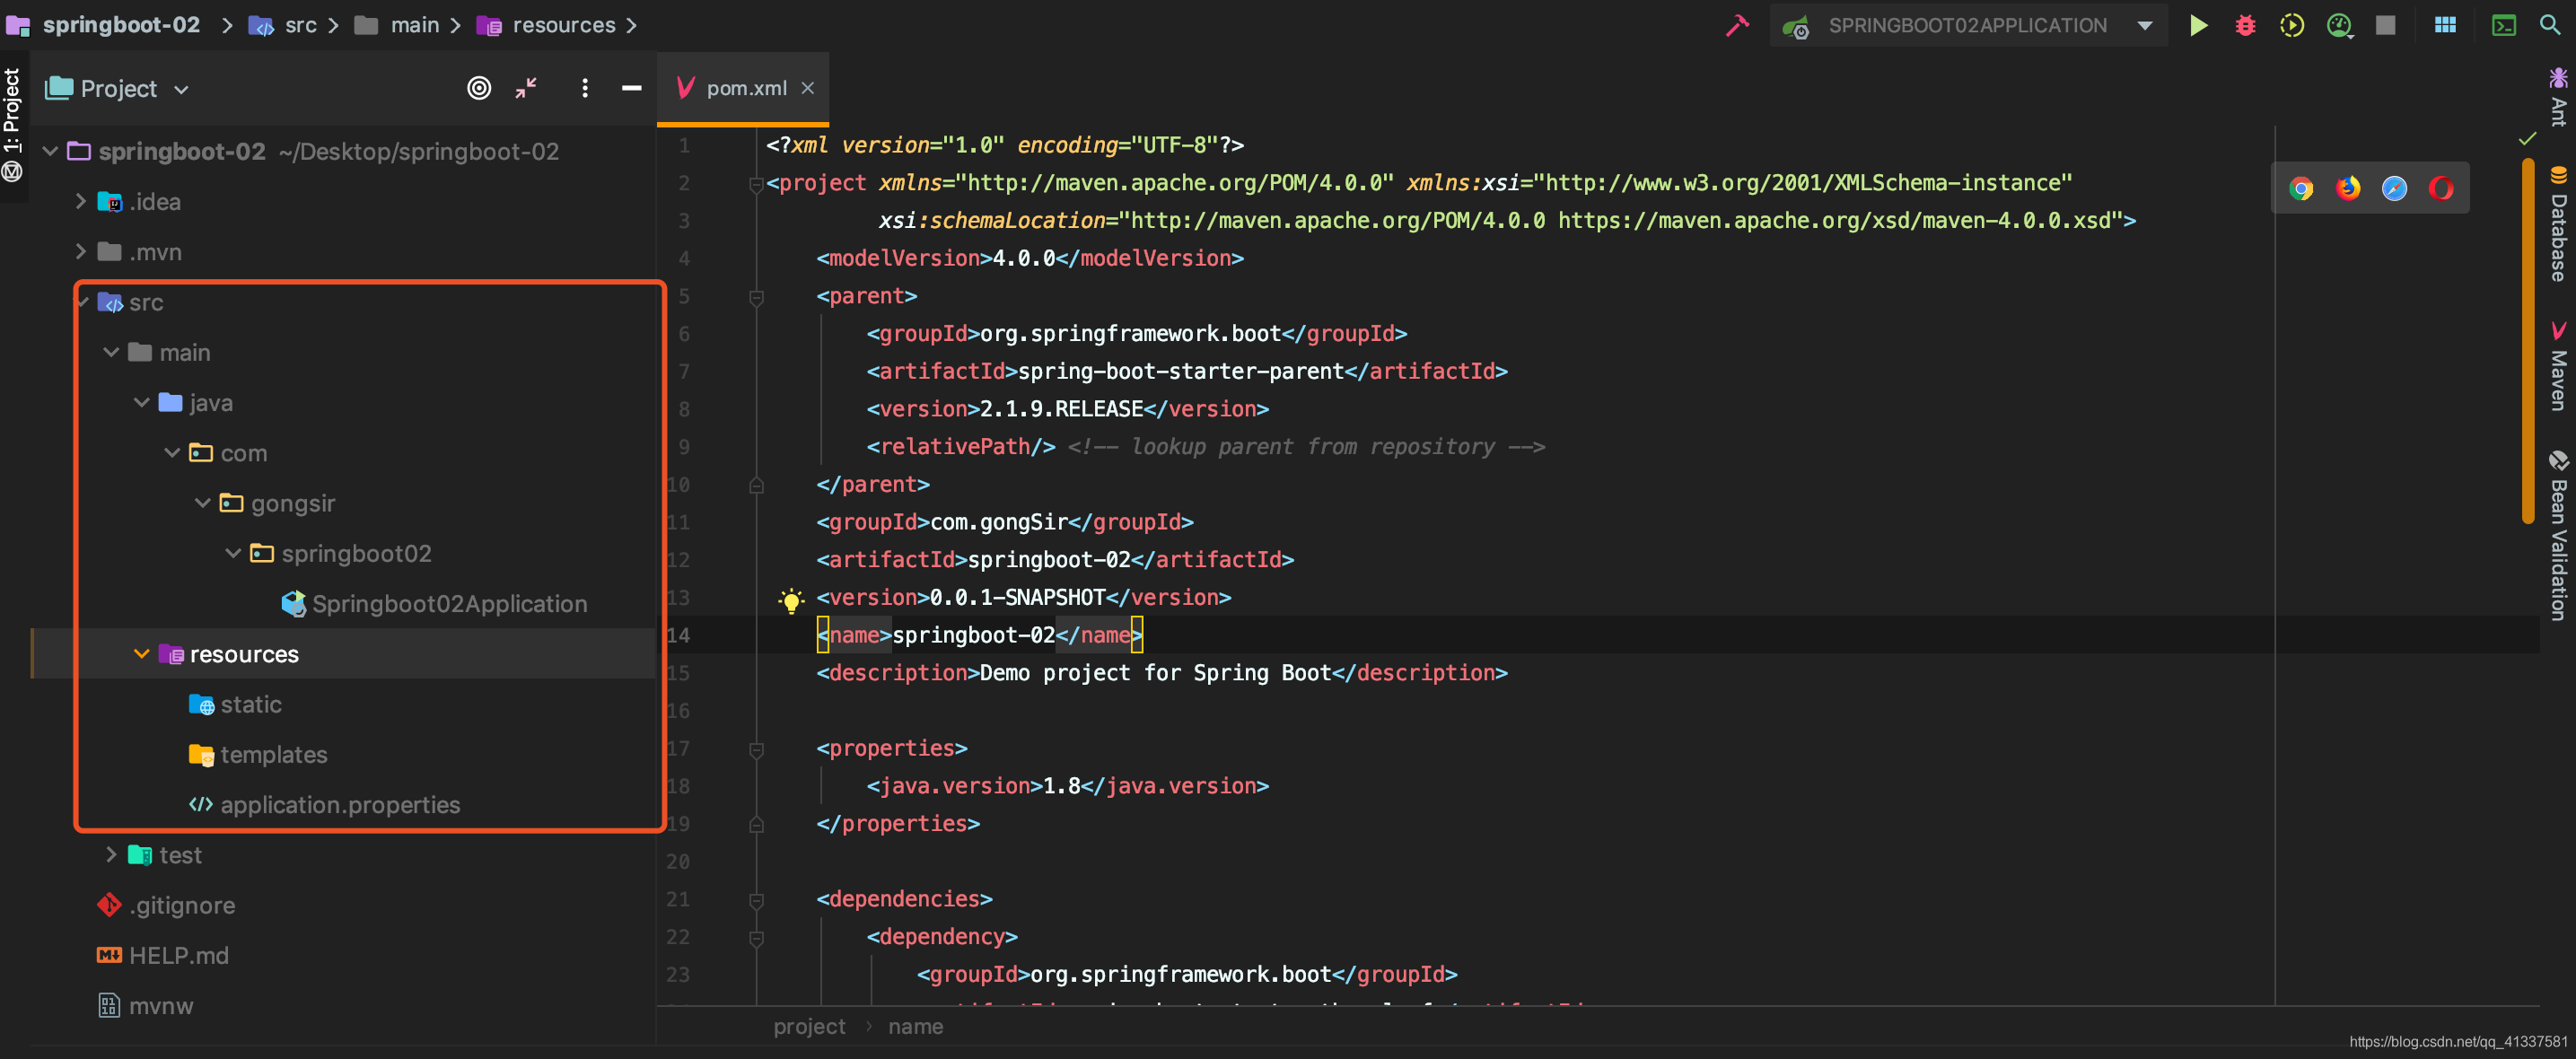
项目架构:
3.2 配置Thymeleaf
SpringBoot为Thymeleaf提供了自动化配置类ThymeleafAutoConfiguration,源码:
@Configuration

@EnableConfigurationProperties({ThymeleafProperties.class})

@ConditionalOnClass({TemplateMode.class, SpringTemplateEngine.class})

@AutoConfigureAfter({WebMvcAutoConfiguration.class, WebFluxAutoConfiguration.class})

public class ThymeleafAutoConfiguration {...}
可以看出相关的配置信息是从ThymeleafProperties类中获得的,进一步查看ThymeleafProperties的源码:
@ConfigurationProperties(

    prefix = "spring.thymeleaf"

)

public class ThymeleafProperties {

    private static final Charset DEFAULT_ENCODING;

    public static final String DEFAULT_PREFIX = "classpath:/templates/";

    public static final String DEFAULT_SUFFIX = ".html";

    private boolean checkTemplate = true;

    private boolean checkTemplateLocation = true;

    private String prefix = "classpath:/templates/";

    private String suffix = ".html";

    private String mode = "HTML";

    //省略

}
从该配置可以看出默认的Thymeleaf存放位置是classpath:/templates/,即resources/templates/下,刚刚我们使用IDEA创建项目时,已经自动生成了该目录。
我们如果需要对Thymeleaf的配置进行更改,可直接在application.properties中配置:
#是否开启缓存,默认为true

spring.thymeleaf.cache=false

#检查模板文件是否存在

spring.thymeleaf.check-template=true

#检查模本目录是否存在

spring.thymeleaf.check-template-location=true

#模板文件编码

spring.thymeleaf.encoding=UTF-8

#模板位置

spring.thymeleaf.prefix=classpath:/templates/

#模板文件后缀名

spring.thymeleaf.suffix=.html

#Content-type

spring.thymeleaf.servlet.content-type=text/html
3.3 编写Demo
1、新建User和UserController:
User.java:
package com.gongsir.springboot02.pojo;

public class User {

    private String name;

    private String major;

    private String grade;

    public String getName() {

        return name;

    }

    public void setName(String name) {

        this.name = name;

    }

    public String getMajor() {

        return major;

    }

    public void setMajor(String major) {

        this.major = major;

    }

    public String getGrade() {

        return grade;

    }

    public void setGrade(String grade) {

        this.grade = grade;

    }

}
UserController.java:
@Controller

public class UserController {

    @GetMapping(path = "/users")

    public ModelAndView getUsers(){

        List<User> list = new ArrayList<>();

        User u1 = new User();

        u1.setName("龚涛");

        u1.setMajor("计算机");

        u1.setGrade("2017");

        list.add(u1);

        User u2 = new User();

        u2.setName("李诗雅");

        u2.setMajor("网络工程");

        u2.setGrade("2017");

        list.add(u2);

        //视图模板文件的名字,需在template目录下创建同名模板文件

        ModelAndView mv = new ModelAndView("users");

        mv.addObject("users",list);

        return mv;

    }

}
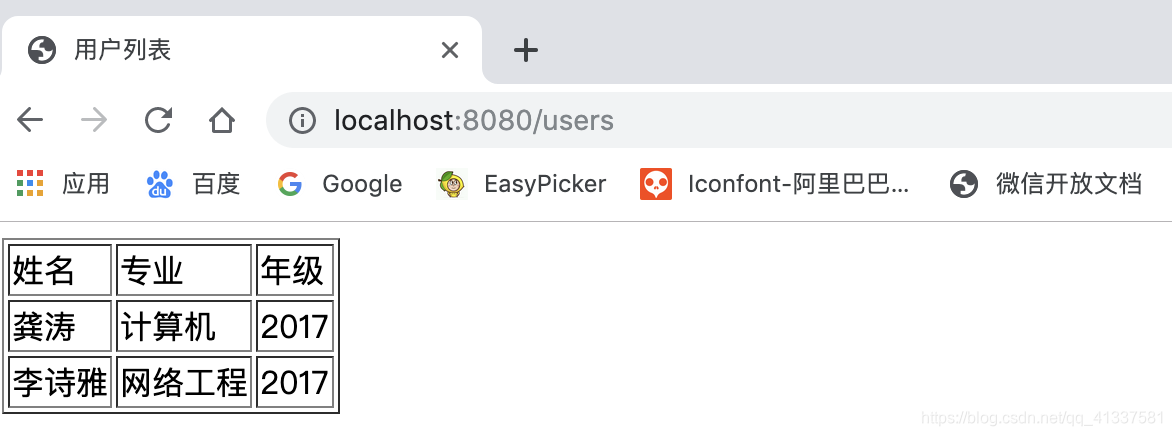
2、在模板目录下新建users.html模板文件,显示数据:
<!DOCTYPE html>

<html lang="en" xmlns:th="http://www.thymeleaf.org">

<head>

    <meta charset="UTF-8">

    <title>用户列表</title>

</head>

<body>

    <table border="1px sold black">

        <tr>

            <td>姓名</td>

            <td>专业</td>

            <td>年级</td>

        </tr>

        <tr th:each="user:${users}">

            <td th:text="${user.name}"></td>

            <td th:text="${user.major}"></td>

            <td th:text="${user.grade}"></td>

        </tr>

    </table>

</body>

</html>
3、启动项目,访问http://localhost:8080/users,如图:
3.4 小结
本文主要介绍SpringBoot整合Thymeleaf视图技术,并给了一个简单demo演示,想学习更多Thymeleaf知识?看官网吧:https://www.thymeleaf.org/.
不过当前流行前后端分离技术,大多数开发不需要在后端整合视图技术,后端只需要提供接口即可,待续.....
三、SpringBoot整合Thymeleaf视图的更多相关文章
- Springboot整合thymeleaf模板
Thymeleaf是个XML/XHTML/HTML5模板引擎,可以用于Web与非Web应用. Thymeleaf的主要目标在于提供一种可被浏览器正确显示的.格式良好的模板创建方式,因此也可以用作静态建 ...
- SpringBoot 整合 Thymeleaf & 如何使用后台模板快速搭建项目
如果你和我一样,是一名 Java 道路上的编程男孩,其实我不太建议你花时间学 Thymeleaf,当然他的思想还是值得借鉴的.但是他的本质在我看来就是 Jsp 技术的翻版(Jsp 现在用的真的很少很少 ...
- 【Java Web开发学习】Spring4整合thymeleaf视图解析
[Java Web开发学习]Spring4整合thymeleaf视图解析 目录 1.简单介绍2.简单例子 转载:https://www.cnblogs.com/yangchongxing/p/9111 ...
- 【Springboot】Springboot整合Thymeleaf模板引擎
Thymeleaf Thymeleaf是跟Velocity.FreeMarker类似的模板引擎,它可以完全替代JSP,相较与其他的模板引擎,它主要有以下几个特点: 1. Thymeleaf在有网络和无 ...
- SpringBoot学习9:springboot整合thymeleaf
1.创建maven项目,添加项目所需依赖 <!--springboot项目依赖的父项目--> <parent> <groupId>org.springframewo ...
- SpringBoot 整合thymeleaf
1.Thymeleaf介绍(官网推荐:https://www.thymeleaf.org/doc/articles/thymeleaf3migration.html) Thymeleaf是跟Veloc ...
- SpringBoot:2.SpringBoot整合Thymeleaf模板引擎渲染web视图
在Web开发过程中,Spring Boot可以通过@RestController来返回json数据,那如何渲染Web页面?Spring Boot提供了多种默认渲染html的模板引擎,主要有以下几种: ...
- springboot整合Thymeleaf模板引擎
引入依赖 需要引入Spring Boot的Thymeleaf启动器依赖. <dependency> <groupId>org.springframework.boot</ ...
- springboot整合thymeleaf+tiles示例
网上关于此框架的配置实在不多,因此想记录下来以防忘记 因为公司框架基于上述(公司采用gradle构建项目,楼主采用的是maven),所以楼主能少走些弯路: 1.创建springboot-maven项目 ...
随机推荐
- Xamarin.Forms之主题
Xamarin.Forms应用程序可以使用DynamicResource标记扩展在运行时动态响应样式更改. 此标记扩展类似于StaticResource标记扩展,两者都使用字典键从ResourceDi ...
- 迁移模型问题,提示admin已存在
在部署的时候迁移文件的时候提示 django.db.migrations.exceptions.InconsistentMigrationHistory: Migration admin.0001_i ...
- PHP7新增的主要特性
1.use的用法 <?php // PHP 7 之前版本用法 use some\namespace\ClassA; use some\namespace\ClassB; use some\nam ...
- codevs 2803 爱丽丝·玛格特罗依德
二次联通门 : codevs 2803 爱丽丝·玛格特罗依德 /* codevs 2803 爱丽丝·玛格特罗伊德 高精 + 找规律 显然, 能拆3就多拆3 不能拆就拆2 注意特判一下 */ #incl ...
- request登录案例
一.案例需求 1.编写login.html登录页面 username & password 两个输入框 2.使用Druid数据库连接池技术,操作mysql,day14数据库中user表 3.使 ...
- python:UnicodeEncodeError: 'ascii' codec can't encode characters in position 0-1: ordinal not in range(128)
# 将默认编码设为utf-8 # 否则会报错: # UnicodeEncodeError: 'ascii' codec can't encode characters in position 0-1: ...
- 19 条效率至少提高 3 倍的 MySQL 技巧
阅读本文大概需要 4 分钟. 来源:https://zhuanlan.zhihu.com/p/49888088 本文我们来谈谈项目中常用的 MySQL 优化方法,共 19 条,具体如下: 1.EXPL ...
- css选择指定元素
.butSpan:){ margin-left: 10px; } nth-child(n+2)括号内可以是公式 可是是数字
- kubernetes --- weave
#wget 'https://cloud.weave.works/launch/k8s/weavescope.yaml?k8s-service-type=NodePort&k8s-versio ...
- srs安装与ffmpeg推流
环境说明:ubuntu 16.04 当前目录为~/. 一. 下载 git clone https://github.com/ossrs/srs.git 二.部署SRS 关闭防火墙,执行如下命令. uf ...