CentOS7.4 搭建和使用telnet
1.先检查是否安装了telnet
rpm -qa | grep telnet   //检查你的CentOS是否安装了telnet和telnet-server

rpm -qa xinetd   //检查你的CentOS是否安装了xinetd,telnet的自启动依赖它
如果执行结果没有任何输出,那么说明你的机器上没有安装telnet和xinetd
2.安装telnet并设置开机自启动
yum list |grep telnet   //列出当前可用的rpm包

yum install telnet-server  //安装telnet-server 服务端

yum install telnet    //安装telnet 客户端
3.如果没有安装xinetd,则安装它
yum install -y xinetd
systemctl enable xinetd.service //设置xinetd开机自启动
4.开启xinetd服务并设置为开机自启。
[root@CentOs64- conf]# systemctl enable xinetd.service

[root@CentOs64- conf]# systemctl status xinetd.service

● xinetd.service - Xinetd A Powerful Replacement For Inetd

   Loaded: loaded (/usr/lib/systemd/system/xinetd.service; enabled; vendor preset: enabled)

   Active: inactive (dead)

[root@CentOs64- conf]# systemctl start xinetd.service

[root@CentOs64- conf]# systemctl status xinetd.service

● xinetd.service - Xinetd A Powerful Replacement For Inetd

   Loaded: loaded (/usr/lib/systemd/system/xinetd.service; enabled; vendor preset: enabled)

   Active: active (running) since Thu -- :: CST; 17s ago

  Process:  ExecStart=/usr/sbin/xinetd -stayalive -pidfile /var/run/xinetd.pid $EXTRAOPTIONS (code=exited, status=/SUCCESS)

 Main PID:  (xinetd)

   CGroup: /system.slice/xinetd.service

           └─ /usr/sbin/xinetd -stayalive -pidfile /var/run/xinetd.pid

Oct  :: CentOs64-7.4 xinetd[]: removing discard

Oct  :: CentOs64-7.4 xinetd[]: removing discard

Oct  :: CentOs64-7.4 xinetd[]: removing echo

Oct  :: CentOs64-7.4 xinetd[]: removing echo

Oct  :: CentOs64-7.4 xinetd[]: removing tcpmux

Oct  :: CentOs64-7.4 xinetd[]: removing time

Oct  :: CentOs64-7.4 xinetd[]: removing time

Oct  :: CentOs64-7.4 xinetd[]: xinetd Version 2.3. started with libwrap loadavg labeled-networking options compiled in.

Oct  :: CentOs64-7.4 xinetd[]: Started working:  available services

Oct  :: CentOs64-7.4 systemd[]: Started Xinetd A Powerful Replacement For Inetd.
经过上面的启动命令和查看xinted装态命令,可以看到xinted已经被成功启动了。
5.测试telnet是否可用,使用的命令和结果如下
[root@CentOs64- conf]# telnet localhost

Trying 127.0.0.1...

telnet: connect to address 127.0.0.1: Connection refused

Trying ::...

telnet: connect to address ::: No route to host
这说明,当前telnet是并不可用的。这是因为telnet的端口是23,而CentOS默认这个端口是关闭的,我们可以使用命令来查看一下23这个端口的装态,如下:
[root@CentOs64- conf]# netstat -tunlp

Active Internet connections (only servers)

Proto Recv-Q Send-Q Local Address           Foreign Address         State       PID/Program name

tcp               0.0.0.0:              0.0.0.0:*               LISTEN      /sshd

tcp               0.0.0.0:            0.0.0.0:*               LISTEN      /java

tcp               0.0.0.0:           0.0.0.0:*               LISTEN      /java

tcp6              :::                 :::*                    LISTEN      /mysqld

udp               172.16.85.47:        0.0.0.0:*                           /ntpd

udp               127.0.0.1:           0.0.0.0:*                           /ntpd

udp               0.0.0.0:             0.0.0.0:*                           /ntpd

udp6              :::                  :::*                                /ntpd
可以看到TCP并没有23 这个端口号,当然你也可以在服务器本地使用nmap ip地址 -p 23 查看telnet状态是关闭的。
6.设置telnet服务开机启动。
systemctl enable telnet.socket
7.重启服务(telnet服务依赖xinetd守护,安装telnet-server后启动时需要重启xinetd服务)。
systemctl start telnet.socket

systemctl start xinetd
8.开启端口
CentOS采用了 firewalld 防火墙,查询是否开启23端口
# firewall-cmd --query-port=23/tcp
no
显示23端口没有开启使用下面命令开启23端口
# firewall-cmd --zone=public --add-port=23/tcp --permanent
success
重新加载firewall-cmd
# firewall-cmd --complete-reload
success
重新查询23端口是否开放
# firewall-cmd --query-port=23/tcp
yes
success表示已开启!现在可以用telnet命令远程登陆CentOS7快乐玩耍了!
注:telnet使用的是文明密码,为安全建议使用SSH加密登陆!
9.telnet默认是不开启的,所以你得telnet不能使用也可能不是第8步的原因,例如我的机器就没有开防火墙,所以执行第9步。
telnet服务之后,默认是不开启服务,修改文件/etc/xinetd.d/telnet来开启服务:
注:如有则修改,第一次修改,此文件若不存在,可自己vim创建修改:
修改 disable = yes 为 disable = no
修改后的telnet文件为:
#default:yes

# description: The telnet server servestelnet sessions; it uses \

# unencrypted username/password pairs for authentication.

service telnet

{

    flags = REUSE

    socket_type  = stream

    wait = no

    user = root

    server =/usr/sbin/in.telnetd

    log_on_failure  += USERID

    disable = no

}
查看xinetd是否启动
[root@CentOs64-7 xinetd.d]# ps -ef | grep xinetd
root 27304 1 0 01:33 ? 00:00:00 /usr/sbin/xinetd -stayalive -pidfile /var/run/xinetd.pid
root 27378 27017 0 02:01 pts/0 00:00:00 grep --color=auto xinetd
说明已经启动
10.使用telnet localhost检测telnet是否正常,密码正确,但是总是提示Login incorrect
telnet是除了SSH之外另一种远程登录服务器的办法,但是它并不安全,因为是明文的。
[root@CentOs64- xinetd.d]# telnet localhost

Trying 127.0.0.1...

Connected to localhost.

Escape character is '^]'.

Kernel 3.10.-693.2..el7.x86_64 on an x86_64

CentOs64- login: root

Password:

Login incorrect

CentOs64- login: root

Password:

Login incorrect

CentOs64- login: Connection closed by foreign host.
解决办法:
解决1:注释/etc/pam.d/remote的第一行,
即:auth required pam_securetty.so
先进入 /etc/pam.d/目录
[root@CentOs64- xinetd.d]# cd /etc/pam.d/

[root@CentOs64- pam.d]# pws

-bash: pws: command not found

[root@CentOs64- pam.d]# pwd

/etc/pam.d
修改结果如下:
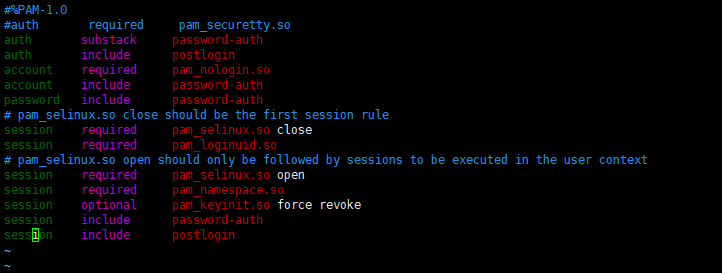
然后再使用telnet localhost就可以成功登录你指定的用户了。
CentOS7.4 搭建和使用telnet的更多相关文章
- centos7 环境搭建
centos7 环境搭建 CentOS-7-x86_64-DVD-1511.iso vmware121. 安装 使用iso安装系统:2. 修改yum源到光盘 先把光盘C ...
- Kafka(二)CentOS7.5搭建Kafka2.11-1.1.0集群与简单测试
一.下载 下载地址: http://kafka.apache.org/downloads.html 我这里下载的是Scala 2.11对应的 kafka_2.11-1.1.0.tgz 二.kaf ...
- 在Centos7下搭建Socks5代理服务器
在Centos7下搭建Socks5代理服务器 http://blog.51cto.com/quliren/2052776 采用socks协议的代理服务器就是SOCKS服务器,是一种通用的代理服务器 ...
- 第四百零五节,centos7下搭建sentry错误日志服务器,接收python以及Django错误,
第四百零五节,centos7下搭建sentry错误日志服务器,接收python以及Django错误, 注意:版本,不然会报错 Docker >=1.11Compose >1.6.0 通过d ...
- Hyperledger超级账本在Centos7下搭建运行环境
超级账本(hyperledger)是Linux基金会于2015年发起的推进区块链数字技术和交易验证的开源项目,加入成员包括:荷兰银行(ABN AMRO).埃森哲(Accenture)等十几个不同利益体 ...
- git操作:在CentOS7上面搭建GitLab服务器
在这篇文章中将要讲解如何在CentOS7上面搭建本地的GitLab服务器. 一.安装并配置必要的依赖关系 首先要在CentOS系统上面安装所需的依赖:ssh.防火墙.postfix(用于邮件通知).w ...
- Storm(二)CentOS7.5搭建Storm1.2.2集群
一.Storm的下载 官网下载地址:http://storm.apache.org/downloads.html 这里下载最新的版本storm1.2.2,进入之后选择一个镜像下载 二.Storm伪分布 ...
- HBase(二)CentOS7.5搭建HBase1.2.6HA集群
一.安装前提 1.HBase 依赖于 HDFS 做底层的数据存储 2.HBase 依赖于 MapReduce 做数据计算 3.HBase 依赖于 ZooKeeper 做服务协调 4.HBase源码是j ...
- Spark(二)CentOS7.5搭建Spark2.3.1分布式集群
一 下载安装包 1 官方下载 官方下载地址:http://spark.apache.org/downloads.html 2 安装前提 Java8 安装成功 zookeeper 安 ...
随机推荐
- git合并相关问题(copy)
[说明:资料来自http://gitbook.liuhui998.com/3_3.html] 一个Git仓库可以维护很多开发分支.现在我们来创建一个新的叫”experimental”的分支: $ gi ...
- 简单粗暴解决google被和谐导致google fonts无法加载的问题
原文:http://www.v2ex.com/t/118403 解决方法:fonts.googleapis.com替换为fonts.useso.com, fonts.useso.com是360安全卫士 ...
- java.util.Optional
public class OptionalDemo { public static void main(String[] args) { //创建Optional实例,也可以通过方法返回值得到. Op ...
- 购买阿里云ECS+安装宝塔面板+Mac下怎么连接阿里云ECS服务器
1.购买阿里云ECS 2.重置实例密码 这个有点对用户不友好,实际意思就是设置服务器的root登录密码 3.配置安全组放行端口 因为服务器需要从宝塔网站download安装包,包括一些常用的服务比如S ...
- vim下撤销操作.选中复制等操作
vim撤销操作:u vim恢复操作:ctrl+r 使用normal模式下的 v命令,进入visual模式,v+ j/k/h/l 进行文本选中 对于选中的文本进行如下按键: (1.1)d -- ...
- 升级Python后, yum不能用了
yum需要使用python2,而升级python3后,就会导致语法错误 更正方法: sudo vim /usr/bin/yum 然后把第一行的python改成python2就好了 之后如果出现类似的, ...
- CF1140G Double Tree
题解 首先如果我们要确定出每个\(dis_{i \to i+1 , i \in odd}\) 这个可以用两遍树形\(DP\)来解决 一遍是考虑走子树子树绕过来的 一遍是考虑从走祖先绕过来的 然后就可以 ...
- LightOj 1220 Mysterious Bacteria
题目大意: 给出一个x,求满足x = b^p,p最大是多少? 解题思路: x可以表示为:x = p1^e1 * p2^e2 * p3^e3 ....... * pn^en. p = gcd (e1,e ...
- [ZPG TEST 115] 种树【差分约束】
4. 种树 (trees.pas/c/cpp) [问题描述] 一条街的一边有几座房子.因为环保原因居民想要在路边种些树.路边的地区被分割成块,并被编号为1..n.每个块的大小为一个单位尺寸并最多可种一 ...
- QT5每日一学(一)下载与安装
一.Qt SDK的下载和安装 1.下载 Qt官网主页提供了最新版Qt的下载,不过我们更倾向于去资源下载页面(https://download.qt.io/official_release ...