vnc server的安装
vnc是一款使用广泛的服务器管理软件,可以实现图形化管理。我在安装vnc server碰到一些问题,也整理下我的安装步骤,希望对博友们有一些帮助。
1 安装对应的软件包
- [root@centos6 ~]# yum search vnc
- [root@centos6 ~]# yum -y install tigervnc-server
2 设置vnc远程连接密码
- [root@centos6 ~]# vncpasswd
- Password:
- Verify:
3 修改vncserver配置文件
- [root@centos6 ~]# vim /etc/sysconfig/vncservers
- VNCSERVERS="2:root"
- VNCSERVERARGS[]="-geometry 1024x768"
注意:1024x768的中间的那个符号是小写字母x。
4 重启服务并查看服务
- [root@centos6 ~]# service vncserver restart #重启vncserver
- Shutting down VNC server: [ OK ]
- Starting VNC server: :root xauth: file /root/.Xauthority does not exist
- xauth: (stdin):: bad display name "centos6.magedu.com:2" in "add" command
- New 'centos6.magedu.com:2 (root)' desktop is centos6.magedu.com:
- Creating default startup script /root/.vnc/xstartup
- Starting applications specified in /root/.vnc/xstartup
- Log file is /root/.vnc/centos6.magedu.com:.log
- [ OK ]
- [root@centos6 ~]# netstat -tunlp |grep vnc #发现监听在5902端口上
- tcp 0.0.0.0: 0.0.0.0:* LISTEN /Xvnc
- tcp 0.0.0.0: 0.0.0.0:* LISTEN /Xvnc
- tcp ::: :::* LISTEN /Xvnc
5 测试vnc服务
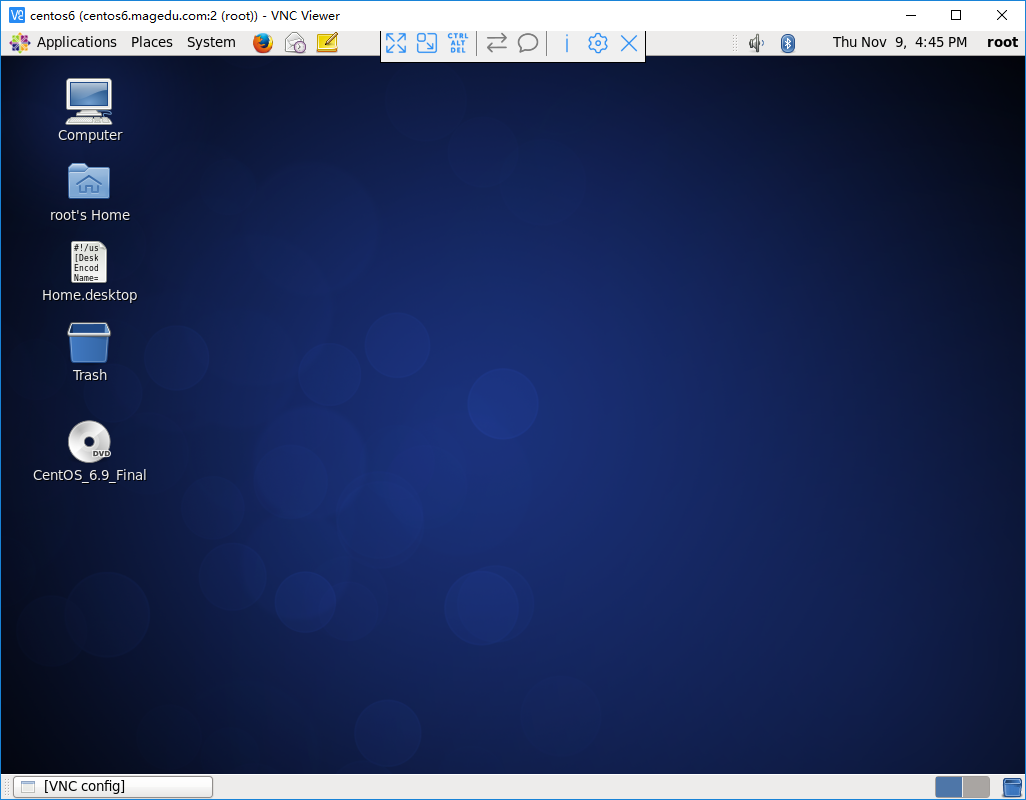
我这里在windows机器使用vncview进行测试。在vncview连接种输入ip:5902,发现连不上去。百度了下,从下面的这个参考地址获取到帮助
整理下需要3个步骤:
- 确保能ping通vnc server所在的服务器
- 临时关闭防火墙
- 临时关闭selinux
- [root@centos6 ~]# service iptables status
- Table: filter
- Chain INPUT (policy ACCEPT)
- num target prot opt source destination
- ACCEPT all -- 0.0.0.0/ 0.0.0.0/ state RELATED,ESTABLISHED
- ACCEPT icmp -- 0.0.0.0/ 0.0.0.0/
- ACCEPT all -- 0.0.0.0/ 0.0.0.0/
- ACCEPT tcp -- 0.0.0.0/ 0.0.0.0/ state NEW tcp dpt:
- REJECT all -- 0.0.0.0/ 0.0.0.0/ reject-with icmp-host-prohibited
- Chain FORWARD (policy ACCEPT)
- num target prot opt source destination
- REJECT all -- 0.0.0.0/ 0.0.0.0/ reject-with icmp-host-prohibited
- Chain OUTPUT (policy ACCEPT)
- num target prot opt source destination
- [root@centos6 ~]# service iptables stop
- iptables: Setting chains to policy ACCEPT: filter [ OK ]
- iptables: Flushing firewall rules: [ OK ]
- iptables: Unloading modules: [ OK ]
- [root@centos6 ~]# getenforce
- Enforcing
- [root@centos6 ~]# setenforce
执行上面的操作就可以远程连接了。后续我们还需要把启用防火墙把对应的端口放行,并且设置selinux支持vncserver。

vnc server的安装的更多相关文章
- 云服务器 ECS Linux 安装 VNC Server 实现图形化访问配置说明
阿里云官方公共 Linux 系统镜像,基于性能及通用性等因素考虑,默认没有安装 VNC 服务组件.本文对常见操作系统下的 VNC Server 安装配置进行简要说明. 本文中仅讨论VNC的安装,关于图 ...
- CentOS 8 配置 VNC Server
CentOS 8 配置 VNC Server 2020-12-31 | 标签: centos, vnc 前言 CentOS 8 配置 VNC Server, 使用户可以远程访问,本例介绍安装和配置流程 ...
- CentOS 安装VNC Server
环境 服务器:192.168.10.181 系统:CentOS 6.0 安装过程 1.切换至root用户 2.检测系统是否安装VNC [root@Nginx canyouNgx]# rpm -q vn ...
- Ubuntu 下安装VNC server
尽管我们在大部分情况下用ssh登录Ubuntu服务器就好了,但是有时候我们的程序需要在图形界面下运行,这时我们就要用到vnc server这个软件了.在Ubuntu下安装vnc server很简单的, ...
- Linux下安装VNC Server
操作系统centos6.5,在其之上安装vnc server,可利用windows上的vnc client远程登录. 1. 安装 yum install tigervnc-server.x86_64 ...
- Linux : fedora 安装 vnc server
Linux配置VNC服务 安装VNC服务端 #yum install vnc-server 配置VNC服务参数文件 编辑vncservers文件追加如下 #vi /etc/sysconfig/vncs ...
- 在CentOS 7.6上安装VNC Server
停止并禁用防火墙 systemctl stop firewalld.service systemctl disable firewalld.service 安装vnxserver yum instal ...
- Linux VNC server 安装配置
1.安装vnc server [root@pxe ~]# yum install tigervnc-server -y 2.设置 vnc server 开机启动 [root@pxe ~]# chk ...
- Ubuntu12.04 64bit 下安装VNC server
1. 安装gonme核心包(如果是字符界面的话) apt-get install x-window-system-coreapt-get install gnome-core (下载完成后需要安装dg ...
随机推荐
- KMP模板实现
看了出题知识点才发现自己连KMP都没有好好的理解,甚至一共就打过一次板子=-= 于是照着之前的课件学了一学...发现没怎么弄懂qwq 我太弱啦! 找了一篇自认为全网最好的介绍 觉得写得很棒 字符串匹配 ...
- Markdown常用快捷键
Markdown使用的符号:井号,星号,大于号,中括号,竖线,横杠,波浪线,反引号 # ,*, > ,[],|,-,~,` 井号 + 空格:根据空格的个数显示各标题的大小 标题一 标题二 标题三 ...
- 在Centos中部署nginx
准备工作: nginx的安装依赖openSSL,zlib和pcre Openssl下载地址: http://www.openssl.org/ zlib下载地址: http://www.zlib.net ...
- H5混合开发问题总结
1.This application is modifying the autolayout engine from a background thread, which can lead to en ...
- 关于分布式环境下的id生成
public class IdWorker { //基准时间 public const long Twepoch = 1288834974657L; //机器标识位数 ; //数据标志位数 ; //序 ...
- idea 启动调试模式总提示端口58346被占用问题
在开发的时候,莫名其妙没法用jrebel调试模式启动了tomcat了,最开始以为是后台端口占用问题,然而把后台java程序全部关了都没用.仔细排查,根据提示发现是端口58346被占用了, 于是便在 w ...
- 记录一次JavaWeb开发的乱码解决
POST提交的中文,测试能正确接收到,而且在控制台打印出中文 但是存到数据库乱码 查看了数据库,设置的是utf-8,最后发现应该在数据库连接的地方设置: jdbc:mysql://localhost: ...
- [Java]LeetCode297. 二叉树的序列化与反序列化 | Serialize and Deserialize Binary Tree
Serialization is the process of converting a data structure or object into a sequence of bits so tha ...
- [Swift]LeetCode309. 最佳买卖股票时机含冷冻期 | Best Time to Buy and Sell Stock with Cooldown
Say you have an array for which the ith element is the price of a given stock on day i. Design an al ...
- [Swift]LeetCode865. 具有所有最深结点的最小子树 | Smallest Subtree with all the Deepest Nodes
Given a binary tree rooted at root, the depth of each node is the shortest distance to the root. A n ...
