python 将png图片格式转换生成gif动画
先看知乎上面的一个连接
用Python写过哪些【脑洞大开】的小工具?
https://www.zhihu.com/question/33646570/answer/157806339
这个哥们通过爬气象网站的气象雷达图,生成一个gif的动态图。非常有趣且很实用,那咱也实现下。
首先先了解下什么是帧,什么是GIF http://baike.baidu.com/item/GIF/217778
我们先实现一个从GIF提取帧的代码
我们这有个gif

代码如下:
from PIL import Image

import sys

def processImage(infile):

    try:

        im = Image.open(infile)

    except IOError:

        print ("Cant load", infile)

        sys.exit(1)

    i = 0

    mypalette = im.getpalette()

    try:

        while 1:

            im.putpalette(mypalette)

            new_im = Image.new("RGBA", im.size)

            new_im.paste(im)

            new_im.save('image\\a'+str(i)+'.png')

            i += 1

            im.seek(im.tell() + 1)

    except EOFError:

        pass # end of sequence

processImage('source.gif')
生成效果:
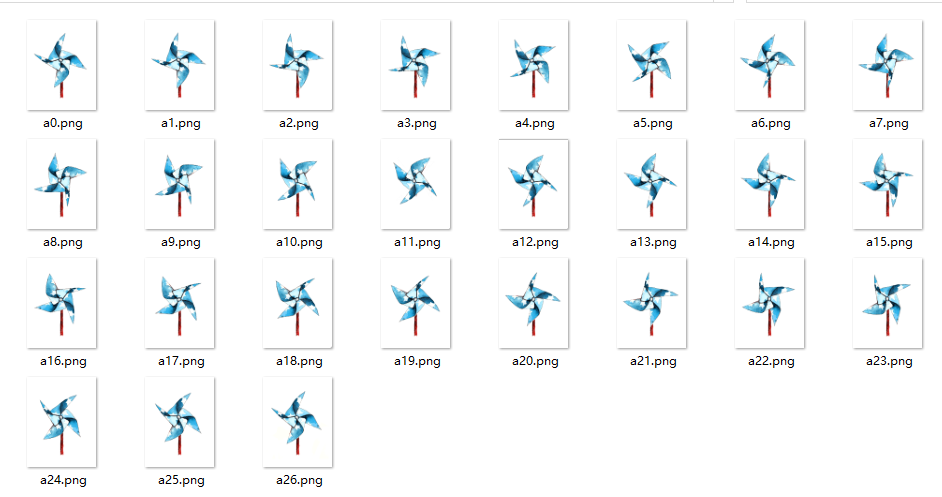
从gif提取frame是不是很简单,只需要一个PIL库搞定
但从frame生成gif就麻烦了,因为我们使用的是py3,网上一大堆代码用的是py2.*的 比如 PythonMagick 、 images2gif
还有部分手写gif文件头部GIF89a,调用帧palette、NETSCAPE2.0写入图像等,你们都运行成功了,为什么我没有运行成功呢?
唉!
python就是牛,库如此之多,虽然本人Py一般般,但有前人为你写诗,您只要尾行加句号就可以了。这里我说的是imageio
下载地址: https://pypi.python.org/pypi/imageio (Version:2.2.0 by 2017-05-25)
import matplotlib.pyplot as plt

import imageio,os

images = []

filenames=sorted((fn for fn in os.listdir('.') if fn.endswith('.png')))

for filename in filenames:

    images.append(imageio.imread(filename))

imageio.mimsave('gif.gif', images,duration=1)
OK! gif生成了!
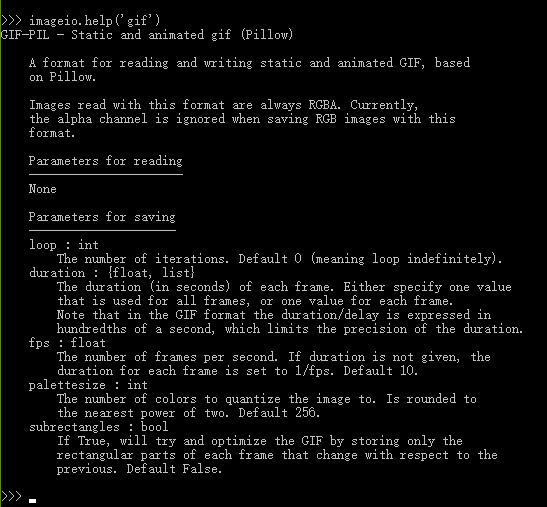
imageio查看参数: http://imageio.readthedocs.io/
imageio.help('gif')
其实,PIL自身也有一个save方法,里面有一个‘save_all’ 参数,意思就是save多个,当format指定为gif时,生成的便是gif的动画
from PIL import Image

im=Image.open("a0.png")

images=[]

images.append(Image.open('a1.png'))

images.append(Image.open('a2.png'))

im.save('gif.gif', save_all=True, append_images=images,loop=1,duration=1,comment=b"aaabb")
读取第一帧,将第一个帧的像素设置为gif像素
python将png图片格式转换生成gif动画已经可以实现了,但我们这里要实现的是获取气象雷达图生成GIF。
1.获取数据
中国气象网网站:http://products.weather.com.cn/product/radar/index/procode/JC_RADAR_AZ9210_JB 这里是上海南汇雷达站点图
获取数据,我们使用pquery
from pyquery import PyQuery as pq

d = pq('http://products.weather.com.cn/product/radar/index/procode/JC_RADAR_AZ9210_JB')

DomTree = d('#slideform #slide option')
2.下载气象雷达png图
想这个用Image.open 直接打开url的文件路径就可以
images.append(Image.open('http://pi.weather.com.cn/i/product/pic/l/sevp_aoc_rdcp_sldas_ebref_az9210_l88_pi_20170621014800000.png'))
那肯定是失败的:
Traceback (most recent call last):

  File "E:/project/test2/my.py", line 29, in <module>

    images.append(Image.open('http://pi.weather.com.cn/i/product/pic/l/sevp_aoc_rdcp_sldas_ebref_az9210_l88_pi_20170621014800000.png'))

  File "C:\Python36\lib\site-packages\PIL\Image.py", line 2410, in open

    fp = builtins.open(filename, "rb")

OSError: [Errno 22] Invalid argument: 'http://pi.weather.com.cn/i/product/pic/l/sevp_aoc_rdcp_sldas_ebref_az9210_l88_pi_20170621014800000.png'
异想天开呀!!!
imageio支持url文件路径 参考: http://imageio.readthedocs.io/en/latest/examples.html
import imageio

import visvis as vv

im = imageio.imread('http://upload.wikimedia.org/wikipedia/commons/d/de/Wikipedia_Logo_1.0.png')

vv.imshow(im)
使用requests 库保存图片
import requests

r = requests.get('http://pi.weather.com.cn/i/product/pic/l/sevp_aoc_rdcp_sldas_ebref_az9210_l88_pi_20170621014800000.png', timeout=3)

file = open('b1.png', 'wb')

size = file.write(r.content)

file.close()

3.生成气象雷达GIF图
python 生成gif在上面我们已经说到两种方法,一种是imageio 另一种是PIL自带save_all, 这里我们直接写一个类封装方法
源码如下:
# -*- coding: UTF8 -*-
import requests
from pyquery import PyQuery as pq
import os, sys
import imageio
from PIL import Image '''
天气预报.gif 生成class
''' class weatherForecast():
def __init__(self, weatherSite, path, endpng, savemodel):
self.savemodel = savemodel
if not os.path.exists(path):
os.makedirs(path) def getPic(self):
'''
获取资源
'''
print('获取pic')
d = pq(weatherSite)
DomTree = d('#slideform #slide option') # 获取DOM节点option 标签
num = 100
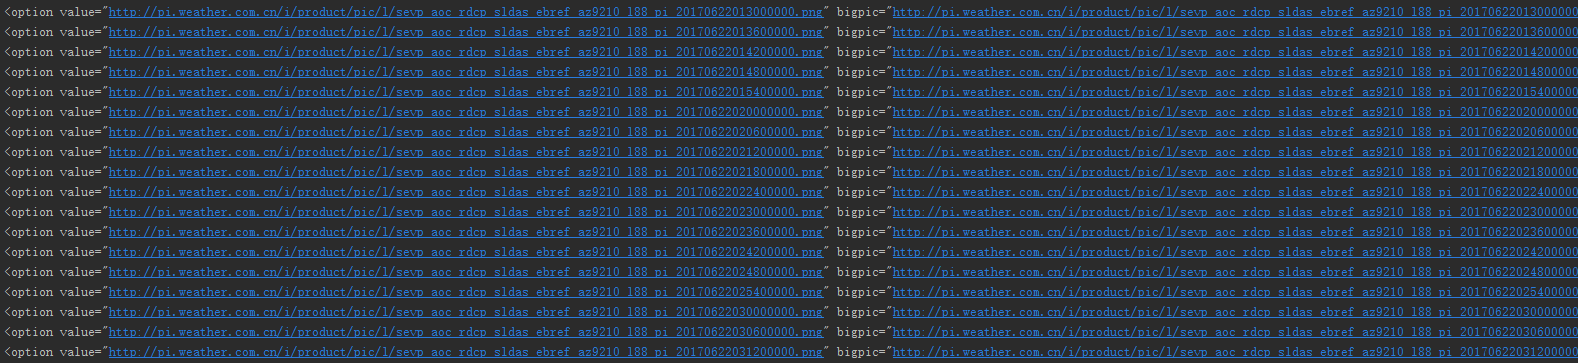
for bigpic in DomTree.items():
pic = bigpic.attr('bigpic') # 获取bigpic 属性指
num += 1
self.download(pic, 'a' + str(num) + '.png') # 下载pic
print('pic下载成功,共下载' + str(num - 100) + '个png')
self.download(endpng, 'a1200.png') # 下载end.png
self.download(endpng, 'a1201.png')
self.download(endpng, 'a1202.png')
self.download(endpng, 'a1203.png') def download(self, url, fname):
'''
下载pic
:return images size
'''
size = 0
try:
r = requests.get(url, timeout=3)
file = open(path + fname, 'wb')
size = file.write(r.content)
file.close()
except:
pass
return size def getGIF(self):
'''
生成gif
'''
images = []
print('执行开始')
self.getPic() # 获取图片资源
filenames = sorted(fn for fn in os.listdir(path) if fn.endswith('.png'))
if self.savemodel == 1: # imageio方法
for filename in filenames:
images.append(imageio.imread(path + filename))
print('执行conversion操作')
imageio.mimsave('weather.gif', images, duration=0.5, loop=1) # duration 每帧间隔时间,loop 循环次数
print('完成……')
elif self.savemodel == 2: # PIL 方法
imN = 1
for filename in filenames:
if imN == 1: # 执行一次 im的open操作,PIL在保存gif之前,必须先打开一个生成的帧,默认第一个frame的大小、调色
im = Image.open(path + filename)
imN = 2 images.append(Image.open(path + filename))
print('执行conversion操作')
im.save('weather.gif', save_all=True, append_images=images, loop=1, duration=500,
comment=b"this is my weather.gif")
print('完成……') '''
注:loop循环次数在浏览器有效果,用看图软件不起作用
'''
if __name__ == "__main__":
weatherSite = "http://products.weather.com.cn/product/radar/index/procode/JC_RADAR_AZ9210_JB" # 上海南汇
path = 'images/' # png 图片存储位置
endpng = 'http://images.cnblogs.com/cnblogs_com/dcb3688/982266/o_end.png' # 因gif是循环播放,end png 区分新loop
savemodel = 1 # 1:imageio保存图片, 2:PIL保存图片
weatherForecast = weatherForecast(weatherSite, path, endpng, savemodel)
weatherForecast.getGIF()
sys.exit()
也可以修改gif尺寸大小,先修改png大小
    def download(self, url, fname):

        '''

        下载pic

        :return images size

        '''

        size = 0

        try:

            r = requests.get(url, timeout=3)

            file = open(path + fname, 'wb')

            size = file.write(r.content)

            file.close()

            # 修改图片大小,原:x=640*y=480  = 320*240

            ima = Image.open(path + fname)

            (x, y) = ima.size  # read image size

            x_s = 320

            y_s = int((y * x_s) / x)  # #calc height based on standard width

            out = ima.resize((x_s, y_s), Image.ANTIALIAS)  # resize image with high-quality

            out.save(path + fname)

        except:

            pass

        return size
images目录
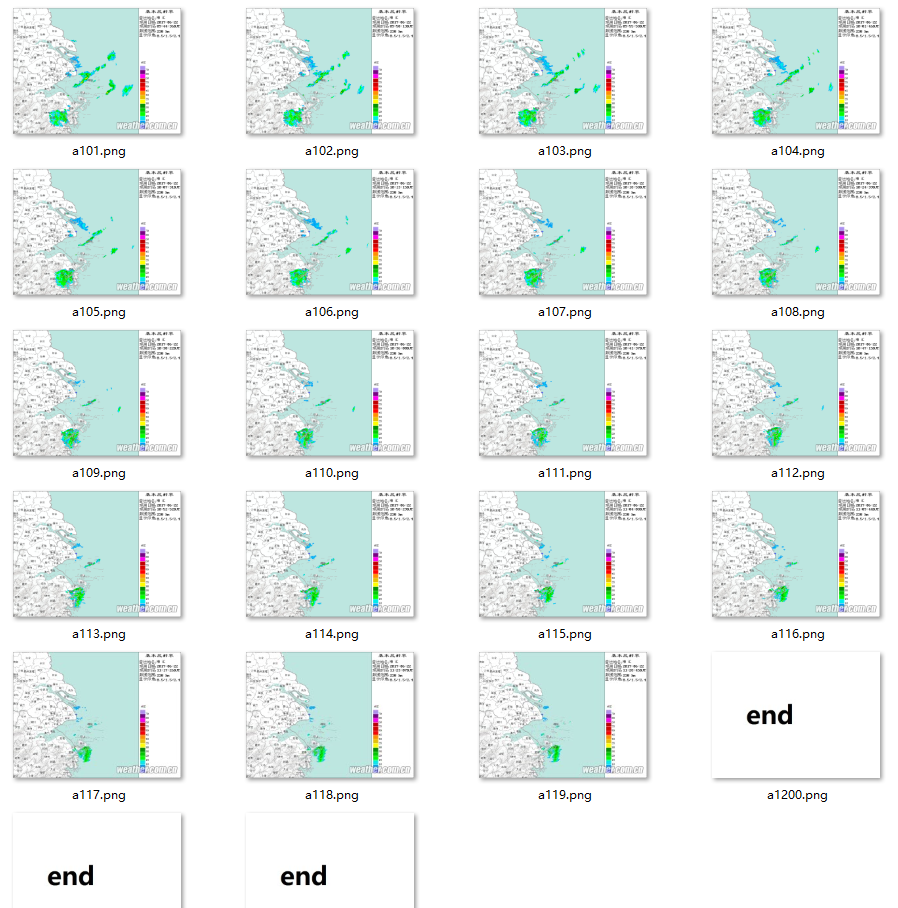
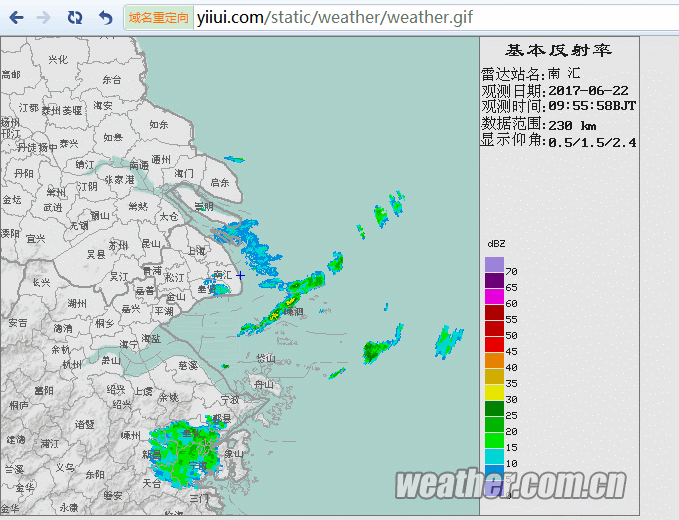
生成气象雷达图gif

4.外部访问气象雷达图
脚步写好了,如何让别人也能访问呢,直接仍到公网IP的website目录就行了,然后写一个crontab定时脚步,每5分钟生成一次
*/ * * * * python /home/wwwroot/www/web/static/weather/weather_forecast.py #每5分钟执行天气查询脚本
在这里,如果执行crontab定时脚步,代码生成的gif就要指定位置,否则生成的gif会在/root 目录里面
imageio.mimsave('/home/wwwroot/www/web/static/weather/weather.gif', images, duration=0.5, loop=) # duration 每帧间隔时间,loop 循环次数
python 将png图片格式转换生成gif动画的更多相关文章
- 【VC++技术杂谈007】使用GDI+进行图片格式转换
本文主要介绍如何使用GDI+对图片进行格式转换,可以转换的图片格式为bmp.jpg.png. 1.加载GDI+库 GDI+是GDI图形库的一个增强版本,提供了一系列Visual C++ API.为了使 ...
- Python批量修改图片格式和尺寸
Python批量修改图片格式和尺寸 备注: 1.导入了PIL库,是处理图片用的,很强大; 2.导入了的win32库,是判断隐藏文件用的,我们的项目需要删除隐藏文件,不需要的可以直接找到删除. 3.导入 ...
- bmp,jpg,png,tif,wmf,emf与eps图片格式转换
wmf/emf是两种Microsoft Windows的图形文件格式.它是一个矢量图格式,但是也允许包含位图.本质上,一个WMF文件保存一系列可以用来重建图片的Windows GDI命令.在某种程度上 ...
- 利用PBFunc在Powerbuilder中进行图片格式转换
利用PBFunc的n_pbfunc_image对象可以方便的进行图片格式的转换与大小转换 支持相互转换的格式有以下几种: FORMAT_BMP //bmp格式FORMAT_GIF //gif格式FO ...
- php 图片格式转换-亲测ok
代码如下 /** * 图片格式转换 * @param string $image_path 文件路径或url * @param string $to_ext 待转格式,支持png,gif,jpeg,w ...
- 关于PHP批量图片格式转换的问题--本文转成webp, 其他过程格式一样
最近要把项目中的图片全部生成webp格式, 过程整理一下, (直接存在本地,或者图片链接存在数据库都可以看看) 首先,肯定是批量处理, 一个php处理不了这么多, 会爆内存的, 个人建议用aja ...
- Python 批量修改图片格式和尺寸
公司的一个项目要求把所有4096x4096的图片全部转化成2048x2048的图片,这种批量转换图片大小的软件网上很多,我的同事原来使用的美图看看的批量转换,但是稍微有点麻烦,每次还需要指定要转换的图 ...
- PIL图片格式转换
PIL格式转换 原图: #!/usr/local/bin/python # -*- coding: utf8 -*- from PIL import Image, ImageFilter import ...
- 图片格式转换之ImageMagick
项目中需要实现一些图片文件到TIFF文件的转换,去网上下载了一些第三方软件. 好的软件需要收费,免费的存在各种问题. 自己动手,丰衣足食! 众里寻他千百度,蓦然回首,那人就是ImageMagick. ...
随机推荐
- 面向对象编程(OPP)
作者:狐狸家的鱼 本文链接:面向对象编程 GitHub:sueRimn 面向对象编程(OPP) 具有灵活.代码可复用.高度模块化等特点,易维护和开发 实例对象与new命令 1.对象 对象是单个实物的抽 ...
- 配置webpack.config.js中的文件
webpack.config.js文件中,主要包括 entry:入口文件 output:出口文件 module:模块 plugins:插件 这几部分 1.基本配置 运行 webpack 这一命令可以将 ...
- Spring bean实例化的方式
实例化过程如图,方式如图. 甩代码. 方式一:构造方法 搞一个bean,修改一下xml配置 package com.itheima.instance.constructor; public class ...
- 使用BeautifulSoup
下载bs4,导入BeautifulSoup pip install bs4 from bs4 import BeautifulSoup BeautifulSoup 的使用 创建对象 r = reque ...
- c++对象的存储空间
1. 非静态成员 2. 静态成员变量 静态成员变量不占对象的内存空间 3. 成员函数 成员函数不占内存空间 4. 析构函数 5. 类中有虚析构函数 6. 继承空类和多重继承空类存储空间的计算 7. t ...
- Ubuntu16.04安装NVIDA驱动和CUDA
该GPU是计算卡,不会用做显示,所以如果你希望自己的显示使用GPU,本方法可能失效. 服务器配置: CPU: E5-母鸡 GPU: NVIDIA Tesla K40c 操作系统:Ubuntu 16. ...
- [C++] const与指针的关系
首先快速复习一些基础. 考虑下面的声明兼定义式: int p = 10; p的基础数据类型是int. 考虑下面的声明兼定义式: const int a = 10; a的基础数据类型是int,a是一个常 ...
- linux 上安装图形界面
linux 上安装 vncserver 后,图形界面里只有灰底和一个terminal 框, 解决方法: 修改 .vnc/xstartup为 unset SESSION_MANAGER # exec / ...
- Hyper-V安装虚拟机
1.进入控制面板-程序,选择“启用或关闭Windows功能” 2.找到Hyper-V,勾选,重启电脑,即可 3.若是没有找到Hyper-V,如此操作 1)新建txt文件,输入以下内容: pushd & ...
- 浅入深出Vue:工具准备之PostMan安装配置及Mock服务配置
浅入深出Vue之工具准备(二):PostMan安装配置 由于家中有事,文章没顾得上.在此说声抱歉,这是工具准备的最后一章. 接下来就是开始环境搭建了~尽情期待 工欲善其事必先利其器,让我们先做好准备工 ...