zabbix6.0安装
一、简述
zabbix6.0 对相关软件版本要求较高,需要php7.25以上php8.0以下版本支持,若使用mysql数据库,其最低要求为mysql8.0,本此搭建采用的是使用较广的lnmp架构
zabbix6.0需要的软件及支持包较多,为便于搭建,建议采用联网搭建,本文刻意对所用到的绝大部分rpm包进行了截图,若是不具备联网环境,可先对照本文和截图下载相关rpm包,然后离线安装(唯大毅力者可坚持到底)。
二、 nginx web服务安装
nginx下载地址
# wget http://nginx.org/download/nginx-1.21.6.tar.gz
下载相关依赖
# yum -y install gcc gcc-c++ make pcre pcre-devel openssl openssl-devel zlib zlib-devel

编译安装
# ./configure --prefix=/usr/local/nginx --with-http_stub_status_module --with-http_ssl_module
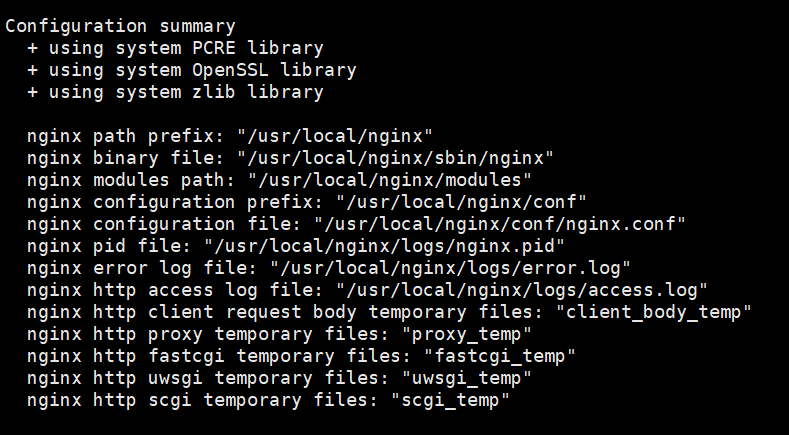
configure是一个可执行脚本,它有很多选项,在待安装的源码路径下使用命令./configure–help输出详细的选项列表。
其中--prefix选项是配置安装的路径,如果不配置该选项,安装后可执行文件默认放在/usr/local/bin,库文件默认放在/usr/local/lib,配置文件默认放在/usr/local/etc,其它的资源文件放在/usr/local/share,比较凌乱。
如果配置--prefix,如:./configure --prefix=/usr/local/nginx ;可以把所有资源文件放在/usr/local/nginx的路径中,不会杂乱,同时还便于软件的卸载和移植。(附:如果要卸载程序,也可以在原来的make目录下用一次make uninstall,但前提是make文件指定过uninstall。)
http_stub_status_module模块主要用于查看Nginx的一些状态信息. 该模块默认是不会编译进Nginx的,如果你要使用该模块,则要在编译安装Nginx时指定:
./configure –with-http_stub_status_module
http_ssl_module模块提供对HTTPS必要的支持。 这个模块不是系统默认的内建模块, 需要采用--with-http_ssl_module指令开启相关的配置。 这个模块需要OpenSSL库的支持
添加模块:./configure --prefix=/usr/local/nginx --with-http_stub_status_module --with-http_ssl_module --with-http_v2_module && make && cp /usr/local/nginx/sbin/nginx /usr/local/nginx/sbin/nginx.bak && cp ./objs/nginx /usr/local/nginx/sbin/ (注:添加模块需要时原有模块需要一块儿编译,且需要停止nginx服务,同时不能make install 否则会覆盖安装,只要将本次编译出来的nginx覆盖原有可执行程序即可)
查看已安装的 Nginx 包含哪些 stub_status 模块:#/usr/local/nginx/sbin/nginx -V
# make

# make install
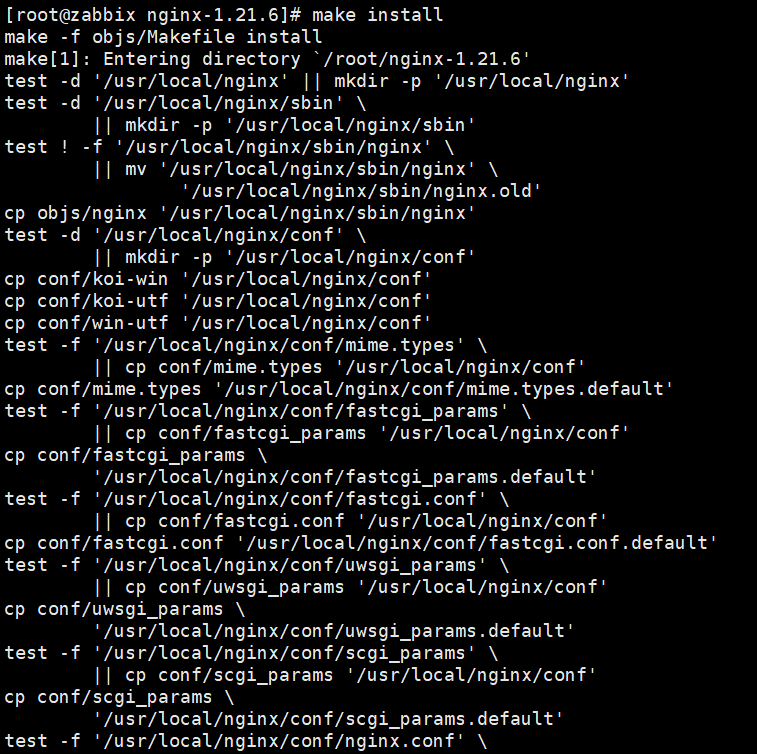
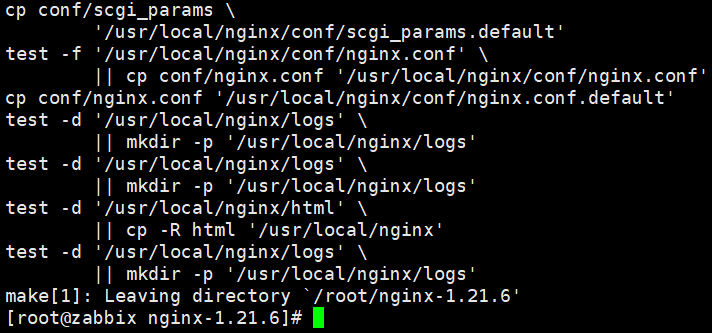
或者联网安装nginxyum源
# vi /etc/yum.repos.d/nginx.repo
[nginx-stable]

name=nginx stable repo

baseurl=http://nginx.org/packages/centos/$releasever/$basearch/

gpgcheck=1

enabled=1

gpgkey=https://nginx.org/keys/nginx_signing.key

module_hotfixes=true

[nginx-mainline]

name=nginx mainline repo

baseurl=http://nginx.org/packages/mainline/centos/$releasever/$basearch/

gpgcheck=1

enabled=0

gpgkey=https://nginx.org/keys/nginx_signing.key

module_hotfixes=true
三、 mysql安装
zabbix6.0需要mysql8及以上版本的数据库支持
参考链接:https://dev.mysql.com/doc/refman/8.0/en/linux-installation-rpm.html
1. 安装mysql源
# yum -y install https://dev.mysql.com/get/mysql80-community-release-el8-1.noarch.rpm&&sed -i 's/el\/8\//el\/7\//g' /etc/yum.repos.d/mysql-community*&&
sed -i 's/gpgcheck=1/gpgcheck=0/g' /etc/yum.repos.d/mysql-community*
或
# yum -y install https://repo.mysql.com//mysql80-community-release-el7-5.noarch.rpm
但是通过官方给出的源安装MySQL会一直有各种报错,其实是mysql默认会安装各种多余的插件,那么也就只需要把mysql多余的仓库源干掉,只留下自己需要的关键部分就OK了,本人为了方便直接手写了一个简单的repo文件,但是我使用的官方源的网址,这一个网址没有FQ的话会有点慢。
换言之,通过yum源安装mysql源,究其根本其实就是在/etc/yum.repos.d/下添加了一个mysql的网络源文件,也就是真正关键的其实还是一个网络源的网址,比如:
http://repo.mysql.com/yum/mysql-8.0-community/el/7/x86_64/

2. 安装mysql
这个就简单了,但要注意zabbix需要mysql-devel的支持,而这个包与mysql-server没有绝对依赖关系,所以需要单独下载
# yum -y install mysql-community-server mysql-community-devel


mysql默认安装目录
| Files or Resources | Location |
|---|---|
| Client programs and scripts | /usr/bin |
| mysqld server | /usr/sbin |
| Configuration file | /etc/my.cnf |
| Data directory | /var/lib/mysql |
| Error log file |
For RHEL, Oracle Linux, CentOS or Fedora platforms: For SLES: |
Value of secure_file_priv |
/var/lib/mysql-files |
| System V init script |
For RHEL, Oracle Linux, CentOS or Fedora platforms: For SLES: |
| Systemd service |
For RHEL, Oracle Linux, CentOS or Fedora platforms: For SLES: |
| Pid file | /var/run/mysql/mysqld.pid |
| Socket | /var/lib/mysql/mysql.sock |
| Keyring directory | /var/lib/mysql-keyring |
| Unix manual pages | /usr/share/man |
| Include (header) files | /usr/include/mysql |
| Libraries | /usr/lib/mysql |
| Miscellaneous support files (for example, error messages, and character set files) | /usr/share/mysql |
四、 PHP74安装
参考官方文献,zabbix6.0需要php7系列的php7.2.5以上版本支持,本人选择7系列最后的php7.4版本,安装源选择remi源,需要epel源支持。
# yum -y install epel-release
# yum -y install http://rpms.famillecollet.com/enterprise/remi-release-7.rpm
1. php74及支持包安装
# yum -y install php74 php74-php php74-php-fpm php74-php-gd php74-php-xml php74-php-sockets php74-php-net-socket php74-php-bcmath php74-php-ctype php74-php-session php74-php-snmp php74-php-mbstring php74-php-gettext php74-php-openssl php74-php-ldap php74-php-mysql
参考下表
| 软件 | 版本 | 备注 |
|---|---|---|
| Apache | 1.3.12 或更高版本 | |
| PHP | 7.2.5 或更高版本 | 不支持 PHP 8.0。 |
| PHP 扩展: | ||
| gd | 2.0.28 或更高版本 | PHP GD 扩展必须支持 PNG (--with-png-dir)、JPEG (--with-jpeg-dir) 和 FreeType 2 (--with-freetype-dir)。 |
| bcmath | php-bcmath (--enable-bcmath) | |
| ctype | php-ctype (--enable-ctype) | |
| libXML | 2.6.15 或更高版本 | php-xml,如果由分发者作为单独的包提供。 |
| xmlreader | php-xmlreader,如果由分发者作为单独的包提供。 | |
| xmlwriter | php-xmlwriter,如果由分发者作为单独的包提供。 | |
| session | php-session,如果由分发者作为单独的包提供。 | |
| sockets | php-net-socket (--enable-sockets)。需要用户脚本支持。 | |
| mbstring | php-mbstring (--enable-mbstring) | |
| gettext | php-gettext (--with-gettext)。Required for translations to work. | |
| ldap | php-ldap.仅当在前端使用 LDAP 身份验证时才需要。 | |
| openssl | php-openssl.仅当在前端使用 SAML 身份验证时才需要。 | |
| mysqli | 如果 MySQL 用作 Zabbix 后端数据库,则需要。 | |
| oci8 | 如果使用 Oracle 作为 Zabbix 后端数据库,则需要。 | |
| pgsql | 如果使用 PostgreSQL 作为 Zabbix 后端数据库,则需要。 |
|
五、环境配置
1. nginx启用php
以yum下载的nginx为例
[root@localhost ~]# cat -n /etc/nginx/conf.d/default.conf

     1    server {

     2        listen       80;

     3        server_name  localhost;

     4

     5        #access_log  /var/log/nginx/host.access.log  main;

     6

     7        location / {

     8            root   /usr/share/nginx/html/zabbix;

     9            index  index.html index.htm index.php;

    10        }

    11

    12        #error_page  404              /404.html;

    13

    14        # redirect server error pages to the static page /50x.html

    15        #

    16        error_page   500 502 503 504  /50x.html;

    17        location = /50x.html {

    18            root   /usr/share/nginx/html;

    19        }

    20

    21        # proxy the PHP scripts to Apache listening on 127.0.0.1:80

    22        #

    23        #location ~ \.php$ {

    24        #    proxy_pass   http://127.0.0.1;

    25        #}

    26

    27        # pass the PHP scripts to FastCGI server listening on 127.0.0.1:9000

    28        #

    29        location ~ \.php$ {

    30            root           html;

    31            fastcgi_pass   127.0.0.1:9000;

    32            fastcgi_index  index.php;

    33            fastcgi_param  SCRIPT_FILENAME  /usr/share/nginx/html/$fastcgi_script_name;

    34            include        fastcgi_params;

    35        }

    36

    37        # deny access to .htaccess files, if Apache's document root

    38        # concurs with nginx's one

    39        #

    40        #location ~ /\.ht {

    41        #    deny  all;

    42        #}

    43    }

    44
2. mysql添加zabbix用户(mysql8默认inodb模式)
启用mysql并设置root密码(略过)
调整mysql密码策略(5.7默认为mysql_native_password)
# echo 'default_authentication_plugin=mysql_native_password' >> /etc/my.cnf
# systemctl restart mysqld
> create user zabbix@'%' identified with mysql_native_password by 'Admin@123!';
> create database zabbix character set utf8 collate utf8_bin;
> grant all privileges on zabbix.* to zabbix@'%';
> flush privileges;
设置MySQL的字符集为UTF-8,令其支持中文
[root@localhost ~]# cat -n /etc/my.cnf

     1    # For advice on how to change settings please see

     2    # http://dev.mysql.com/doc/refman/8.0/en/server-configuration-defaults.html

     3    [mysql]

     4    default-character-set=utf8

     5    [mysqld]

     6    #

     7    # Remove leading # and set to the amount of RAM for the most important data

     8    # cache in MySQL. Start at 70% of total RAM for dedicated server, else 10%.

     9    # innodb_buffer_pool_size = 128M

    10    #

    11    # Remove the leading "# " to disable binary logging

    12    # Binary logging captures changes between backups and is enabled by

    13    # default. It's default setting is log_bin=binlog

    14    # disable_log_bin

    15    #

    16    # Remove leading # to set options mainly useful for reporting servers.

    17    # The server defaults are faster for transactions and fast SELECTs.

    18    # Adjust sizes as needed, experiment to find the optimal values.

    19    # join_buffer_size = 128M

    20    # sort_buffer_size = 2M

    21    # read_rnd_buffer_size = 2M

    22    #

    23    # Remove leading # to revert to previous value for default_authentication_plugin,

    24    # this will increase compatibility with older clients. For background, see:

    25    # https://dev.mysql.com/doc/refman/8.0/en/server-system-variables.html

    26    #sysvar_default_authentication_plugin

    27    # default-authentication-plugin=mysql_native_password

    28    datadir=/var/lib/mysql

    29    socket=/var/lib/mysql/mysql.sock

    30

    31    log-error=/var/log/mysqld.log

    32    pid-file=/var/run/mysqld/mysqld.pid

    33    default_authentication_plugin=mysql_native_password

    34    character_set_server=utf8
3. php配置调整
zabbix需要php的某些配置下限比默认的要高
[root@localhost ~]# find / -name php.ini

/etc/opt/remi/php74/php.ini

[root@localhost ~]# vi /etc/opt/remi/php74/php.ini

388 max_execution_time = 300

398 max_input_time = 600

694 post_max_size = 16M
具体配置参考如下
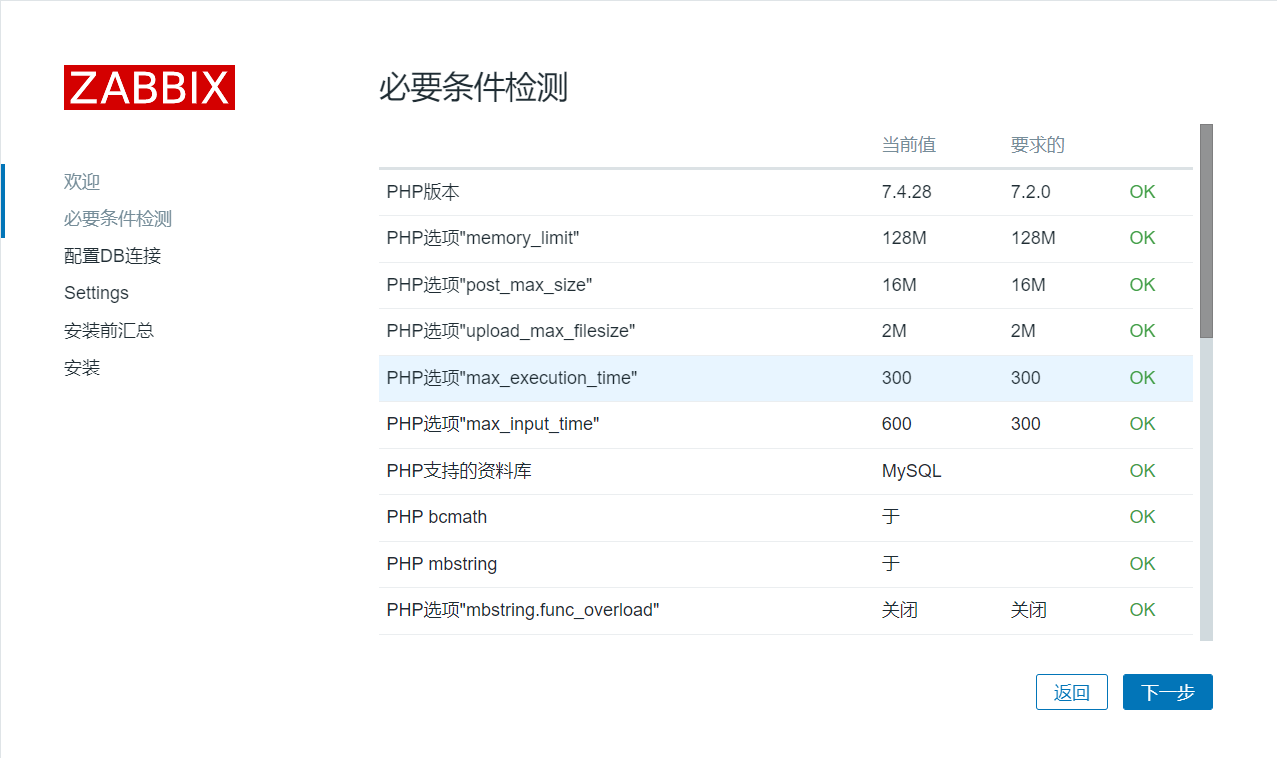
                    Current value    Required

PHP version                7.4.28      7.2.0

PHP option "memory_limit"       128M        128M

PHP option "post_max_size"         16M        16M

PHP option "upload_max_filesize"   2M        2M

PHP option "max_execution_time"   300        300

PHP option "max_input_time"      600        300

PHP databases support MySQL      ok     ok

PHP bcmath                  on        on

PHP mbstring                 on         on

PHP option "mbstring.func_overload"  off      off

PHP sockets                     on        on

PHP gd                    2.3.3     2.0

PHP gd PNG support             on        on

PHP gd JPEG support             on        on

PHP gd GIF support             on        on

PHP gd FreeType support          on        on

PHP libxml                  2.9.1    2.6.15

PHP xmlwriter                on        on

PHP xmlreader                on        on

PHP LDAP                   on        on

PHP OpenSSL                  on        on

PHP ctype                   on        on

PHP session                 on        on

PHP option "session.auto_start"     off      off

PHP gettext                 on        on

PHP option "arg_separator.output"    &       &
六、 zabbix安装
1. zabbix_server安装
1.1 安装包下载
# wget https://cdn.zabbix.com/zabbix/sources/stable/6.0/zabbix-6.0.0.tar.gz
1.2 创建zabbix用户
# useradd -M -s /sbin/nologin zabbix
1.3 下载依赖包(有些依赖是通过现在下载的包的依赖关系同步下载下来的)
# yum -y install libevent-devel net-snmp-devel libxml2-devel libcurl-devel
[root@localhost ~]# yum -y install libevent-devel net-snmp-devel libxml2-devel libcurl-devel

........................................................................................................................................................................

Installed:

  libcurl-devel.x86_64 0:7.29.0-59.el7_9.1    libevent-devel.x86_64 0:2.0.21-4.el7    libxml2-devel.x86_64 0:2.9.1-6.el7_9.6    net-snmp-devel.x86_64 1:5.7.2-49.el7_9.1

Dependency Installed:

  elfutils-devel.x86_64 0:0.176-5.el7                  elfutils-libelf-devel.x86_64 0:0.176-5.el7         gdbm-devel.x86_64 0:1.10-8.el7

  libdb-devel.x86_64 0:5.3.21-25.el7                   libevent.x86_64 0:2.0.21-4.el7                     lm_sensors-devel.x86_64 0:3.4.0-8.20160601gitf9185e5.el7

  perl-ExtUtils-Install.noarch 0:1.58-299.el7_9        perl-ExtUtils-MakeMaker.noarch 0:6.68-3.el7        perl-ExtUtils-Manifest.noarch 0:1.61-244.el7

  perl-ExtUtils-ParseXS.noarch 1:3.18-3.el7            perl-Test-Harness.noarch 0:3.28-3.el7              perl-devel.x86_64 4:5.16.3-299.el7_9

  popt-devel.x86_64 0:1.13-16.el7                      pyparsing.noarch 0:1.5.6-9.el7                     rpm-devel.x86_64 0:4.11.3-48.el7_9

  systemtap-sdt-devel.x86_64 0:4.0-13.el7              tcp_wrappers-devel.x86_64 0:7.6-77.el7             xz-devel.x86_64 0:5.2.2-1.el7

Dependency Updated:

  curl.x86_64 0:7.29.0-59.el7_9.1       elfutils-libelf.x86_64 0:0.176-5.el7          elfutils-libs.x86_64 0:0.176-5.el7       libcurl.x86_64 0:7.29.0-59.el7_9.1

  libdb.x86_64 0:5.3.21-25.el7          libdb-utils.x86_64 0:5.3.21-25.el7            libssh2.x86_64 0:1.8.0-4.el7             libxml2.x86_64 0:2.9.1-6.el7_9.6

  rpm.x86_64 0:4.11.3-48.el7_9          rpm-build-libs.x86_64 0:4.11.3-48.el7_9       rpm-libs.x86_64 0:4.11.3-48.el7_9        rpm-python.x86_64 0:4.11.3-48.el7_9

Complete!
1.4 编译安装
# ./configure --prefix=/usr/local/zabbix --enable-server --enable-proxy --enable-agent --with-mysql --with-net-snmp --with-libcurl --with-libxml2
会得到一个配置列表
Configuration:

  Detected OS:           linux-gnu

  Install path:          /usr/local/zabbix

  Compilation arch:      linux

  Compiler:              cc -std=gnu11

  Compiler flags:         -g -O2

  Library-specific flags:

    database:              -I/usr/include/mysql -m64

    libXML2:               -I/usr/include/libxml2

    Net-SNMP:               -I/usr/local/include -I/usr/lib64/perl5/CORE -I. -I/usr/include

  Enable server:         yes

  Server details:

    With database:         MySQL

    WEB Monitoring:        cURL

      SSL certificates:      /usr/local/zabbix/share/zabbix/ssl/certs

      SSL keys:              /usr/local/zabbix/share/zabbix/ssl/keys

    SNMP:                  yes

    IPMI:                  no

    SSH:                   no

    TLS:                   no

    ODBC:                  no

    Linker flags:           -L/usr/lib64   -L/usr/lib64/mysql              -rdynamic

    Libraries:              -lmysqlclient  -lpthread -ldl -lssl -lcrypto -lresolv -lm -lrt      -lnetsnmp    -lz -lpthread -levent    -lcurl -lm -ldl  -lresolv -lxml2   -lpcre

    Configuration file:    /usr/local/zabbix/etc/zabbix_server.conf

    External scripts:      /usr/local/zabbix/share/zabbix/externalscripts

    Alert scripts:         /usr/local/zabbix/share/zabbix/alertscripts

    Modules:               /usr/local/zabbix/lib/modules

  Enable proxy:          yes

  Proxy details:

    With database:         MySQL

    WEB Monitoring:        cURL

      SSL certificates:      /usr/local/zabbix/share/zabbix/ssl/certs

      SSL keys:              /usr/local/zabbix/share/zabbix/ssl/keys

    SNMP:                  yes

    IPMI:                  no

    SSH:                   no

    TLS:                   no

    ODBC:                  no

    Linker flags:           -L/usr/lib64   -L/usr/lib64/mysql              -rdynamic

    Libraries:              -lmysqlclient  -lpthread -ldl -lssl -lcrypto -lresolv -lm -lrt      -lnetsnmp    -lz -lpthread -levent    -lcurl -lm -ldl  -lresolv -lxml2   -lpcre

    Configuration file:    /usr/local/zabbix/etc/zabbix_proxy.conf

    External scripts:      /usr/local/zabbix/share/zabbix/externalscripts

    Modules:               /usr/local/zabbix/lib/modules

  Enable agent:          yes

  Agent details:

    TLS:                   no

    Modbus:                no

    Linker flags:                -rdynamic

    Libraries:              -lz -lpthread    -lcurl -lm -ldl  -lresolv -lxml2   -lpcre

    Configuration file:    /usr/local/zabbix/etc/zabbix_agentd.conf

    Modules:               /usr/local/zabbix/lib/modules

  Enable agent 2:        no

  Enable web service:    no

  Enable Java gateway:   no

  LDAP support:          no

  IPv6 support:          no
******************************************************
* Now run 'make install' *
* *
* Thank you for using Zabbix! *
* <http://www.zabbix.com> *
******************************************************
按提示编译安装make install,或先make一下再make install都行,make install的过程中会自动make
# mkdir /usr/local/zabbix/log
# chown -R zabbix:zabbix /usr/local/zabbix/
1.5 修改配置文件
安装完成后,找到zabbix_server的配置文件,可查看./configure产生的配置列表或用find工具全局查找也行
修改其中一下内容
# vi /usr/local/zabbix/etc/zabbix_server.conf
38 LogFile=/usr/local/zabbix/log/zabbix_server.log  #日志文件地址,目录没有需要创建并授权
87 DBHost=localhost  #数据库地址
99 DBName=zabbix    #数据库名
115 DBUser=zabbix    #数据库用户名
123 DBPassword=mypassword  #数据库密码
130 DBSocket=/var/lib/mysql/mysql.sock  #数据库sock文件路径
140 DBPort=3306        #数据库端口
507 Timeout=30
548  AlertScriptsPath=/usr/local/zabbix/alertscripts    #告警脚本存放位置
557  ExternalScripts=/usr/local/zabbix/externalscripts    #告警脚本存放位置
593 LogSlowQueries=3000
665 Include=/usr/local/zabbix/etc/zabbix_server.conf.d/*.conf  #自定义监控配置文件
1.6 导入zabbix数据库信息
#mysql -uroot -pmypassword
> use zabbix

> source /root/zabbix-6.0.0/database/mysql/schema.sql;

> source /root/zabbix-6.0.0/database/mysql/images.sql;

> source /root/zabbix-6.0.0/database/mysql/data.sql;
1.7 复制zabbix网页文件到nginx
[root@localhost ~]# find / -name html | grep nginx

/usr/share/nginx/html

[root@localhost ~]# cp -r /root/zabbix-6.0.0/ui/ /usr/share/nginx/html/zabbix/

[root@localhost ~]# ls /usr/share/nginx/html/zabbix/

actionconf.php      chart2.php     composer.lock        host_discovery.php           image.php       js               modules      templates.php

api_jsonrpc.php     chart3.php     conf                 hostgroups.php               imgstore.php    jsLoader.php     report2.php  toptriggers.php

app                 chart4.php     data                 hostinventoriesoverview.php  include         jsrpc.php        report4.php  tr_events.php

assets              chart6.php     disc_prototypes.php  hostinventories.php          index_http.php  local            robots.txt   trigger_prototypes.php

audio               chart7.php     favicon.ico          host_prototypes.php          index.php       locale           setup.php    triggers.php

auditacts.php       chart.php      graphs.php           httpconf.php                 index_sso.php   maintenance.php  sysmap.php   vendor

browserwarning.php  composer.json  history.php          httpdetails.php              items.php       map.php          sysmaps.php  zabbix.php

[root@localhost ~]#
1.8 配置环境变量(注:路径末尾不能以"/"结尾,否则将导致整个PATH变量出错)
# echo "export PATH=$PATH:/usr/local/zabbix/sbin" >> ~/.bashrc
1.9 zabbix_server启服务与关服务
[root@localhost ~]# zabbix_server

zabbix_server [13151]: unknown parameter "datadir" in config file "/usr/local/zabbix/etc/zabbix_server.conf", line 545

[root@localhost ~]# vi /usr/local/zabbix/etc/zabbix_server.conf

[root@localhost ~]# zabbix_server

[root@localhost ~]#  ps -ef | grep zabbix_server

zabbix   13288     1  0 15:12 ?        00:00:00 zabbix_server

zabbix   13289 13288  0 15:12 ?        00:00:00 zabbix_server: ha manager

zabbix   13290 13288  0 15:12 ?        00:00:00 zabbix_server: service manager #1 [processed 0 events, updated 0 event tags, deleted 0 problems, synced 0 service updates, idle 5.005735 sec during 5.005985 sec]

zabbix   13291 13288  0 15:12 ?        00:00:00 zabbix_server: configuration syncer [synced configuration in 0.132350 sec, idle 60 sec]

zabbix   13294 13288  0 15:12 ?        00:00:00 zabbix_server: alert manager #1 [sent 0, failed 0 alerts, idle 5.008452 sec during 5.008567 sec]

zabbix   13295 13288  0 15:12 ?        00:00:00 zabbix_server: alerter #1 started

zabbix   13297 13288  0 15:12 ?        00:00:00 zabbix_server: alerter #2 started

zabbix   13298 13288  0 15:12 ?        00:00:00 zabbix_server: alerter #3 started

zabbix   13299 13288  0 15:12 ?        00:00:00 zabbix_server: preprocessing manager #1 [queued 0, processed 1 values, idle 5.988724 sec during 5.988941 sec]

zabbix   13300 13288  0 15:12 ?        00:00:00 zabbix_server: preprocessing worker #1 started

zabbix   13301 13288  0 15:12 ?        00:00:00 zabbix_server: preprocessing worker #2 started

zabbix   13302 13288  0 15:12 ?        00:00:00 zabbix_server: preprocessing worker #3 started

zabbix   13303 13288  0 15:12 ?        00:00:00 zabbix_server: lld manager #1 [processed 0 LLD rules, idle 5.005437sec during 5.005697 sec]

zabbix   13304 13288  0 15:12 ?        00:00:00 zabbix_server: lld worker #1 [processed 1 LLD rules, idle 54.267585 sec during 56.977977 sec]

zabbix   13305 13288  0 15:12 ?        00:00:00 zabbix_server: lld worker #2 [processed 1 LLD rules, idle 114.316031 sec during 114.367490 sec]

zabbix   13306 13288  0 15:12 ?        00:00:00 zabbix_server: housekeeper [startup idle for 30 minutes]

zabbix   13307 13288  0 15:12 ?        00:00:00 zabbix_server: timer #1 [updated 0 hosts, suppressed 0 events in 0.001008 sec, idle 59 sec]

zabbix   13308 13288  0 15:12 ?        00:00:00 zabbix_server: http poller #1 [got 0 values in 0.001036 sec, idle 5 sec]

zabbix   13310 13288  0 15:12 ?        00:00:00 zabbix_server: discoverer #1 [processed 0 rules in 0.001023 sec, idle 60 sec]

zabbix   13312 13288  0 15:12 ?        00:00:00 zabbix_server: history syncer #1 [processed 0 values, 0 triggers in 0.000081 sec, idle 1 sec]

zabbix   13313 13288  0 15:12 ?        00:00:00 zabbix_server: history syncer #2 [processed 0 values, 0 triggers in 0.000048 sec, idle 1 sec]

zabbix   13314 13288  0 15:12 ?        00:00:00 zabbix_server: history syncer #3 [processed 2 values, 1 triggers in 0.010322 sec, idle 1 sec]

zabbix   13315 13288  0 15:12 ?        00:00:00 zabbix_server: history syncer #4 [processed 0 values, 0 triggers in 0.000035 sec, idle 1 sec]

zabbix   13316 13288  0 15:12 ?        00:00:00 zabbix_server: escalator #1 [processed 0 escalations in 0.002113 sec, idle 3 sec]

zabbix   13321 13288  0 15:12 ?        00:00:00 zabbix_server: proxy poller #1 [exchanged data with 0 proxies in 0.000071 sec, idle 5 sec]

zabbix   13322 13288  0 15:12 ?        00:00:00 zabbix_server: self-monitoring [processed data in 0.000044 sec, idle 1 sec]

zabbix   13323 13288  0 15:12 ?        00:00:00 zabbix_server: task manager [processed 0 task(s) in 0.000838 sec, idle 5 sec]

zabbix   13324 13288  0 15:12 ?        00:00:00 zabbix_server: poller #1 [got 0 values in 0.000029 sec, idle 5 sec]

zabbix   13325 13288  0 15:12 ?        00:00:00 zabbix_server: poller #2 [got 0 values in 0.000088 sec, idle 5 sec]

zabbix   13327 13288  0 15:12 ?        00:00:00 zabbix_server: poller #3 [got 0 values in 0.000076 sec, idle 5 sec]

zabbix   13329 13288  0 15:12 ?        00:00:00 zabbix_server: poller #4 [got 0 values in 0.000127 sec, idle 5 sec]

zabbix   13330 13288  0 15:12 ?        00:00:00 zabbix_server: poller #5 [got 0 values in 0.000072 sec, idle 5 sec]

zabbix   13332 13288  0 15:12 ?        00:00:00 zabbix_server: unreachable poller #1 [got 0 values in 0.000107 sec, idle 5 sec]

zabbix   13333 13288  0 15:12 ?        00:00:00 zabbix_server: trapper #1 [processed data in 0.000000 sec, waiting for connection]

zabbix   13335 13288  0 15:12 ?        00:00:00 zabbix_server: trapper #2 [processed data in 0.000000 sec, waiting for connection]

zabbix   13336 13288  0 15:12 ?        00:00:00 zabbix_server: trapper #3 [processed data in 0.000000 sec, waiting for connection]

zabbix   13337 13288  0 15:12 ?        00:00:00 zabbix_server: trapper #4 [processed data in 0.000000 sec, waiting for connection]

zabbix   13338 13288  0 15:12 ?        00:00:00 zabbix_server: trapper #5 [processed data in 0.000000 sec, waiting for connection]

zabbix   13339 13288  0 15:12 ?        00:00:00 zabbix_server: icmp pinger #1 [got 0 values in 0.000023 sec, idle 5 sec]

zabbix   13340 13288  0 15:12 ?        00:00:00 zabbix_server: alert syncer [queued 0 alerts(s), flushed 0 result(s) in 0.001468 sec, idle 1 sec]

zabbix   13341 13288  0 15:12 ?        00:00:00 zabbix_server: history poller #1 [got 0 values in 0.000091 sec, idle 1 sec]

zabbix   13342 13288  0 15:12 ?        00:00:00 zabbix_server: history poller #2 [got 0 values in 0.000071 sec, idle 1 sec]

zabbix   13343 13288  0 15:12 ?        00:00:00 zabbix_server: history poller #3 [got 0 values in 0.000026 sec, idle 1 sec]

zabbix   13344 13288  0 15:12 ?        00:00:00 zabbix_server: history poller #4 [got 0 values in 0.000078 sec, idle 1 sec]

zabbix   13347 13288  0 15:12 ?        00:00:00 zabbix_server: history poller #5 [got 2 values in 0.000248 sec, idle 1 sec]

zabbix   13349 13288  0 15:12 ?        00:00:00 zabbix_server: availability manager #1 [queued 0, processed 0 values, idle 5.066162 sec during 5.066413 sec]

zabbix   13350 13288  0 15:12 ?        00:00:00 zabbix_server: trigger housekeeper [deleted 0 problems records in 0.001275 sec, idle for 60 second(s)]

zabbix   13351 13288  0 15:12 ?        00:00:00 zabbix_server: odbc poller #1 [got 0 values in 0.000085 sec, idle 5 sec]

root     13503 20023  0 15:15 pts/0    00:00:00 grep --color=auto zabbix_server

[root@localhost ~]# netstat -tulnp | grep zabbix_server

tcp        0      0 0.0.0.0:10051           0.0.0.0:*               LISTEN      13288/zabbix_server
[root@localhost ~]# for i in $(ps -ef | awk '/zabbix/{print $2}');do kill -9 $i;done
1.10 关闭防火墙,selinux(或修改防火墙策略)
[root@localhost ~]# systemctl disable firewalld --now

Removed symlink /etc/systemd/system/multi-user.target.wants/firewalld.service.

Removed symlink /etc/systemd/system/dbus-org.fedoraproject.FirewallD1.service.

[root@localhost ~]# setenforce 0

[root@localhost ~]# getenforce

Permissive

[root@localhost ~]# sed -i '/^SELINUX=/cSELINUX=disabled' /etc/selinux/config

[root@localhost ~]# cat /etc/selinux/config

# This file controls the state of SELinux on the system.

# SELINUX= can take one of these three values:

#     enforcing - SELinux security policy is enforced.

#     permissive - SELinux prints warnings instead of enforcing.

#     disabled - No SELinux policy is loaded.

SELINUX=disabled

# SELINUXTYPE= can take one of three values:

#     targeted - Targeted processes are protected,

#     minimum - Modification of targeted policy. Only selected processes are protected.

#     mls - Multi Level Security protection.

SELINUXTYPE=targeted
1.11 通过web访问zabbix
若出现问题,先检查一下各服务是否都是启用状态,建议选用中文界面
[root@localhost ~]# systemctl enable mysqld --now

[root@localhost ~]#
[root@localhost ~]# systemctl enable nginx --now

Created symlink from /etc/systemd/system/multi-user.target.wants/nginx.service to /usr/lib/systemd/system/nginx.service.
[root@localhost ~]# systemctl enable php74-php-fpm --now
Created symlink from /etc/systemd/system/multi-user.target.wants/php74-php-fpm.service to /usr/lib/systemd/system/php74-php-fpm.service.
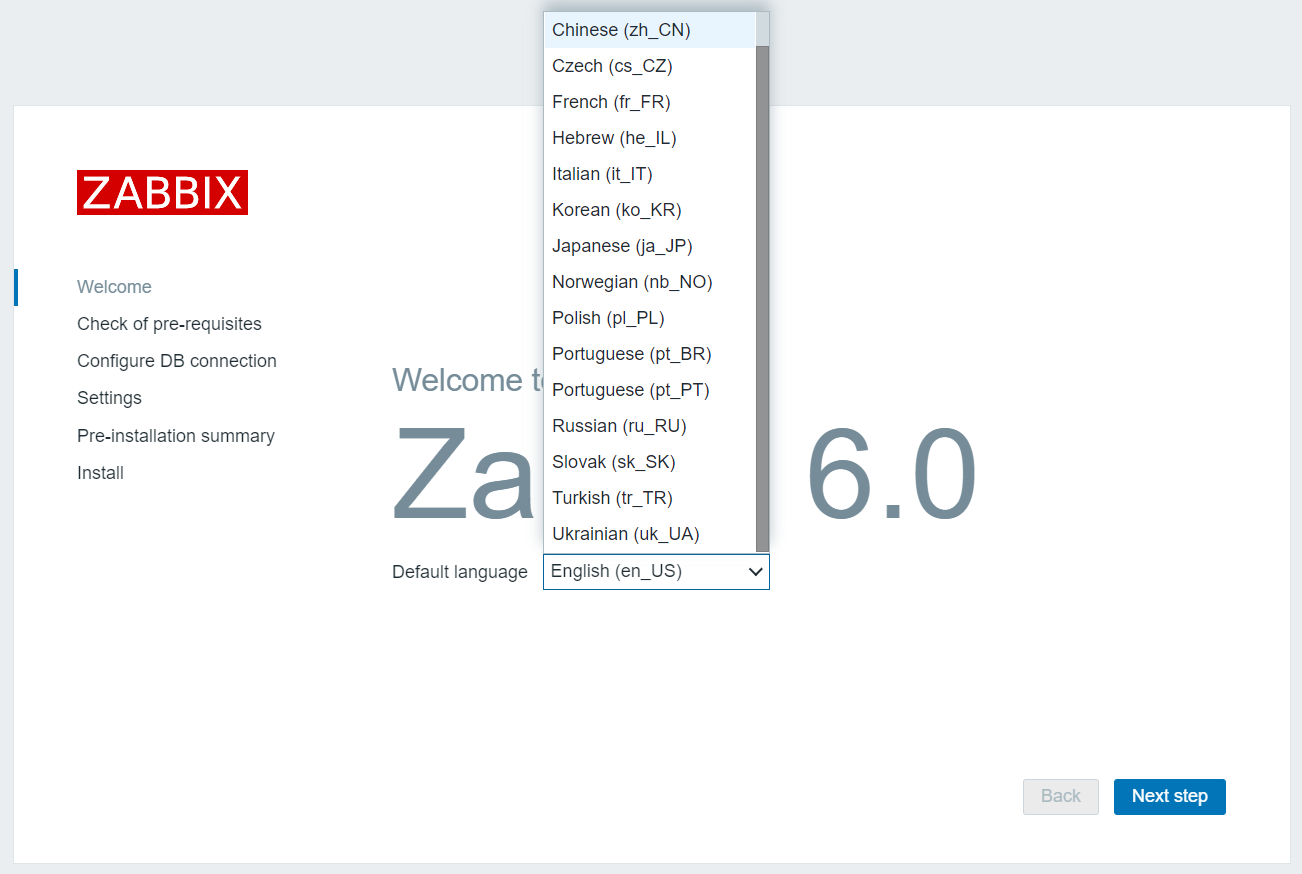
检查php各项配置是否合格
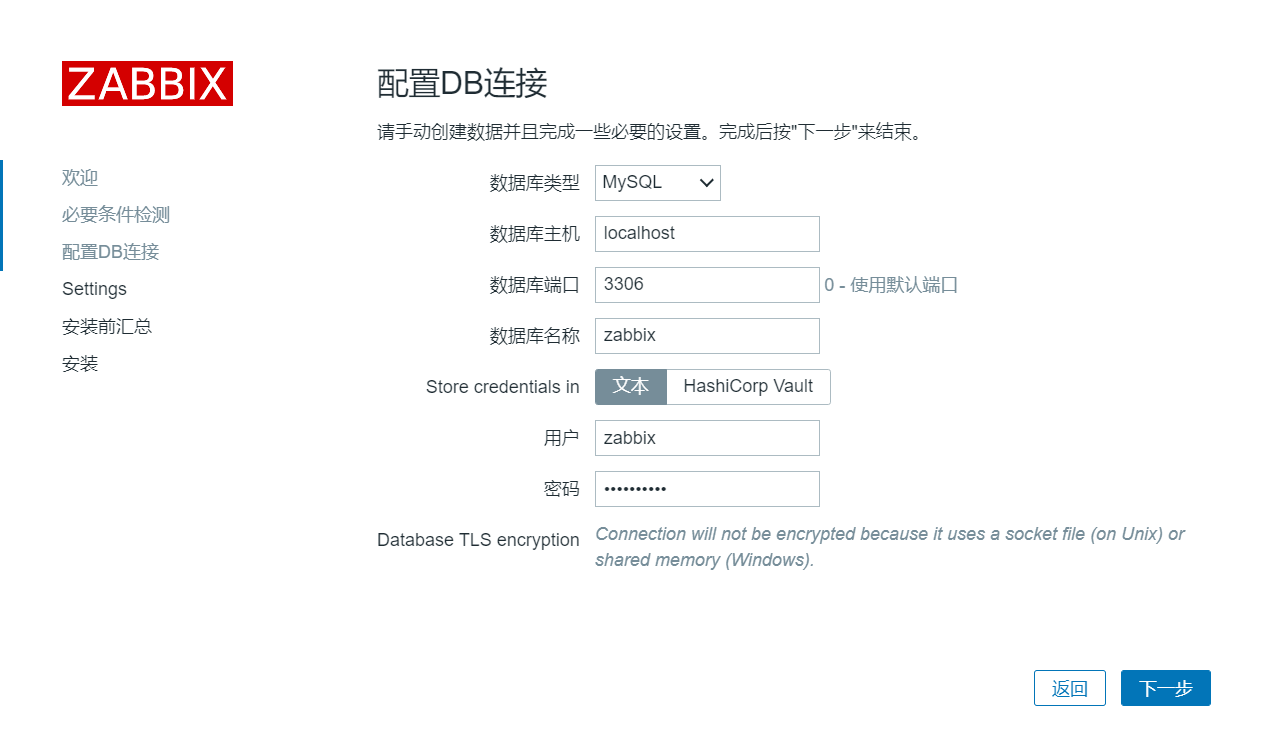
配置数据库
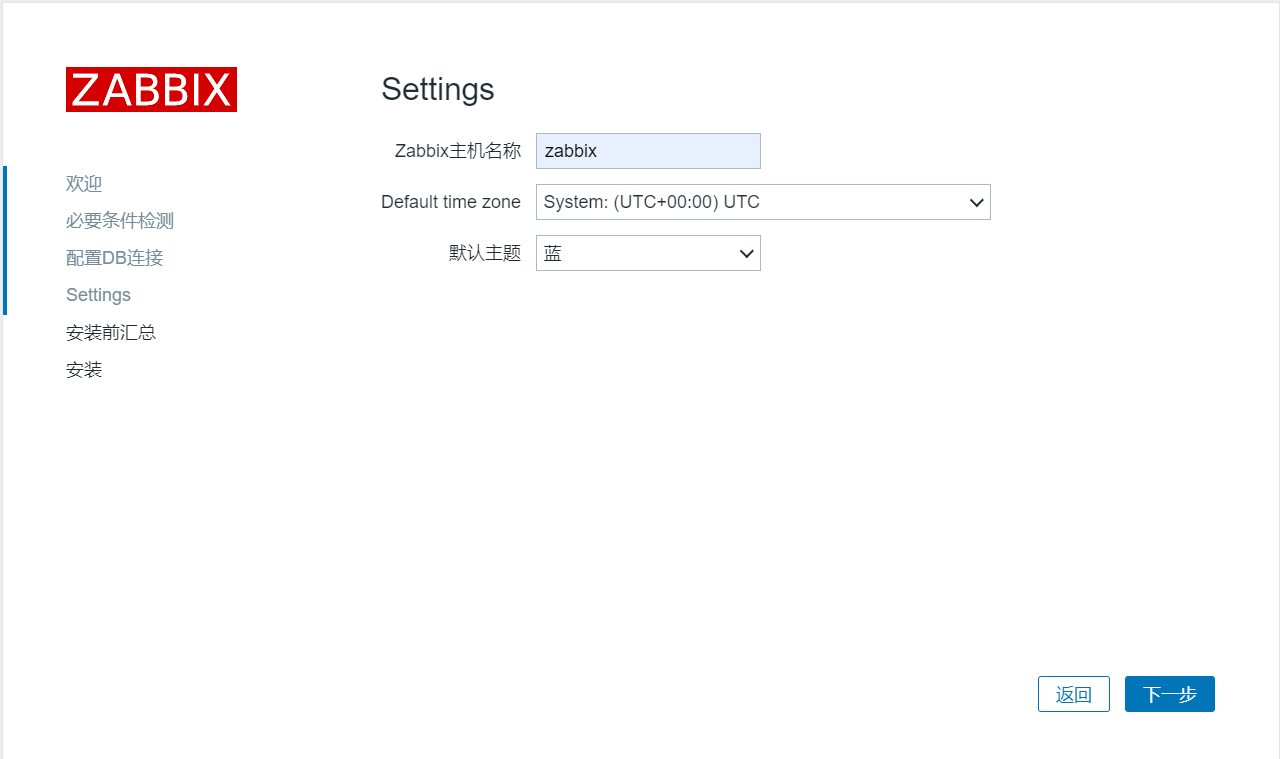
设置主机名、时区和主题
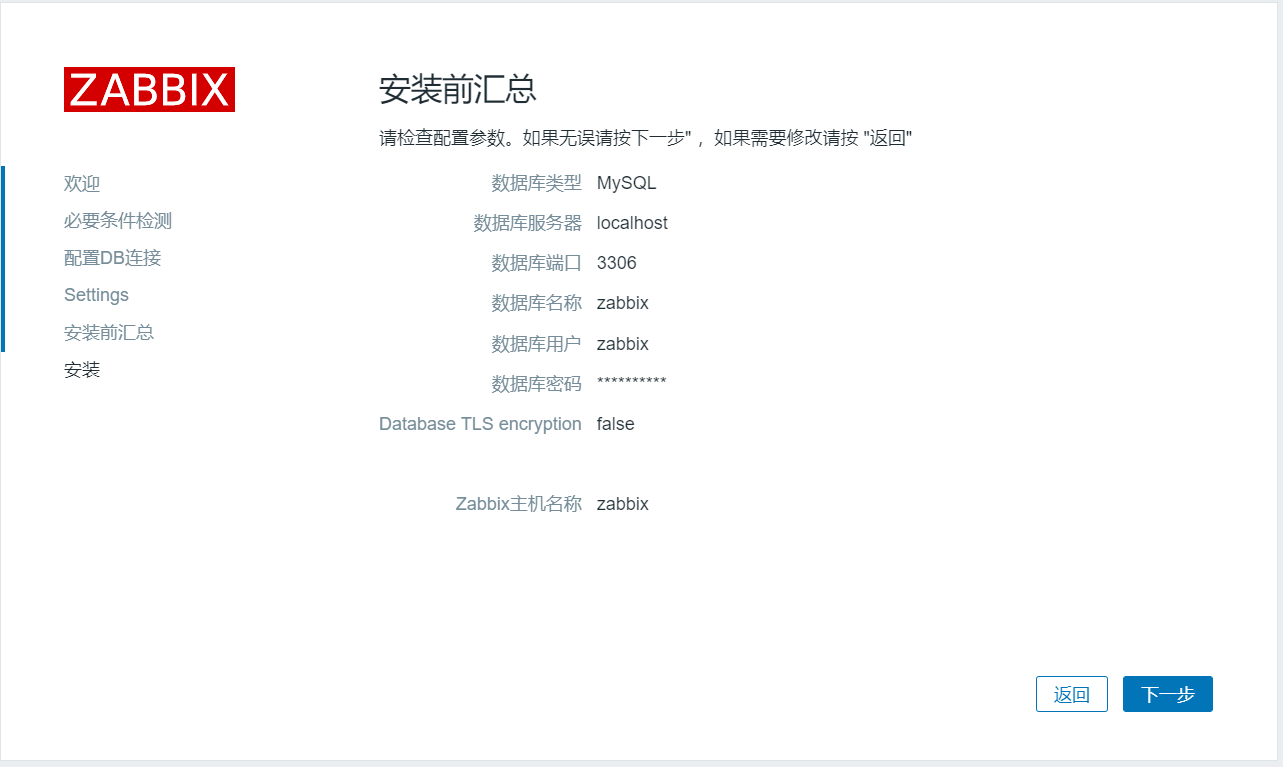
最后检查一次
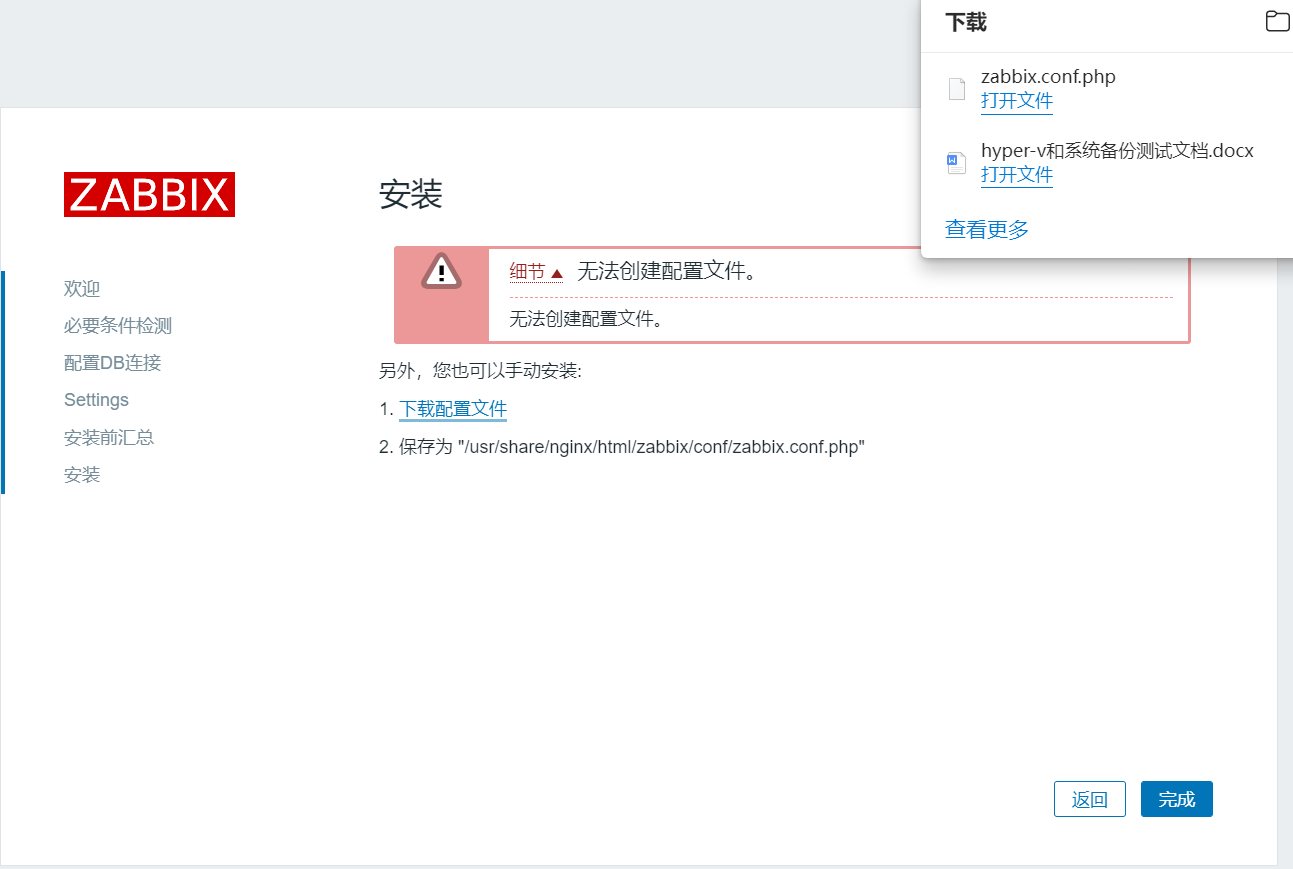
若出现以下情况,手动下载并导入zabbix配置文件
完成图示

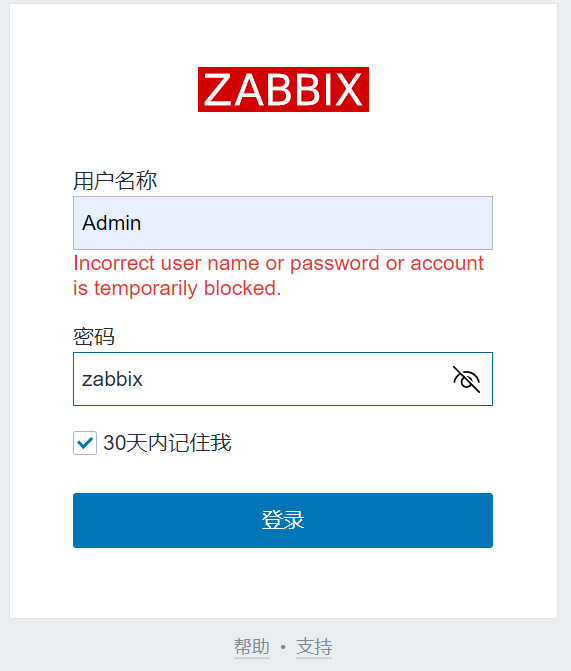
使用默认账号密码登陆
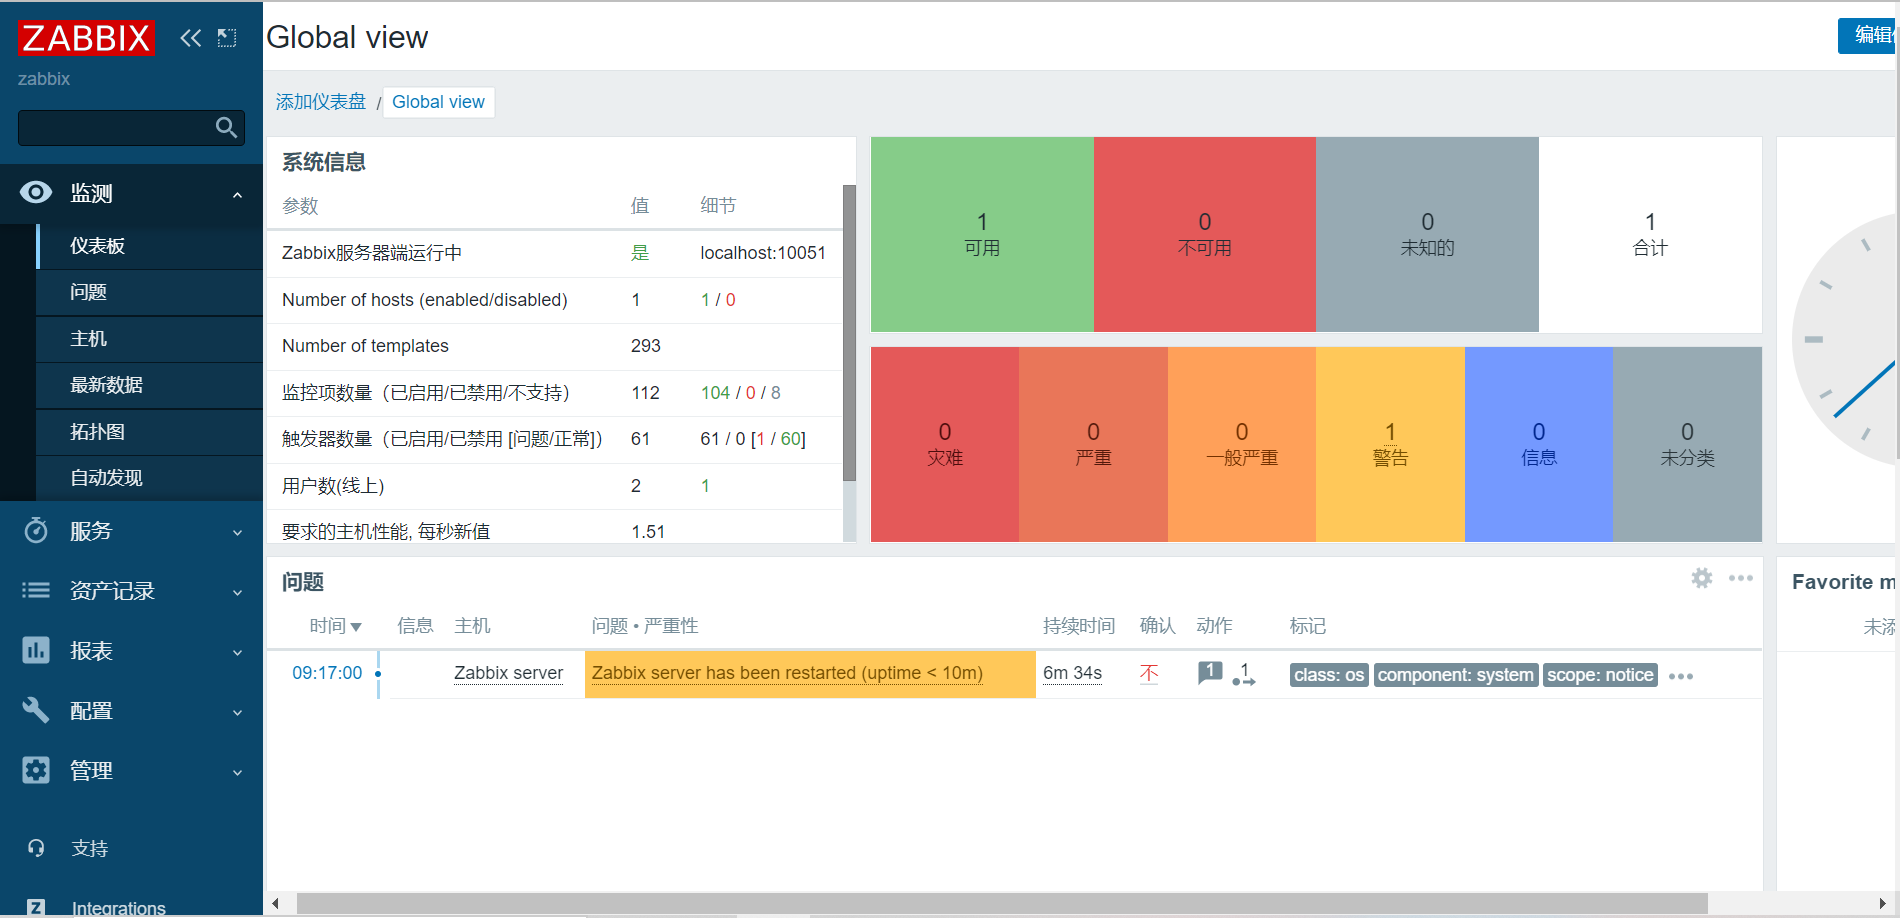
进入zabbix网页监控界面,如果显示本地zabbix_agentd未启用,本地服务器输入命令:# zabbix_agentd ;然后等待即可
如果重启了zabbix_server,也有警告提示
2. zabbix_agent(被监控端)安装
# wget https://cdn.zabbix.com/zabbix/binaries/stable/6.0/6.0.0/zabbix_agent-6.0.0-linux-3.0-amd64-static.tar.gz
[root@localhost zabbix]# wget https://cdn.zabbix.com/zabbix/binaries/stable/6.0/6.0.0/zabbix_agent-6.0.0-linux-3.0-amd64-static.tar.gz
[root@localhost zabbix]# mkdir /usr/local/zabbix_agentd
[root@localhost zabbix]# tar -xf zabbix_agent-6.0.0-linux-3.0-amd64-static.tar.gz -C /usr/local/zabbix_agentd
[root@localhost zabbix]# useradd -M -s /sbin/nologin zabbix
[root@localhost zabbix]# chown -R zabbix:zabbix /usr/local/zabbix_agentd
[root@localhost zabbix]# cp /usr/local/zabbix_agentd/conf/zabbix_agentd.conf /usr/local/etc/
[root@localhost zabbix]# sed -i 's/Server=127.0.0.1/Server=192.168.3.241' /usr/local/etc/zabbix_agentd.conf
[root@localhost zabbix]# cd /usr/local/zabbix/sbin
[root@localhost sbin]# ./zabbix_agentd
最后在zabbix的web端选择一个合适的模板,添加主机就行
参考链接:https://www.zabbix.com/documentation/6.0/zh/manual/installation/upgrade/packages/rhel_centos
zabbix6.0安装的更多相关文章
- CentOS Stream 8 安装 Zabbix6.0 -- LNMP环境(nginx-1.20,mariadb-10.6,php-7.4)
镜像下载.域名解析.时间同步请点击阿里云开源镜像站 zabbix6.0 LTS版本出来了,前段时间刚安装了5.4,今天打算在虚拟机上安装6.0测试,安装6.0的要求php版本不低于7.2,mariad ...
- 记:MySQL 5.7.3.0 安装 全程截图
前言: 下一个班快讲MySQL数据库了,正好把服务器里面的MySQL卸了重装了一下. 截个图,作为笔记.也正好留给需要的朋友们. 目录: 下载软件 运行安装程序 安装程序欢迎界面 许可协议 查找更新 ...
- 烂泥:zabbix3.0安装与配置
本文由ilanniweb提供友情赞助,首发于烂泥行天下 想要获得更多的文章,可以关注我的微信ilanniweb 这个月又快过完了,最近也比较忙,没时间写文章,今天挤点时间把zabbix3.0安装与配置 ...
- CentOS 7.0安装配置Vsftp服务器
一.配置防火墙,开启FTP服务器需要的端口 CentOS 7.0默认使用的是firewall作为防火墙,这里改为iptables防火墙. 1.关闭firewall: systemctl stop fi ...
- elasticsearch5.0.0 安装插件及配置过程
elasticsearch5.0.0 安装插件及配置过程 由于es5.0是里程碑式的更新,所以很多变化的地方,暂时我就插件安装遇到的问题记录一下. 插件安装命令 2.3版本的安装命令 安装Marvel ...
- IIS和4.0安装到底有没有先后顺序解答
在很多人或许很多技术大神都会觉得IIS的安装和4.0没得先后顺序的.其错误弊端在与IIS没有注册到4.0上. 经过今天遇到了服务器安装服务端发觉报错[无法识别的属性“targetFramework”. ...
- Hadoop2.6.0安装 — 集群
文 / vincentzh 原文连接:http://www.cnblogs.com/vincentzh/p/6034187.html 这里写点 Hadoop2.6.0集群的安装和简单配置,一方面是为自 ...
- zabbix3.0安装部署文档
zabbix v3.0安装部署 摘要: 本文的安装过程摘自http://www.ttlsa.com/以及http://b.lifec-inc.com ,和站长凉白开的<ZABBIX从入门到精通v ...
- [转]phoneGap3.0安装步骤(以windows下的android环境为例):
phoneGap3.0安装步骤(以windows下的android环境为例): 环境: WIN系统,JDK,Android,Eclipse,Ant,Git,PhoneGap3.x (Cordova) ...
- Node Express 4.0 安装
前言 今天想要用nodejs 写个后台服务,很久之前看过node express 框架,可真当向下手安装的时候,发现好多命令都不记得了.写完后台服务,没事了,总结了下安装过程,记录一下,以便以后查阅方 ...
随机推荐
- JavaScript 闭包 —— { }
闭包是什么 闭包是一个[函数](一个作用域可以访问另一个函数的局部变量) 闭包的作用 延伸变量的作用域 function f() { let num = 21; return function () ...
- C语言可以在执行语句中间定义变量吗?
C语言可以在执行语句中间定义变量吗? 例如:for(int i=0; i<5; i++){ ...
- Jsoup爬取网上数据完成翻译
Jsoup使用 首先进入Jsoup下载jar包 然后打开IDEA创建一个普通的java项目 在项目结构里创建 lib 目录 但是我们这样并不能直接进行使用 需要添加路径 右键点击 然后添加路径 选择模 ...
- 【java8新特性】01:函数式编程及Lambda入门
我们首先需要先了解什么是函数式编程.函数式编程是一种结构化编程范式.类似于数学函数.它关注的重点在于数据操作.或者说它所提倡的思想是做什么,而不是如何去做. 自Jdk8中开始.它也支持函数式编程.函数 ...
- Kubernetes 多租户:多租户介绍
多租户集群由多个用户和/或工作负载共享,这些用户和/或工作负载被称为"租户".多租户集群的运营方必须将租户彼此隔离,以最大限度地减少被盗用的租户或恶意租户可能对集群和其他租户造成的 ...
- 6.第五篇 安装keepalived与Nginx
文章转载自:https://mp.weixin.qq.com/s?__biz=MzI1MDgwNzQ1MQ==&mid=2247483796&idx=1&sn=347664de ...
- Logstash:使用Logstash将电子邮件导入到Elasticsearch
- 在 K8S 上部署以 mysql 数据库作为后端存储的单机版 nacos
Nacos 被用于: 服务发现 微服务配置信息管理 部署 nacos 时,需要用到如下两个镜像,这两个镜像均来自于 nacos 官方发布到 docker hub 的镜像, nacos/nacos-se ...
- k8s中pod的容器日志查看命令
如果容器已经崩溃停止,您可以仍然使用 kubectl logs --previous 获取该容器的日志,只不过需要添加参数 --previous. 如果 Pod 中包含多个容器,而您想要看其中某一个容 ...
- 10.使用nexus3配置golang私有仓库
1,前言说明 golang是近来非常火热的语言,但是处理其依赖包一直都是一个让人头疼的问题,尤其是在国内,开发者需要下载一些官方的包的时候,就会非常苦恼.尽管已经有了私服 Athens,公司也已经搭建 ...
