浅析Redis基础数据结构
Redis是一种内存数据库,所以可以很方便的直接基于内存中的数据结构,对外提供众多的接口,而这些接口实际上就是对不同的数据结构进行操作的算法,首先redis本身是一种key-value的数据库,对于value常见的类型有:
字符串(string)、散列(hash)、列表(list)、集合(set)、排序集合(sorted set)、位图(bitmaps)、地理空间索引(Geospatial indexes)、流(streams)
1.全局哈希表实现
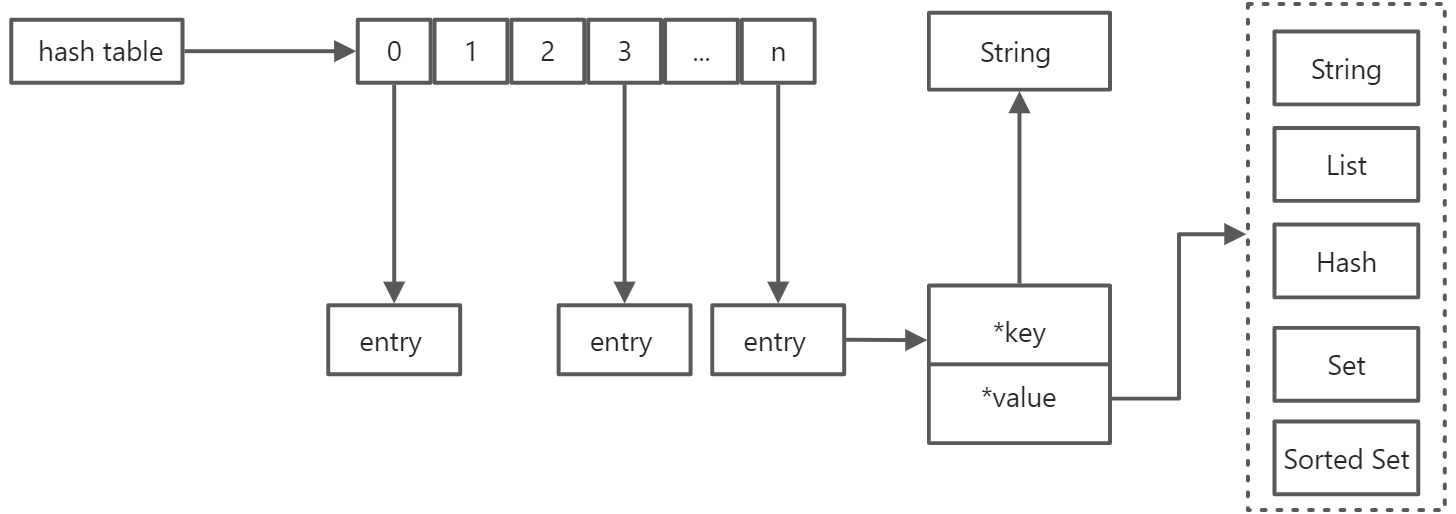
key-value是redis中最基础的结构,key-value是采用哈希表(hash table)这种基础的数据结构来实现的,其中key是字符串类型,而value则会有上面说的各种数据类型。
哈希表是由基础的哈希函数和数组来构成了,哈希函数采用的SipHash算法,数组本身无法存储多种类型的数据,所以数组元素本身是一个指针,指向具体的元素(entry),这个entry又存储了key和value的地址,具体value也是也是一个比较复杂的数据结构,整个key-value我们可以称为全局哈希表,如下图:
通常情况下哈希表查找的平均时间复杂度是O(1),所以在Redis中按照key来查找元素的复杂度也是O(1),所以Redis对于大量的key也能保持较高的性能,但是保持高性能的前提是哈希冲突的情况比较少,随着数组不断被填满,哈希冲突的概率会不断提高,所以需要和普通的哈希表一样进行扩容,这个过程叫做rehash,rehash过程需要大量的数据搬迁工作,由于Redis是采用单线程的模型,假如要搬迁的元素过多会占用很多的CPU时间,从而导致长时间阻塞其他请求的执行,所以普通哈希表存在的问题在Redis中都会遇到,有两种情况会导致Redis性能的降低:
- 哈希冲突
- 扩容搬迁
Redis解决哈希冲突采用的办法也是链表法,这时候数组元素指针指向的是链表的头指针,当链表中元素个数过多时就会执行扩容,参考:
// 来源:// https://github.com/redis/redis/blob/5.0/src/dict.h// https://github.com/redis/redis/blob/5.0/src/dict.ctypedef struct dictEntry {void *key;union {void *val;uint64_t u64;int64_t s64;double d;} v;struct dictEntry *next;} dictEntry;// 字典类型定义typedef struct dictType {uint64_t (*hashFunction)(const void *key);void *(*keyDup)(dict *d, const void *key);void *(*valDup)(dict *d, const void *obj);int (*keyCompare)(dict *d, const void *key1, const void *key2);void (*keyDestructor)(dict *d, void *key);void (*valDestructor)(dict *d, void *obj);int (*expandAllowed)(size_t moreMem, double usedRatio);/* Allow a dictEntry to carry extra caller-defined metadata. The* extra memory is initialized to 0 when a dictEntry is allocated. */size_t (*dictEntryMetadataBytes)(dict *d);} dictType;/* This is our hash table structure. Every dictionary has two of this as we* implement incremental rehashing, for the old to the new table. */typedef struct dictht {dictEntry **table;unsigned long size;unsigned long sizemask;unsigned long used;} dictht;// hash类型定义typedef struct dict {dictType *type;void *privdata;dictht ht[2];// -1表示没有运行rehashlong rehashidx; /* rehashing not in progress if rehashidx == -1 */unsigned long iterators; /* number of iterators currently running */} dict;int dictRehash(dict *d, int n) {// 空桶间隔int empty_visits = n*10; /* Max number of empty buckets to visit. */if (!dictIsRehashing(d)) return 0;while(n-- && d->ht[0].used != 0) {dictEntry *de, *nextde;/* Note that rehashidx can't overflow as we are sure there are more* elements because ht[0].used != 0 */assert(d->ht[0].size > (unsigned long)d->rehashidx);while(d->ht[0].table[d->rehashidx] == NULL) {d->rehashidx++;if (--empty_visits == 0) return 1;}de = d->ht[0].table[d->rehashidx];/* Move all the keys in this bucket from the old to the new hash HT */// 搬当前嘈的整个链表while(de) {uint64_t h;nextde = de->next;/* Get the index in the new hash table */h = dictHashKey(d, de->key) & d->ht[1].sizemask;de->next = d->ht[1].table[h];d->ht[1].table[h] = de;d->ht[0].used--;d->ht[1].used++;de = nextde;}d->ht[0].table[d->rehashidx] = NULL;d->rehashidx++;}/* Check if we already rehashed the whole table... */if (d->ht[0].used == 0) {zfree(d->ht[0].table);d->ht[0] = d->ht[1];_dictReset(&d->ht[1]);d->rehashidx = -1;return 0;}/* More to rehash... */return 1;}static void _dictRehashStep(dict *d) {if (d->iterators == 0) dictRehash(d,1);}#define dictIsRehashing(d) ((d)->rehashidx != -1)/* Add or Overwrite:* Add an element, discarding the old value if the key already exists.* Return 1 if the key was added from scratch, 0 if there was already an* element with such key and dictReplace() just performed a value update* operation. */int dictReplace(dict *d, void *key, void *val){dictEntry *entry, *existing, auxentry;/* Try to add the element. If the key* does not exists dictAdd will succeed. */entry = dictAddRaw(d,key,&existing);if (entry) {dictSetVal(d, entry, val);return 1;}/* Set the new value and free the old one. Note that it is important* to do that in this order, as the value may just be exactly the same* as the previous one. In this context, think to reference counting,* you want to increment (set), and then decrement (free), and not the* reverse. */auxentry = *existing;dictSetVal(d, existing, val);dictFreeVal(d, &auxentry);return 0;}/* Add an element to the target hash table */int dictAdd(dict *d, void *key, void *val){dictEntry *entry = dictAddRaw(d,key,NULL);if (!entry) return DICT_ERR;dictSetVal(d, entry, val);return DICT_OK;}dictEntry *dictAddRaw(dict *d, void *key, dictEntry **existing){long index;dictEntry *entry;dictht *ht;// 如果正在执行rehash 则执行渐进式扩容if (dictIsRehashing(d)) _dictRehashStep(d);/* Get the index of the new element, or -1 if* the element already exists. */// 查询下标索引if ((index = _dictKeyIndex(d, key, dictHashKey(d,key), existing)) == -1)return NULL;/* Allocate the memory and store the new entry.* Insert the element in top, with the assumption that in a database* system it is more likely that recently added entries are accessed* more frequently. */ht = dictIsRehashing(d) ? &d->ht[1] : &d->ht[0];entry = zmalloc(sizeof(*entry));entry->next = ht->table[index];ht->table[index] = entry;ht->used++;/* Set the hash entry fields. */dictSetKey(d, entry, key);return entry;}static long _dictKeyIndex(dict *d, const void *key, uint64_t hash, dictEntry **existing){unsigned long idx, table;dictEntry *he;if (existing) *existing = NULL;/* Expand the hash table if needed */if (_dictExpandIfNeeded(d) == DICT_ERR)return -1;// 同时查询两个哈希表for (table = 0; table <= 1; table++) {idx = hash & d->ht[table].sizemask;/* Search if this slot does not already contain the given key */he = d->ht[table].table[idx];while(he) {if (key==he->key || dictCompareKeys(d, key, he->key)) {if (existing) *existing = he;return -1;}he = he->next;}if (!dictIsRehashing(d)) break;}return idx;}/* This is the initial size of every hash table */#define DICT_HT_INITIAL_SIZE 4static int dict_can_resize = 1;static unsigned int dict_force_resize_ratio = 5;/* Expand the hash table if needed */static int _dictExpandIfNeeded(dict *d){/* Incremental rehashing already in progress. Return. */if (dictIsRehashing(d)) return DICT_OK;// 初始大小为4/* If the hash table is empty expand it to the initial size. */if (d->ht[0].size == 0) return dictExpand(d, DICT_HT_INITIAL_SIZE);/* If we reached the 1:1 ratio, and we are allowed to resize the hash* table (global setting) or we should avoid it but the ratio between* elements/buckets is over the "safe" threshold, we resize doubling* the number of buckets. */// 判断是否达到扩容条件 如果放置的元素和大小已经相等 且 dict_can_resize为1或者达到强制扩容阈值5if (d->ht[0].used >= d->ht[0].size &&(dict_can_resize ||d->ht[0].used/d->ht[0].size > dict_force_resize_ratio)){return dictExpand(d, d->ht[0].used*2);}return DICT_OK;}dictEntry *dictFind(dict *d, const void *key){dictEntry *he;uint64_t h, idx, table;if (d->ht[0].used + d->ht[1].used == 0) return NULL; /* dict is empty */if (dictIsRehashing(d)) _dictRehashStep(d);h = dictHashKey(d, key);for (table = 0; table <= 1; table++) {idx = h & d->ht[table].sizemask;he = d->ht[table].table[idx];while(he) {if (key==he->key || dictCompareKeys(d, key, he->key))return he;he = he->next;}if (!dictIsRehashing(d)) return NULL;}return NULL;}
Redis dict的整体实现如下:
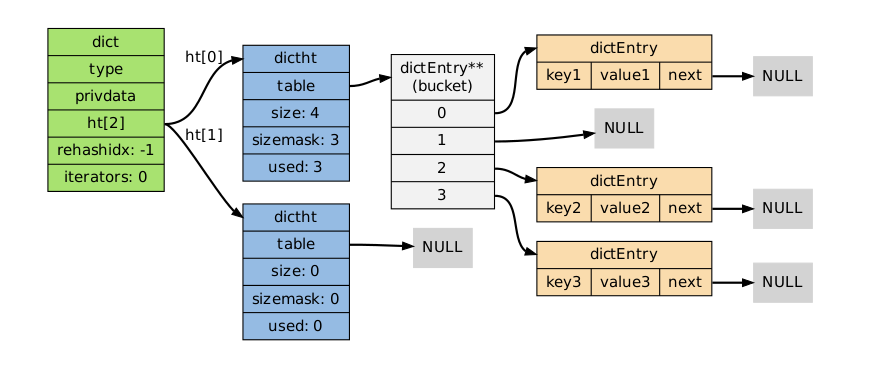
其中扩容是在添加元素时进行,dict结构体的定义中重点是dictht类型的ht数组和rehashidx,ht数组有两个元素,每个元素其实就是1个哈希表,默认先往ht[0]当中写入,当ht[0]比较满的时候,会触发扩容操作,然后逐渐将元素搬迁是ht[1],当完全完成迁移时再将ht[0]释放掉,并且将ht[1]赋值给ht[0],将ht[1]变为初始状态,则扩容完毕,而rehashidx变量则是1个非常重要的变量,用来表示扩容的进度,当扩容完毕后,rehashidx的值会置为-1。
首先扩容操作发生在向Redis添加元素的过程中,这时会调用dictAdd函数,里面又继续调用了dictAddRaw函数,函数内首先判断当前是否正在执行rehash操作,如果正在rehash会进行渐进式数据搬迁,然后继续向下走会调用_dictKeyIndex函数查询当前的key所对应的数组下标索引,判断key是否已经存在,如果不存在则进行写入,然后判断当前是否在rehash,如果是则会使用新的哈希表ht[1],否则默认写入ht[0],首先会创建当前entry所用的空间,然后将已有的链表挂到当前entry的尾部,最后将entry赋值给数组,所以明显是采用头插方式,因为Redis认为刚写入的数据会更容易被访问到,因此会放到头部。
上面的过程是操作的主线,然后看下扩容的条件,在调用_dictKeyIndex查询下标时,执行了_dictExpandIfNeeded函数,这个函数就是具体来执行扩容的,可以看到初始情况下如果ht[0]的size属性为0,则会进行初始化,大小为DICT_HT_INITIAL_SIZE,这个值默认是4,如果已经初始化的话,会判断是否达到扩容的条件,如果当前放置的元素数量和数组长度相等,说明数组已经比较满了,并且后面两个条件满足1个那么就可以进行扩容,首先是dict_can_resize这个值默认为0,表示能否进行扩容,在Redis中存在配置好的定时任务,其中包括rdb和aof持久化,在持久化执行的时候,会调用dictDisableResize将这个值设置为0,原因是此时正在执行持久化尽量不要扩容带来额外的消耗,那么另外还有1个强制扩容阈值dict_force_resize_ratio默认是5,也就是说当实际元素数量超过数组长度5倍时,无论如何都会进行扩容,否则redis的性能将会急剧下降,扩容的大小是之前数组大小的2倍。
然后就是渐进式扩容,当插入或查找元素时,都会判断当前是否在rehash,如果正在rehash过程中则执行_dictRehashStep函数,其中如果当前没有迭代查询的操作则执行dictRehash,里面会将步长乘以10,表示如果桶的元素为NULL每次最多检查10个桶,同时会移动rehashidx指针,如果10个桶都没有数据则直接退出,如果有一个桶有数据就只搬这1个桶然后就退出,下一次操作时再继续执行,如果存在数据则会将当前桶的链表头到ht[1]对应的链表尾部,同时将ht[0]置空,最后如果发现数据全部搬完则会用新的ht[1]替换ht[0],然后释放ht[1],继续恢复原有的状态就完成了扩容。
最后可能会考虑到一个问题是,如果Redis长时间没有读写操作,那么rehash岂不是永远不会完成,其实Redis也会有定时任务来执行rehash操作,在server.c中可以找到serverCron函数,这个函数按照特定的时钟周期被触发,默认的server.hz为10,从Redis 5.0开始可以根据客户端的负载自动调整时钟周期,在serverCron函数中会调用databasesCron函数,当不执行rdb和aof持久化的时候则会执行rehash,具体代码段参考:
if (server.rdb_child_pid == -1 && server.aof_child_pid == -1) {/* We use global counters so if we stop the computation at a given* DB we'll be able to start from the successive in the next* cron loop iteration. */static unsigned int resize_db = 0;static unsigned int rehash_db = 0;int dbs_per_call = CRON_DBS_PER_CALL;int j;/* Don't test more DBs than we have. */if (dbs_per_call > server.dbnum) dbs_per_call = server.dbnum;/* Resize */for (j = 0; j < dbs_per_call; j++) {tryResizeHashTables(resize_db % server.dbnum);resize_db++;}/* Rehash */if (server.activerehashing) {for (j = 0; j < dbs_per_call; j++) {int work_done = incrementallyRehash(rehash_db);if (work_done) {/* If the function did some work, stop here, we'll do* more at the next cron loop. */break;} else {/* If this db didn't need rehash, we'll try the next one. */rehash_db++;rehash_db %= server.dbnum;}}}}
可以看到会先判断activerehashing配置是否开启,如果开启会挨个扫描每个db依次执行incrementallyRehash函数:
int incrementallyRehash(int dbid) {/* Keys dictionary */if (dictIsRehashing(server.db[dbid].dict)) {dictRehashMilliseconds(server.db[dbid].dict,1);return 1; /* already used our millisecond for this loop... */}/* Expires */if (dictIsRehashing(server.db[dbid].expires)) {dictRehashMilliseconds(server.db[dbid].expires,1);return 1; /* already used our millisecond for this loop... */}return 0;}
然后会继续调用dictRehashMilliseconds函数意思是花1ms的时间执行rehash,这个函数又回到了dict.c中:
/* Rehash for an amount of time between ms milliseconds and ms+1 milliseconds */int dictRehashMilliseconds(dict *d, int ms) {long long start = timeInMilliseconds();int rehashes = 0;while(dictRehash(d,100)) {rehashes += 100;if (timeInMilliseconds()-start > ms) break;}return rehashes;}
这时候步长变成100,也就是每次最多扫描1000个桶,如果运行时间大于1ms则退出去,这个就是在没有用户操作时后台rehash的过程。
所以可以看到,采用渐进式扩容的方式其实是计算机中的摊销思想,可以将整个哈希表迁移的时间均摊到每次操作中,这样每次操作的速度几乎不受影响,仍然可以保持高性能的读写。
2.value类型的实现

2.1 List类型
String的实现只有简单动态字符串这一种,简称sds,这块没有什么特殊的操作,然后是List,上图是指向双向链表和压缩列表,双向链表比较好理解,关键是压缩列表(ziplist),压缩列表的定义在ziplist.c中,注释讲的比较详细,大致内容如下:

其中zlbytes是压缩列表的字节数,包括本身的4个字节,zltail是压缩列表最后1个entry的偏移量,本身占用4个字节,设置这个的好处是可以直接从尾部弹出元素而无需遍历压缩列表,然后zllen表示压缩列表中的entry数量,本身占用2个字节,也就是最多放2^16 - 2个条目,当超过这个条目时设置为2^16 - 1,这时候需要遍历才能知道多少个entry,正常是不会超过的,entry的组成下面说,最后是zlend表示ziplist的结尾,长度1个字节,固定为0xff
那么对于每个entry则编码方式为: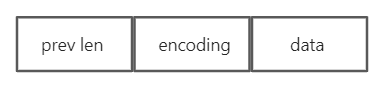
prevlen表示上一个entry的长度,这样可以方便向前查找,prevlen的长度是不固定的,参考代码:
/* Encode the length of the previous entry and write it to "p". This only* uses the larger encoding (required in __ziplistCascadeUpdate). */int zipStorePrevEntryLengthLarge(unsigned char *p, unsigned int len) {if (p != NULL) {p[0] = ZIP_BIG_PREVLEN;memcpy(p+1,&len,sizeof(len));memrev32ifbe(p+1);}return 1+sizeof(len);}/* Encode the length of the previous entry and write it to "p". Return the* number of bytes needed to encode this length if "p" is NULL. */unsigned int zipStorePrevEntryLength(unsigned char *p, unsigned int len) {if (p == NULL) {return (len < ZIP_BIG_PREVLEN) ? 1 : sizeof(len)+1;} else {if (len < ZIP_BIG_PREVLEN) {p[0] = len;return 1;} else {return zipStorePrevEntryLengthLarge(p,len);}}}
这两个函数在对ziplist做操作时都会调用到用来获取上一个entry的长度,其中p表示当前entry的指针,len是上一个entry的长度,如果p是NULL仅仅返回编码这个长度的内容所需要的字节数,其中ZIP_BIG_PREVLEN定义为254,也就是说当长度小于254时使用1个字节编码,反过来当大于254时将会调用zipStorePrevEntryLengthLarge,第一个字节固定为254并且后面4个字节表示长度,也就是说prevlen此时占用5个字节。
然后看下encoding,也就是编码信息,写入的代码如下:
unsigned int zipStoreEntryEncoding(unsigned char *p, unsigned char encoding, unsigned int rawlen) {unsigned char len = 1, buf[5];if (ZIP_IS_STR(encoding)) {/* Although encoding is given it may not be set for strings,* so we determine it here using the raw length. */if (rawlen <= 0x3f) {if (!p) return len;buf[0] = ZIP_STR_06B | rawlen;} else if (rawlen <= 0x3fff) {len += 1;if (!p) return len;buf[0] = ZIP_STR_14B | ((rawlen >> 8) & 0x3f);buf[1] = rawlen & 0xff;} else {len += 4;if (!p) return len;buf[0] = ZIP_STR_32B;buf[1] = (rawlen >> 24) & 0xff;buf[2] = (rawlen >> 16) & 0xff;buf[3] = (rawlen >> 8) & 0xff;buf[4] = rawlen & 0xff;}} else {/* Implies integer encoding, so length is always 1. */if (!p) return len;buf[0] = encoding;}/* Store this length at p. */memcpy(p,buf,len);return len;}
如果entry的值为整数,那么encoding只占用1个字节,不同的值表示不同的整数类型,具体由下面的宏来定义:
/* Different encoding/length possibilities */#define ZIP_STR_MASK 0xc0#define ZIP_INT_MASK 0x30#define ZIP_STR_06B (0 << 6)#define ZIP_STR_14B (1 << 6)#define ZIP_STR_32B (2 << 6)// entry值为整数时的表示#define ZIP_INT_16B (0xc0 | 0<<4)#define ZIP_INT_32B (0xc0 | 1<<4)#define ZIP_INT_64B (0xc0 | 2<<4)#define ZIP_INT_24B (0xc0 | 3<<4)#define ZIP_INT_8B 0xfe
否则如果entry数据的长度小于等于63,也是占用1个字节,大于63并且小于16383则占用2个字节,如果大于16383则占用5个字节,第1个字节为128,后续4个字节从代码可以看出来就是数据本身的长度。
那么ziplist的最大大小是多少呢?是由如下的宏进行定义:
#define SIZE_SAFETY_LIMIT 8192
可以看到ziplist的最大长度是8k,具体的分析过程这里先不再详细说,先看下list的整体结构:
// list由quicklist实现 定义在quicklist.h中typedef struct quicklist {quicklistNode *head;quicklistNode *tail;unsigned long count; /* total count of all entries in all ziplists */unsigned long len; /* number of quicklistNodes */int fill : 16; /* fill factor for individual nodes */unsigned int compress : 16; /* depth of end nodes not to compress;0=off */} quicklist;typedef struct quicklistNode {struct quicklistNode *prev;struct quicklistNode *next;unsigned char *zl;unsigned int sz; /* ziplist size in bytes */unsigned int count : 16; /* count of items in ziplist */unsigned int encoding : 2; /* RAW==1 or LZF==2 */unsigned int container : 2; /* NONE==1 or ZIPLIST==2 */unsigned int recompress : 1; /* was this node previous compressed? */unsigned int attempted_compress : 1; /* node can't compress; too small */unsigned int extra : 10; /* more bits to steal for future usage */} quicklistNode;
整个list结构定义是quicklist结构体,其中包括头节点和尾节点的指针,以及node和entry总的计数,其中fill表示ziplist的填充因子,compress表示不压缩的深度,0表示关闭压缩。
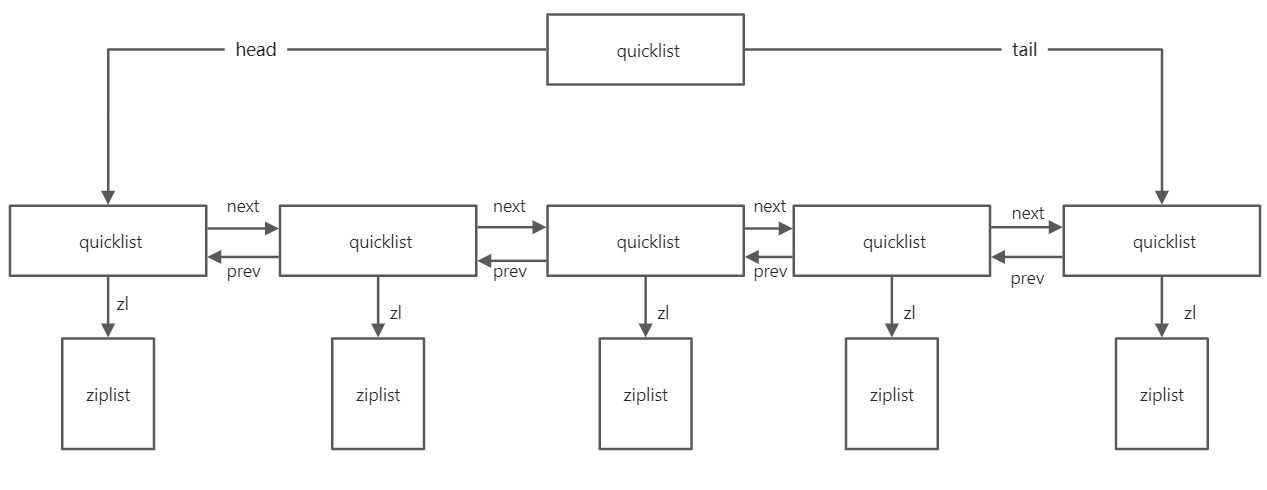
然后每一个node的定义在下面,由于是双向链表所以包含前驱节点和后继节点的指针,然后zl就是一个压缩列表,sz表示压缩列表的大小,count表示ziplist中的entry个数,encoding默认是1,如果开启LZF压缩则是2,container的值默认是2,其余的默认都是0。
所以根据结构体的定义,我们可以简单得出下面的图:
然后我们分析下写入的过程,首先写入是在t_list.c中传入执行:
#define COMPRESS_MAX (1 << 16)void quicklistSetCompressDepth(quicklist *quicklist, int compress) {if (compress > COMPRESS_MAX) {compress = COMPRESS_MAX;} else if (compress < 0) {compress = 0;}quicklist->compress = compress;}#define FILL_MAX (1 << 15)void quicklistSetFill(quicklist *quicklist, int fill) {if (fill > FILL_MAX) {fill = FILL_MAX;} else if (fill < -5) {fill = -5;}quicklist->fill = fill;}void quicklistSetOptions(quicklist *quicklist, int fill, int depth) {quicklistSetFill(quicklist, fill);quicklistSetCompressDepth(quicklist, depth);}void lpushCommand(client *c) {pushGenericCommand(c,LIST_HEAD);}// 命令入口void rpushCommand(client *c) {pushGenericCommand(c,LIST_TAIL);}void pushGenericCommand(client *c, int where) {int j, pushed = 0;for (j = 2; j < c->argc; j++) {if (sdslen(c->argv[j]->ptr) > LIST_MAX_ITEM_SIZE) {addReplyError(c, "Element too large");return;}}robj *lobj = lookupKeyWrite(c->db,c->argv[1]);if (lobj && lobj->type != OBJ_LIST) {addReply(c,shared.wrongtypeerr);return;}for (j = 2; j < c->argc; j++) {if (!lobj) {// 调用object.c中的函数创建objectlobj = createQuicklistObject();// 设置ziplist最大大小和非压缩深度quicklistSetOptions(lobj->ptr, server.list_max_ziplist_size,server.list_compress_depth);dbAdd(c->db,c->argv[1],lobj);}listTypePush(lobj,c->argv[j],where);pushed++;}addReplyLongLong(c, (lobj ? listTypeLength(lobj) : 0));if (pushed) {char *event = (where == LIST_HEAD) ? "lpush" : "rpush";signalModifiedKey(c->db,c->argv[1]);notifyKeyspaceEvent(NOTIFY_LIST,event,c->argv[1],c->db->id);}server.dirty += pushed;}// object.c createQuicklistObjectrobj *createQuicklistObject(void) {quicklist *l = quicklistCreate(); // quicklist.c quicklistCreaterobj *o = createObject(OBJ_LIST,l);o->encoding = OBJ_ENCODING_QUICKLIST;return o;}// quicklist.c quicklistCreatequicklist *quicklistCreate(void) {struct quicklist *quicklist;quicklist = zmalloc(sizeof(*quicklist));quicklist->head = quicklist->tail = NULL;quicklist->len = 0;quicklist->count = 0;quicklist->compress = 0;quicklist->fill = -2;return quicklist;}void listTypePush(robj *subject, robj *value, int where) {if (subject->encoding == OBJ_ENCODING_QUICKLIST) {int pos = (where == LIST_HEAD) ? QUICKLIST_HEAD : QUICKLIST_TAIL;value = getDecodedObject(value);size_t len = sdslen(value->ptr);quicklistPush(subject->ptr, value->ptr, len, pos);decrRefCount(value);} else {serverPanic("Unknown list encoding");}}
插入可以从左端和右端,左端就是从链表头部插入,右端则是从链表尾部插入,最终都会带着条件调用pushGenericCommand函数,过程同样是先lookupKey从全局哈希表中看看key是否存在,如果不存在则首先创建整个的quicklist结构,然后通过dbAdd写入db的全局哈希表中,最终还是调用了前面的dictAdd函数,其中quick list创建比较简单,只是设置了一些默认值,然后会调用quicklistSetOptions函数设置ziplist的最大大小和非压缩深度,这两个参数都是通过Redis的配置文件传入,默认定义为:
/* List defaults */#define OBJ_LIST_MAX_ZIPLIST_SIZE -2#define OBJ_LIST_COMPRESS_DEPTH 0
这里-2相当于一个档次,范围有5档,是-5~-1,另外也可以使用真实的大小传入,在quicklistSetFill中写的很清楚,如果大小大于32768那么就设置为32768,如果小于-5,则设置为-5,这个负数的意思等下会说。
然后就来到了listTypePush这个函数,将value转成sds,然后调用quicklistPush函数插入到双向链表中:
/* Wrapper to allow argument-based switching between HEAD/TAIL pop */void quicklistPush(quicklist *quicklist, void *value, const size_t sz,int where) {if (where == QUICKLIST_HEAD) {quicklistPushHead(quicklist, value, sz);} else if (where == QUICKLIST_TAIL) {quicklistPushTail(quicklist, value, sz);}}int quicklistPushHead(quicklist *quicklist, void *value, size_t sz) {quicklistNode *orig_head = quicklist->head;assert(sz < UINT32_MAX); /* TODO: add support for quicklist nodes that are sds encoded (not zipped) */if (likely(_quicklistNodeAllowInsert(quicklist->head, quicklist->fill, sz))) {quicklist->head->zl =ziplistPush(quicklist->head->zl, value, sz, ZIPLIST_HEAD);quicklistNodeUpdateSz(quicklist->head);} else {quicklistNode *node = quicklistCreateNode();node->zl = ziplistPush(ziplistNew(), value, sz, ZIPLIST_HEAD);quicklistNodeUpdateSz(node);_quicklistInsertNodeBefore(quicklist, quicklist->head, node);}quicklist->count++;quicklist->head->count++;return (orig_head != quicklist->head);}int quicklistPushTail(quicklist *quicklist, void *value, size_t sz) {quicklistNode *orig_tail = quicklist->tail;assert(sz < UINT32_MAX); /* TODO: add support for quicklist nodes that are sds encoded (not zipped) */if (likely(_quicklistNodeAllowInsert(quicklist->tail, quicklist->fill, sz))) {quicklist->tail->zl =ziplistPush(quicklist->tail->zl, value, sz, ZIPLIST_TAIL);quicklistNodeUpdateSz(quicklist->tail);} else {quicklistNode *node = quicklistCreateNode();node->zl = ziplistPush(ziplistNew(), value, sz, ZIPLIST_TAIL);quicklistNodeUpdateSz(node);_quicklistInsertNodeAfter(quicklist, quicklist->tail, node);}quicklist->count++;quicklist->tail->count++;return (orig_tail != quicklist->tail);}REDIS_STATIC quicklistNode *quicklistCreateNode(void) {quicklistNode *node;node = zmalloc(sizeof(*node));node->zl = NULL;node->count = 0;node->sz = 0;node->next = node->prev = NULL;node->encoding = QUICKLIST_NODE_ENCODING_RAW;node->container = QUICKLIST_NODE_CONTAINER_ZIPLIST;node->recompress = 0;return node;}
同样插入分为插入到头部或者插入到尾部,先看下整体过程,如果是插入到头部,那么首先判断头部的ziplist是不是满了,如果没满则允许插入,对ziplist进行修改放到头部的位置,其实就是对ziplist的空间进行扩容,将所有的entry往后搬迁然后将value填充到前面,详细的操作就在ziplist.c中,否则如果满了就更简单了,直接new一个新的quicklist node,然后用value填充形成ziplist,最后执行_quicklistInsertNodeBefore将当前新建的node插入到当前双向链表的头部,具体代码就是双向链表的操作代码,比较简单,另外在尾部插入也是类似的操作,只是和头部写入相比少了数据搬迁的过程,效率相对来说更高一些,所以rpush操作比lpush操作性能略高一些。
同理对于pop的操作非常类似,就不再详细叙述了,其中有个判断ziplist是否满的函数_quicklistNodeAllowInsert可以来简单说下:
#define sizeMeetsSafetyLimit(sz) ((sz) <= SIZE_SAFETY_LIMIT)REDIS_STATIC int _quicklistNodeAllowInsert(const quicklistNode *node,const int fill, const size_t sz) {if (unlikely(!node))return 0;int ziplist_overhead;/* size of previous offset */if (sz < 254)ziplist_overhead = 1;elseziplist_overhead = 5;/* size of forward offset */if (sz < 64)ziplist_overhead += 1;else if (likely(sz < 16384))ziplist_overhead += 2;elseziplist_overhead += 5;/* new_sz overestimates if 'sz' encodes to an integer type */unsigned int new_sz = node->sz + sz + ziplist_overhead;if (likely(_quicklistNodeSizeMeetsOptimizationRequirement(new_sz, fill)))return 1;/* when we return 1 above we know that the limit is a size limit (which is* safe, see comments next to optimization_level and SIZE_SAFETY_LIMIT) */else if (!sizeMeetsSafetyLimit(new_sz))return 0;else if ((int)node->count < fill)return 1;elsereturn 0;}// 表示ziplist级别的常量数组static const size_t optimization_level[] = {4096, 8192, 16384, 32768, 65536};REDIS_STATIC int_quicklistNodeSizeMeetsOptimizationRequirement(const size_t sz,const int fill) {if (fill >= 0)return 0;size_t offset = (-fill) - 1;if (offset < (sizeof(optimization_level) / sizeof(*optimization_level))) {if (sz <= optimization_level[offset]) {return 1;} else {return 0;}} else {return 0;}}
_quicklistNodeAllowInsert这个函数是判断ziplist能否再容纳下当前长度的新的内容,就是按照上面entry格式的定义预先算了一下长度,如果fill是真实的长度则会走下面的判断,如果是-5-1则会调用_quicklistNodeSizeMeetsOptimizationRequirement这个函数判断新的长度是否满足条件,首先计算了offset范围是04,这里是用数组的大小数以第一个元素的大小,由于数组是5个元素所以大小为5,所以必然进入第一个分支,这个时候将offset作为下标取值,这里数组值就是这个level下ziplist的最大限制,例如默认fill为-2,所以offset为1,因此大小限制为8192,满足就返回1表示允许。再回到第一个函数如果fill是大于0的,会走第二个判断先判断是不是满足小于SIZE_SAFETY_LIMIT,如果满足再判断是否小于实际配置的fill值这样,所以默认情况都是在optimization_level这个数组这里限制的。
另外还会注意到很有趣的一点就是,从quicklistPushHead再到_quicklistNodeAllowInsert调用了2次likely函数,还有1次unlikely函数,其实likely/unlikely都属于系统调用,作用是用来优化CPU的分支预测,如果一个条件我们认为经常成立,那么可以用likely告诉CPU按照期望来预测,unlikely是反过来的会告诉CPU不要走这个分支,因为CPU自动分支预测会先对运行结果进行学习然后再预测,如果使用likely/unlikely系统调用后相当于告诉CPU先验知识,使用恰当可以提升程序的运行效率,但是反过来如果用的不好或者用反了,要比默认情况下性能低,因为默认情况下fill的值为-2所以会百分之百进入第一个分支,所以加上likely是会提升性能的,但是如果配置为1个大于0的值,性能会有所降低,这个配置项对应redis.conf中的list-max-ziplist-size -2,推荐配置为-2或者-1,不要自己指定长度。
上面就是Redis中list基本的源码分析,经过分析可以知道list是由双端列表实现,其中链表中的每个节点是由压缩列表实现,优点就是ziplist非常紧凑,并且对CPU缓存友好,通常只取头部或者尾部,解析ziplist性能很高,可以降低链表节点过多造成内存碎片,缺点就是每次添加删除元素都需要空间伸缩和数据搬迁,不过这部分内存是由Redis的zmalloc库来管理,因此可以高效复用,省掉了系统调用的开销。
list在使用时要注意下面几个点:
- list的push和pop操作复杂度都是O(1),计算长度的llen复杂度也是O(1),这类操作是比较高效的。
- 像lrange、lset、lindex操作的复杂度都是O(n),要尽量避免使用,但是由于ziplist是包含一组元素,所以按照下标查找可以一次跳过整个ziplist,相比普通的双向链表比还是比较高效的,lrange这种操作一般用在查看头部或尾部少量元素时使用。
- list-max-ziplist-size正常建议配置为-2或-1,不要自己指定长度。
其他一些类型的源码分析方法类似,不再详细分析了,只简要概括下。
2.2 Hash类型
hash类型它也是由ziplist或散列表实现,不过这两个不是同时使用而是一种转化的关系,具体在server.h中有对于其默认值的定义:
#define OBJ_HASH_MAX_ZIPLIST_ENTRIES 512#define OBJ_HASH_MAX_ZIPLIST_VALUE 64
关于hash的编码类型也只有OBJ_ENCODING_ZIPLIST和OBJ_ENCODING_HT这两种,具体在t_hash.c中有相关的源码,初始情况下如果全局哈希表中key不存在,则先进行初始化,value此时会设置为ziplist类型:
// t_hash.c hset/hmset前先查找keyrobj *hashTypeLookupWriteOrCreate(client *c, robj *key) {robj *o = lookupKeyWrite(c->db,key);if (o == NULL) {// 不存在则先创建hash objecto = createHashObject();dbAdd(c->db,key,o);} else {if (o->type != OBJ_HASH) {addReply(c,shared.wrongtypeerr);return NULL;}}return o;}// object.c 创建hash objectrobj *createHashObject(void) {// 创建ziplist对象unsigned char *zl = ziplistNew();robj *o = createObject(OBJ_HASH, zl);o->encoding = OBJ_ENCODING_ZIPLIST;return o;}
那么什么时候会转换为散列表实现,在hashTypeSet函数中有这么1行:
/* Check if the ziplist needs to be converted to a hash table */if (hashTypeLength(o) > server.hash_max_ziplist_entries)hashTypeConvert(o, OBJ_ENCODING_HT);
在向ziplist插入新元素后,如果ziplist的entry个数大于hash_max_ziplist_entries的配置值,则会自动转换为散列表来实现,默认情况下上面的宏定义为512,当元素超过512个时会转换为散列表,需要注意的是一旦压缩列表转换为散列表,就算元素被删除,也不会再转换回去了,代码中仅仅会执行dictResize操作。
hash类型如果使用ziplist实现的情况下写入和查找的时间复杂度都是O(n),有全局的限制,ziplist一般不会太长,大多数情况下都会转成散列表类型,这时HSET/HGET的复杂度都是O(1)。
对于hash-max-ziplist-entries的配置建议是如果机器内存充足,一般情况下保持默认即可,如果内存比较紧张可以时间换空间,可以把这个配置改大,因为压缩列表本身比较节省空间,通过牺牲读写的效率来节约内存使用。
2.3 Set和ZSet
对于Set类型底层由数组或散列表构成,如果Set的元素都是整数且元素个数小于512个,会使用数组来保存,默认值也有定义如下:
#define OBJ_SET_MAX_INTSET_ENTRIES 512
当元素个数超过512时会转化为散列表实现,这个和hash类型非常类似,只是此时散列表的值都为NULL。
最后看ZSet类型,ZSet是由压缩列表或跳表实现,和hash类型一样由两个参数来控制:
#define OBJ_ZSET_MAX_ZIPLIST_ENTRIES 128#define OBJ_ZSET_MAX_ZIPLIST_VALUE 64
默认当元素个数小于128个并且value大小小于64时,采用ziplist方式来实现,否则会转换为sikplist实现,具体的代码片段参考t_zset.c:
/* Lookup the key and create the sorted set if does not exist. */zobj = lookupKeyWrite(c->db,key);if (zobj == NULL) {if (xx) goto reply_to_client; /* No key + XX option: nothing to do. */if (server.zset_max_ziplist_entries == 0 ||server.zset_max_ziplist_value < sdslen(c->argv[scoreidx+1]->ptr)){zobj = createZsetObject();} else {zobj = createZsetZiplistObject();}dbAdd(c->db,key,zobj);} else {if (zobj->type != OBJ_ZSET) {addReply(c,shared.wrongtypeerr);goto cleanup;}}
如果在全局哈希表中没有找到key的情况下,会判断如果zset_max_ziplist_entries设置为0或者写入value的长度大于zset_max_ziplist_value的情况下会创建ZsetObject,否则会创建ZiplistObject。那么随着元素不断的插入一旦达到阈值则会从ziplist转换为skiplist:
/* check if the element is too large or the list* becomes too long *before* executing zzlInsert. */if (zzlLength(zobj->ptr)+1 > server.zset_max_ziplist_entries ||sdslen(ele) > server.zset_max_ziplist_value ||!ziplistSafeToAdd(zobj->ptr, sdslen(ele))){zsetConvert(zobj,OBJ_ENCODING_SKIPLIST);} else {zobj->ptr = zzlInsert(zobj->ptr,ele,score);if (newscore) *newscore = score;*flags |= ZADD_ADDED;return 1;}
写入之前判断如果ZSet中元素个数大于zset_max_ziplist_entries或者元素的长度大于zset_max_ziplist_value或者写入之后ziplist的大小没有超过8k限制,则会执行zsetConvert将对象转换为OBJ_ENCODING_SKIPLIST类型,否则就正常执行插入。
至于zset的结构定义在server.h中:
/* ZSETs use a specialized version of Skiplists */typedef struct zskiplistNode {sds ele;double score;struct zskiplistNode *backward;struct zskiplistLevel {struct zskiplistNode *forward;unsigned long span;} level[];} zskiplistNode;typedef struct zskiplist {struct zskiplistNode *header, *tail;unsigned long length;int level;} zskiplist;typedef struct zset {dict *dict;zskiplist *zsl;} zset;
可以看到zset除了zskiplist之外还定义了dict,我们知道对于跳表来说可以实现插入、查找、删除的复杂度都是O(log N),除了这个之外zset还有一些比较简单的操作例如直接根据元素获取对应的分值或者判断某元素是否在zset中等,对于这些操作可以进一步提升性能,所以作者通过空间换时间的方式增加了一个dict来维护元素值和分值的关系,像ZSCORE的复杂度就是O(1),从而对跳表进行加速,对于计算zset长度的操作,因为zskiplist中也会维护计数,复杂度也是O(1)。
综上总结下就是:单元素操作大部分复杂度都是O(1),例如:HGET、HSET、HDEL、SADD、SREM、ZSCORE、LPUSH、LPOP、RPUSH、RPOP、ZSCORE等,计算长度的复杂度也是O(1),例如:LLEN、HLEN、ZCARD等,对于zset的其他操作大部分复杂度都是O(log n),如:ZRANGEBYSCORE、ZADD、ZCOUNT、ZINCRBY、ZRANK、ZLEXCOUNT等,这些操作在大部分情况下都是比较高效的。
另外还有些比较危险的操作,例如:keys *、HGETALL、SMEMBERS、LRANGE、ZRANGE这些操作,复杂度都是O(n),需要对整个数据结构进行遍历,可能会带来非常大的开销,直接阻塞其他请求的执行,使用时务必谨慎,除非你知道自己在做什么,这些操作推荐使用Redis提供的游标进行操作,对应的有SCAN、HSCAN、SSCAN、ZSCAN等,这些操作都是每次返回一小批数据,然后基于游标再进行迭代,这样不会一次性查询造成其他的请求阻塞,CPU时间被轮换使用。
Redis数据结构是性能优化的基石,写代码之前考虑使用合适的数据结构可以避免掉很多性能方面的问题。
浅析Redis基础数据结构的更多相关文章
- redis 基础数据结构实现
参考文献 redis数据结构分析 Skip List(跳跃表)原理详解 redis 源码分析之内存布局 Redis 基础数据结构与对象 Redis设计与实现-第7章-压缩列表 在redis中构建了自己 ...
- 1.基础: 万丈高楼平地起——Redis基础数据结构 学习记录
<Redis深度历险:核心原理和应用实践>1.基础: 万丈高楼平地起——Redis基础数据结构 学习记录http://naotu.baidu.com/file/b874e2624d3f37 ...
- redis基础数据结构及编码方式
redis基础数据结构和编码方式 一.基础数据结构 1)简单动态字符串 2)双端链表 3)字典 4)跳跃表 5)整数集合 6)压缩列表 二.对象类型与编码 在redis的数据库中创建一个新的键值对时, ...
- Redis——基础数据结构
Redis提供了5种基础数据结构,分别是String,list,set,hash和zset. 1.String Redis所有的键都是String.Redis的String是动态字符串,内部结构类似J ...
- Redis基础数据结构
Redis数据库中每个键值对都是由对象( c 的结构体对象)组成的. 数据库键总是一个字符串对象(string object) 数据库键的值可以使字符串对象.列表对象(list object).哈希对 ...
- Redis 基础数据结构之二 list(列表)
Redis 有 5 种基础数据结构,分别为:string (字符串).list (列表).set (集合).hash (哈希) 和 zset (有序集合). 今天来说一下list(列表)这种数据结构, ...
- Redis 基础数据结构之一:string(字符串)
Redis 有 5 种基础数据结构,分别为:string (字符串).list (列表).set (集合).hash (哈希) 和 zset (有序集合),Redis存储数据的结构是键值对形式的. 首 ...
- Redis基础数据结构-基于2.8
SDS SDS是Redis中String的底层数据结构,数据结构如下,SDS保留了传统的C字符串表达方式即数组的最后一个元素是'/0'结尾.此外还添加了两个字段len和free,其中len表示字符串长 ...
- Redis 基础数据结构与对象
Redis用到的底层数据结构有:简单动态字符串.双端链表.字典.压缩列表.整数集合.跳跃表等,Redis并没有直接使用这些数据结构来实现键值对数据库,而是基于这些数据结构创建了一个对象系统,这个系统包 ...
随机推荐
- nginx 练习(将游戏图片部署到NFS+LNMP架构简介+uwsgi架构简介)
nginx(将游戏图片部署到NFS) 练习 一.首先去NFS这里创建挂载点 1.先在NFS的opt下面创建文件夹存放图片 [root@linux opt]# mkdir /opt/img 2.然后将此 ...
- redis(二)-----redis基本数据类型之字符串
Redis的全称是REmote Dictionary Server,它主要提供了5种数据结构:字符串.哈希.列表.集合.有序集合,同时在字符串的基础之上演变 出了位图(Bitmaps)和HyperLo ...
- rsync 与 inotify 的使用 & 实现实时同步备份
今日内容 rsync 内容详细 上一篇内容问题 1.yum源问题 2.VPN链接正常,但是没办法通过172 3.VPN链接时,出现了DNS错误 4.掩码不对 5.openvpn开启错误 复制的命令 1 ...
- 《操作系统导论》第5章 | 进程API
本章主要讨论UNIX系统中的进程创建.UNIX系统采用了一种非常有趣的创建新进程的方式,即通过一对系统调用:fork()和exec().进程还可以通过第三个系统调用wait(),来等待其创建的子进程执 ...
- kube-proxy的三种工作模式
kube-proxy模式详解 kubernetes里kube-proxy支持三种模式,在v1.8之前我们使用的是iptables 以及 userspace两种模式,在kubernetes 1.8之后引 ...
- 图解python | 简介
作者:韩信子@ShowMeAI 教程地址:http://www.showmeai.tech/tutorials/56 本文地址:http://www.showmeai.tech/article-det ...
- 用 JuiceFS 备份 Nginx 日志可以这么简单
在我们线上的生产环境中要备份的东西很多,各种服务日志.数据库数据.用户上传数据.代码等等.用 JuiceFS 来备份可以节省你大量时间,我们会围绕这个主题写一系列的教程,整理出一套最佳实践,方便大家. ...
- Gateway 简介
概述 微服务可能分布在不同的主机上,这样有许多缺点:前端需要硬编码调用不同地址的微服务很麻烦:存在跨域访问的问题:微服务地址直接暴露是不安全的.还有所以需要为前端提供一个统一的访问入口.Gateway ...
- 【C# 并发编程】开端
1,异步编程 异步编程就是使用future模式(又称promise)或者回调机制来实现(Non-blocking on waiting). 如果使用回调或事件来实现(容易callback hell), ...
- Spring源码之六-onRefresh()方法
Spring源码之六-onRefresh()方法 大家好,我是程序员田同学. 今天带大家解读Spirng源码之六的onRefresh()方法,这是refresh()的其中的一个方法,看似是一个空方法, ...