ssm——spring整理
目录
1、概述
2、Spring工厂与IOC
2.1、为什么要有Spring框架
Spring工厂是一个生产各种类的实例的工厂,Ioc相当于工厂的管理员,负责调度与管理Spring所生产出的各个实例的使用情况。在java编程中,我们往往会使用到许多类,每次使用一个类,我们都必须new 一个它的实例对象,通过这个new出来的实例对象才能调用这个类的成员变量和方法。如果当工程量比较大的话,这样子就很麻烦了,每个类new对象盘根错节。这样就会带来很严重的耦合性。显然这种传统的方式与软件工程所推崇的“高内聚,低耦合”相悖。因此,为了解决这样的耦合性问题。我们引入Spring框架。让Spring工厂为我们创建好实例,我们如果要用到某个类的实例的话,就直接从Spring工厂中拿就行了,不过要注意Spring工厂中默认都是单实例的。
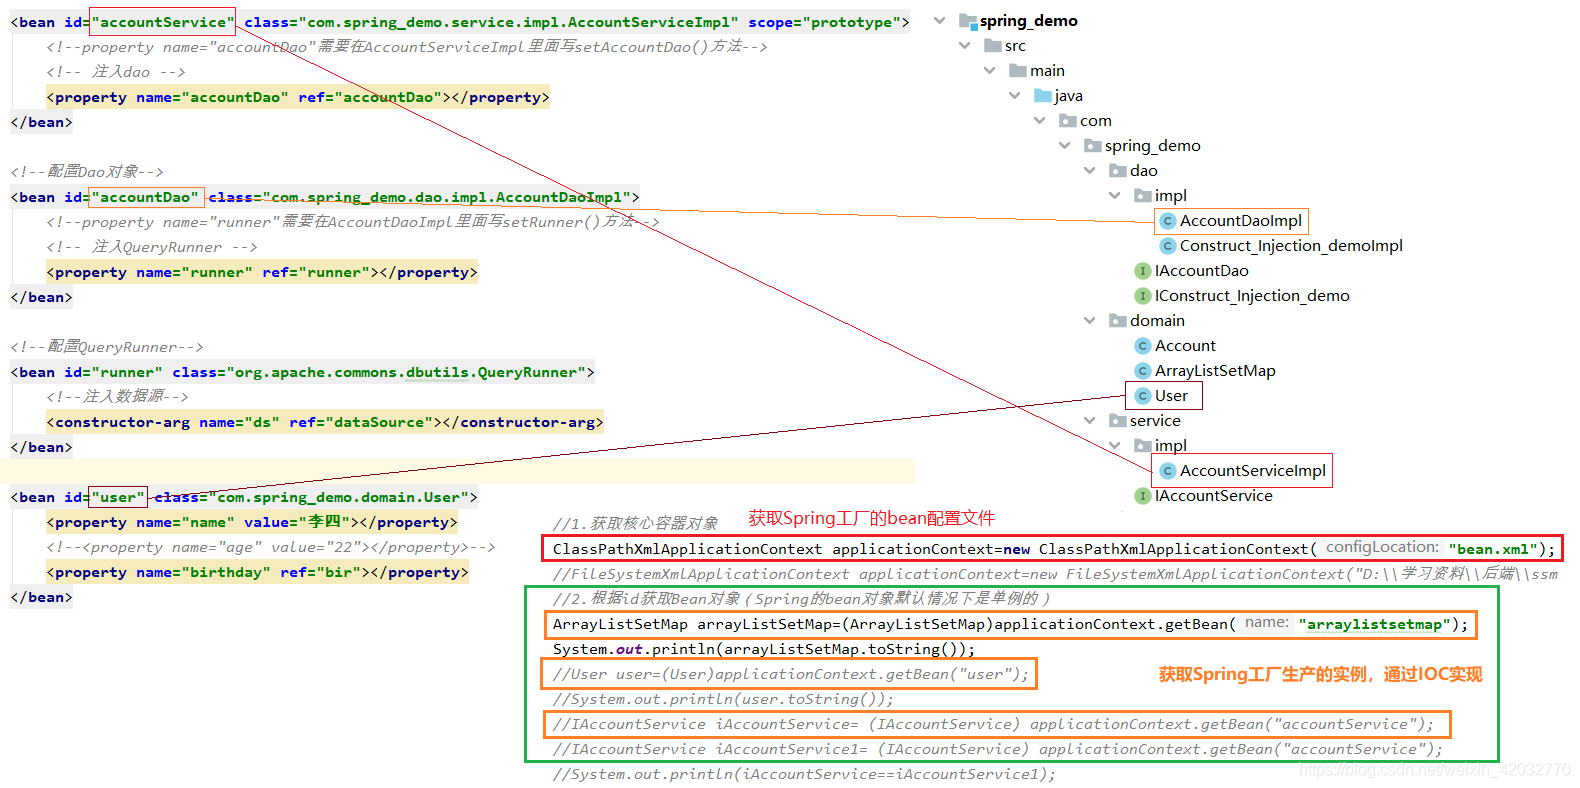
下面看一个简单的Spring工厂生产实例的例子。

2.2、什么是IOC
IOC——Inversion Of Control (控制反转)。就是把创建对象的权利交给框架。它包括依赖注入和依赖查找。IOC不是什么技术,而是一种设计思想。在Java开发中,Ioc意味着将你设计好的对象交给容器控制,而不是传统的在你的对象内部直接控制。
IOC容器:IoC是有专门一个容器来创建这些对象,即由Ioc容器来控制对象的创建,IoC容器控制了对象,主要控制了外部资源获取(不只是对象包括比如文件等)。
IOC反转:所谓的反转就是由容器来帮忙创建及注入依赖对象。因为由容器帮我们查找及注入依赖对象,对象只是被动的接受依赖对象,所以是反转。而正转就是由我们自己在对象中主动控制去直接获取依赖对象。
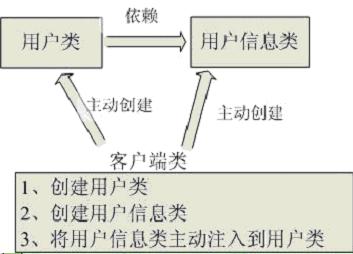
传统的程序设计中都是主动创建类对象。

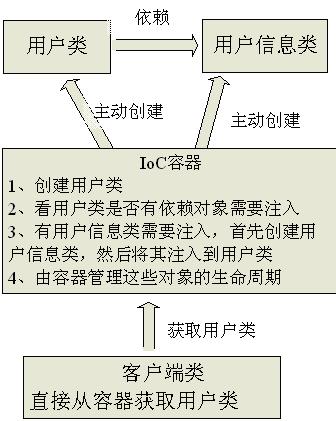
当有了IoC/DI的容器后,在客户端类中不再主动去创建这些对象了。

IoC不是一种技术,只是一种思想,一个重要的面向对象编程的法则,它能指导我们如何设计出松耦合、更优良的程序。传统应用程序都是由我们在类内部主动创建依赖对象,从而导致类与类之间高耦合,难于测试;有了IoC容器后,把创建和查找依赖对象的控制权交给了容器,由容器进行注入组合对象,所以对象与对象之间是松散耦合,这样也方便测试,利于功能复用,更重要的是使得程序的整个体系结构变得非常灵活。其实IoC对编程带来的最大改变不是从代码上,而是从思想上,发生了“主从换位”的变化。应用程序原本是老大,要获取什么资源都是主动出击,但是在IoC/DI思想中,应用程序就变成被动的了,被动的等待IoC容器来创建并注入它所需要的资源了。IoC很好的体现了面向对象设计法则之一 —— 好莱坞法则:“别找我们,我们找你”;即由IoC容器帮对象找相应的依赖对象并注入,而不是由对象主动去找。
2、Spring工厂对实例注入
2.1、使用<bean>标签进行注入
参考代码下载地址:https://gitee.com/wulinchun/ssm-learning/tree/master/ (使用bean进行spring工厂注入代码示例)
bean.xml
<?xml version="1.0" encoding="UTF-8"?><beans xmlns="http://www.springframework.org/schema/beans"xmlns:xsi="http://www.w3.org/2001/XMLSchema-instance"xsi:schemaLocation="http://www.springframework.org/schema/beans http://www.springframework.org/schema/beans/spring-beans.xsd"><!--配置数据源--><bean id="dataSource" class="com.mchange.v2.c3p0.ComboPooledDataSource"><!--连接数据库的必备信息--><property name="driverClass" value="com.mysql.jdbc.Driver"></property><property name="jdbcUrl" value="jdbc:mysql://localhost:3306/ssm"></property><property name="user" value="root"></property><property name="password" value="123456"></property></bean><!-- 配置Service --><!--bean的作用范围调整bean标签的scope属性作用:用于指定bean的作用范围取值:singleton:单实例(默认值)prototype:多实例request:作用于web应用的请求范围session:作用于web应用的会话范围global-session:作用于集群环境的会话范围(全局会话范围),当不是集群环境时,它就是session--><!--单例对象出生:当容器创建时对象出生活着:只要容器还在,对象就一直活着死亡:容器销毁,对象消亡总结:单例对象的生命周期和容器相同多例对象出生:当我们使用对象时spring框架为我们创建活着:对象只要在使用过程中就一直活着。死亡:当对象长时间不用,且没有别的对象引用时,由java的垃圾回收器回收--><!--spring中的依赖注入依赖注入:Dependency InjectionIOC的作用:降低程序间的耦合(依赖关系)依赖关系的管理:以后都交给spring来维护在当前类徐迎用到其他类的对象,由spring为我们提供,我们只需在配置文件中说明依赖关系的维护:就称之为依赖注入。依赖注入:能注入的数据:有三类1、基本类型和String2、其他bean类型(在配置文件中或者注解配置过的bean)3、复杂类型/集合类型注入方式:有三种1、使用构造函数提供2、使用set方法提供3、使用注解提供--><bean id="accountService" class="com.spring_demo.service.impl.AccountServiceImpl" scope="prototype"><!--property name="accountDao"需要在AccountServiceImpl里面写setAccountDao()方法--><!-- 注入dao --><property name="accountDao" ref="accountDao"></property></bean><!--配置Dao对象--><bean id="accountDao" class="com.spring_demo.dao.impl.AccountDaoImpl"><!--property name="runner"需要在AccountDaoImpl里面写setRunner()方法--><!-- 注入QueryRunner --><property name="runner" ref="runner"></property></bean><!--配置QueryRunner--><bean id="runner" class="org.apache.commons.dbutils.QueryRunner"><!--注入数据源--><constructor-arg name="ds" ref="dataSource"></constructor-arg></bean><!--构造函数注入:使用的标签:constructor-arg标签出现的位置:bean标签的内部标签中的属性type:用于指定要注入的数据的数据类型,该数据类型也是构造函数中某个或某些参数的类型index:用于指定要注入的数据给构造函数中指定索引位置的参数赋值,索引的位置是从0开始name:用于提供基本类型和String类型的数据==========================以上三个用于指定给构造函数中哪个参数赋值=======================value:用于指定其他的bean类型数据。它指的就是在Spring的IOC核心容器中出现过的bean对象ref:用于指定其他的bean类型数据。它指的就是在spring的IOC核心容器中出现过的bean对象优势:在获取bean对象时,注入数据是必须的操作,否则对象无法创建成功弊端:改变了bean对象的实例化方式,使我们在创建对象时,如果用不到这些数据,也必须提供。--><!--<bean id="user" class="com.spring_demo.domain.User"><constructor-arg name="name" value="张三"></constructor-arg><!–<constructor-arg name="birthday" value="1998-01-10"></constructor-arg>–><!–注意:birthday是date类型,因此这里无法直接配置,要把value改成ref直接参照–><constructor-arg name="birthday" ref="bir"></constructor-arg><constructor-arg name="age" value="22"></constructor-arg></bean>--><!--set方法注入涉及的标签:property出现的位置:bean标签的内部标签的属性name:用于指定注入时所调用的set方法名称value:用于指定其他的bean类型数据。它指的就是在Spring的IOC核心容器中出现过的bean对象ref:用于指定其他的bean类型数据。它指的就是在spring的IOC核心容器中出现过的bean对象优势:创建对象时没有明确的限制,可以直接使用默认构造函数弊端:不能保证某个成员变量必须有值--><bean id="user" class="com.spring_demo.domain.User"><property name="name" value="李四"></property><!--<property name="age" value="22"></property>--><property name="birthday" ref="bir"></property></bean><!--复杂类型的注入用于给List结构集合注入的标签:list array set用于给Map结构集合注入的标签:map props结构相同,标签可以互换--><bean id="arraylistsetmap" class="com.spring_demo.domain.ArrayListSetMap"><property name="testArray"><array><value>array1</value><value>array2</value><value>array3</value></array></property><property name="testList"><list><value>list1</value><value>list2</value><value>list3</value></list></property><property name="testSet"><set><value>set1</value><value>set2</value><value>set3</value></set></property><property name="testMap"><map><entry key="key1" value="v1"></entry><entry key="key2" value="v2"></entry><entry key="key3" value="v3"></entry></map></property></bean><bean id="bir" class="java.util.Date" factory-bean="dateFormat" factory-method="parse"><constructor-arg value="1998-01-10"></constructor-arg></bean><bean id="dateFormat" class="java.text.SimpleDateFormat"><constructor-arg value="yyyy-MM-dd"></constructor-arg></bean></beans>

2.2、使用注解进行注入
参考代码下载地址:https://gitee.com/wulinchun/ssm-learning/tree/master/ (使用annotate进行spring工厂注入代码示例)
bean.xml
<?xml version="1.0" encoding="UTF-8"?><beans xmlns="http://www.springframework.org/schema/beans"xmlns:xsi="http://www.w3.org/2001/XMLSchema-instance"xmlns:context="http://www.springframework.org/schema/context"xsi:schemaLocation="http://www.springframework.org/schema/beanshttp://www.springframework.org/schema/beans/spring-beans.xsdhttp://www.springframework.org/schema/contexthttp://www.springframework.org/schema/context/spring-context.xsd"><!--告知spring在创建容器时要扫描的包,配置所需要的标签不是在beans的约束中,而是一个名称为context名称空间和约束中--><context:component-scan base-package="com.spring_demo_ann"></context:component-scan></beans>


2.2.3、Spring常用注解
一、用于创建对象的注解
相当于:<bean id="" class="">
1、@Component
来管理。相当于在
xml
中配置一个
bean
。
value
:指定
bean
的
id
。如果不指定
value
属性,默认
bean
的
id
是当前类的类名。首字母小写。
这三个注解都是针对一个的衍生注解,它们的作用及属性都是一模一样的。 它们只不过是提供了更加明确的语义化。
注:如果注解中有且只有一个属性要赋值时,且名称是 value,value 在赋值时是可以不写。(例如:@Repository(value="userDao")等价于@Repository("userDao")
方法可以省略。它只能注入其他
bean
类型。当有多个类型匹配时,使用要注入的对象变量名称作为bean
的
id,
在
spring
容器查找,找到了也可以注入
的
id
注入。它在给字段注入时不能独立使用,必须和@Autowire一起使用;但是给方法参数注入时,可以独立使用。
bean
的
id
。
作用:直接按照 Bean 的 id 注入。它也只能注入其他 bean 类型。
属性: name:指定 bean 的 id。
类型数据的
的作用范围。
value:指定范围的值。
singleton:单实例(默认值)
prototype:多实例 request:作用于web应用的请求范围
session:作用于web应用的会话范围
globalsession:作用于集群环境的会话范围(全局会话范围),当不是集群环境时,它就是session
四、和生命周期相关的注解
相当于:<bean id="" class="" init-method="" destroy-method="" />
1、@PostConstruct
用java类实现bean.xml中的配置功能
作用:指定当前类是一个配置类。
细节:当配置类作为AnnotationConfigApplicationContext对象创建的参数时,该注解可以不写。
作用:用于通过注解指定spring在创建容器时要扫描的包。
属性:value:它和basePackages的作用是一样的,都是用于指定创建容器时要扫描的包。我们使用此注解就等同于在xml中配置了:<context:component-scan base-package="xxx包名"/>
作用:用于把当前方法的返回值作为bean对象存入spring的ioc容器中。
属性:name:用于指定bean的id。当不写时,默认值是当前方法的名称。
细节:当我们使用注解配置方法时,如果方法有参数,spring框架会去容器中查找有没有可用的bean对象。查找的方式和@Autowired注解的作用是一样的。
作用:用于导入其他的配置类。
属性:value:用于指定其他配置类的字节码。当我们使用Import的注解之后,有Import注解的类就父配置类,而导入的都是子配置类。
5、@PropertySource
作用:用于指定properties文件的位置。
属性:value:指定文件的名称和路径。关键字:classpath,表示类路径下。
2.3、基于注解的jdbc实现
参考代码下载地址:https://gitee.com/wulinchun/ssm-learning/tree/master/ (基于注解的jdbc实现代码示例)
2.3.1、maven项目的目录结构

2.3.2、代码片段
AccountDaoImpl.java
package com.spring_demo_ann_JDBC.dao.impl;import java.sql.SQLException;import java.util.List;import org.apache.commons.dbutils.QueryRunner;import org.apache.commons.dbutils.handlers.BeanListHandler;import org.springframework.beans.factory.annotation.Autowired;import org.springframework.stereotype.Repository;import com.spring_demo_ann_JDBC.dao.IAccountDao;import com.spring_demo_ann_JDBC.domain.Account;/*** 持久层接口实现类* @author:wu linchun* @time:2021/01/17 上午10:32:34**/@Repository("accountDao")public class AccountDaoImpl implements IAccountDao {@Autowiredprivate QueryRunner runner;public List<Account> findAllAccount() {// TODO Auto-generated method stubtry {return runner.query("select * from account", new BeanListHandler<Account>(Account.class));} catch (SQLException e) {// TODO Auto-generated catch blocke.printStackTrace();}return null;}public Account findAccountById(Integer accountId) {// TODO Auto-generated method stubtry {return (Account) runner.query("select * from account where id=?", new BeanListHandler<Account>(Account.class),accountId);} catch (SQLException e) {// TODO Auto-generated catch blocke.printStackTrace();}return null;}public void saveAccount(Account account) {// TODO Auto-generated method stubtry {runner.update("insert into account values(?,?,?)",account.getId(),account.getName(),account.getMoney());} catch (SQLException e) {// TODO Auto-generated catch blocke.printStackTrace();}}public void updateAccount(Account account) {// TODO Auto-generated method stubtry {runner.update("update account set id=?,name=?,money=?",account.getId(),account.getName(),account.getMoney());} catch (SQLException e) {// TODO Auto-generated catch blocke.printStackTrace();}}public void deleteAccount(Integer accountId) {// TODO Auto-generated method stubtry {runner.update("delete from account where id=?",accountId);} catch (SQLException e) {// TODO Auto-generated catch blocke.printStackTrace();}}}
AccountServiceImpl.java
package com.spring_demo_ann_JDBC.service.impl;import java.util.List;import org.springframework.beans.factory.annotation.Autowired;import org.springframework.stereotype.Service;import com.spring_demo_ann_JDBC.dao.IAccountDao;import com.spring_demo_ann_JDBC.domain.Account;import com.spring_demo_ann_JDBC.service.IAccountService;/*** 业务层接口实现类* 业务层可以调用持久层所提供的访问数据库方法,并且可以做一些处理。* @author:wu linchun* @time:2021/01/17 上午11:10:12**/@Service("accountService")public class AccountServiceImpl implements IAccountService {@Autowiredprivate IAccountDao accountDao;public List<Account> findAllAccount() {// TODO Auto-generated method stub/* 业务层可以调用持久层,写业务代码 *//* xxxxxxx */return accountDao.findAllAccount();}public Account findAccountById(Integer accountId) {// TODO Auto-generated method stubreturn accountDao.findAccountById(accountId);}public void saveAccount(Account account) {// TODO Auto-generated method stubaccountDao.saveAccount(account);}public void updateAccount(Account account) {// TODO Auto-generated method stubaccountDao.updateAccount(account);}public void deleteAccount(Integer accountId) {// TODO Auto-generated method stubaccountDao.deleteAccount(accountId);}}
JdbcConfig.java
package config;import javax.sql.DataSource;import org.apache.commons.dbutils.QueryRunner;import org.springframework.beans.factory.annotation.Qualifier;import org.springframework.beans.factory.annotation.Value;import org.springframework.context.annotation.Bean;import org.springframework.context.annotation.Scope;import com.mchange.v2.c3p0.ComboPooledDataSource;/*** 和spring连接数据库相关的配置类** @author:wu linchun* @time:2021/01/17 下午12:24:37**/public class JdbcConfig {@Value("${jdbc.driver}")private String driver;@Value("${jdbc.url}")private String url;@Value("${jdbc.username}")private String username;@Value("${jdbc.password}")private String password;/*** 用于创建一个QueryRunner对象** @param dataSource* @return*/@Bean(name = "runner")@Scope("prototype") //多实例public QueryRunner createQueryRunner(@Qualifier("ds2") DataSource dataSource) {return new QueryRunner(dataSource);}/*** 创建数据源对象** @return*/@Bean(name = "ds2")public DataSource createDataSource() {try {ComboPooledDataSource ds = new ComboPooledDataSource();ds.setDriverClass(driver);ds.setJdbcUrl(url);ds.setUser(username);ds.setPassword(password);return ds;} catch (Exception e) {throw new RuntimeException(e);}}/*@Bean(name = "ds1")public DataSource createDataSource1() {try {ComboPooledDataSource ds = new ComboPooledDataSource();ds.setDriverClass(driver);ds.setJdbcUrl("jdbc:mysql://localhost:3306/ssm");ds.setUser(username);ds.setPassword(password);return ds;} catch (Exception e) {throw new RuntimeException(e);}}*/}
package config;import org.springframework.context.annotation.ComponentScan;import org.springframework.context.annotation.Configuration;import org.springframework.context.annotation.Import;import org.springframework.context.annotation.PropertySource;@Configuration@ComponentScan("com.spring_demo_ann_JDBC")@Import(JdbcConfig.class)@PropertySource("classpath:jdbcConfig.properties")public class SpringConfiguration {}
jdbcConfig.properties
jdbc.driver=com.mysql.jdbc.Driverjdbc.url=jdbc:mysql://localhost:3306/ssmjdbc.username=rootjdbc.password=123456
2.4、基于XML的jdbc实现
参考代码下载地址:https://gitee.com/wulinchun/ssm-learning/tree/master/ (基于xml的jdbc实现代码示例)
2.4.1、maven项目的目录结构

2.4.2、代码片段
AccountDaoImpl.java
package com.spring_demo_xml_JDBC.dao.impl;import java.sql.SQLException;import java.util.List;import org.apache.commons.dbutils.QueryRunner;import org.apache.commons.dbutils.handlers.BeanHandler;import org.apache.commons.dbutils.handlers.BeanListHandler;import com.spring_demo_xml_JDBC.dao.IAccountDao;import com.spring_demo_xml_JDBC.domain.Account;/*** 持久层实现类** @author:wu linchun* @time:2020-01-15下午5:01:29*/public class AccountDaoImpl implements IAccountDao {private QueryRunner runner;public AccountDaoImpl(QueryRunner runner) {super();this.runner = runner;}public List<Account> findAllAccount() {// TODO Auto-generated method stubtry {return runner.query("select * from account", new BeanListHandler<Account>(Account.class));} catch (SQLException e) {// TODO Auto-generated catch blocke.printStackTrace();}return null;}public Account findAccountById(Integer accountId) {// TODO Auto-generated method stubtry {return (Account) runner.query("select * from account where id=?",new BeanHandler<Account>(Account.class), accountId);} catch (SQLException e) {// TODO Auto-generated catch blocke.printStackTrace();}return null;}public void saveAccount(Account account) {// TODO Auto-generated method stubtry {runner.update("insert into account values(?,?,?)", account.getId(), account.getName(), account.getMoney());} catch (SQLException e) {// TODO Auto-generated catch blocke.printStackTrace();}}public void updateAccount(Account account) {// TODO Auto-generated method stubtry {runner.update("update account set name=?,money=? where id=?", account.getName(),account.getMoney(), account.getId());} catch (SQLException e) {// TODO Auto-generated catch blocke.printStackTrace();}}public void deleteAccount(Integer accountId) {// TODO Auto-generated method stubtry {runner.update("delete from account where id=?", accountId);} catch (SQLException e) {// TODO Auto-generated catch blocke.printStackTrace();}}}
AccountServiceImpl.java
package com.spring_demo_xml_JDBC.service.impl;import java.util.List;import com.spring_demo_xml_JDBC.dao.IAccountDao;import com.spring_demo_xml_JDBC.domain.Account;import com.spring_demo_xml_JDBC.service.IAccountService;/**** @author:wu linchun* @time:2020-01-15下午4:56:23**/public class AccountServiceImpl implements IAccountService {private IAccountDao accountDao;public void setAccountDao(IAccountDao accountDao) {this.accountDao = accountDao;}public List<Account> findAllAccount() {// TODO Auto-generated method stub/* 业务层可以调用持久层,写业务代码 *//* xxxxxxx */return accountDao.findAllAccount();}public Account findAccountById(Integer accountId) {// TODO Auto-generated method stubreturn accountDao.findAccountById(accountId);}public void saveAccount(Account account) {// TODO Auto-generated method stubaccountDao.saveAccount(account);}public void updateAccount(Account account) {// TODO Auto-generated method stubaccountDao.updateAccount(account);}public void deleteAccount(Integer accountId) {// TODO Auto-generated method stubaccountDao.deleteAccount(accountId);}}
QueryRunnerTest.java
package spring_demo_xml_JDBC;import java.util.List;import org.junit.Test;import org.springframework.context.support.ClassPathXmlApplicationContext;import org.springframework.context.support.FileSystemXmlApplicationContext;import com.spring_demo_xml_JDBC.domain.Account;import com.spring_demo_xml_JDBC.service.impl.AccountServiceImpl;/**** @author:wu linchun* @time:2020/01/15 下午5:33:43**/public class QueryRunnerTest {ClassPathXmlApplicationContext ac = new ClassPathXmlApplicationContext("bean.xml");AccountServiceImpl as=(AccountServiceImpl)ac.getBean("accountService");/*** 测试是否可以获取bean配置*/@Testpublic void testBeanXml() {ClassPathXmlApplicationContext applicationContext = new ClassPathXmlApplicationContext("bean.xml");ClassPathXmlApplicationContext applicationContext1 = new ClassPathXmlApplicationContext("bean.xml");/** FileSystemXmlApplicationContext applicationContext=new* FileSystemXmlApplicationContext("C:\\Program Files\\eclipse-workspace\\spring_demo_xml_JDBC\\src\\main\\resources\\bean.xml"* );*//** FileSystemXmlApplicationContext applicationContext1=new* FileSystemXmlApplicationContext("C:\\Program Files\\eclipse-workspace\\spring_demo_xml_JDBC\\src\\main\\resources\\bean.xml"* );*/System.out.println(applicationContext.toString());System.out.println(applicationContext == applicationContext1);}@Testpublic void testFindAll() {// 3.执行方法List<Account> accounts = as.findAllAccount();for (Account account : accounts) {System.out.println(account);}}@Testpublic void testFindAccountById(){Account account=as.findAccountById(1);System.out.println(account.toString());}@Testpublic void testSaveAccount(){Account account=new Account(7,"ggg",1000f);as.saveAccount(account);}@Testpublic void testUpdateAccount(){Account account=new Account(7,"ggg",2000f);as.updateAccount(account);}@Testpublic void testDeleteAccount(){as.deleteAccount(7);}}
3、Spring事务
事务:是逻辑上一组操作,要么全都成功,要么全都失败。事务包含:原子性(Atomicity)、一致性(Consistency)、隔离性(Isolation)、持久性(Durability)
- 原子性(Atomicity):事务不可分割
- 一致性(Consistency):事务执行的前后,数据完整性保持一致
- 隔离性(Isolation):一个事务执行的时候,不应该受到其他事务的打扰
- 持久性(Durability):一旦结束,数据就永久的保存到数据库
3.1、使用ThreadLocal管理Spring事务
这里只展示一个demo,使用ThreadLocal管理Spring事务,实现事务回滚,确保数据的一致性。关于ThreadLocal类的更多详细请看 https://www.zhihu.com/question/341005993
这是一个实现转账的功能


为了解决这个问题,就必须使用事务回滚机制,即在发生异常时,将已经修改了的数据进行回滚,使数据恢复到原来的状态。
关键代码
MyConnectionUtils.java
package com.spring_demo_routine.utils;import org.springframework.stereotype.Service;import java.sql.Connection;import javax.sql.DataSource;import java.sql.SQLException;/*** @description: 连接的工具类,它用于从数据源中获取一个连接,并且实现和线程的绑定* @author: wu linchun* @time: 2021/1/16 11:58*/public class MyConnectionUtils {//ThreadLocal作用主要是做线程隔离,确保线程安全。//Spring采用Threadlocal的方式,来保证单个线程中的数据库操作使用的是同一个数据库连接。//如果某个用户频繁使用数据库,那么就需要建立多次链接和关闭,服务器可能会吃不消//ThreadLocal可以为每一个用户单独创建一个连接对象,这样就不必该用户每次访问数据库JVM都给new一个连接对象了。private ThreadLocal<Connection> t1=new ThreadLocal<Connection>();private DataSource dataSource;public void setDataSource(DataSource dataSource) {this.dataSource = dataSource;}/*** 获取当前线程上的连接* @return* @throws SQLException*/public Connection getThreadConnection() throws SQLException {//先从ThreadLocal上获取Connection conn=t1.get();//判断当前线程上是否有连接if(conn==null){//从数据源中获取一个连接,并且存入ThreadLocal中conn=dataSource.getConnection();t1.set(conn);}//返回当前线程上的连接return conn;}/*** 把连接和线程解绑*/public void removeConnection(){t1.remove();}}
AccountDaoImpl.java
package com.spring_demo_routine.dao.impl;import com.mchange.v1.db.sql.ConnectionUtils;import com.spring_demo_routine.dao.IAccountDao;import com.spring_demo_routine.domain.Account;import com.spring_demo_routine.utils.MyConnectionUtils;import org.apache.commons.dbutils.QueryRunner;import org.apache.commons.dbutils.handlers.BeanHandler;import org.apache.commons.dbutils.handlers.BeanListHandler;import org.springframework.beans.factory.annotation.Autowired;import org.springframework.stereotype.Repository;import java.sql.SQLException;import java.util.List;/*** @description: 账户接口实现类* @author: wu linchun* @time: 2021/1/16 11:53*/public class AccountDaoImpl implements IAccountDao {private QueryRunner runner;private MyConnectionUtils connectionUtils;public void setRunner(QueryRunner runner) {this.runner = runner;}public void setConnectionUtils(MyConnectionUtils connectionUtils) {this.connectionUtils = connectionUtils;}public List<Account> findAllAccount() throws SQLException {return runner.query(connectionUtils.getThreadConnection(),"select * from account",new BeanListHandler<Account>(Account.class));}public Account findAccountById(Integer accountId) throws SQLException {return runner.query(connectionUtils.getThreadConnection(),"select * from account where id=?",new BeanHandler<Account>(Account.class));}public void saveAccount(Account account) throws SQLException {runner.update(connectionUtils.getThreadConnection(),"insert into account(id,name,money) values(?,?,?)",account.getId(),account.getName(),account.getMoney());}public void updateAccount(Account account) throws SQLException {runner.update(connectionUtils.getThreadConnection(),"update account set name=?, money=? where id=?",account.getName(),account.getMoney(),account.getId());}public void deleteAccount(Integer acccountId) throws SQLException {runner.update(connectionUtils.getThreadConnection(),"delete from account where id=?",acccountId);}public Account findAccountByName(String accountName) throws SQLException {return runner.query(connectionUtils.getThreadConnection(),"select * from account where name = ?",new BeanHandler<Account>(Account.class),accountName);}}
beam.xml
<?xml version="1.0" encoding="UTF-8"?><beans xmlns="http://www.springframework.org/schema/beans"xmlns:xsi="http://www.w3.org/2001/XMLSchema-instance"xsi:schemaLocation="http://www.springframework.org/schema/beanshttp://www.springframework.org/schema/beans/spring-beans.xsd"><!-- 配置Service --><bean id="accountService" class="com.spring_demo_routine.service.impl.AccountServiceImpl"><!-- 注入dao --><property name="accountDao" ref="accountDao"></property></bean><!--配置Dao对象--><bean id="accountDao" class="com.spring_demo_routine.dao.impl.AccountDaoImpl"><!-- 注入QueryRunner --><property name="runner" ref="runner"></property><!-- 注入ConnectionUtils --><property name="connectionUtils" ref="connectionUtils"></property></bean><!--配置QueryRunner--><bean id="runner" class="org.apache.commons.dbutils.QueryRunner" scope="prototype"></bean><!-- 配置数据源 --><bean id="dataSource" class="com.mchange.v2.c3p0.ComboPooledDataSource"><!--连接数据库的必备信息--><property name="driverClass" value="com.mysql.jdbc.Driver"></property><property name="jdbcUrl" value="jdbc:mysql://localhost:3306/ssm"></property><property name="user" value="root"></property><property name="password" value="19980319"></property></bean><!-- 配置Connection的工具类 ConnectionUtils --><bean id="connectionUtils" class="com.spring_demo_routine.utils.MyConnectionUtils"><!-- 注入数据源--><property name="dataSource" ref="dataSource"></property></bean></beans>


发生异常后数据回滚,不会修改

参考代码下载地址:https://gitee.com/wulinchun/ssm-learning/tree/master/ (ssm——spring整理——spring事务(ThreadLocal))
4、Spring AOP
:全称是
Aspect Oriented Programming 即:面向切面编程。AOP可以把我们程序重复的代码抽取出来,在需要执行的时候,使用动态代理的技术,在不修改源码的基础上,对我们的已有方法进行增强。

AOP的作用及优势:
4.1、使用AOP动态代理实现方法功能增强的一个demo
参考代码下载地址:https://gitee.com/wulinchun/ssm-learning/tree/master/ (ssm——spring整理——springAOP(xml配置))
4.1.1、使用XML配置
关键代码
AccountServiceImpl.java
package com.spring_AOP_xml_demo.service.impl;import com.spring_AOP_xml_demo.domain.Account;import com.spring_AOP_xml_demo.service.IAccountService;/*** @description: 业务层实现接口* @author: wu linchun* @time: 2021/1/17 14:12*/public class AccountServiceImpl implements IAccountService {/*** 要被增强的方法:给saveAccount,updateAccount,deleteAccount方法都增加一个打印日志的功能*/public void saveAccount() {System.out.println("执行了保存账户");}public void updateAccount(Account account) {System.out.println("执行了修改账户");}public void deleteAccount() {System.out.println("执行了删除账户");}}
package com.spring_AOP_xml_demo.utils;/*** @description: 模拟日志打印* @author: wu linchun* @time: 2021/1/17 14:07*/public class MyLogger {public void printLog(){System.out.println("打印了日志");}}
bean.xml
<?xml version="1.0" encoding="UTF-8"?><beans xmlns="http://www.springframework.org/schema/beans"xmlns:xsi="http://www.w3.org/2001/XMLSchema-instance"xmlns:aop="http://www.springframework.org/schema/aop"xsi:schemaLocation="http://www.springframework.org/schema/beanshttp://www.springframework.org/schema/beans/spring-beans.xsdhttp://www.springframework.org/schema/aophttp://www.springframework.org/schema/aop/spring-aop.xsd"><bean id="iaccountService" class="com.spring_AOP_xml_demo.service.IAccountService" abstract="true"></bean><bean id="accountService" class="com.spring_AOP_xml_demo.service.impl.AccountServiceImpl"></bean><bean id="mylogger" class="com.spring_AOP_xml_demo.utils.MyLogger"></bean><!-- <!–配置AOP–><aop:config><!–配置切面–><aop:aspect id="logAdvice" ref="mylogger"><!– 配置通知的类型,并且建立通知方法和切入点方法的关联(指定类指定方法)–><aop:after method="printLog" pointcut="execution(public void com.spring_AOP_xml_demo.service.impl.AccountServiceImpl.saveAccount())"></aop:after></aop:aspect></aop:config>--><!--配置AOP--><aop:config><!--配置切面--><aop:aspect id="logAdvice" ref="mylogger"><!-- 配置通知的类型,并且建立通知方法和切入点方法的关联(指定类中的所有方法)--><aop:after method="printLog"pointcut="execution(* com.spring_AOP_xml_demo.service.impl.*.*(..))"></aop:after></aop:aspect></aop:config></beans>
测试一下:
package spring_AOP_xml_demo;import com.spring_AOP_xml_demo.domain.Account;import com.spring_AOP_xml_demo.service.IAccountService;import com.spring_AOP_xml_demo.service.impl.AccountServiceImpl;import org.junit.Test;import org.springframework.context.support.ClassPathXmlApplicationContext;/*** @description: AOP测试* @author: wu linchun* @time: 2021/1/17 14:38*/public class AopTest {ClassPathXmlApplicationContext ac=new ClassPathXmlApplicationContext("bean.xml");//AccountServiceImpl as= (AccountServiceImpl) ac.getBean("accountService");//注意!!!这里要用IAccountService声明,不能使用AccountServiceImpl,否则会报类型转换异常// 因为AccountServiceImpl实现接口IAccountService,但并没有注入接口IAccountServiceIAccountService ias=(IAccountService)ac.getBean("accountService");Account account=new Account();@Testpublic void testSaveAccount(){//as.saveAccount();ias.saveAccount();}@Testpublic void testUpdateAccount(){ias.updateAccount(account);}@Testpublic void testDeleteAccount(){ias.deleteAccount();}@Testpublic void testAll(){ias.saveAccount();ias.updateAccount(account);ias.deleteAccount();}}

关于AOP配置步骤说明:
1、把通知类用 bean 标签配置起来

2、使用aop:config标签表明开始AOP的配置。
3、使用aop:aspect标签表明配置切面。id属性:是给切面提供一个唯一标识 。ref属性:是指定通知类bean的Id。
4、使用 aop:pointcut 配置切入点表达式。expression属性:用于定义切入点表达式。 id属性:用于给切入点表达式提供一个唯一标识。
5、使用 aop:xxx 配置对应的通知类型。aop:before:前置通知。 aop:after:后置通知。 aop:around:环绕通知(可以手动控制增强代码什么时候执行)。
4.1.1、使用注解配置
参考代码下载地址:https://gitee.com/wulinchun/ssm-learning/tree/master/ (ssm——spring整理——springAOP(注解配置))
关键代码
SpringConfiguration.java
package config;import org.springframework.context.annotation.ComponentScan;import org.springframework.context.annotation.Configuration;import org.springframework.context.annotation.EnableAspectJAutoProxy;/**** 配置类* @author:wu linchun* @time:2021/01/18下午2:12:07**/@Configuration@ComponentScan(basePackages="com.spring_AOP_annotation_demo")@EnableAspectJAutoProxypublic class SpringConfiguration {}
MyLogger.java
package com.spring_AOP_annotation_demo.utils;import org.aspectj.lang.ProceedingJoinPoint;import org.aspectj.lang.annotation.After;import org.aspectj.lang.annotation.AfterReturning;import org.aspectj.lang.annotation.Around;import org.aspectj.lang.annotation.Aspect;import org.aspectj.lang.annotation.Before;import org.aspectj.lang.annotation.Pointcut;import org.springframework.stereotype.Component;/**** 用于记录日志的工具类,它里面提供了公共的代码** @author:wu linchun* @time:2021/01/18上午10:51:37**/@Component("mylogger")@Aspect // 表示当前类是一个切面类public class MyLogger {// 配置切入点@Pointcut("execution(* com.spring_AOP_annotation_demo.service.impl.*.*(..))")private void pt1() {}/*** 前置通知*/@Before("pt1()")public void beforePrintLog() {System.out.println("前置通知MyLogger类中beforePrintLog()打印了日志");}// 后置通知和异常通知是互斥的,spring基于注解的AOP配置中,这四个通知类型的调用确实有顺序问题。/*** 后置通知*/@AfterReturning("pt1()")public void afterPrintLog() {System.out.println("后置通知MyLogger类中afterPrintLog()打印了日志");}/*** 最终通知*/@After("pt1()")public void finalPrintLog() {System.out.println("最终通知MyLogger类中的afterPrintLog方法开始记录日志了。。。");}/*** 环绕通知 问题: 当我们配置了环绕通知之后,切入点方法没有执行,而通知方法执行了。 分析:* 通过对比动态代理中的环绕通知代码,发现动态代理的环绕通知有明确的切入点方法调用,而我们的代码中没有。 解决:* Spring框架为我们提供了一个接口:ProceedingJoinPoint。该接口有一个方法proceed(),此方法就相当于明确调用切入点方法。* 该接口可以作为环绕通知的方法参数,在程序执行时,spring框架会为我们提供该接口的实现类供我们使用。** spring中的环绕通知: 它是spring框架为我们提供的一种可以在代码中手动控制增强方法何时执行的方式。* @throws Throwable*/@Around("pt1()")public void aroundPringLog(ProceedingJoinPoint pjp) throws Throwable {System.out.println("环绕通知——前置通知MyLogger类中beforePrintLog()打印了日志");pjp.proceed(); //被功能增强的程序执行System.out.println("环绕通知——后置通知MyLogger类中beforePrintLog()打印了日志");}}
AccountServiceImpl.java
package com.spring_AOP_annotation_demo.service.impl;import org.springframework.stereotype.Service;import com.spring_AOP_annotation_demo.service.IAccountService;/***** @author:wu linchun* @time:2021/01/18上午10:57:15**/@Service("accountService")public class AccountServiceImpl implements IAccountService {public void saveAccount() {// TODO Auto-generated method stubSystem.out.println("执行了保存");}public void updateAccount(int i) {// TODO Auto-generated method stubSystem.out.println("执行了更新");}public int deleteAccount() {// TODO Auto-generated method stubSystem.out.println("执行了删除");return 0;}}
注意:后置通知和异常通知是互斥的,spring基于注解的AOP配置中,这四个通知类型的调用确实有顺序问题。所以如果使用注解配置AOP,建议使用环绕通知的方式,确保顺序正确。
4.2、Spring AOP实现对方法的事务管理
参考代码下载地址:https://gitee.com/wulinchun/ssm-learning/tree/master/ (ssm——spring整理——使用 AOP实现对方法的事务管理)
5、Spring总结
这篇文章是通过学习b站上ssm视频课程,然后对一些知识点做了一些整理。无论是mybatis还是spring,框架的出现除了简化编程少写些代码,最终目的是为了线程安全。解决在大量频繁访问的情况下,确保服务器的JVM能够正常运行。在面向对象的程序中,不可避免会引用到许多的对象,以java为例,如果每次用到某个类的话,都需new一个对象,而new一个对象就相当于在内存中开辟一块空间。当程序足够复杂,需要new的对象足够多时,显然程序每次运行时new的对象都会占据内存的很大一部分空间。虽然JVM有着良好高效的垃圾回收机制,但是如果是大量的,频繁的操作,显然会导致服务器的内存空间在短时间内迅速被占满。这就会影响系统的性能,甚至造成死锁,服务器宕机。虽然框架中,spring工厂中的对象还是会在内存中预占有相当的空间,但是工厂中的对象是共享的,可以用“共享单车”来类比一下。对象相当于自行车,不需要每个人都要自己买一部自行车,每个人不是在任何时候都会使用到自行车。将自行车放在工厂中,需要的话由IOC统一配给,用完再还回去。显然当程序日益复杂,业务日益庞大的时候,如何优化调度,确保资源能被最大化利用,确保资源能被及时配给,这就是框架所需不断升级改进的地方。
6、参考资料
- https://www.cnblogs.com/NancyStartOnce/p/6813162.html
- https://www.zhihu.com/question/20794107
- https://www.zhihu.com/question/341005993
ssm——spring整理的更多相关文章
- maven/eclipse搭建ssm(spring+spring mvc+mybatis)
maven/eclipse搭建ssm(spring+spring mvc+mybatis) 前言 本文旨在利用maven搭建ssm环境,而关于maven的具体内容,大家可以去阅读<Maven 实 ...
- SSM Spring+SpringMVC+mybatis+maven+mysql环境搭建
SSM Spring+SpringMVC+mybatis+maven环境搭建 1.首先右键点击项目区空白处,选择new->other..在弹出框中输入maven,选择Maven Project. ...
- SSM(Spring + Springmvc + Mybatis)框架面试题
JAVA SSM框架基础面试题https://blog.csdn.net/qq_39031310/article/details/83050192 SSM(Spring + Springmvc + M ...
- SSM(Spring +SpringMVC + Mybatis)框架搭建
SSM(Spring +SpringMVC + Mybatis)框架的搭建 最近通过学习别人博客发表的SSM搭建Demo,尝试去搭建一个简单的SSMDemo---实现的功能是对用户增删改查的操作 参考 ...
- SSM(Spring+SpringMVC+Mybatis)框架环境搭建(整合步骤)(一)
1. 前言 最近在写毕设过程中,重新梳理了一遍SSM框架,特此记录一下. 附上源码:https://gitee.com/niceyoo/jeenotes-ssm 2. 概述 在写代码之前我们先了解一下 ...
- SSM Spring +SpringMVC+Mybatis 整合配置 及pom.xml
SSM Spring +SpringMVC+Mybatis 配置 及pom.xml SSM框架(spring+springMVC+Mybatis) pom.xml文件 maven下的ssm整合配置步骤
- SSM(Spring,SpringMVC,Mybatis)框架整合项目
快速上手SSM(Spring,SpringMVC,Mybatis)框架整合项目 环境要求: IDEA MySQL 8.0.25 Tomcat 9 Maven 3.6 数据库环境: 创建一个存放书籍数据 ...
- SSM:spring+springmvc+mybatis框架中的XML配置文件功能详细解释(转)
原文:https://blog.csdn.net/yijiemamin/article/details/51156189# 这几天一直在整合SSM框架,虽然网上有很多已经整合好的,但是对于里面的配置文 ...
- SSM:spring+springmvc+mybatis框架中的XML配置文件功能详细解释
这几天一直在整合SSM框架,虽然网上有很多已经整合好的,但是对于里面的配置文件并没有进行过多的说明,很多人知其然不知其所以然,经过几天的搜索和整理,今天总算对其中的XML配置文件有了一定的了解,所以拿 ...
- ssm(spring,springmvc,mybatis)
1.配置web.xml <?xml version="1.0" encoding="UTF-8"?> <web-app version=&qu ...
随机推荐
- POJ1185 [NOI2001] 炮兵阵地 (状压DP)
又是一道有合法性检测的状压题. dp[i][j][k]表示第i行状态为j,i-1行状态为k时前i行放置的最大数量. 注意22行统计二进制数中1的个数时的巧妙方法. 1 #include<cstd ...
- 洛谷P2880 [USACO07JAN] Balanced Lineup G(树状数组/线段树)
维护区间最值的模板题. 1.树状数组 1 #include<bits/stdc++.h> 2 //树状数组做法 3 using namespace std; 4 const int N=5 ...
- 15 Uncaught TypeError: Cannot set properties of null (setting ‘onclick‘)
1.报错的代码 <!DOCTYPE html> <html> <head> <meta charset="utf-8"> <t ...
- "一键重装系统软件"操作流程
博主之前重装系统都是直接用win10系统更新里的重置系统(版本不会变化),和U盘重装电脑出厂映像(有各种品牌自带的软件,而且由于是出场版本,版本很低) 所以这次用"小白一键重装系统" ...
- 1.Python面向对象基础
面向对象(OOP) 面向对象编程--object oriented programming 简写 OOP 面向过程和面向对象的区别: 面向过程: 1.把完成某一个需求的所有步骤从头到尾逐步实现 2 ...
- wpf下的图片放大缩小
WPF下实现图片的放大缩小移动 在windows 7里面有自带的图片查看器,这个软件可以打开一张图片然后以鼠标在图片中的焦点为原点来进行缩放,并且放大后可以随意拖动.下面我们在WPF中实现这个功能 ...
- Linux系统命令基础
Linux系统命令基础 前面咱们已经成功安装了Linux系统--centos7,那么现在奔向Linux命令行的世界. Linux命令格式 1.一般情况下,[参数]是可选的,一些情况下[文件或路径]也是 ...
- Codeforces Round #812 (Div. 2) E(并查集)
种类并查集:定义种类之间的关系来判断操作是否进行 题目大意:对于题目给出的一个矩阵,我们可以进行一种操作:swap(a[i][j],a[j][i]) 使得矩阵可以变换为字典序最小的矩阵 思路: 通过扫 ...
- JUC学习笔记——共享模型之内存
JUC学习笔记--共享模型之内存 在本系列内容中我们会对JUC做一个系统的学习,本片将会介绍JUC的内存部分 我们会分为以下几部分进行介绍: Java内存模型 可见性 模式之两阶段终止 模式之Balk ...
- Java-(array)数组的基本概念 及 Java内存划分
(array)数组的基本概念 数组的概念:是一种容器,可同时存放多个数据值 数组的特点: 1.数组是一种引用数据类型 2.数组当中的多个数据,类型必须统一 3.数组的长度在程序运行期间不可改变 数组的 ...
