ansible使用临时命令通过模块来执行任务
使用临时命令通过模块来执行任务
一、查看系统上安装的所有模块
ansible-doc -l
查看ping模块帮助文档
ansible-doc ping
1、ansible模块
文件模块:
copy:将本地文件复制到受控主机
file:设置文件的权限和其他属性
lineinfile:确保特定行是否在文件中,也就是说修改文件内容
synchronize:使用rsync同步内容
软件包模块
package:使用操作系统本机的自动检测软件包管理器管理软件包
yum:使用yum软件包管理器管理软件包
apt:使用apt软件包管理器管理软件包
dnf:使用dnf软件包管理器管理软件包
pip:从PyPI管理Python软件包
系统模块
firewalld:使用firewalld管理任意端口和服务
reboot:重新启动计算机
service:管理服务
user:添加、删除和管理用户账户
Net Tools模块
get_url:通过http、https或者ftp下载文件
nmcli:管理网络
uri:与WEB服务交互
语法:
ansible bgx -m command -a 'df -h'
命令 主机名称 指定模块 模块名称 模块动作 具体命令
执行的状态返回信息:
绿色:执行成功并且不需要做改变的动作
黄色:执行成功并且对目标主机做变更
红色:执行失败
常用模块
案例1:user
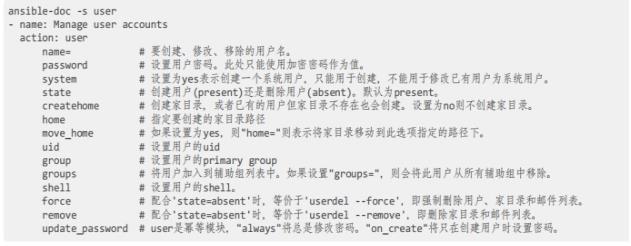
临时命令使用user模块来确保newbie用户存在于node1.example.com上,并且其UID为4000
[galaxy@server ~]$ ansible server1 -m user -a 'name=newbie uid=4000 state=present'
创建用户并指定密码,如果该用户存在,仍然修改密码
[galaxy@server ~]$ openssl passwd -1 linux

$1$bChlQ4jX$97x50MlATs0PA6UsObqN1.

[galaxy@server ~]$ ansible all -m user -a 'name=chenyu state=present password="$1$bChlQ4jX$97x50MlATs0PA6UsObqN1." update_password=always'
创建用户并指定密码,但是如果改用户存在,则不修改密码
[galaxy@server ~]$ openssl passwd -1 redhat

$1$zcVeWQiB$dIsAdkcv91mTjrCaayN3F/

[galaxy@server ~]$ ansible all -m user -a 'name=chenyu12 state=present password="$1$zcVeWQiB$dIsAdkcv91mTjrCaayN3F/"  update_password=on_create'
案例2:shell
临时命令使用shell模块来删除node1.example.com节点中的用户newbie
ansible server1 -m shell -a ‘userdel -r newbie’
案例3:copy
ansible webserver -m copy -a ‘src=/etc/fstab dest=/var/tmp/fstab’
ansible webserver -m copy -a ‘src=/etc/fstab dest=/var/tmp/fstab group=chenyu owner=chenyu’

案例4:template模块---template模块用法和copy模块用法基本一致,它主要用于复制配置文件
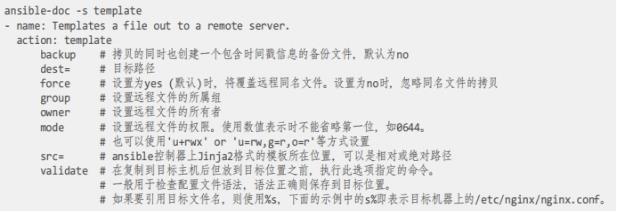
ansible all -m template -a 'src=/usr/share/doc/httpd/httpd-vhosts.conf dest=/etc/httpd/conf.d/httpd-vhosts.conf group=root owner=root mode=0644 '
案例5:file 修改文件的权限属性和context值
ansible webserver -m file -a 'path=/var/tmp/fstab mode=g+w mode=o+w group=galaxy owner=galaxy setype=samba_share_t'
mode:设置权限可以是mode=g+w 也可以是mode=666
group:设置文件的所属组
owner:设置文件的所有者
setype:修改文件的context值
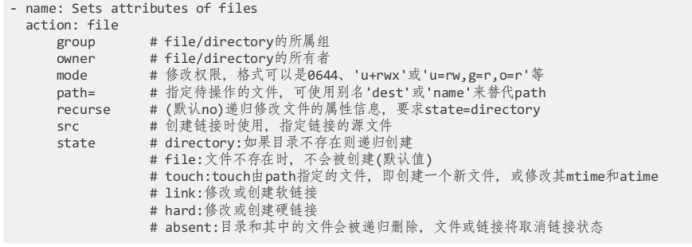
新建文件
ansible webserver -m file -a 'path=/var/tmp/bbb state=touch'
新建目录
ansible webserver -m file -a 'path=/var/tmp/cc state=directory'
删除文件或者目录
ansible webserver -m file -a 'path=/var/tmp/cc state=absent'
创建软链接
ansible webserver -m file -a 'dest=/var/tmp/chenyu src=/var/tmp/bbb state=link'
创建硬链接
ansible webserver -m file -a 'dest=/var/tmp/chenyu1 src=/var/tmp/aaa state=hard'
案例6:lineinfile
把abc开头的一行换成 bbbbb
ansible webserver -m lineinfile -a 'dest=/tmp/cy regexp=abc line=bbbbb'
在某一行前面插入一行新数据---insertbefore
ansible webserver -m lineinfile -a 'dest=/tmp/cy insertbefore="aa(.*)" line=chenyu'
在某一行后面插入一行新数据---insertafter
ansible webserver -m lineinfile -a 'dest=/tmp/cy insertafter="aaaa(.*)" line=bbbb'
删除某一行
ansible webserver -m lineinfile -a 'dest=/tmp/cy regexp="aaa(.*)" state=absent'
案例7:yum_repository模块-----配置yum仓库
ansible webserver -m yum_repository -a 'file=server name=baseos description=rhel8 baseurl=file:///mnt/BaseOS enabled=yes gpgcheck=no'
ansible webserver -m yum_repository -a 'file=server name=appstream description=RHEL8 baseurl=file:///mnt/AppStream enabled=yes gpgcheck=no'

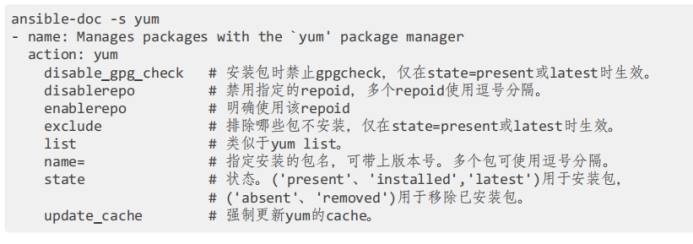
案例8:yum模块----yum安装与卸载
state:present、installed、latest安装
absent、removed卸载
ansible all -m yum -a 'name=httpd state=installed' ----------------安装
ansible all -m yum -a 'name=httpd state=removed' ----------------卸载
案例9:service模块

重启httpd服务并设置下次启动生效
ansible all -m service -a 'name=httpd state=started enabled=yes'
案例10:fetch—拉取文件模块
和copy工作方式类似,只不过是从远程主机将文件拉取到本地端,存储时使用主机名作为目录树,且只能拉取文件,不能拉取目录

将远程主机的/etc/fstab文件拉取到本地来,存储的名字为/tmp/node1(node2)/etc/fstab
ansible all -m fetch -a 'src=/etc/fstab dest=/tmp'
将某台远程主机的/etc/fstab文件拉取到本地来,存储的名字为/tmp/fstab
ansible node1 -m fetch -a 'src=/etc/fstab dest=/tmp/ flat=yes'
将远程主机的/etc/fstab文件拉取到本地来,存储的名字为/tmp/fstab-node1(node2)
ansible all -m fetch -a 'src=/etc/fstab dest=/tmp/fstab-{{inventory_hostname}} flat=yes'
案例11:firewalld模块
允许http流量的传入
ansible all -m firewalld -a 'service=http permanent=yes state=enabled immediate=yes'
富规则 允许172.16.30.0/24主机http流量的传入
ansible all -m firewalld -a ‘zone=public rich_rule="rule family=ipv4 source address=172.16.30.0/24 service name=http accept" permanent=yes state=enabled immediate=yes'
案例12:replace模块
replace模块可以根据我们指定的正则表达式替换文件中的字符串,文件中所有被匹配的字符串都会被替换
参数:
path参数:2.3版本之前只能用dest、destfile、name指定操作文件,2.4版本中仍然可以用这些参数名,也可以用path
regexp参数:必须参数,指定一个python正则表达式,文件中与正则匹配的字符串将会被替换
replace参数:指定最终要替换成的字符串
backup参数:是否在修改文件之前对文件进行备份,最好设置为yes。
将/tmp/cy文件中的“abc”替换成“yyy”
ansible all -m replace -a 'path=/tmp/cy regexp="abc" replace="yyy"'
将/tmp/cy文件中的“yyy”替换成“iii”,且把替换前的/tmp/cy文件备份
ansible all -m replace -a 'path=/tmp/cy regexp="yyy" replace="iii" backup=yes'
案例13:parted模块
新建扩展分区
ansible node1 -m parted -a 'device=/dev/sda number=4 part_type=extended part_start=46GiB part_end=49.8GiB state=present'
新建逻辑分区ansible node1 -m parted -a 'device=/dev/sda number=5 part_type=logical part_start=46.1GiB part_end=48.2GiB state=present'
案例14:filesystem—文件系统
ansible node1 -m filesystem -a 'fstype=xfs dev=/dev/sda5'
案例15:mount---挂载
新建挂载点/common
ansible node1 -m file -a 'path=/common state=directory'
查看/dev/sda5的UUID
ansible node1 -m shell -a 'blkid /dev/sda5'
将分区/dev/sda5挂载到/common目录
ansible node1 -m mount -a 'path=/common src="UUID=d162b8b9-2326-4ee4-a559-80861461c4f0" fstype=xfs state=mounted'
卸载
ansible node1 -m mount -a 'path=/common src="UUID=d162b8b9-2326-4ee4-a559-80861461c4f0" fstype=xfs state=absent'
案例16:lvg—新建卷组
ansible node1 -m lvg -a 'vg=vg0 pesize=16M pvs=/dev/sda5'
案例17:lvol—新建逻辑卷
ansible node1 -m lvol -a 'lv=lv0 size=1000M vg=vg0'
在线扩容逻辑卷
ansible node1 -m lvol -a 'lv=lv0 size=1600M vg=vg0 resizefs=yes'
案例18:sefcontext---修改context值
ansible node1 -m file -a 'path=/share state=directory'
修改context值
ansible node1 -m sefcontext -a 'target="/share(/.*)?" setype=samba_share_t state=present'
应用新的selinux 文件的context值
ansible node1 -m command -a 'restorecon -irv /share'
案例19:debug
用户输出自定义的信息,类似于echo、print等输出命令。ansible中的debug主要用于输出变量值、表达式值,以及用于when条件判断时。使用方式非常简单

案例20:cron---计划任务模块
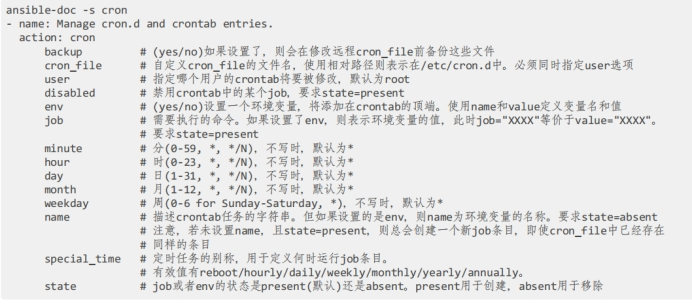
ansible node1 -m cron -a 'name="shuchu" job="/bin/echo I AM RHCE" user=root minute=0 hour=14 state=present'
案例21:get_url

语法:ansible node1 -m get_url -a 'url=需要下载的文件 dest=存放的位置'
部署web服务器
[root@ansible ~]# su - student

Last login: Fri Oct 21 11:08:53 CST 2022 on pts/0

[student@ansible ~]$ cd ansible/
下载本地仓库
[student@ansible ansible]$ ansible node1 -m yum_repository -a 'file=server name=baseos description=centos8 baseurl=file:///mnt/BaseOS enabled=yes gpgcheck=no'

node1 | CHANGED => {

    "ansible_facts": {

        "discovered_interpreter_python": "/usr/libexec/platform-python"

    },

    "changed": true,

    "repo": "baseos",

    "state": "present"

}

[student@ansible ansible]$ ansible node1 -m yum_repository -a 'file=server name=appsteram description=centos8 baseurl=file:///mnt/AppStream enabled=yes gpgcheck=no'

node1 | CHANGED => {

    "ansible_facts": {

        "discovered_interpreter_python": "/usr/libexec/platform-python"

    },

    "changed": true,

    "repo": "appsteram",

    "state": "present"

}
挂载本地仓库
[student@ansible ansible]$ ansible node1 -m mount -a 'src=/dev/cdrom path=/mnt fstype=iso9660 state=mounted'

node1 | CHANGED => {

    "ansible_facts": {

        "discovered_interpreter_python": "/usr/libexec/platform-python"

    },

    "changed": true,

    "dump": "0",

    "fstab": "/etc/fstab",

    "fstype": "iso9660",

    "name": "/mnt",

    "opts": "defaults",

    "passno": "0",

    "src": "/dev/cdrom"

}
下载htppd
[student@ansible ansible]$ ansible node1 -m yum -a 'name=httpd state=installed'

node1 | CHANGED => {

    "ansible_facts": {

        "discovered_interpreter_python": "/usr/libexec/platform-python"

    },

    "changed": true,

    "msg": "",

    "rc": 0,

    "results": [

        "Installed: mailcap-2.1.48-3.el8.noarch",

        "Installed: httpd-2.4.37-30.module_el8.3.0+462+ba287492.0.1.x86_64",

        "Installed: httpd-filesystem-2.4.37-30.module_el8.3.0+462+ba287492.0.1.noarch",

        "Installed: apr-1.6.3-11.el8.x86_64",

        "Installed: httpd-tools-2.4.37-30.module_el8.3.0+462+ba287492.0.1.x86_64",

        "Installed: centos-logos-httpd-80.5-2.el8.noarch",

        "Installed: mod_http2-1.15.7-2.module_el8.3.0+477+498bb568.x86_64",

        "Installed: apr-util-1.6.1-6.el8.x86_64",

        "Installed: apr-util-bdb-1.6.1-6.el8.x86_64",

        "Installed: apr-util-openssl-1.6.1-6.el8.x86_64"

    ]

}
做软链接
[student@ansible ansible]$ ansible node1 -m file -a 'src=/var/www/html dest=/www state=link'

node1 | CHANGED => {

    "ansible_facts": {

        "discovered_interpreter_python": "/usr/libexec/platform-python"

    },

    "changed": true,

    "dest": "/www",

    "gid": 0,

    "group": "root",

    "mode": "0777",

    "owner": "root",

    "size": 13,

    "src": "/var/www/html",

    "state": "link",

    "uid": 0

}

node1中查看

[root@node1 /]# ll -d /www

lrwxrwxrwx 1 root root 13 Oct 24 15:58 /www -> /var/www/html
输入内容
[student@ansible ansible]$ ansible node1 -m shell -a 'echo "my name is luojialong" > /www/index.html'

node1 | CHANGED | rc=0 >>

[student@ansible ansible]$ ansible node1 -m shell -a 'cat /www/index.html'

node1 | CHANGED | rc=0 >>

my name is luojialong
设置httpd服务开机自启
[student@ansible ansible]$ ansible node1 -m service -a 'name=httpd state=started enabled=yes'

node1 | CHANGED => {

    "ansible_facts": {

        "discovered_interpreter_python": "/usr/libexec/platform-python"

    },

    "changed": true,

    "enabled": true,

    "name": "httpd",

    "state": "started",

    "status": {

        "ActiveState": "inactive",

        "AllowedCPUs": "",

        "AllowedMemoryNodes": "",

        "BlockIOAccounting": "no",

        "BlockIOWeight": "[not set]",

        "CPUAccounting": "no",

        "CPUAffinity": "",

        "CPUAffinityFromNUMA": "no",

        "CPUQuotaPerSecUSec": "infinity",

        "CPUQuotaPeriodUSec": "infinity",

        "CPUSchedulingPolicy": "0",

        "CPUSchedulingPriority": "0",

        "CPUSchedulingResetOnFork": "no",

        "CPUShares": "[not set]",

        "CPUUsageNSec": "[not set]",

        "CPUWeight": "[not set]",

        "ControlPID": "0",

        "DefaultMemoryLow": "0",

        "DefaultMemoryMin": "0",

        "Delegate": "no",

        "DevicePolicy": "auto",

        "EffectiveCPUs": "",

        "EffectiveMemoryNodes": "",

        "Environment": "LANG=C",

        "ExecMainCode": "0",

        "ExecMainExitTimestampMonotonic": "0",

        "ExecMainPID": "0",

        "ExecMainStartTimestampMonotonic": "0",

        "ExecMainStatus": "0",

        "ExecReload": "{ path=/usr/sbin/httpd ; argv[]=/usr/sbin/httpd $OPTIONS -k graceful ; ignore_errors=no ; start_time=[n/a] ; stop_time=[n/a] ; pid=0 ; code=(null) ; status=0/0 }",

        "ExecStart": "{ path=/usr/sbin/httpd ; argv[]=/usr/sbin/httpd $OPTIONS -DFOREGROUND ; ignore_errors=no ; start_time=[n/a] ; stop_time=[n/a] ; pid=0 ; code=(null) ; status=0/0 }",

        "FileDescriptorStoreMax": "0",

        "GID": "[not set]",

        "GuessMainPID": "yes",

        "IOAccounting": "no",

        "IOSchedulingClass": "0",

        "IOSchedulingPriority": "0",

        "IOWeight": "[not set]",

        "IPAccounting": "no",

        "IPEgressBytes": "18446744073709551615",

        "IPEgressPackets": "18446744073709551615",

        "IPIngressBytes": "18446744073709551615",

        "IPIngressPackets": "18446744073709551615",

        "LimitAS": "infinity",

        "LimitASSoft": "infinity",

        "LimitCORE": "infinity",

        "LimitCORESoft": "infinity",

        "LimitCPU": "infinity",

        "LimitCPUSoft": "infinity",

        "LimitDATA": "infinity",

        "LimitDATASoft": "infinity",

        "LimitFSIZE": "infinity",

        "LimitFSIZESoft": "infinity",

        "LimitLOCKS": "infinity",

        "LimitLOCKSSoft": "infinity",

        "LimitMEMLOCK": "65536",

        "LimitMEMLOCKSoft": "65536",

        "LimitMSGQUEUE": "819200",

        "LimitMSGQUEUESoft": "819200",

        "LimitNICE": "0",

        "LimitNICESoft": "0",

        "LimitNOFILE": "262144",

        "LimitNOFILESoft": "1024",

        "LimitNPROC": "2964",

        "LimitNPROCSoft": "2964",

        "LimitRSS": "infinity",

        "LimitRSSSoft": "infinity",

        "LimitRTPRIO": "0",

        "LimitRTPRIOSoft": "0",

        "LimitRTTIME": "infinity",

        "LimitRTTIMESoft": "infinity",

        "LimitSIGPENDING": "2964",

        "LimitSIGPENDINGSoft": "2964",

        "LimitSTACK": "infinity",

        "LimitSTACKSoft": "8388608",

        "LogLevelMax": "-1",

        "LogRateLimitBurst": "0",

        "LogRateLimitIntervalUSec": "0",

        "MainPID": "0",

        "MemoryAccounting": "yes",

        "MemoryCurrent": "[not set]",

        "MemoryHigh": "infinity",

        "MemoryLimit": "infinity",

        "MemoryLow": "0",

        "MemoryMax": "infinity",

        "MemoryMin": "0",

        "MemorySwapMax": "infinity",

        "NFileDescriptorStore": "0",

        "NRestarts": "0",

        "NUMAMask": "",

        "NUMAPolicy": "n/a",

        "Nice": "0",

        "NonBlocking": "no",

        "NotifyAccess": "main",

        "OOMScoreAdjust": "0",

        "PermissionsStartOnly": "no",

        "RemainAfterExit": "no",

        "Restart": "no",

        "RestartUSec": "100ms",

        "Result": "success",

        "RootDirectoryStartOnly": "no",

        "RuntimeMaxUSec": "infinity",

        "SecureBits": "0",

        "Slice": "system.slice",

        "StandardError": "inherit",

        "StandardInput": "null",

        "StandardInputData": "",

        "StandardOutput": "journal",

        "StartupBlockIOWeight": "[not set]",

        "StartupCPUShares": "[not set]",

        "StartupCPUWeight": "[not set]",

        "StartupIOWeight": "[not set]",

        "StatusErrno": "0",

        "SyslogFacility": "3",

        "SyslogLevel": "6",

        "SyslogLevelPrefix": "yes",

        "SyslogPriority": "30",

        "TTYReset": "no",

        "TTYVHangup": "no",

        "TTYVTDisallocate": "no",

        "TasksAccounting": "yes",

        "TasksCurrent": "[not set]",

        "TasksMax": "4743",

        "TimeoutStartUSec": "1min 30s",

        "TimeoutStopUSec": "1min 30s",

        "TimerSlackNSec": "50000",

        "Type": "notify",

        "UID": "[not set]",

        "UMask": "0022",

        "WatchdogTimestampMonotonic": "0",

        "WatchdogUSec": "0"

    }

}
开启防火墙
[student@ansible ansible]$ ansible node1 -m service -a 'name=firewalld state=started enabled=yes'

node1 | CHANGED => {

    "ansible_facts": {

        "discovered_interpreter_python": "/usr/libexec/platform-python"

    },

    "changed": true,

    "enabled": true,

    "name": "firewalld",

    "state": "started",

    "status": {

        "ActiveState": "inactive",

        "AllowedCPUs": "",

        "AllowedMemoryNodes": "",

        "BlockIOAccounting": "no",

        "BlockIOWeight": "[not set]",

        "BusName": "org.fedoraproject.FirewallD1",

        "CPUAccounting": "no",

        "CPUAffinity": "",

        "CPUAffinityFromNUMA": "no",

        "CPUQuotaPerSecUSec": "infinity",

        "CPUQuotaPeriodUSec": "infinity",

        "CPUSchedulingPolicy": "0",

        "CPUSchedulingPriority": "0",

        "CPUSchedulingResetOnFork": "no",

        "CPUShares": "[not set]",

        "CPUUsageNSec": "[not set]",

        "CPUWeight": "[not set]",

        "ControlPID": "0",

        "DefaultMemoryLow": "0",

        "DefaultMemoryMin": "0",

        "Delegate": "no",

        "DevicePolicy": "auto",

        "EffectiveCPUs": "",

        "EffectiveMemoryNodes": "",

        "EnvironmentFiles": "/etc/sysconfig/firewalld (ignore_errors=yes)",

        "ExecMainCode": "0",

        "ExecMainExitTimestampMonotonic": "0",

        "ExecMainPID": "0",

        "ExecMainStartTimestampMonotonic": "0",

        "ExecMainStatus": "0",

        "ExecReload": "{ path=/bin/kill ; argv[]=/bin/kill -HUP $MAINPID ; ignore_errors=no ; start_time=[n/a] ; stop_time=[n/a] ; pid=0 ; code=(null) ; status=0/0 }",

        "ExecStart": "{ path=/usr/sbin/firewalld ; argv[]=/usr/sbin/firewalld --nofork --nopid $FIREWALLD_ARGS ; ignore_errors=no ; start_time=[n/a] ; stop_time=[n/a] ; pid=0 ; code=(null) ; status=0/0 }",

        "FileDescriptorStoreMax": "0",

        "GID": "[not set]",

        "GuessMainPID": "yes",

        "IOAccounting": "no",

        "IOSchedulingClass": "0",

        "IOSchedulingPriority": "0",

        "IOWeight": "[not set]",

        "IPAccounting": "no",

        "IPEgressBytes": "18446744073709551615",

        "IPEgressPackets": "18446744073709551615",

        "IPIngressBytes": "18446744073709551615",

        "IPIngressPackets": "18446744073709551615",

        "LimitAS": "infinity",

        "LimitASSoft": "infinity",

        "LimitCORE": "infinity",

        "LimitCORESoft": "infinity",

        "LimitCPU": "infinity",

        "LimitCPUSoft": "infinity",

        "LimitDATA": "infinity",

        "LimitDATASoft": "infinity",

        "LimitFSIZE": "infinity",

        "LimitFSIZESoft": "infinity",

        "LimitLOCKS": "infinity",

        "LimitLOCKSSoft": "infinity",

        "LimitMEMLOCK": "65536",

        "LimitMEMLOCKSoft": "65536",

        "LimitMSGQUEUE": "819200",

        "LimitMSGQUEUESoft": "819200",

        "LimitNICE": "0",

        "LimitNICESoft": "0",

        "LimitNOFILE": "262144",

        "LimitNOFILESoft": "1024",

        "LimitNPROC": "2964",

        "LimitNPROCSoft": "2964",

        "LimitRSS": "infinity",

        "LimitRSSSoft": "infinity",

        "LimitRTPRIO": "0",

        "LimitRTPRIOSoft": "0",

        "LimitRTTIME": "infinity",

        "LimitRTTIMESoft": "infinity",

        "LimitSIGPENDING": "2964",

        "LimitSIGPENDINGSoft": "2964",

        "LimitSTACK": "infinity",

        "LimitSTACKSoft": "8388608",

        "LogLevelMax": "-1",

        "LogRateLimitBurst": "0",

        "LogRateLimitIntervalUSec": "0",

        "MainPID": "0",

        "MemoryAccounting": "yes",

        "MemoryCurrent": "[not set]",

        "MemoryHigh": "infinity",

        "MemoryLimit": "infinity",

        "MemoryLow": "0",

        "MemoryMax": "infinity",

        "MemoryMin": "0",

        "MemorySwapMax": "infinity",

        "NFileDescriptorStore": "0",

        "NRestarts": "0",

        "NUMAMask": "",

        "NUMAPolicy": "n/a",

        "Nice": "0",

        "NonBlocking": "no",

        "NotifyAccess": "none",

        "OOMScoreAdjust": "0",

        "PermissionsStartOnly": "no",

        "RemainAfterExit": "no",

        "Restart": "no",

        "RestartUSec": "100ms",

        "Result": "success",

        "RootDirectoryStartOnly": "no",

        "RuntimeMaxUSec": "infinity",

        "SecureBits": "0",

        "Slice": "system.slice",

        "StandardError": "null",

        "StandardInput": "null",

        "StandardInputData": "",

        "StandardOutput": "null",

        "StartupBlockIOWeight": "[not set]",

        "StartupCPUShares": "[not set]",

        "StartupCPUWeight": "[not set]",

        "StartupIOWeight": "[not set]",

        "StatusErrno": "0",

        "SyslogFacility": "3",

        "SyslogLevel": "6",

        "SyslogLevelPrefix": "yes",

        "SyslogPriority": "30",

        "TTYReset": "no",

        "TTYVHangup": "no",

        "TTYVTDisallocate": "no",

        "TasksAccounting": "yes",

        "TasksCurrent": "[not set]",

        "TasksMax": "4743",

        "TimeoutStartUSec": "1min 30s",

        "TimeoutStopUSec": "1min 30s",

        "TimerSlackNSec": "50000",

        "Type": "dbus",

        "UID": "[not set]",

        "UMask": "0022",

        "WatchdogTimestampMonotonic": "0",

        "WatchdogUSec": "0"

    }

}

[root@node1 www]# systemctl status firewalld

● firewalld.service - firewalld - dynamic firewall daemon

   Loaded: loaded (/usr/lib/systemd/system/firewalld.service; disabled; vendor preset: e>

   Active: inactive (dead)

     Docs: man:firewalld(1)

lines 1-4/4 (END)

^C

[root@node1 www]# systemctl status firewalld

● firewalld.service - firewalld - dynamic firewall daemon

   Loaded: loaded (/usr/lib/systemd/system/firewalld.service; enabled; vendor preset: en>

   Active: active (running) since Mon 2022-10-24 16:12:13 CST; 4s ago

     Docs: man:firewalld(1)

 Main PID: 5226 (firewalld)

    Tasks: 2 (limit: 4743)

   Memory: 26.0M

   CGroup: /system.slice/firewalld.service

           └─5226 /usr/libexec/platform-python -s /usr/sbin/firewalld --nofork --nopid

Oct 24 16:12:13 node1.example.com systemd[1]: Starting firewalld - dynamic firewall daem>

Oct 24 16:12:13 node1.example.com systemd[1]: Started firewalld - dynamic firewall daemo>

Oct 24 16:12:13 node1.example.com firewalld[5226]: WARNING: AllowZoneDrifting is enabled>
设置允许http流量的传入
[student@ansible ansible]$ ansible node1 -m firewalld -a 'service=http permanent=yes state=enabled immediate=yes'

node1 | CHANGED => {

    "ansible_facts": {

        "discovered_interpreter_python": "/usr/libexec/platform-python"

    },

    "changed": true,

    "msg": "Permanent and Non-Permanent(immediate) operation, Changed service http to enabled"

}
测试
[student@ansible ansible]$ curl http://node1

my name is luojialong
ansible使用临时命令通过模块来执行任务的更多相关文章
- salt常用命令、模块、执行
一.salt常用命令 salt 该命令执行salt的执行模块,通常在master端运行,也是我们最常用到的命令 salt [options] '<target>' <function ...
- ansible笔记(6):常用模块之命令类模块
ansible笔记():常用模块之命令类模块 command模块 command模块可以帮助我们在远程主机上执行命令 注意:使用command模块在远程主机中执行命令时,不会经过远程主机的shell处 ...
- ansible命令及模块
ping 命令 #测试单个主机 [root@node1 opt]# ansible -m ping 10.0.0.22 #获取多个主机 [root@node1 opt]# ansible 10.0.0 ...
- Ansible 命令相关模块command, shell, raw, expect, script, telnet[转]
本文主要介绍Ansible的几个命令模块,包括: command - 在远程节点上执行命令 shell - 让远程主机在shell进程下执行命令 script - 将本地script传送到远程主机之后 ...
- ansible的安装及命令相关模块
ansible 第一步:下载epel源 curl -o /etc/yum.repos.d/CentOS-Base.repo http://mirrors.aliyun.com/repo/Centos- ...
- Ansible常用模块之命令类模块
Command模块 在远程节点上执行命令 [root@tiandong ~]# ansible all -m command -a "ls" 在远程主机上执行ls命令. [root ...
- Ansible Tower系列 四(使用tower执行一个命令)【转】
在主机清单页面中,选择一个主机清单,进入后,选择hosts里的主机 Paste_Image.png 点击 RUN COMMANDS MODULE 选择 commandARGUMENTS 填写 ifco ...
- Python3安装Celery模块后执行Celery命令报错
1 Python3安装Celery模块后执行Celery命令报错 pip3 install celery # 安装正常,但是执行celery 命令的时候提示没有_ssl模块什么的 手动在Python解 ...
- python之commands和subprocess入门介绍(可执行shell命令的模块)
一.commands模块 1.介绍 当我们使用Python进行编码的时候,但是又想运行一些shell命令,去创建文件夹.移动文件等等操作时,我们可以使用一些Python库去执行shell命令. com ...
随机推荐
- 一分钟安装DolphinScheduler并上手体验
一分钟安装Apache DolphinScheduler并上手体验 1 一分钟安装DolphinScheduler并上手体验 本教程基于DolphinScheduler1.3.2 2 需要准备: 一台 ...
- 论文翻译:2020_Lightweight Online Noise Reduction on Embedded Devices using Hierarchical Recurrent Neural Networks
论文地址:基于分层递归神经网络的嵌入式设备轻量化在线降噪 引用格式:Schröter H, Rosenkranz T, Zobel P, et al. Lightweight Online Noise ...
- 杀死 Windows 某个端口
进入终端命令行,输入netstat -aon|findstr 3000查找端口号所对应的 PID: 输入指令taskkill /pid 20348 /f:
- jQuery使用case记录
添加元素/内容追加等 元素内: append() - 在被选元素的结尾插入内容 prepend() - 在被选元素的开头插入内容 元素外: after() - 在被选元素之后插入内容 before() ...
- JZOJ3542冒泡排序
题面 下面是一段实现冒泡排序算法的C++代码: for (int i=1;i<=n-1;i++) for (int j=1;j<=n-i ;j++) if(a[j]>a[j+1] ...
- Rsync数据备份工具
Rsync数据备份工具 1.Rsync基本概述 rsync是一款开源的备份工具,可以在不同主机之间进行同步(windows和Linux之间 Mac和 Linux Linux和Linux),可实现全量备 ...
- ZooKeeper 组件安装配置
ZooKeeper 组件安装配置 下载和安装 ZooKeeper ZooKeeper最新的版本可以通过官网 http://hadoop.apache.org/zookeeper/ 来获取,安装 Zoo ...
- class 中的 构造方法、static代码块、私有/公有/静态/实例属性、继承 ( extends、constructor、super()、static、super.prop、#prop、get、set )
part 1 /** * << class 中的 static 代码块与 super.prop 的使用 * * - ...
- CDH6.2.0 搭建大数据集群
1. 资料准备 现在官网https://www.cloudera.com 需要注册账号,未来可能会收费等问题,十分麻烦,这里有一份我自己百度云的备份 链接: https://pan.baidu.com ...
- 从Spring中学到的【1】--读懂继承链
最近看了一些 Spring 源码,发现源码分析的文章很多,而底层思想分析的文章比较少,这个系列文章准备总结一下Spring中给我的启示,包括设计模式思想.SOLID设计原则等,涉及一些编程的基本原则, ...
