2.2.2 RelativeLayout(相对布局)
本节引言
在上一节中我们对LinearLayout进行了详细的解析,LinearLayout也是我们 用的比较多的一个布局,我们更多的时候更钟情于他的weight(权重)属性,等比例划分,对屏幕适配还是 帮助蛮大的;但是使用LinearLayout的时候也有一个问题,就是当界面比较复杂的时候,需要嵌套多层的 LinearLayout,这样就会降低UI Render的效率(渲染速度),而且如果是listview或者GridView上的 item,效率会更低,另外太多层LinearLayout嵌套会占用更多的系统资源,还有可能引发stackoverflow; 但是如果我们使用RelativeLayout的话,可能仅仅需要一层就可以完成了,以父容器或者兄弟组件参考+margin +padding就可以设置组件的显示位置,是比较方便的!当然,也不是绝对的,具体问题具体分析吧! 总结就是:尽量使用RelativeLayout + LinearLayout的weight属性搭配使用吧!
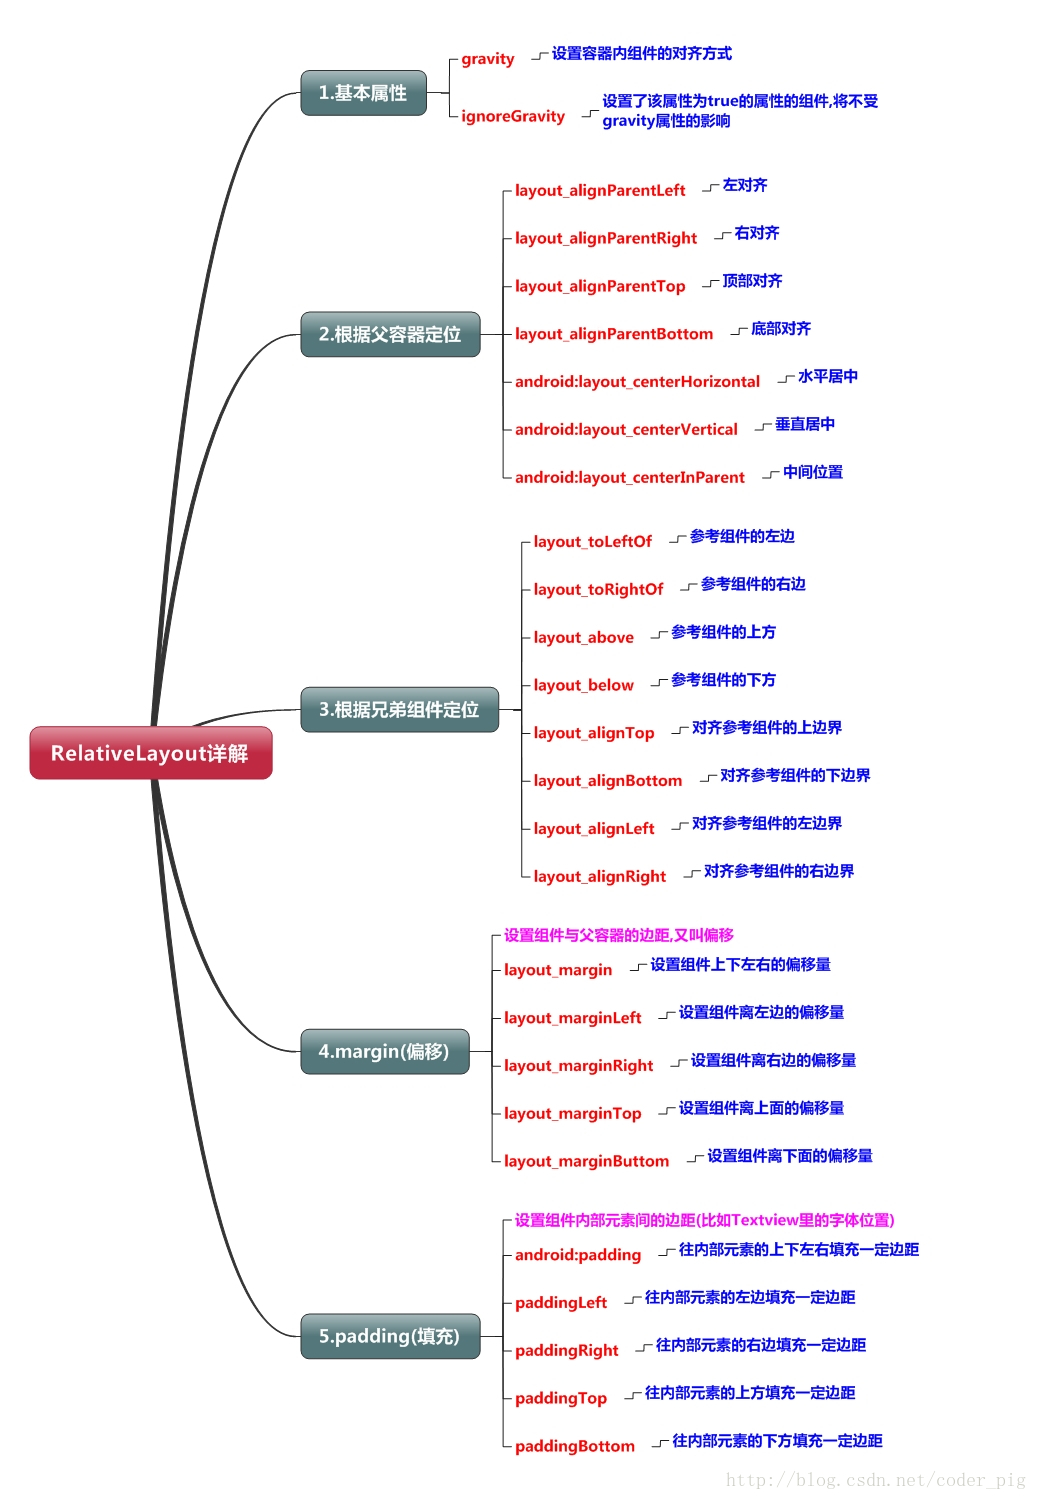
1.核心属性

2.父容器定位属性示意图

3.根据兄弟组件定位

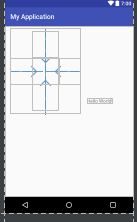
图中的组件1,2就是兄弟组件了,而组件3与组件1或组件2并不是兄弟组件,所以组件3不能通过 组件1或2来进行定位,比如layout_toleftof = "组件1"这样是会报错的!切记! 关于这个兄弟组件定位的最经典例子就是"梅花布局"了,下面代码实现下:
运行效果图:


实现代码:
<RelativeLayout xmlns:android="http://schemas.android.com/apk/res/android"

    xmlns:tools="http://schemas.android.com/tools"

    android:id="@+id/RelativeLayout1"

    android:layout_width="match_parent"

    android:layout_height="match_parent" >

    <!-- 这个是在容器中央的 -->

    <ImageView

        android:id="@+id/img1"

        android:layout_width="80dp"

        android:layout_height="80dp"

        android:layout_centerInParent="true"

        android:src="@drawable/pic1"/>

    <!-- 在中间图片的左边 -->

    <ImageView

        android:id="@+id/img2"

        android:layout_width="80dp"

        android:layout_height="80dp"

        android:layout_toLeftOf="@id/img1"

        android:layout_centerVertical="true"

        android:src="@drawable/pic2"/>

    <!-- 在中间图片的右边 -->

    <ImageView

        android:id="@+id/img3"

        android:layout_width="80dp"

        android:layout_height="80dp"

        android:layout_toRightOf="@id/img1"

        android:layout_centerVertical="true"

        android:src="@drawable/pic3"/>

    <!-- 在中间图片的上面-->

    <ImageView

        android:id="@+id/img4"

        android:layout_width="80dp"

        android:layout_height="80dp"

        android:layout_above="@id/img1"

        android:layout_centerHorizontal="true"

        android:src="@drawable/pic4"/>

    <!-- 在中间图片的下面 -->

    <ImageView

        android:id="@+id/img5"

        android:layout_width="80dp"

        android:layout_height="80dp"

        android:layout_below="@id/img1"

        android:layout_centerHorizontal="true"

        android:src="@drawable/pic5"/>

</RelativeLayout>
4.margin与padding的区别
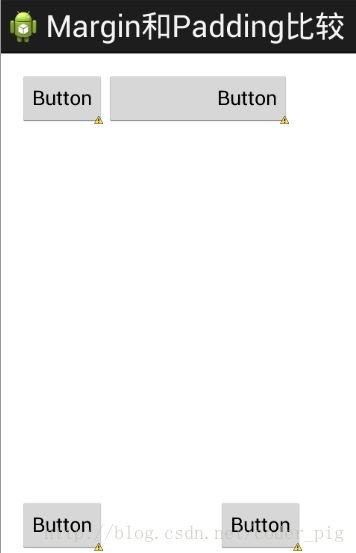
初学者对于这两个属性可能会有一点混淆,这里区分下: 首先margin代表的是偏移,比如marginleft = "5dp"表示组件离容器左边缘偏移5dp; 而padding代表的则是填充,而填充的对象针对的是组件中的元素,比如TextView中的文字 比如为TextView设置paddingleft = "5dp",则是在组件里的元素的左边填充5dp的空间! margin针对的是容器中的组件,而padding针对的是组件中的元素,要区分开来! 下面通过简单的代码演示两者的区别:

比较示例代码如下:
<RelativeLayout xmlns:android="http://schemas.android.com/apk/res/android"

    xmlns:tools="http://schemas.android.com/tools"

    android:layout_width="match_parent"

    android:layout_height="match_parent"

    android:paddingBottom="@dimen/activity_vertical_margin"

    android:paddingLeft="@dimen/activity_horizontal_margin"

    android:paddingRight="@dimen/activity_horizontal_margin"

    android:paddingTop="@dimen/activity_vertical_margin"

    tools:context=".MainActivity" >

    <Button

        android:id="@+id/btn1"

        android:layout_height="wrap_content"

        android:layout_width="wrap_content"

        android:text="Button"/>

    <Button

        android:paddingLeft="100dp"

        android:layout_height="wrap_content"

        android:layout_width="wrap_content"

        android:text="Button"

        android:layout_toRightOf="@id/btn1"/>

    <Button

        android:id="@+id/btn2"

        android:layout_height="wrap_content"

        android:layout_width="wrap_content"

        android:text="Button"

        android:layout_alignParentBottom="true"/>

    <Button

        android:layout_marginLeft="100dp"

        android:layout_height="wrap_content"

        android:layout_width="wrap_content"

        android:text="Button"

        android:layout_toRightOf="@id/btn2"

        android:layout_alignParentBottom="true"/>

</RelativeLayout>
5.很常用的一点:margin可以设置为负数
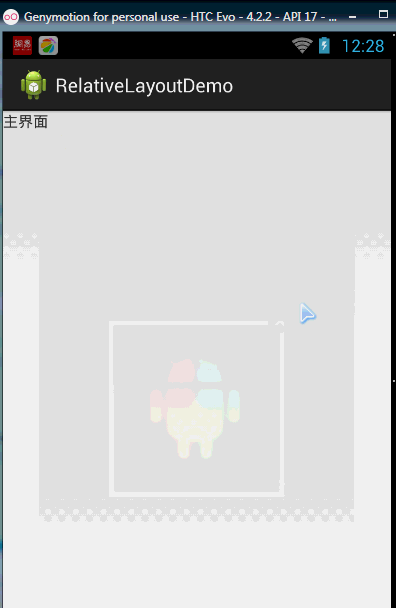
相信很多朋友都不知道一点吧,平时我们设置margin的时候都习惯了是正数的, 其实是可以用负数的,下面写个简单的程序演示下吧,模拟进入软件后,弹出广告 页面的,右上角的cancle按钮的margin则是使用负数的!
效果图如下:

贴出的广告Activity的布局代码吧,当然,如果你对这个有兴趣的话可以下下demo, 因为仅仅是实现效果,所以代码会有些粗糙!
<RelativeLayout xmlns:android="http://schemas.android.com/apk/res/android"

    xmlns:tools="http://schemas.android.com/tools"

    android:layout_width="match_parent"

    android:layout_height="match_parent"

    tools:context="com.jay.example.relativelayoutdemo.MainActivity"

    android:background="#00CCCCFF">

    <ImageView

        android:id="@+id/imgBack"

        android:layout_width="200dp"

        android:layout_height="200dp"

        android:layout_centerInParent="true"

        android:background="@drawable/myicon" />

    <ImageView

        android:id="@+id/imgCancle"

        android:layout_width="28dp"

        android:layout_height="28dp"

        android:layout_alignRight="@id/imgBack"

        android:layout_alignTop="@id/imgBack"

        android:background="@drawable/cancel"

        android:layout_marginTop="-15dp"

        android:layout_marginRight="-10dp" />

</RelativeLayout>
2.2.2 RelativeLayout(相对布局)的更多相关文章
- Android开发重点难点1:RelativeLayout(相对布局)详解
前言 啦啦啦~博主又推出了一个新的系列啦~ 之前的Android开发系列主要以完成实验的过程为主,经常会综合许多知识来写,所以难免会有知识点的交杂,给人一种混乱的感觉. 所以博主推出“重点难点”系列, ...
- Android开发3:Intent、Bundle的使用和ListView的应用 、RelativeLayout(相对布局)简述(简单通讯录的实现)
前言 啦啦啦~博主又来骚扰大家啦~大家是不是感觉上次的Android开发博文有点长呢~主要是因为博主也是小白,在做实验的过程中查询了很多很多概念,努力去理解每一个知识点,才完成了最终的实验.还有就是随 ...
- RelativeLayout相对布局
RelativeLayout相对布局常用属性: 第一类:属性值为true或false android:layout_centerHrizontal 水平居中 android:layout_center ...
- Android(java)学习笔记164:Relativelayout相对布局案例
我们看看案例代码,自己心领神会: <?xml version="1.0" encoding="utf-8"?> <RelativeLayout ...
- RelativeLayout相对布局 安卓布局技巧
http://blog.csdn.net/nieweiking/article/details/38417317 RelativeLayout相对布局 相对布局 RelativeLayout 允许子元 ...
- 第13章、布局Layouts之RelativeLayout相对布局(从零開始学Android)
RelativeLayout相对布局 RelativeLayout是一种相对布局,控件的位置是依照相对位置来计算的,后一个控件在什么位置依赖于前一个控件的基本位置,是布局最经常使用,也是最灵活的一种布 ...
- Android精通:TableLayout布局,GridLayout网格布局,FrameLayout帧布局,AbsoluteLayout绝对布局,RelativeLayout相对布局
在Android中提供了几个常用布局: LinearLayout线性布局 RelativeLayout相对布局 FrameLayout帧布局 AbsoluteLayout绝对布局 TableLayou ...
- Android精通:View与ViewGroup,LinearLayout线性布局,RelativeLayout相对布局,ListView列表组件
UI的描述 对于Android应用程序中,所有用户界面元素都是由View和ViewGroup对象构建的.View是绘制在屏幕上能与用户进行交互的一个对象.而对于ViewGroup来说,则是一个用于存放 ...
- RelativeLayout相对布局 各个属性详解
RelativeLayout相对布局 相对布局 RelativeLayout 允许子元素指定它们相对于其父元素或兄弟元素的位置,这是实际布局中最常用的布局方式之一.它灵活性大很多,当然属性也多,操作难 ...
- Android(java)学习笔记107:Relativelayout相对布局
1. Relativelayout相对布局案例: 我们看看案例代码,自己心领神会: <?xml version="1.0" encoding="utf-8" ...
随机推荐
- [android] 新闻客户端实现左侧导航点击切换
设置主布局文件,为根布局设置一个id,作为内容区 给ListView的条目设置点击事件,setOnItemClickListener()方法,参数:上下文 当前的Fragment实现OnItemCli ...
- 彻底理解ReentrantLock
5.ReentrantLock的介绍 ReenTrantLock重入锁,是实现Lock接口的一个类,也是在实际编程中使用频率很高的一个锁,支持重入性,表示能够对共享资源能够重复加锁,即当前线程获取该锁 ...
- LINQ to Objects系列(2)两种查询语法介绍
LINQ为我们提供了两种查询语法,分别是查询表达式和查询方法语法.这篇文章分为以下几个方面进行总结. 1,一个包含两种查询语法的简单示例 2,查询表达式的结构 3,查询方法相关的运算符 一个包含两种查 ...
- Java 面试中遇到的坑
Java开发中很多人都不愿意修改自己以前的代码,看别人的代码更是无法忍受,当看到别人代码里面一些匪夷所思的写法实现时,恨不得找到负责人好好跟他谈谈心,那么你在开发中是不是也使用到以下几种实现呢. 1. ...
- 自定义MVC框架之工具类-文件上传类
截止目前已经改造了3个类: ubuntu:通过封装验证码类库一步步安装php的gd扩展 自定义MVC框架之工具类-分页类的封装 该文件上传类功能如下: 1,允许定制上传的文件类型,文件mime信息,文 ...
- BZOJ3884(SummerTrainingDay04-C 欧拉定理)
上帝与集合的正确用法 根据一些书上的记载,上帝的一次失败的创世经历是这样的: 第一天, 上帝创造了一个世界的基本元素,称做“元”. 第二天, 上帝创造了一个新的元素,称作“α”.“α”被定义为“元 ...
- RBAC 介绍 (权限)
RBAC是什么? RBAC是基于角色的访问控制(Role-Based Access Control )在RBAC中,权限与角色相关联,用户通过成为适当角色的成员而得到这些角色的权限.这就极大地简化了权 ...
- 【代码笔记】iOS-MBProgressHUD
一,工程图. 二,代码. AppDelegate.h #import <UIKit/UIKit.h> #import "MBProgressHUD.h" @interf ...
- SpringMVC注解集合
@RequestMapper注解 绑定请求路径与处理方法例如: @RequestMapping("login.do") public String showLogin() { .. ...
- 在Ubuntu 14.04 LTS系统中设置Apache虚拟主机(一IP多访问)
参考资料:http://os.51cto.com/art/201406/441909.htm
