CentOS7.4安装部署openstack [Liberty版] (一)
一、OpenStack简介


二、部署环境

各角色描述及需求:
控制器:
控制节点运行身份认证服务,镜像服务,管理部分计算和网络服务,不同的网络代理和仪表盘。同样包括像SQL数据库,消息队列及 NTP这样的支撑服务。

可选的:可以在控制节点允许块存储,对象存储,Orchestration和Telemetry服务。

控制节点需要最少两块网卡。
计算:
计算节点运行操作实例的 :hypervisor计算部分。默认情况下使用 KVM 作为hypervisor。计算节点同样运行网络服务代理,用来连接实例到虚拟网络,通过:security groups 为实例提供防火墙服务。

这个服务可以部署超过1个计算节点。每个节点要求最少两个网络接口。
块设备存储:
该可选的块存储节点包含磁盘,块存储服务会向实例提供这些磁盘。

简单起见,计算节点和这个节点间的服务流量使用管理网络。生产环境中应该实施单独的存储网络以增强性能和安全。

这个服务可以部署超过一个块存储节点。每个节点要求至少一个网卡接口。
对象存储:
该可选的对象存储节点包含磁盘,对象存储服务用来存储账号,容器和对象。

简单起见,计算节点和这个节点间的服务流量使用管理网络。生产环境中应该实施单独的存储网络以增强性能和安全。

这个服务要求两个节点。每个节点要求最少一个网络接口。你可以部署超过两个对象存储节点。
网络:
从下面虚拟网络选项中选择一种。

网络选项1:提供者网络

提供者网络选项以最简单的方式部署OpenStack网络服务,可能包括二层服务(桥/交换机)服务、VLAN网络分段。本质上,它建立虚拟网络到物理网络的桥,
依靠物理网络基础设施提供三层服务(路由)。使用DHCP为实例提供IP地址信息。

注:这个选项不支持自服务私有网络,3层(路由)服务和高级服务比如 LBaaS 和 FWaaS。如果您希望有这些特性,考虑自服务网络选项。

网络选项2:自服务网络

自服务网络选项扩展提供者网络选项,三层网络服务启用 self-service`网络使用叠加分段方法,比如 VXLAN。本质上,它使用NAT路由虚拟网络到路由物理网络。
额外地,这个选项提供高级服务的基础,比如LBaas和FWaaS。
2.域名解析和关闭防火墙 (所有机器上)
/etc/hosts  #主机名称设置后不可用修改

192.168.1.101 controller

192.168.1.102 compute1

192.168.1.103 block1

192.168.1.104 object1

192.168.1.105 object2

关闭 selinux

sed -i 's#SELINUX=enforcing#SELINUX=disabled#g' /etc/sysconfig/selinux

setenforce

关闭 iptables

systemctl start firewalld.service

systemctl stop firewalld.service

systemctl disable firewalld.service
3.密码、时间同步及yum+epel源
密码:安装过程中涉及很多服务的密码,为了方便记忆统一为"",生产环境请勿设置

时间:参考文档  http://www.cnblogs.com/panwenbin-logs/p/8384340.html

yum+epel源:建议使用国内的163或阿里yum源

OpenStack源:

cat /etc/yum.repos.d/CentOS-OpenStack-liberty.repo

[centos-openstack-liberty]

name=CentOS- - OpenStack liberty

baseurl=http://vault.centos.org/centos/7.3.1611/cloud/x86_64/openstack-liberty/

gpgcheck=

enabled=

gpgkey=file:///etc/pki/rpm-gpg/RPM-GPG-KEY-Centos-7
4.升级安装包
yum upgrade

reboot     #重启
5.安装 OpenStack 客户端
yum install -y python-openstackclient

yum install -y openstack-selinux     #如果启用了 SELinux ,安装 openstack-selinux 包实现对OpenStack服务的安全策略进行自动管理
三、安装配置数据库服务(MySQL)
[root@controller ~]# yum install -y  mariadb mariadb-server MySQL-python

[root@controller ~]# cp /usr/share/mariadb/my-medium.cnf /etc/my.cnf    #或者是/usr/share/mysql/my-medium.cnf

[root@controller ~]# vim /etc/my.cnf

[mysqld]

bind-address = 192.168.1.101

default-storage-engine = innodb

innodb_file_per_table

collation-server = utf8_general_ci

init-connect = 'SET NAMES utf8'

character-set-server = utf8

max_connections=

[root@controller ~]# systemctl enable mariadb.service && systemctl start mariadb.service  #启动数据库服务,并将其配置为开机自启

[root@controller ~]# mysql_secure_installation #密码 123456,一路 y 回车
四、安装配置消息队列服务(rabbitmq)
[root@controller ~]# yum install -y rabbitmq-server
root@controller ~]# systemctl enable rabbitmq-server.service && systemctl start rabbitmq-server.service
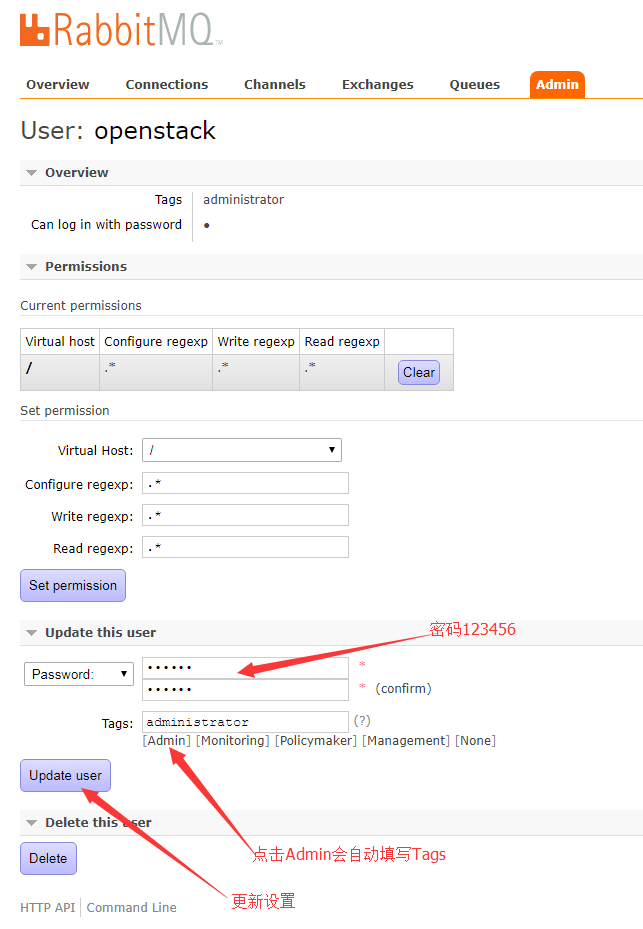
[root@controller ~]# rabbitmqctl add_user openstack #添加 openstack 用户,密码123456
[root@controller ~]# rabbitmqctl set_permissions openstack ".*" ".*" ".*" #给openstack用户配置写和读权限
[root@controller ~]# rabbitmq-plugins list #查看支持的插件
[root@controller ~]# rabbitmq-plugins enable rabbitmq_management #使用此插件实现 web 管理
[root@linux-node1 ~]# systemctl restart rabbitmq-server.service
[root@controller ~]# netstat -tnlp|grep beam
tcp 0 0 0.0.0.0:15672 0.0.0.0:* LISTEN 997/beam #管理端口
tcp 0 0 0.0.0.0:25672 0.0.0.0:* LISTEN 997/beam #server间内部通信口
tcp6 0 0 :::5672 :::* LISTEN 997/beam #client端通信口
访问RabbitMQ,访问地址是http://192.168.1.101:15672/,默认用户名密码都是guest
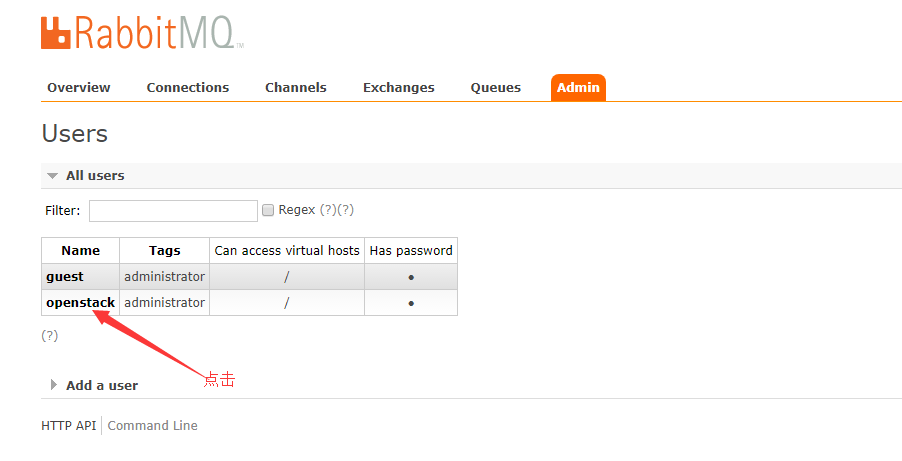
退出guest用户,测试使用openstack用户登录是否成功

五、安装和配置OpenStack身份认证服务(代码名称keystone。出于性能原因,这个配置部署Apache HTTP服务处理查询并使用Memcached存储tokens而不用SQL数据库。)
1.服务简述
OpenStack:Identity service为认证管理,授权管理和服务目录服务管理提供单点整合。其它OpenStack服务将身份认证服务当做通用统一API来使用。此外,提供用户信息但是不在OpenStack项目中的服务(如LDAP服务)可被整合进先前存在的基础设施中。

为了从identity服务中获益,其他的OpenStack服务需要与它合作。当某个OpenStack服务收到来自用户的请求时,该服务询问Identity服务,验证该用户是否有权限进行此次请求

身份服务包含这些组件:

服务器

  一个中心化的服务器使用RESTful 接口来提供认证和授权服务。

驱动

  驱动或服务后端被整合进集中式服务器中。它们被用来访问OpenStack外部仓库的身份信息, 并且它们可能已经存在于OpenStack被部署在的基础设施(例如,SQL数据库或LDAP服务器)中。

模块

  中间件模块运行于使用身份认证服务的OpenStack组件的地址空间中。这些模块拦截服务请求,取出用户凭据,并将它们送入中央是服务器寻求授权。中间件模块和OpenStack组件间的整合使用Python Web服务器网关接口。

当安装OpenStack身份服务,用户必须将之注册到其OpenStack安装环境的每个服务。身份服务才可以追踪那些OpenStack服务已经安装,以及在网络中定位它们。
2.服务需求:在配置 OpenStack 身份认证服务前,必须创建一个数据库及权限授权。
[root@controller ~]# mysql -u root -p123456

MariaDB [(none)]> CREATE DATABASE keystone;

Query OK,  row affected (0.00 sec)

MariaDB [(none)]> GRANT ALL PRIVILEGES ON keystone.* TO 'keystone'@'localhost' IDENTIFIED BY '';

Query OK,  rows affected (0.01 sec)

MariaDB [(none)]> GRANT ALL PRIVILEGES ON keystone.* TO 'keystone'@'%'  IDENTIFIED BY '';

Query OK,  rows affected (0.00 sec)

MariaDB [(none)]> show databases; #查看数据库是否创建成功

+--------------------+

| Database           |

+--------------------+

| information_schema |

| keystone           |

| mysql              |

| performance_schema |

+--------------------+

MariaDB [(none)]> select User,Password,Host from mysql.user where User  like "keystone"; #查看授权

+----------+-------------------------------------------+-----------+

| User     | Password                                  | Host      |

+----------+-------------------------------------------+-----------+

| keystone | *6BB4837EB74329105EE4568DDA7DC67ED2CA2AD9 | %         |

| keystone | *6BB4837EB74329105EE4568DDA7DC67ED2CA2AD9 | localhost |

+----------+-------------------------------------------+-----------+

MariaDB [(none)]> \q

Bye
3.服务安装
[root@controller ~]#yum install openstack-keystone httpd mod_wsgi memcached python-memcached -y

[root@controller ~]#systemctl enable memcached.service && systemctl start memcached.service

[root@controller ~]# netstat -tnlp|grep memcached

tcp               127.0.0.1:         0.0.0.0:*               LISTEN      /memcached

tcp6              :::               :::*                    LISTEN      /memcached

[root@controller ~]# openssl rand -hex   #创建管理员令牌

c5a232c9b4bba9eea176

[root@controller ~]# grep "^[a-z]" -B    /etc/keystone/keystone.conf

[DEFAULT]

admin_token = db771afcb68c09caee6d  #与上面生成的管理员令牌一致

[database]

connection = mysql://keystone:123456@controller/keystone #配置数据库访问地址

[memcache]

servers = localhost: #配置Memcached服务访问地址

[revoke]

driver = sql  #配置SQL 回滚驱动

[token]

provider = uuid  #配置 UUID token provider 和Memcached 驱动

driver = memcache

[root@controller ~]#su -s /bin/sh -c "keystone-manage db_sync" keystone #初始化身份认证服务的数据库

[root@controller ~]# tail /var/log/keystone/keystone.log #查看日志是否有错误,

-- ::08.343  INFO migrate.versioning.api [-]  -> ...

-- ::08.406  INFO migrate.versioning.api [-] done

-- ::08.407  INFO migrate.versioning.api [-]  -> ...

-- ::08.565  INFO migrate.versioning.api [-] done

-- ::08.565  INFO migrate.versioning.api [-]  -> ...

-- ::08.600  INFO migrate.versioning.api [-] done

-- ::08.620  INFO migrate.versioning.api [-]  -> ...

-- ::08.667  INFO migrate.versioning.api [-] done

-- ::08.667  INFO migrate.versioning.api [-]  -> ...

-- ::08.813  INFO migrate.versioning.api [-] done
配置 Apache HTTP 服务器
[root@controller ~]# grep -n "^ServerName" /etc/httpd/conf/httpd.conf #配置 ServerName 选项为控制节点

:ServerName controller

[root@controller ~]# vim /etc/httpd/conf.d/wsgi-keystone.conf

Listen

Listen

<VirtualHost *:>

    WSGIDaemonProcess keystone-public processes= threads= user=keystone group=keystone display-name=%{GROUP}

    WSGIProcessGroup keystone-public

    WSGIScriptAlias / /usr/bin/keystone-wsgi-public

    WSGIApplicationGroup %{GLOBAL}

    WSGIPassAuthorization On

    <IfVersion >= 2.4>

      ErrorLogFormat "%{cu}t %M"

    </IfVersion>

    ErrorLog /var/log/httpd/keystone-error.log

    CustomLog /var/log/httpd/keystone-access.log combined

    <Directory /usr/bin>

        <IfVersion >= 2.4>

            Require all granted

        </IfVersion>

        <IfVersion < 2.4>

            Order allow,deny

            Allow from all

        </IfVersion>

    </Directory>

</VirtualHost>

<VirtualHost *:>

    WSGIDaemonProcess keystone-admin processes= threads= user=keystone group=keystone display-name=%{GROUP}

    WSGIProcessGroup keystone-admin

    WSGIScriptAlias / /usr/bin/keystone-wsgi-admin

    WSGIApplicationGroup %{GLOBAL}

    WSGIPassAuthorization On

    <IfVersion >= 2.4>

      ErrorLogFormat "%{cu}t %M"

    </IfVersion>

    ErrorLog /var/log/httpd/keystone-error.log

    CustomLog /var/log/httpd/keystone-access.log combined

    <Directory /usr/bin>

        <IfVersion >= 2.4>

            Require all granted

        </IfVersion>

        <IfVersion < 2.4>

            Order allow,deny

            Allow from all

        </IfVersion>

    </Directory>

</VirtualHost>

[root@controller ~]# systemctl enable httpd.service && systemctl start httpd.service #启动 Apache HTTP 服务并配置其随系统启动

[root@controller ~]# netstat -tnlp|grep httpd

tcp6              :::                   :::*                    LISTEN      /httpd

tcp6              :::                :::*                    LISTEN      /httpd    #用于管理, 只有admin_role可以使用
tcp6              :::                 :::*                    LISTEN      /httpd    #用于业务,普通用户使用
创建服务实体和API端点
[root@controller ~]# export OS_URL=http://controller:35357/v3 #配置端点URL

[root@controller ~]# export OS_IDENTITY_API_VERSION=   #配置认证 API 版本

[root@controller ~]# export OS_TOKEN=db771afcb68c09caee6d  #配置认证令牌

[root@controller ~]# env|grep ^OS #查看设置是否生效

OS_IDENTITY_API_VERSION=

OS_TOKEN=db771afcb68c09caee6d

OS_URL=http://controller:35357/v3

在Openstack环境中,认证服务管理服务目录。服务使用这个目录来决定您的环境中可用的服务。

[root@controller ~]# openstack service create --name keystone --description "OpenStack Identity" identity #为身份认证服务创建服务实体

+-------------+----------------------------------+

| Field       | Value                            |

+-------------+----------------------------------+

| description | OpenStack Identity               |

| enabled     | True                             |

| id          | 351c5f4d5174430eacb38b16a6403d40 |

| name        | keystone                         |

| type        | identity                         |

+-------------+----------------------------------+

身份认证服务管理了一个与环境相关的 API 端点的目录。服务使用这个目录来决定如何与您环境中的其他服务进行通信。

OpenStack使用三个API端点变种代表每种服务:admin,internal和public。默认情况下,管理API端点允许修改用户和租户而公共和内部APIs不允许这些操作。
在生产环境中,处于安全原因,变种为了服务不同类型的用户可能驻留在单独的网络上。对实例而言,公共API网络为了让顾客管理他们自己的云在互联网上是可见的。
管理API网络在管理云基础设施的组织中操作也是有所限制的。内部API网络可能会被限制在包含OpenStack服务的主机上。此外,OpenStack支持可伸缩性的多区域。
[root@controller ~]# openstack endpoint create --region RegionOne   identity public http://controller:5000/v2.0 #创建认证服务的 API 端点

+--------------+----------------------------------+

| Field        | Value                            |

+--------------+----------------------------------+

| enabled      | True                             |

| id           | 1ee55eac378f4d179bacb4ea3d1850d1 |

| interface    | public                           |

| region       | RegionOne                        |

| region_id    | RegionOne                        |

| service_id   | 351c5f4d5174430eacb38b16a6403d40 |

| service_name | keystone                         |

| service_type | identity                         |

| url          | http://controller:5000/v2.0      |

+--------------+----------------------------------+

[root@controller ~]#  openstack endpoint create --region RegionOne   identity internal http://controller:5000/v2.0

+--------------+----------------------------------+

| Field        | Value                            |

+--------------+----------------------------------+

| enabled      | True                             |

| id           | 00da46788e874f529f67046226c7b0c9 |

| interface    | internal                         |

| region       | RegionOne                        |

| region_id    | RegionOne                        |

| service_id   | 351c5f4d5174430eacb38b16a6403d40 |

| service_name | keystone                         |

| service_type | identity                         |

| url          | http://controller:5000/v2.0      |

+--------------+----------------------------------+

[root@controller ~]#  openstack endpoint create --region RegionOne      identity admin http://controller:35357/v2.0

+--------------+----------------------------------+

| Field        | Value                            |

+--------------+----------------------------------+

| enabled      | True                             |

| id           | fab8917d632a4a8c8ccb4290cbd382c6 |

| interface    | admin                            |

| region       | RegionOne                        |

| region_id    | RegionOne                        |

| service_id   | 351c5f4d5174430eacb38b16a6403d40 |

| service_name | keystone                         |

| service_type | identity                         |

| url          | http://controller:35357/v2.0     |

+--------------+----------------------------------+

注:每个添加到OpenStack环境中的服务要求一个或多个服务实体和三个认证服务中的API 端点变种。

为进行管理操作,创建管理的项目、用户和角色

[root@controller ~]# openstack project create --domain default  --description "Admin Project" admin  #创建 admin 项目

+-------------+----------------------------------+

| Field       | Value                            |

+-------------+----------------------------------+

| description | Admin Project                    |

| domain_id   | default                          |

| enabled     | True                             |

| id          | 839cdfc946e1491c8004e3b732d17f9a |

| is_domain   | False                            |

| name        | admin                            |

| parent_id   | None                             |

+-------------+----------------------------------+

[root@controller ~]# openstack user create --domain default  --password-prompt admin  #创建 admin 用户

User Password:        #密码设置为123456

Repeat User Password:

+-----------+----------------------------------+

| Field     | Value                            |

+-----------+----------------------------------+

| domain_id | default                          |

| enabled   | True                             |

| id        | d4f0c9b24be84306960e29a7961d22a3 |

| name      | admin                            |

+-----------+----------------------------------+

[root@controller ~]# openstack role create admin    #创建 admin 角色

+-------+----------------------------------+

| Field | Value                            |

+-------+----------------------------------+

| id    | ebab14b851254fe69abb49132f3b76a2 |

| name  | admin                            |

+-------+----------------------------------+

[root@controller ~]# openstack role add --project admin --user admin admin  #添加 admin 角色到 admin 项目和用户上,这个命令执行后没有输出

每个服务包含独有用户的service 项目。创建``service``项目

[root@controller ~]# openstack project create --domain default  --description "Service Project" service

+-------------+----------------------------------+

| Field       | Value                            |

+-------------+----------------------------------+

| description | Service Project                  |

| domain_id   | default                          |

| enabled     | True                             |

| id          | cfbdca3af1a043d8ace0f47724312e60 |

| is_domain   | False                            |

| name        | service                          |

| parent_id   | None                             |

+-------------+----------------------------------+

常规任务应该使用无特权的项目和用户,作为示例,创建一个demo项目和用户

[root@controller ~]# openstack project create --domain default  --description "Demo Project" demo  #创建demo 项目,当为这个项目创建额外用户时,不要重复这一步。

+-------------+----------------------------------+

| Field       | Value                            |

+-------------+----------------------------------+

| description | Demo Project                     |

| domain_id   | default                          |

| enabled     | True                             |

| id          | 2003811a2ad548e7b686f06a55fe9ce9 |

| is_domain   | False                            |

| name        | demo                             |

| parent_id   | None                             |

+-------------+----------------------------------+

[root@controller ~]#  openstack user create --domain default  --password-prompt demo  #创建 demo 用户

User Password:

Repeat User Password:

+-----------+----------------------------------+

| Field     | Value                            |

+-----------+----------------------------------+

| domain_id | default                          |

| enabled   | True                             |

| id        | d4ffbeefe72d412187047a79e3a51d00 |

| name      | demo                             |

+-----------+----------------------------------+

[root@controller ~]# openstack role create user  #创建 user 角色

+-------+----------------------------------+

| Field | Value                            |

+-------+----------------------------------+

| id    | a1b9a999563544daa808e5ee1e0edaf0 |

| name  | user                             |

+-------+----------------------------------+

[root@controller ~]#  openstack role add --project demo --user demo user #添加 user 角色到 demo 项目和用户 ,你可以重复此过程来创建额外的项目和用户。
验证操作
[root@controller ~]# vim /usr/share/keystone/keystone-dist-paste.ini#因为安全性的原因,关闭临时认证令牌机制,删除 以下三个段中 admin_token_auth字段

 [pipeline:public_api]

 [pipeline:admin_api]

 [pipeline:api_v3]

[root@controller ~]# unset OS_TOKEN OS_URL #重置OS_TOKEN和OS_URL环境变量

[root@controller ~]# openstack --os-auth-url http://controller:35357/v3 --os-project-domain-id default --os-user-domain-id default --os-project-name admin --os-username admin --os-auth-type password  token issue  #使用 admin 用户,请求认证令牌,密码为123456

Password:

+------------+----------------------------------+

| Field      | Value                            |

+------------+----------------------------------+

| expires    | --03T15::.805097Z      |

| id         | ed30245e370648a185539a970e6c9e19 |

| project_id | 839cdfc946e1491c8004e3b732d17f9a |

| user_id    | d4f0c9b24be84306960e29a7961d22a3 |

+------------+----------------------------------+

[root@controller ~]# openstack --os-auth-url http://controller:5000/v3 --os-project-domain-id default --os-user-domain-id default --os-project-name demo --os-username demo --os-auth-type password token issue  #使用 demo 用户,请求认证令牌

Password:

+------------+----------------------------------+

| Field      | Value                            |

+------------+----------------------------------+

| expires    | --03T15::.135574Z      |

| id         | a9c52f8f92804a81b7d0c6b5496a8ee3 |

| project_id | 2003811a2ad548e7b686f06a55fe9ce9 |

| user_id    | d4ffbeefe72d412187047a79e3a51d00 |

+------------+----------------------------------+

前面我们使用环境变量和命令选项的组合通过openstack客户端与身份认证服务交互。为了提升客户端操作的效率,OpenStack支持简单的客户端环境变量脚本即OpenRC 文件

创建 admin 和 ``demo``项目和用户创建客户端环境变量脚本,为客户端操作加载合适的的凭证。

[root@controller ~]# cat admin-openrc.sh  #编辑文件 admin-openrc.sh 并添加如下内容

export OS_PROJECT_DOMAIN_ID=default

export OS_USER_DOMAIN_ID=default

export OS_PROJECT_NAME=admin

export OS_TENANT_NAME=admin

export OS_USERNAME=admin

export OS_PASSWORD=

export OS_AUTH_URL=http://controller:35357/v3

export OS_IDENTITY_API_VERSION=

[root@controller ~]# cat demo-openrc.sh  #编辑文件 demo-openrc.sh 并添加如下内容

export OS_PROJECT_DOMAIN_ID=default

export OS_USER_DOMAIN_ID=default

export OS_PROJECT_NAME=demo

export OS_TENANT_NAME=demo

export OS_USERNAME=demo

export OS_PASSWORD=

export OS_AUTH_URL=http://controller:5000/v3

export OS_IDENTITY_API_VERSION=

[root@controller ~]# source admin-openrc.sh #加载admin-openrc.sh文件来身份认证服务的环境变量位置和admin项目和用户证书

[root@controller ~]#  openstack token issue #请求认证令牌信息

+------------+----------------------------------+

| Field      | Value                            |

+------------+----------------------------------+

| expires    | --03T15::.249772Z      |

| id         | 48602913c79046f69d4db4ce7645b61b |

| project_id | 839cdfc946e1491c8004e3b732d17f9a |

| user_id    | d4f0c9b24be84306960e29a7961d22a3 |

+------------+----------------------------------+

[root@controller ~]# source demo-openrc.sh #同上

[root@controller ~]#  openstack token issue

+------------+----------------------------------+

| Field      | Value                            |

+------------+----------------------------------+

| expires    | --03T15::.666144Z      |

| id         | 9f3a4ff3239f418c8c000e712b42b216 |

| project_id | 2003811a2ad548e7b686f06a55fe9ce9 |

| user_id    | d4ffbeefe72d412187047a79e3a51d00 |

+------------+----------------------------------+
六、添加镜像服务
OpenStack 的镜像服务 (glance) 允许用户发现、注册和恢复虚拟机镜像。它提供了一个 REST API,允许您查询虚拟机镜像的 metadata 并恢复一个实际的镜像。您可以存储虚拟机镜像通过不同位置的镜像服务使其可用,就像 OpenStack 对象存储那样从简单的文件系统到对象存储系统。
1.服务简述
镜像服务 (glance) 允许用户发现、注册和获取虚拟机镜像。它提供了一个 REST API,允许您查询虚拟机镜像的 metadata 并获取一个现存的镜像。您可以将虚拟机镜像存储到各种位置,从简单的文件系统到对象存储系统—-例如 OpenStack 对象存储, 并通过镜像服务使用。

OpenStack镜像服务是IaaS的核心服务。它接受磁盘镜像或服务器镜像API请求,和来自终端用户或OpenStack计算组件的元数据定义。它也支持包括OpenStack对象存储在内的多种类型仓库上的磁盘镜像或服务器镜像存储。

大量周期性进程运行于OpenStack镜像服务上以支持缓存。同步复制(Replication)服务保证集群中的一致性和可用性。其它周期性进程包括auditors, updaters, 和 reapers。

OpenStack镜像服务包括以下组件:

glance-api

  接收镜像API的调用,诸如镜像发现、恢复、存储。

glance-registry

  存储、处理和恢复镜像的元数据,元数据包括项诸如大小和类型。

  glance-registry是私有内部服务,用于服务OpenStack Image服务。不要向用户暴露该服务

数据库

  存放镜像元数据,用户是可以依据个人喜好选择数据库的,多数的部署使用MySQL或SQLite。

镜像文件的存储仓库

  支持多种类型的仓库,它们有普通文件系统、对象存储、RADOS块设备、HTTP、以及亚马逊S3。记住,其中一些仓库仅支持只读方式使用。

元数据定义服务

  通用的API,是用于为厂商,管理员,服务,以及用户自定义元数据。这种元数据可用于不同的资源,例如镜像,工件,卷,配额以及集合。一个定义包括了新属性的键,描述,约束以及可以与之关联的资源的类型。
2.部署需求:安装和配置镜像服务之前,必须创建创建一个数据库、服务凭证和API端点。
[root@controller ~]#  mysql -u root -p123456  #创建数据并授权

MariaDB [(none)]> CREATE DATABASE glance;

Query OK,  row affected (0.00 sec)

MariaDB [(none)]>  GRANT ALL PRIVILEGES ON glance.* TO 'glance'@'localhost' IDENTIFIED BY '';

Query OK,  rows affected (0.01 sec)

MariaDB [(none)]> GRANT ALL PRIVILEGES ON glance.* TO 'glance'@'%' IDENTIFIED BY '';

Query OK,  rows affected (0.00 sec)

MariaDB [(none)]> \q

Bye
[root@controller ~]# source admin-openrc.sh  #获得 admin 凭证来获取只有管理员能执行命令的访问权限

[root@controller ~]# openstack user create --domain default --password-prompt glance #创建 glance 用户

User Password:      #密码为123456

Repeat User Password:

+-----------+----------------------------------+

| Field     | Value                            |

+-----------+----------------------------------+

| domain_id | default                          |

| enabled   | True                             |

| id        | 87a0389545e54e6697db202744c736b6 |

| name      | glance                           |

+-----------+----------------------------------+

[root@controller ~]# openstack role add --project service --user glance admin #添加 admin 角色到 glance 用户和 service 项目上,命令没有输出

[root@controller ~]# openstack service create --name glance  --description "OpenStack Image service" image #创建glance服务实体

+-------------+----------------------------------+

| Field       | Value                            |

+-------------+----------------------------------+

| description | OpenStack Image service          |

| enabled     | True                             |

| id          | b4c7005fde9b4c0085e2fc5874f02f34 |

| name        | glance                           |

| type        | image                            |

+-------------+----------------------------------+

创建镜像服务的 API 端点

[root@controller ~]# openstack endpoint create --region RegionOne image public http://controller:9292

+--------------+----------------------------------+

| Field        | Value                            |

+--------------+----------------------------------+

| enabled      | True                             |

| id           | 589466fdddf447b9b7e273954c2b7987 |

| interface    | public                           |

| region       | RegionOne                        |

| region_id    | RegionOne                        |

| service_id   | b4c7005fde9b4c0085e2fc5874f02f34 |

| service_name | glance                           |

| service_type | image                            |

| url          | http://controller:9292           |

+--------------+----------------------------------+

[root@controller ~]# openstack endpoint create --region RegionOne image internal http://controller:9292

+--------------+----------------------------------+

| Field        | Value                            |

+--------------+----------------------------------+

| enabled      | True                             |

| id           | f67a5c559caf4580aee84304d1a2f37d |

| interface    | internal                         |

| region       | RegionOne                        |

| region_id    | RegionOne                        |

| service_id   | b4c7005fde9b4c0085e2fc5874f02f34 |

| service_name | glance                           |

| service_type | image                            |

| url          | http://controller:9292           |

+--------------+----------------------------------+

[root@controller ~]#  openstack endpoint create --region RegionOne  image admin http://controller:9292

+--------------+----------------------------------+

| Field        | Value                            |

+--------------+----------------------------------+

| enabled      | True                             |

| id           | fb54cd8ff23b4ea0872f1a5db7182d8e |

| interface    | admin                            |

| region       | RegionOne                        |

| region_id    | RegionOne                        |

| service_id   | b4c7005fde9b4c0085e2fc5874f02f34 |

| service_name | glance                           |

| service_type | image                            |

| url          | http://controller:9292           |

+--------------+----------------------------------+
3.服务安装
[root@controller ~]# yum install -y openstack-glance python-glance python-glanceclient

 [root@controller neutron]# grep "^[a-z]" -B   /etc/glance/glance-api.conf #编辑/etc/glance/glance-api.conf

[DEFAULT]

notification_driver = noop #配置 noop 禁用通知,因为他们只适合与可选的Telemetry 服务

verbose = True

[database]

connection = mysql://glance:123456@controller/glance  #配置数据库访问地址

[glance_store]

default_store = file  #配置本地文件系统存储和镜像文件位置

filesystem_store_datadir = /var/lib/glance/images/

[keystone_authtoken] #配置认证服务访问信息,在 [keystone_authtoken] 中注释或者删除其他选项

auth_uri = http://controller:5000

auth_url = http://controller:35357

auth_plugin = password

project_domain_id = default

user_domain_id = default

project_name = service

username = glance

password =

[paste_deploy]

flavor = keystone #配置认证服务访问

[root@controller neutron]# grep "^[a-z]" -B   /etc/glance/glance-registry.conf   #编辑/etc/glance/glance-registry.conf

[DEFAULT]

notification_driver = noop #配置 noop 禁用通知,因为他们只适合与可选的Telemetry 服务

verbose = True

[database]

connection = mysql://glance:123456@controller/glance

[keystone_authtoken] #配置认证服务访问信息,在 [keystone_authtoken] 中注释或者删除其他选项

auth_uri = http://controller:5000

auth_url = http://controller:35357

auth_plugin = password

project_domain_id = default

user_domain_id = default

project_name = service

username = glance

password =

[paste_deploy]

flavor = keystone #配置认证服务访问

[root@controller ~]# su -s /bin/sh -c "glance-manage db_sync" glance #将配置写入镜像服务数据库

[root@controller yum.repos.d]# tail /var/log/glance/api.log

-- ::34.439  INFO migrate.versioning.api [-]  -> ...

-- ::34.468  INFO glance.db.sqlalchemy.migrate_repo.schema [-] creating table artifacts

-- ::34.567  INFO glance.db.sqlalchemy.migrate_repo.schema [-] creating table artifact_tags

-- ::34.978  INFO glance.db.sqlalchemy.migrate_repo.schema [-] creating table artifact_properties

-- ::35.054  INFO glance.db.sqlalchemy.migrate_repo.schema [-] creating table artifact_blobs

-- ::35.211  INFO glance.db.sqlalchemy.migrate_repo.schema [-] creating table artifact_blob_locations

-- ::35.339  INFO glance.db.sqlalchemy.migrate_repo.schema [-] creating table artifact_dependencies

-- ::35.542  INFO migrate.versioning.api [-] done

-- ::35.542  INFO migrate.versioning.api [-]  -> ...

-- ::36.271  INFO migrate.versioning.api [-] done

[root@controller yum.repos.d]# systemctl enable openstack-glance-api.service openstack-glance-registry.service #启动镜像服务、配置他们随机启动

[root@controller yum.repos.d]# systemctl start openstack-glance-api.service openstack-glance-registry.service

[root@controller ~]# netstat -tnlp|grep python

tcp               0.0.0.0:            0.0.0.0:*               LISTEN      /python2    #glance-api

tcp               0.0.0.0:            0.0.0.0:*               LISTEN      /python2     #glance-registry

验证操作

[root@controller ~]# echo "export OS_IMAGE_API_VERSION=2" | tee -a admin-openrc.sh demo-openrc.sh #在每个客户端脚本中,配置镜像服务客户端使用2.0的API

export OS_IMAGE_API_VERSION=

[root@controller ~]#    source admin-openrc.sh #获得 admin 凭证来获取只有管理员能执行命令的访问权限

[root@controller ~]# wget http://download.cirros-cloud.net/0.3.4/cirros-0.3.4-x86_64-disk.img #下载测试源镜像

[root@controller ~]# glance image-create --name "cirros" --file cirros-0.3.-x86_64-disk.img --disk-format qcow2  --container-format bare --visibility public --progress
 #使用 QCOW2 磁盘格式, bare 容器格式上传镜像到镜像服务并设置公共可见,这样所有的项目都可以访问它

[=============================>] %

+------------------+--------------------------------------+

| Property         | Value                                |

+------------------+--------------------------------------+

| checksum         | ee1eca47dc88f4879d8a229cc70a07c6     |

| container_format | bare                                 |

| created_at       | --04T11::48Z                 |

| disk_format      | qcow2                                |

| id               | 936bce27-085b-4d79-8cce-68cff70d7abd |

| min_disk         |                                     |

| min_ram          |                                     |

| name             | cirros                               |

| owner            | 839cdfc946e1491c8004e3b732d17f9a     |

| protected        | False                                |

| size             |                              |

| status           | active                               |

| tags             | []                                   |

| updated_at       | --04T11::49Z                 |

| virtual_size     | None                                 |

| visibility       | public                               |

+------------------+--------------------------------------+

[root@controller ~]#  glance image-list #确认镜像的上传并验证属性

+--------------------------------------+--------+

| ID                                   | Name   |

+--------------------------------------+--------+

| 936bce27-085b-4d79-8cce-68cff70d7abd | cirros |

+--------------------------------------+--------+
七、安装和配置 Compute 服务,即 nova
1.服务简述
使用OpenStack计算服务来托管和管理云计算系统。OpenStack计算服务是基础设施即服务(IaaS)系统的主要部分,模块主要由Python实现。

OpenStack计算组件请求OpenStack Identity服务进行认证;请求OpenStack Image服务提供磁盘镜像;为OpenStack dashboard提供用户与管理员接口。磁盘镜像访问限制在项目与用户上;配额以每个项目进行设定(例如,每个项目下可以创建多少实例)。OpenStack组件可以在标准硬件上水平大规模扩展,并且下载磁盘镜像启动虚拟机实例。

OpenStack计算服务由下列组件所构成:

nova-api 服务

  接收和响应来自最终用户的计算API请求。此服务支持OpenStack计算服务API,Amazon EC2 API,以及特殊的管理API用于赋予用户做一些管理的操作。它会强制实施一些规则,发起多数的编排活动,例如运行一个实例。

nova-api-metadata 服务

  接受来自虚拟机发送的元数据请求。``nova-api-metadata``服务一般在安装``nova-network``服务的多主机模式下使用。更详细的信息,请参考OpenStack管理员手册中的链接`Metadata service <http://docs.openstack.org/admin-guide/compute-networking-nova.html#metadata-service>`__ in the OpenStack Administrator Guide。

nova-compute服务

  一个持续工作的守护进程,通过Hypervior的API来创建和销毁虚拟机实例。例如:

  1.XenServer/XCP 的 XenAPI

  2.KVM 或 QEMU 的 libvirt

  3.VMware 的 VMwareAPI

  过程是蛮复杂的。最为基本的,守护进程同意了来自队列的动作请求,转换为一系列的系统命令如启动一个KVM实例,然后,到数据库中更新它的状态。

nova-scheduler服务

  拿到一个来自队列请求虚拟机实例,然后决定那台计算服务器主机来运行它。

nova-conductor模块

  媒介作用于``nova-compute``服务与数据库之间。它排除了由``nova-compute``服务对云数据库的直接访问。nova-conductor模块可以水平扩展。但是,不要将它部署在运行nova-compute服务的主机节点上。参考Configuration Reference Guide <http://docs.openstack.org/mitaka/config-reference/compute/conductor.html>`__。

nova-cert模块

  服务器守护进程向Nova Cert服务提供X509证书。用来为euca-bundle-image生成证书。仅仅是在EC2 API的请求中使用

nova-network worker 守护进程

  与nova-comput`服务类似,从队列中接受网络任务,并且操作网络。执行任务例如创建桥接的接口或者改变IPtables的规则。

nova-consoleauth 守护进程

  授权控制台代理所提供的用户令牌。详情可查看nova-novncproxy和 nova-xvpvncproxy。该服务必须为控制台代理运行才可奏效。在集群配置中你可以运行二者中任一代理服务而非仅运行一个nova-consoleauth服务。更多关于nova-consoleauth的信息,请查看`About nova-consoleauth <http://docs.openstack.org/admin-guide/compute-remote-console-access.html#about-nova-consoleauth>`__。

nova-novncproxy 守护进程

  提供一个代理,用于访问正在运行的实例,通过VNC协议,支持基于浏览器的novnc客户端。

nova-spicehtml5proxy 守护进程

  提供一个代理,用于访问正在运行的实例,通过 SPICE 协议,支持基于浏览器的 HTML5 客户端。

nova-xvpvncproxy 守护进程

  提供一个代理,用于访问正在运行的实例,通过VNC协议,支持OpenStack特定的Java客户端。

nova-cert 守护进程

  X509 证书。

nova客户端

  用于用户作为租户管理员或最终用户来提交命令。

队列

  一个在守护进程间传递消息的中央集线器。常见实现有RabbitMQ 及Zero MQ 等AMQP消息队列。

SQL数据库

  存储构建时和运行时的状态,为云基础设施,包括有:

  1.可用实例类型

  2.使用中的实例

  3.可用网络

  4.项目

理论上,OpenStack计算可以支持任何和SQL-Alchemy所支持的后端数据库,通常使用SQLite3来做测试可开发工作,MySQL和PostgreSQL 作生产环境。
2.部署需求:创建Nova服务所需数据库及相关授权、服务凭证和API端点
controller端(控制端):
[root@controller ~]# mysql -u root -p123456

MariaDB [(none)]> CREATE DATABASE nova;  #创建 nova 数据库

Query OK,  row affected (0.00 sec)

MariaDB [(none)]>   GRANT ALL PRIVILEGES ON nova.* TO 'nova'@'localhost' IDENTIFIED BY '';  #对nova数据库授予恰当的访问权限

Query OK,  rows affected (0.01 sec)

MariaDB [(none)]> GRANT ALL PRIVILEGES ON nova.* TO 'nova'@'%' IDENTIFIED BY '';

Query OK,  rows affected (0.00 sec)

MariaDB [(none)]> \q

Bye

[root@controller ~]# source admin-openrc.sh #获得 admin 凭证来获取只有管理员能执行命令的访问权限

创建服务证书

[root@controller ~]# openstack user create --domain default --password-prompt nova  #创建 nova 用户

User Password:    #密码为123456

Repeat User Password:

+-----------+----------------------------------+

| Field     | Value                            |

+-----------+----------------------------------+

| domain_id | default                          |

| enabled   | True                             |

| id        | 00a917a5ba494d13b3c48bb51d47384c |

| name      | nova                             |

+-----------+----------------------------------+

[root@controller ~]# openstack role add --project service --user nova admin  #添加admin 角色到 nova 用户,命令没有输出

[root@controller ~]# openstack service create --name nova --description "OpenStack Compute" compute #创建nova 服务实体

+-------------+----------------------------------+

| Field       | Value                            |

+-------------+----------------------------------+

| description | OpenStack Compute                |

| enabled     | True                             |

| id          | 9ced96bbfda44296aba0311fbc52f68e |

| name        | nova                             |

| type        | compute                          |

+-------------+----------------------------------+

创建计算服务API端点

[root@controller ~]# openstack endpoint create --region RegionOne  compute public http://controller:8774/v2/%\(tenant_id\)s

+--------------+-----------------------------------------+

| Field        | Value                                   |

+--------------+-----------------------------------------+

| enabled      | True                                    |

| id           | 02b501d9270345fe887165c35c9ee9b2        |

| interface    | public                                  |

| region       | RegionOne                               |

| region_id    | RegionOne                               |

| service_id   | 9ced96bbfda44296aba0311fbc52f68e        |

| service_name | nova                                    |

| service_type | compute                                 |

| url          | http://controller:8774/v2/%(tenant_id)s |

+--------------+-----------------------------------------+

[root@controller ~]# openstack endpoint create --region RegionOne   compute internal http://controller:8774/v2/%\(tenant_id\)s

+--------------+-----------------------------------------+

| Field        | Value                                   |

+--------------+-----------------------------------------+

| enabled      | True                                    |

| id           | 886844dc06d84b838e623f6d3939818c        |

| interface    | internal                                |

| region       | RegionOne                               |

| region_id    | RegionOne                               |

| service_id   | 9ced96bbfda44296aba0311fbc52f68e        |

| service_name | nova                                    |

| service_type | compute                                 |

| url          | http://controller:8774/v2/%(tenant_id)s |

+--------------+-----------------------------------------+

[root@controller ~]# openstack endpoint create --region RegionOne    compute admin http://controller:8774/v2/%\(tenant_id\)s

+--------------+-----------------------------------------+

| Field        | Value                                   |

+--------------+-----------------------------------------+

| enabled      | True                                    |

| id           | b72dc761e3004e398277d90441ee2cc3        |

| interface    | admin                                   |

| region       | RegionOne                               |

| region_id    | RegionOne                               |

| service_id   | 9ced96bbfda44296aba0311fbc52f68e        |

| service_name | nova                                    |

| service_type | compute                                 |

| url          | http://controller:8774/v2/%(tenant_id)s |

+--------------+-----------------------------------------+
3.安装服务
[root@controller ~]# yum install -y openstack-nova-api openstack-nova-cert openstack-nova-conductor openstack-nova-console openstack-nova-novncproxy openstack-nova-scheduler python-novaclient  #安装软件包

 root@controller neutron]# grep "^[a-z]" -B   /etc/nova/nova.conf #编辑/etc/nova/nova.conf文件

[DEFAULT]

rpc_backend = rabbit # #配置 RabbitMQ消息队列访问

auth_strategy = keystone # #配置认证服务访问

my_ip = 192.168.1.101 #配置 my_ip使用控制节点的管理接口的IP地址

network_api_class = nova.network.neutronv2.api.API  #启用网络服务支持

security_group_api = neutron

linuxnet_interface_driver = nova.network.linux_net.NeutronLinuxBridgeInterfaceDriver

firewall_driver = nova.virt.firewall.NoopFirewallDriver

enabled_apis=osapi_compute,metadata  #禁用EC2 API

verbose = True

[database]

connection = mysql://nova:123456@controller/nova #配置数据库访问

[glance]

host = controller   #配置镜像服务的位置,域名如果无法解析也可以IP地址

[keystone_authtoken]  #配置认证服务访问

auth_uri = http://controller:5000

auth_url = http://controller:35357

auth_plugin = password

project_domain_id = default

user_domain_id = default

project_name = service

username = nova

password =

[neutron]  #配置计算使用网络访问参数,启用元数据代理和配置secret

url = http://controller:9696

auth_url = http://controller:35357

auth_plugin = password

project_domain_id = default

user_domain_id = default

region_name = RegionOne

project_name = service

username = neutron

password =

service_metadata_proxy = True  #启用元数据代理和配置元数据共享密码

metadata_proxy_shared_secret = 123456 #自定义,与/etc/neutron/metadata_agent.ini文件中一致即可

[oslo_concurrency]

lock_path = /var/lib/nova/tmp   #配置锁路径

[oslo_messaging_rabbit]  #配置 RabbitMQ消息队列访问

rabbit_host = controller

rabbit_userid = openstack

rabbit_password =

[vnc] #配置VNC代理使用控制节点的管理IP地址

vncserver_listen = $my_ip

vncserver_proxyclient_address = $my_ip

[root@controller ~]# su -s /bin/sh -c "nova-manage db sync" nova  #同步Compute 数据库,忽略告警信息

[root@controller yum.repos.d]# tail /var/log/nova/nova-manage.log

-- ::52.552  INFO migrate.versioning.api [-]  -> ...

-- ::52.663  INFO migrate.versioning.api [-] done

-- ::52.664  INFO migrate.versioning.api [-]  -> ...

-- ::52.740  INFO migrate.versioning.api [-] done

-- ::52.740  INFO migrate.versioning.api [-]  -> ...

-- ::52.931  INFO migrate.versioning.api [-] done

-- ::52.931  INFO migrate.versioning.api [-]  -> ...

-- ::53.217  INFO migrate.versioning.api [-] done

-- ::53.218  INFO migrate.versioning.api [-]  -> ...

-- ::53.230  INFO migrate.versioning.api [-] done

[root@controller ~]# systemctl enable openstack-nova-api.service openstack-nova-cert.service   openstack-nova-consoleauth.service openstack-nova-scheduler.service openstack-nova-conductor.service openstack-nova-novncproxy.service   #启动 Compute 服务并将其设置为随系统启动

[root@controller ~]# systemctl start openstack-nova-api.service openstack-nova-cert.service openstack-nova-consoleauth.service openstack-nova-scheduler.service openstack-nova-conductor.service openstack-nova-novncproxy.service
compute1(计算节点)安装并配置Nova服务:
[root@compute1 ~]# yum install -y openstack-nova-compute sysfsutils

[root@compute1 ~]# egrep -c '(vmx|svm)' /proc/cpuinfo #确定计算节点是否支持虚拟机的硬件加速 。如果这个命令返回 1或者更大的值,说明计算节点支持硬件加速,一般不需要进行额外的配置。

如果这个命令返回``0``,则计算节点不支持硬件加速,必须配置 libvirt使用QEMU而不是使用KVM。

[root@compute1 neutron]#  grep "^[a-z]" -B   /etc/nova/nova.conf #编辑/etc/nova/nova.conf文件

[DEFAULT]

rpc_backend = rabbit   #配置RabbitMQ消息队列

auth_strategy = keystone #配置认证服务访问

my_ip = 192.168.1.102  #计算节点上的管理网络接口的IP 地址

network_api_class = nova.network.neutronv2.api.API   #启用网络服务支持

security_group_api = neutron

linuxnet_interface_driver = nova.network.linux_net.NeutronLinuxBridgeInterfaceDriver

firewall_driver = nova.virt.firewall.NoopFirewallDriver  #网络包括防火墙服务,你必须使用nova.virt.firewall.NoopFirewallDriver驱动程序禁用计算机防火墙服务

verbose = True

[glance]

host = controller   #配置镜像服务的位置

[keystone_authtoken]  #配置认证服务访问

auth_uri = http://controller:5000

auth_url = http://controller:35357

auth_plugin = password

project_domain_id = default

user_domain_id = default

project_name = service

username = nova

password =

[libvirt]

virt_type = kvm

[neutron] #配置计算使用网络访问参数

url = http://controller:9696

auth_url = http://controller:35357

auth_plugin = password

project_domain_id = default

user_domain_id = default

region_name = RegionOne

project_name = service

username = neutron

password =

[oslo_concurrency]

lock_path = /var/lib/nova/tmp    #配置锁路径

[oslo_messaging_rabbit]  #配置RabbitMQ消息队列

rabbit_host = controller

rabbit_userid = openstack

rabbit_password =

[vnc] #启用并配置远程控制台访问

enabled = True

vncserver_listen = 0.0.0.0

vncserver_proxyclient_address = $my_ip

novncproxy_base_url = http://controller:6080/vnc_auto.html #如果主机无法解析controller主机名,你可以将 controller替换为你控制节点管理网络的IP地址。

[root@compute1 ~]# systemctl enable libvirtd.service openstack-nova-compute.service  #启动计算服务及其依赖,并将其配置为随系统自动启动

[root@compute1 ~]# systemctl start libvirtd.service openstack-nova-compute.service
验证操作:
controller端(控制端):
[root@controller ~]# source admin-openrc.sh  #获得 admin 凭证来获取只有管理员能执行命令的访问权限

[root@controller ~]#  nova service-list #列出服务组件,以验证是否成功启动并注册了每个进程  该输出应该显示四个服务组件在控制节点上启用,一个服务组件在计算节点上启用

+----+------------------+------------+----------+---------+-------+----------------------------+-----------------+

| Id | Binary           | Host       | Zone     | Status  | State | Updated_at                 | Disabled Reason |

+----+------------------+------------+----------+---------+-------+----------------------------+-----------------+

|   | nova-scheduler   | controller | internal | enabled | up    | --04T12::55.000000 | -               |

|   | nova-conductor   | controller | internal | enabled | up    | --04T12::55.000000 | -               |

|   | nova-consoleauth | controller | internal | enabled | up    | --04T12::55.000000 | -               |

|   | nova-cert        | controller | internal | enabled | up    | --04T12::55.000000 | -               |

|   | nova-compute     | compute1   | nova     | enabled | up    | --04T12::49.000000 | -               |

+----+------------------+------------+----------+---------+-------+----------------------------+-----------------+

[root@controller ~]# nova endpoints #列出身份认证服务中的 API 端点来验证身份认证服务的连通性

WARNING: keystone has no endpoint in ! Available endpoints for this service:  #忽略输出的警告

+-----------+----------------------------------+

| keystone  | Value                            |

+-----------+----------------------------------+

| id        | 00da46788e874f529f67046226c7b0c9 |

| interface | internal                         |

| region    | RegionOne                        |

| region_id | RegionOne                        |

| url       | http://controller:5000/v2.0      |

+-----------+----------------------------------+

+-----------+----------------------------------+

| keystone  | Value                            |

+-----------+----------------------------------+

| id        | 1ee55eac378f4d179bacb4ea3d1850d1 |

| interface | public                           |

| region    | RegionOne                        |

| region_id | RegionOne                        |

| url       | http://controller:5000/v2.0      |

+-----------+----------------------------------+

+-----------+----------------------------------+

| keystone  | Value                            |

+-----------+----------------------------------+

| id        | fab8917d632a4a8c8ccb4290cbd382c6 |

| interface | admin                            |

| region    | RegionOne                        |

| region_id | RegionOne                        |

| url       | http://controller:35357/v2.0     |

+-----------+----------------------------------+

WARNING: nova has no endpoint in ! Available endpoints for this service:

+-----------+------------------------------------------------------------+

| nova      | Value                                                      |

+-----------+------------------------------------------------------------+

| id        | 02b501d9270345fe887165c35c9ee9b2                           |

| interface | public                                                     |

| region    | RegionOne                                                  |

| region_id | RegionOne                                                  |

| url       | http://controller:8774/v2/839cdfc946e1491c8004e3b732d17f9a |

+-----------+------------------------------------------------------------+

+-----------+------------------------------------------------------------+

| nova      | Value                                                      |

+-----------+------------------------------------------------------------+

| id        | 886844dc06d84b838e623f6d3939818c                           |

| interface | internal                                                   |

| region    | RegionOne                                                  |

| region_id | RegionOne                                                  |

| url       | http://controller:8774/v2/839cdfc946e1491c8004e3b732d17f9a |

+-----------+------------------------------------------------------------+

+-----------+------------------------------------------------------------+

| nova      | Value                                                      |

+-----------+------------------------------------------------------------+

| id        | b72dc761e3004e398277d90441ee2cc3                           |

| interface | admin                                                      |

| region    | RegionOne                                                  |

| region_id | RegionOne                                                  |

| url       | http://controller:8774/v2/839cdfc946e1491c8004e3b732d17f9a |

+-----------+------------------------------------------------------------+

WARNING: glance has no endpoint in ! Available endpoints for this service:

+-----------+----------------------------------+

| glance    | Value                            |

+-----------+----------------------------------+

| id        | 589466fdddf447b9b7e273954c2b7987 |

| interface | public                           |

| region    | RegionOne                        |

| region_id | RegionOne                        |

| url       | http://controller:9292           |

+-----------+----------------------------------+

+-----------+----------------------------------+

| glance    | Value                            |

+-----------+----------------------------------+

| id        | f67a5c559caf4580aee84304d1a2f37d |

| interface | internal                         |

| region    | RegionOne                        |

| region_id | RegionOne                        |

| url       | http://controller:9292           |

+-----------+----------------------------------+

+-----------+----------------------------------+

| glance    | Value                            |

+-----------+----------------------------------+

| id        | fb54cd8ff23b4ea0872f1a5db7182d8e |

| interface | admin                            |

| region    | RegionOne                        |

| region_id | RegionOne                        |

| url       | http://controller:9292           |

+-----------+----------------------------------+

[root@controller ~]# nova image-list  #列出镜像服务目录的镜像,验证镜像服务的连通性

+--------------------------------------+--------+--------+--------+

| ID                                   | Name   | Status | Server |

+--------------------------------------+--------+--------+--------+

| 936bce27-085b-4d79-8cce-68cff70d7abd | cirros | ACTIVE |        |

+--------------------------------------+--------+--------+--------+
八、安装和配置网络服务(neutron)
OpenStack网络(neutron)管理您OpenStack环境中虚拟网络基础设施(VNI)所有网络方面和物理网络基础设施(PNI)的接入层方面。OpenStack网络允许租户创建包括像 firewall,load balancer和 virtual private network (VPN)等这样服务的高级网络虚拟拓扑。
1.服务简述
OpenStack Networking(neutron),允许创建、插入接口设备,这些设备由其他的OpenStack服务管理。插件式的实现可以容纳不同的网络设备和软件,为OpenStack架构与部署提供了灵活性。

它包含下列组件:

neutron-server

  接收和路由API请求到合适的OpenStack网络插件,以达到预想的目的。

OpenStack网络插件和代理

  插拔端口,创建网络和子网,以及提供IP地址,这些插件和代理依赖于供应商和技术而不同,OpenStack网络基于插件和代理为Cisco 虚拟和物理交换机、NEC OpenFlow产品,Open vSwitch,Linux bridging以及VMware NSX 产品穿线搭桥。

  常见的代理L3(3层),DHCP(动态主机IP地址),以及插件代理。

消息队列

  大多数的OpenStack Networking安装都会用到,用于在neutron-server和各种各样的代理进程间路由信息。也为某些特定的插件扮演数据库的角色,以存储网络状态

OpenStack网络主要和OpenStack计算交互,以提供网络连接到它的实例。
2.部署需求:创建neutron服务数据库,服务凭证和API端点
[root@controller ~]# mysql -u root -p123456

MariaDB [(none)]> CREATE DATABASE neutron;  #创建neutron数据库

Query OK,  row affected (0.00 sec)

MariaDB [(none)]>  GRANT ALL PRIVILEGES ON neutron.* TO 'neutron'@'localhost'   IDENTIFIED BY '';  #对neutron数据库授予恰当的访问权限

Query OK,  rows affected (0.03 sec)

MariaDB [(none)]>  GRANT ALL PRIVILEGES ON neutron.* TO 'neutron'@'%'   IDENTIFIED BY '';

Query OK,  rows affected (0.00 sec)

MariaDB [(none)]> \q

Bye

[root@controller ~]#  source admin-openrc.sh  #获得 admin 凭证来获取只有管理员能执行命令的访问权限

创建服务证书

[root@controller ~]#  openstack user create --domain default --password-prompt neutron #创建neutron用户

User Password:     #密码为123456

Repeat User Password:

+-----------+----------------------------------+

| Field     | Value                            |

+-----------+----------------------------------+

| domain_id | default                          |

| enabled   | True                             |

| id        | c704bcba775b43b4b9b12a06f60af725 |

| name      | neutron                          |

+-----------+----------------------------------+

[root@controller ~]# openstack role add --project service --user neutron admin  #添加admin 角色到neutron 用户

[root@controller ~]# openstack service create --name neutron --description "OpenStack Networking" network  #创建neutron服务实体

+-------------+----------------------------------+

| Field       | Value                            |

+-------------+----------------------------------+

| description | OpenStack Networking             |

| enabled     | True                             |

| id          | 71ddd68d6f6c463f8656274270650d68 |

| name        | neutron                          |

| type        | network                          |

+-------------+----------------------------------+

[root@controller ~]#  openstack endpoint create --region RegionOne network public http://controller:9696  #创建网络服务API端点

+--------------+----------------------------------+

| Field        | Value                            |

+--------------+----------------------------------+

| enabled      | True                             |

| id           | 7761b18170534542af7a614f53025110 |

| interface    | public                           |

| region       | RegionOne                        |

| region_id    | RegionOne                        |

| service_id   | 71ddd68d6f6c463f8656274270650d68 |

| service_name | neutron                          |

| service_type | network                          |

| url          | http://controller:9696           |

+--------------+----------------------------------+

[root@controller ~]# openstack endpoint create --region RegionOne network internal http://controller:9696

+--------------+----------------------------------+

| Field        | Value                            |

+--------------+----------------------------------+

| enabled      | True                             |

| id           | 1e92ad2a17854c678d37079dd9a9e297 |

| interface    | internal                         |

| region       | RegionOne                        |

| region_id    | RegionOne                        |

| service_id   | 71ddd68d6f6c463f8656274270650d68 |

| service_name | neutron                          |

| service_type | network                          |

| url          | http://controller:9696           |

+--------------+----------------------------------+

[root@controller ~]# openstack endpoint create --region RegionOne network admin http://controller:9696

+--------------+----------------------------------+

| Field        | Value                            |

+--------------+----------------------------------+

| enabled      | True                             |

| id           | 077b1b1213a84699b6c5fda239db148d |

| interface    | admin                            |

| region       | RegionOne                        |

| region_id    | RegionOne                        |

| service_id   | 71ddd68d6f6c463f8656274270650d68 |

| service_name | neutron                          |

| service_type | network                          |

| url          | http://controller:9696           |

+--------------+----------------------------------+
3.配置服务(这里使用网络服务选项2)
controller端(控制端):
[root@controller ~]#yum install openstack-neutron openstack-neutron-ml2 openstack-neutron-linuxbridge python-neutronclient ebtables ipset
[root@controller ~]#  grep "^[a-z]" -B  1 /etc/neutron/neutron.conf #编辑/etc/neutron/neutron.conf文件

[DEFAULT]

core_plugin = ml2 #启用Layer 2 (ML2)插件模块,路由服务和重叠的IP地址

service_plugins = router

allow_overlapping_ips = True

rpc_backend = rabbit #配置 "RabbitMQ" 消息队列访问

auth_strategy = keystone #配置认证服务访问

notify_nova_on_port_status_changes = True #配置网络以能够反映计算网络拓扑变化

notify_nova_on_port_data_changes = True

nova_url = http://controller:8774/v2

verbose = True #启用详细日志

[keystone_authtoken] #配置认证服务访问,在 [keystone_authtoken] 中注释或者删除其他选项。

uth_uri = http://controller:5000

auth_url = http://controller:35357

auth_plugin = password

project_domain_id = default

user_domain_id = default

project_name = service

username = neutron

password = 123456

[database]

connection = mysql://neutron:123456@controller/neutron  #配置数据库访问

[nova] #配置网络以能够反映计算网络拓扑变化

auth_url = http://controller:35357

auth_plugin = password

project_domain_id = default

user_domain_id = default

region_name = RegionOne

project_name = service

username = nova

password = 123456

[oslo_concurrency]

lock_path = /var/lib/neutron/tmp #配置锁路径

[oslo_messaging_rabbit] #配置 "RabbitMQ"消息队列访问

rabbit_host = controller

rabbit_userid = openstack

rabbit_password = 123456

[root@controller ~]#  grep "^[a-z]" -B  1 /etc/neutron/plugins/ml2/ml2_conf.ini #编辑/etc/neutron/plugins/ml2/ml2_conf.ini文件

[ml2]

type_drivers = flat,vlan,vxlan #启用flat,VLAN和VXLAN网络

tenant_network_types = vxlan #启用VXLAN项目(私有)网络  Linux桥接代理只支持VXLAN网络。

mechanism_drivers = linuxbridge,l2population #启用Linux 桥接和layer-2 population mechanisms

extension_drivers = port_security #启用端口安全扩展驱动

[ml2_type_flat]

flat_networks = public #配置公共flat提供网络

[ml2_type_vxlan]

vni_ranges = 1:1000 #配置VXLAN网络标识范围与私有网络不同

[securitygroup]

enable_ipset = True #启用 ipset 增加安全组的方便性

[root@controller ~]#  grep "^[a-z]" -B  1 /etc/neutron/plugins/ml2/linuxbridge_agent.ini #编辑/etc/neutron/plugins/ml2/linuxbridge_agent.ini文件

[linux_bridge]

physical_interface_mappings = public:ens32 #映射公共虚拟网络到公共物理网络接口

[vxlan] #启用VXLAN覆盖网络,配置处理覆盖网络和启用layer-2 的物理网络接口的IP地址

enable_vxlan = True

local_ip = 192.168.1.101

l2_population = True

[agent]

prevent_arp_spoofing = True #启用ARP欺骗防护

[securitygroup]  #启用安全组并配置 Linux 桥接 iptables 防火墙驱动

enable_security_group = True

firewall_driver = neutron.agent.linux.iptables_firewall.IptablesFirewallDriver

[root@controller ~]#  grep "^[a-z]" -B  1 /etc/neutron/l3_agent.ini  #编辑/etc/neutron/l3_agent.ini 文件

[DEFAULT] #配置Linux桥接网络驱动和外部网络桥接

interface_driver = neutron.agent.linux.interface.BridgeInterfaceDriver

external_network_bridge =  #故意缺少值,这样就可以在一个代理上启用多个外部网络

verbose = True #启用详细日志

[root@controller ~]#  grep "^[a-z]" -B  1 /etc/neutron/dhcp_agent.ini  #编辑/etc/neutron/dhcp_agent.ini 文件

[DEFAULT]         #配置Linux桥接网卡驱动,Dnsmasq DHCP驱动并启用隔离元数据,这样在公共网络上的实例就可以通过网络访问元数据

interface_driver = neutron.agent.linux.interface.BridgeInterfaceDriver

dhcp_driver = neutron.agent.linux.dhcp.Dnsmasq

enable_isolated_metadata = True

verbose = True

dnsmasq_config_file = /etc/neutron/dnsmasq-neutron.conf  #启用 dnsmasq 配置文件

[root@controller ~]#  grep "^[a-z]" -B  1 /etc/neutron/dnsmasq-neutron.conf  #编辑创建并/etc/neutron/dnsmasq-neutron.conf 文件

dhcp-option-force=26,1450

[root@controller ~]#  grep "^[a-z]" -B  1 /etc/neutron/metadata_agent.ini

[DEFAULT] #配置访问参数

auth_uri = http://controller:5000

auth_url = http://controller:35357

auth_region = RegionOne

auth_plugin = password

project_domain_id = default

user_domain_id = default

project_name = service

username = neutron

password = 123456

nova_metadata_ip = controller #配置元数据主机

metadata_proxy_shared_secret = 123456 #配置元数据代理共享密码,自定义

verbose = True

admin_tenant_name = %SERVICE_TENANT_NAME%

admin_user = %SERVICE_USER%

admin_password = %SERVICE_PASSWORD%

[root@controller ~]#ln -s /etc/neutron/plugins/ml2/ml2_conf.ini /etc/neutron/plugin.ini #网络服务初始化脚本需要一个超链接 /etc/neutron/plugin.ini指向ML2插件配置文件/etc/neutron/plugins/ml2/ml2_conf.ini。

[root@controller ~]#su -s /bin/sh -c "neutron-db-manage --config-file /etc/neutron/neutron.conf --config-file /etc/neutron/plugins/ml2/ml2_conf.ini upgrade head" neutron #同步数据库

INFO  [alembic.runtime.migration] Context impl MySQLImpl.

INFO  [alembic.runtime.migration] Will assume non-transactional DDL.

  Running upgrade for neutron ...

INFO  [alembic.runtime.migration] Context impl MySQLImpl.

INFO  [alembic.runtime.migration] Will assume non-transactional DDL.

INFO  [alembic.runtime.migration] Running upgrade  -> juno, juno_initial

INFO  [alembic.runtime.migration] Running upgrade juno -> 44621190bc02, add_uniqueconstraint_ipavailability_ranges

INFO  [alembic.runtime.migration] Running upgrade 44621190bc02 -> 1f71e54a85e7, ml2_network_segments models change for multi-segment network.

INFO  [alembic.runtime.migration] Running upgrade 1f71e54a85e7 -> 408cfbf6923c, remove ryu plugin

INFO  [alembic.runtime.migration] Running upgrade 408cfbf6923c -> 28c0ffb8ebbd, remove mlnx plugin

INFO  [alembic.runtime.migration] Running upgrade 28c0ffb8ebbd -> 57086602ca0a, scrap_nsx_adv_svcs_models

INFO  [alembic.runtime.migration] Running upgrade 57086602ca0a -> 38495dc99731, ml2_tunnel_endpoints_table

INFO  [alembic.runtime.migration] Running upgrade 38495dc99731 -> 4dbe243cd84d, nsxv

INFO  [alembic.runtime.migration] Running upgrade 4dbe243cd84d -> 41662e32bce2, L3 DVR SNAT mapping

INFO  [alembic.runtime.migration] Running upgrade 41662e32bce2 -> 2a1ee2fb59e0, Add mac_address unique constraint

INFO  [alembic.runtime.migration] Running upgrade 2a1ee2fb59e0 -> 26b54cf9024d, Add index on allocated

INFO  [alembic.runtime.migration] Running upgrade 26b54cf9024d -> 14be42f3d0a5, Add default security group table

INFO  [alembic.runtime.migration] Running upgrade 14be42f3d0a5 -> 16cdf118d31d, extra_dhcp_options IPv6 support

INFO  [alembic.runtime.migration] Running upgrade 16cdf118d31d -> 43763a9618fd, add mtu attributes to network

INFO  [alembic.runtime.migration] Running upgrade 43763a9618fd -> bebba223288, Add vlan transparent property to network

INFO  [alembic.runtime.migration] Running upgrade bebba223288 -> 4119216b7365, Add index on tenant_id column

INFO  [alembic.runtime.migration] Running upgrade 4119216b7365 -> 2d2a8a565438, ML2 hierarchical binding

INFO  [alembic.runtime.migration] Running upgrade 2d2a8a565438 -> 2b801560a332, Remove Hyper-V Neutron Plugin

INFO  [alembic.runtime.migration] Running upgrade 2b801560a332 -> 57dd745253a6, nuage_kilo_migrate

INFO  [alembic.runtime.migration] Running upgrade 57dd745253a6 -> f15b1fb526dd, Cascade Floating IP Floating Port deletion

INFO  [alembic.runtime.migration] Running upgrade f15b1fb526dd -> 341ee8a4ccb5, sync with cisco repo

INFO  [alembic.runtime.migration] Running upgrade 341ee8a4ccb5 -> 35a0f3365720, add port-security in ml2

INFO  [alembic.runtime.migration] Running upgrade 35a0f3365720 -> 1955efc66455, weight_scheduler

INFO  [alembic.runtime.migration] Running upgrade 1955efc66455 -> 51c54792158e, Initial operations for subnetpools

INFO  [alembic.runtime.migration] Running upgrade 51c54792158e -> 589f9237ca0e, Cisco N1kv ML2 driver tables

INFO  [alembic.runtime.migration] Running upgrade 589f9237ca0e -> 20b99fd19d4f, Cisco UCS Manager Mechanism Driver

INFO  [alembic.runtime.migration] Running upgrade 20b99fd19d4f -> 034883111f, Remove allow_overlap from subnetpools

INFO  [alembic.runtime.migration] Running upgrade 034883111f -> 268fb5e99aa2, Initial operations in support of subnet allocation from a pool

INFO  [alembic.runtime.migration] Running upgrade 268fb5e99aa2 -> 28a09af858a8, Initial operations to support basic quotas on prefix space in a subnet pool

INFO  [alembic.runtime.migration] Running upgrade 28a09af858a8 -> 20c469a5f920, add index for port

INFO  [alembic.runtime.migration] Running upgrade 20c469a5f920 -> kilo, kilo

INFO  [alembic.runtime.migration] Running upgrade kilo -> 354db87e3225, nsxv_vdr_metadata.py

INFO  [alembic.runtime.migration] Running upgrade 354db87e3225 -> 599c6a226151, neutrodb_ipam

INFO  [alembic.runtime.migration] Running upgrade 599c6a226151 -> 52c5312f6baf, Initial operations in support of address scopes

INFO  [alembic.runtime.migration] Running upgrade 52c5312f6baf -> 313373c0ffee, Flavor framework

INFO  [alembic.runtime.migration] Running upgrade 313373c0ffee -> 8675309a5c4f, network_rbac

INFO  [alembic.runtime.migration] Running upgrade kilo -> 30018084ec99, Initial no-op Liberty contract rule.

INFO  [alembic.runtime.migration] Running upgrade 30018084ec99 -> 4ffceebfada, network_rbac

INFO  [alembic.runtime.migration] Running upgrade 4ffceebfada -> 5498d17be016, Drop legacy OVS and LB plugin tables

INFO  [alembic.runtime.migration] Running upgrade 5498d17be016 -> 2a16083502f3, Metaplugin removal

INFO  [alembic.runtime.migration] Running upgrade 2a16083502f3 -> 2e5352a0ad4d, Add missing foreign keys

INFO  [alembic.runtime.migration] Running upgrade 2e5352a0ad4d -> 11926bcfe72d, add geneve ml2 type driver

INFO  [alembic.runtime.migration] Running upgrade 11926bcfe72d -> 4af11ca47297, Drop cisco monolithic tables

INFO  [alembic.runtime.migration] Running upgrade 8675309a5c4f -> 45f955889773, quota_usage

INFO  [alembic.runtime.migration] Running upgrade 45f955889773 -> 26c371498592, subnetpool hash

INFO  [alembic.runtime.migration] Running upgrade 26c371498592 -> 1c844d1677f7, add order to dnsnameservers

INFO  [alembic.runtime.migration] Running upgrade 1c844d1677f7 -> 1b4c6e320f79, address scope support in subnetpool

INFO  [alembic.runtime.migration] Running upgrade 1b4c6e320f79 -> 48153cb5f051, qos db changes

INFO  [alembic.runtime.migration] Running upgrade 48153cb5f051 -> 9859ac9c136, quota_reservations

INFO  [alembic.runtime.migration] Running upgrade 9859ac9c136 -> 34af2b5c5a59, Add dns_name to Port

  OK

[root@controller ~]#systemctl restart openstack-nova-api.service #重启计算API 服务

#启动网络服务并配置他们开机自启动(对所有网络选项)

[root@controller ~]#systemctl enable neutron-server.service neutron-linuxbridge-agent.service neutron-dhcp-agent.service neutron-metadata-agent.service

[root@controller ~]#systemctl start  neutron-server.service neutron-linuxbridge-agent.service neutron-dhcp-agent.service neutron-metadata-agent.service  neutron-l3-agent.service

对网络选项2,同样也启用并启动layer-3服务:

[root@controller ~]#systemctl enable neutron-l3-agent.service

[root@controller ~]#systemctl start neutron-l3-agent.service
compute1(计算节点):
[root@compute1 ~]# yum install openstack-neutron openstack-neutron-linuxbridge ebtables ipset -y

 配置Networking通用组件,Networking 通用组件的配置包括认证机制、消息队列和插件。

 [root@compute1 ]#  grep "^[a-z]" -B   /etc/neutron/neutron.conf

[DEFAULT]

rpc_backend = rabbit #配置RabbitMQ消息队列访问

auth_strategy = keystone #配置认证服务访问 在 [keystone_authtoken] 中注释或者删除其他选项。

verbose = True

[keystone_authtoken] #配置认证服务访问

auth_uri = http://controller:5000

auth_url = http://controller:35357

auth_plugin = password

project_domain_id = default

user_domain_id = default

project_name = service

username = neutron

password =

[oslo_concurrency]

lock_path = /var/lib/neutron/tmp #配置锁路径

[oslo_messaging_rabbit] # #配置RabbitMQ消息队列访问

rabbit_host = controller

rabbit_userid = openstack

rabbit_password =

配置Linux 桥接代理

[root@compute1 ]#  grep "^[a-z]" -B   /etc/neutron/plugins/ml2/linuxbridge_agent.ini

[linux_bridge]

physical_interface_mappings = public:eth0  #映射公共虚拟网络到公共物理网络接口

[vxlan]  #启用VXLAN覆盖网络,配置处理覆盖网络和启用layer-2 的物理网络接口的IP地址

enable_vxlan = True

local_ip = 192.168.1.102

l2_population = True

[agent]

prevent_arp_spoofing = True #启用ARP欺骗防护

[securitygroup]  #启用安全组并配置 Linux 桥接 iptables 防火墙驱动

enable_security_group = True

firewall_driver = neutron.agent.linux.iptables_firewall.IptablesFirewallDriver

[root@compute1 ~]#systemctl restart openstack-nova-compute.service  # 重启计算服务

[root@compute1 ~]#systemctl enable neutron-linuxbridge-agent.service #启动Linux桥接代理并配置它开机自启动

[root@compute1 ~]#systemctl start  neutron-linuxbridge-agent.service
验证操作:
controller端(控制端):
[root@controller ~]#  source admin-openrc.sh  #获得 admin 凭证来获取只有管理员能执行命令的访问权限

[root@controller ~]#  neutron ext-list  #列出加载的扩展,对neutron-server进程是否启动正常进行验证

+-----------------------+-----------------------------------------------+

| alias                 | name                                          |

+-----------------------+-----------------------------------------------+

| dns-integration       | DNS Integration                               |

| ext-gw-mode           | Neutron L3 Configurable external gateway mode |

| binding               | Port Binding                                  |

| agent                 | agent                                         |

| subnet_allocation     | Subnet Allocation                             |

| l3_agent_scheduler    | L3 Agent Scheduler                            |

| external-net          | Neutron external network                      |

| flavors               | Neutron Service Flavors                       |

| net-mtu               | Network MTU                                   |

| quotas                | Quota management support                      |

| l3-ha                 | HA Router extension                           |

| provider              | Provider Network                              |

| multi-provider        | Multi Provider Network                        |

| extraroute            | Neutron Extra Route                           |

| router                | Neutron L3 Router                             |

| extra_dhcp_opt        | Neutron Extra DHCP opts                       |

| security-group        | security-group                                |

| dhcp_agent_scheduler  | DHCP Agent Scheduler                          |

| rbac-policies         | RBAC Policies                                 |

| port-security         | Port Security                                 |

| allowed-address-pairs | Allowed Address Pairs                         |

| dvr                   | Distributed Virtual Router                    |

+-----------------------+-----------------------------------------------+

[root@controller ~]# neutron agent-list  #列出代理以验证启动 neutron 代理是否成功 ,该输出应该显示在控制节点上有四个代理,在每个计算节点上有一个代理

+--------------------------------------+--------------------+------------+-------+----------------+---------------------------+

| id                                   | agent_type         | host       | alive | admin_state_up | binary                    |

+--------------------------------------+--------------------+------------+-------+----------------+---------------------------+

| 186d2121-3fe5-49b6-b462-fe404afb159e | Linux bridge agent | controller | :-)   | True           | neutron-linuxbridge-agent |

| 73aa6284-ac78--80df-2334bcd71736 | Metadata agent     | controller | :-)   | True           | neutron-metadata-agent    |

| 7424c397-481e-49c8-a8df-71d68e7c3b29 | L3 agent           | controller | :-)   | True           | neutron-l3-agent          |

| 8d555ed3--4af2--7e53145a9b03 | DHCP agent         | controller | :-)   | True           | neutron-dhcp-agent        |

| d6f66209---87e7-275dec0e792a | Linux bridge agent | compute1   | :-)   | True           | neutron-linuxbridge-agent |

+--------------------------------------+--------------------+------------+-------+----------------+---------------------------+
九、启动一个实例
创建虚拟网络
在创建私有项目网络前,必须创建创建公共网络(在启动实例前,必须创建必要的虚拟网络设施。对网络选择1,实例通过layer-2(桥接/交换)使用连接到物理网络设施的公共提供虚拟网络。这个网络包括一个为实例提供IP地址的DHCP服务。admin或者其他权限用户必须创建这个网络,因为它直接连接到物理网络设施。)
创建公共网络

[root@controller ~]# source admin-openrc.sh   #加载 admin 凭证来获取管理员能执行的命令访问权限

[root@controller ~]# neutron net-create public --shared --provider:physical_network public --provider:network_type flat  #创建网络

Created a new network:

+---------------------------+--------------------------------------+

| Field                     | Value                                |

+---------------------------+--------------------------------------+

| admin_state_up            | True                                 |

| id                        | 5fc60cce---b9e2-c768af2ea302 |

| mtu                       |                                     |

| name                      | public                               |

| port_security_enabled     | True                                 |

| provider:network_type     | flat                                 |

| provider:physical_network | public                               |

| provider:segmentation_id  |                                      |

| router:external           | False                                |

| shared                    | True                                 |

| status                    | ACTIVE                               |

| subnets                   |                                      |

| tenant_id                 | e5f65d198e594c9f8a8db29a6a9d01a7     |

+---------------------------+--------------------------------------+

[root@controller ~]# neutron subnet-create public 192.168.1.0/ --name public --allocation-pool start=192.168.1.220,end=192.168.1.250 --dns-nameserver 114.114.114.114  --gateway 192.168.1.1    #在网络上创建一个子网

Created a new subnet:

+-------------------+----------------------------------------------------+

| Field             | Value                                              |

+-------------------+----------------------------------------------------+

| allocation_pools  | {"start": "192.168.1.220", "end": "192.168.1.250"} |

| cidr              | 192.168.1.0/                                     |

| dns_nameservers   | 192.168.1.1                                    |

| enable_dhcp       | True                                               |

| gateway_ip        | 192.168.1.1                                        |

| host_routes       |                                                    |

| id                | ac92ba15-daef-4bc3-a353-ed1325c85844               |

| ip_version        |                                                   |

| ipv6_address_mode |                                                    |

| ipv6_ra_mode      |                                                    |

| name              | public                                             |

| network_id        | 5fc60cce---b9e2-c768af2ea302               |

| subnetpool_id     |                                                    |

| tenant_id         | e5f65d198e594c9f8a8db29a6a9d01a7                   |

+-------------------+----------------------------------------------------+

创建私有项目网络

[root@controller ~]# source demo-openrc.sh  #加载 demo 凭证来获取管理员能执行的命令访问权限

[root@controller ~]# neutron net-create private #创建网络 非特权用户一般不能在这个命令制定更多参数

Created a new network:

+-----------------------+--------------------------------------+

| Field                 | Value                                |

+-----------------------+--------------------------------------+

| admin_state_up        | True                                 |

| id                    | ce8a6c38-5a84-47c0-b058-9bdd8b67e179 |

| mtu                   |                                     |

| name                  | private                              |

| port_security_enabled | True                                 |

| router:external       | False                                |

| shared                | False                                |

| status                | ACTIVE                               |

| subnets               |                                      |

| tenant_id             | a152b2b891a147dfa3068d66311ad0c3     |

+-----------------------+--------------------------------------+

[root@controller ~]# neutron subnet-create private172.16.1.0/ --name private   --dns-nameserver 114.114.114.114 --gateway 172.16.1.1  #在网络上创建一个子网

Created a new subnet:

+-------------------+------------------------------------------------+

| Field             | Value                                          |

+-------------------+------------------------------------------------+

| allocation_pools  | {"start": "172.16.1.2", "end": "172.16.1.254"} |

| cidr              | 172.16.1.0/                                  |

| dns_nameservers   | 114.114.114.114                                |

| enable_dhcp       | True                                           |

| gateway_ip        | 172.16.1.1                                     |

| host_routes       |                                                |

| id                | 91f26704-6ead-4d73-870e-115dd8377998           |

| ip_version        |                                               |

| ipv6_address_mode |                                                |

| ipv6_ra_mode      |                                                |

| name              | private                                        |

| network_id        | ce8a6c38-5a84-47c0-b058-9bdd8b67e179           |

| subnetpool_id     |                                                |

| tenant_id         | a152b2b891a147dfa3068d66311ad0c3               |

+-------------------+------------------------------------------------+

创建路由器

[root@controller ~]# source admin-openrc.sh #获得 admin 凭证来获取只有管理员能执行的命令的访问权限

[root@controller ~]# neutron net-update public --router:external #添加router: external到 public 网络

Updated network: public

[root@controller ~]#  source demo-openrc.sh  #加载 demo 凭证获得用户能执行的命令访问权限

[root@controller ~]#  neutron router-create router #创建路由

Created a new router:

+-----------------------+--------------------------------------+

| Field                 | Value                                |

+-----------------------+--------------------------------------+

| admin_state_up        | True                                 |

| external_gateway_info |                                      |

| id                    | 649c8cfc-e117--b55d-cd9214792ae3 |

| name                  | router                               |

| routes                |                                      |

| status                | ACTIVE                               |

| tenant_id             | a152b2b891a147dfa3068d66311ad0c3     |

+-----------------------+--------------------------------------+

[root@controller ~]# neutron router-interface-add router private #在路由器添加一个私网子网接口

Added interface-b387--81b8-a2cbeb5b6b4d to router router.

[root@controller ~]# neutron router-gateway-set router public  #在路由器上设置公共网络的网关

Set gateway for router router
验证操作
[root@controller ~]# source admin-openrc.sh #加载 admin 凭证来获取管理员能执行的命令访问权限

[root@controller ~]# ip netns  #列出网络命名空间。你应该可以看到一个qrouter命名空间和两个qdhcp命名空间。

qrouter-649c8cfc-e117--b55d-cd9214792ae3 (id: )

qdhcp-ce8a6c38-5a84-47c0-b058-9bdd8b67e179 (id: )

qdhcp-5fc60cce---b9e2-c768af2ea302 (id: )

[root@controller ~]#  neutron router-port-list router  #列出路由器上的端口来确定公网的网关IP 地址

+--------------------------------------+------+-------------------+--------------------------------------------------------------------------------------+

| id                                   | name | mac_address       | fixed_ips                                                                            |

+--------------------------------------+------+-------------------+--------------------------------------------------------------------------------------+

| -b387--81b8-a2cbeb5b6b4d |      | fa::3e:a2:c5: | {"subnet_id": "91f26704-6ead-4d73-870e-115dd8377998", "ip_address": "172.16.1.1"}    |

| d3d1023b-5cfc-473b-ace9-84e25a6cfdba |      | fa::3e:::d1 | {"subnet_id": "ac92ba15-daef-4bc3-a353-ed1325c85844", "ip_address": "192.168.1.201"} |

+--------------------------------------+------+-------------------+--------------------------------------------------------------------------------------+

[root@controller ~]#  ping -c  192.168.1.221  #从控制节点或任意公共物理网络上的主机Ping这个IP地址

PING 192.168.1.201 (192.168.1.221) () bytes of data.

 bytes from 192.168.1.221: icmp_seq= ttl= time=0.293 ms

 bytes from 192.168.1.221: icmp_seq= ttl= time=0.066 ms

 bytes from 192.168.1.221: icmp_seq= ttl= time=0.120 ms

 bytes from 192.168.1.221: icmp_seq= ttl= time=0.065 ms

--- 192.168.1.221 ping statistics ---

 packets transmitted,  received, % packet loss, time 3000ms

rtt min/avg/max/mdev = 0.065/0.136/0.293/0.093 ms

生成一个密钥对

[root@controller ~]# source demo-openrc.sh

[root@controller ~]# ssh-keygen -q -N ""   #可以跳过执行 ssh-keygen 命令而使用已存在的公钥

Enter file in which to save the key (/root/.ssh/id_rsa):

[root@controller ~]# nova keypair-add --pub-key ~/.ssh/id_rsa.pub mykey #生成和添加秘钥对

[root@controller ~]# nova keypair-list #验证公钥的添加

+-------+-------------------------------------------------+

| Name  | Fingerprint                                     |

+-------+-------------------------------------------------+

| mykey | ::::2d:e3::e5:a0::ea::8e:1b:a8:ae |

+-------+-------------------------------------------------+

添加安全组规则(默认情况下, default安全组适用于所有实例并且包括拒绝远程访问实例的防火墙规则。推荐至少允许ICMP (ping) 和安全shell(SSH))

[root@controller ~]# nova secgroup-add-rule default icmp - - 0.0.0.0/  #允许 ICMP (ping)

+-------------+-----------+---------+-----------+--------------+

| IP Protocol | From Port | To Port | IP Range  | Source Group |

+-------------+-----------+---------+-----------+--------------+

| icmp        | -        | -      | 0.0.0.0/ |              |

+-------------+-----------+---------+-----------+--------------+

[root@controller ~]# nova secgroup-add-rule default tcp   0.0.0.0/  #允许安全 shell (SSH) 的访问

+-------------+-----------+---------+-----------+--------------+

| IP Protocol | From Port | To Port | IP Range  | Source Group |

+-------------+-----------+---------+-----------+--------------+

| tcp         |         |       | 0.0.0.0/ |              |

+-------------+-----------+---------+-----------+--------------+
#一个实例指定了虚拟机资源的大致分配,包括处理器、内存和存储
[root@controller ~]# source demo-openrc.sh
[root@controller ~]#  nova flavor-list  #列出可用类型,实验使用m1.tiny方案。
+----+-----------+-----------+------+-----------+------+-------+-------------+-----------+

| ID | Name      | Memory_MB | Disk | Ephemeral | Swap | VCPUs | RXTX_Factor | Is_Public |

+----+-----------+-----------+------+-----------+------+-------+-------------+-----------+

|   | m1.tiny   |        |     |          |      |      | 1.0         | True      |

|   | m1.small  |       |    |          |      |      | 1.0         | True      |

|   | m1.medium |       |    |          |      |      | 1.0         | True      |

|   | m1.large  |       |    |          |      |      | 1.0         | True      |

|   | m1.xlarge |      |   |          |      |      | 1.0         | True      |

+----+-----------+-----------+------+-----------+------+-------+-------------+-----------+

[root@controller ~]# nova image-list
+--------------------------------------+--------+--------+--------+

| ID                                   | Name   | Status | Server |

+--------------------------------------+--------+--------+--------+

| 2df37e06-ed46--b5d0-f643640b6a52 | cirros | ACTIVE |        |

+--------------------------------------+--------+--------+--------+

[root@controller ~]#  neutron net-list
+--------------------------------------+---------+-----------------------------------------------------+

| id                                   | name    | subnets                                             |

+--------------------------------------+---------+-----------------------------------------------------+

| 5fc60cce---b9e2-c768af2ea302 | public  | ac92ba15-daef-4bc3-a353-ed1325c85844 192.168.1.0/ |

| ce8a6c38-5a84-47c0-b058-9bdd8b67e179 | private | 91f26704-6ead-4d73-870e-115dd8377998 172.16.1.0/  |

+--------------------------------------+---------+-----------------------------------------------------+

[root@controller ~]# nova secgroup-lsit
+--------------------------------------+---------+------------------------+

| Id                                   | Name    | Description            |

+--------------------------------------+---------+------------------------+

| 0771996c--4ce0-b6c6-8a890a326295 | default | Default security group |

+--------------------------------------+---------+------------------------+

[root@controller ~]# nova boot --flavor m1.tiny --image cirros --nic net-id=ce8a6c38-5a84-47c0-b058-9bdd8b67e179  --security-group default --key-name mykey  private-instance #启动实例

+--------------------------------------+-----------------------------------------------+

| Property                             | Value                                         |

+--------------------------------------+-----------------------------------------------+

| OS-DCF:diskConfig                    | MANUAL                                        |

| OS-EXT-AZ:availability_zone          |                                               |

| OS-EXT-STS:power_state               |                                              |

| OS-EXT-STS:task_state                | scheduling                                    |

| OS-EXT-STS:vm_state                  | building                                      |

| OS-SRV-USG:launched_at               | -                                             |

| OS-SRV-USG:terminated_at             | -                                             |

| accessIPv4                           |                                               |

| accessIPv6                           |                                               |

| adminPass                            | VLYaSAvPAE54                                  |

| config_drive                         |                                               |

| created                              | --05T12::27Z                          |

| flavor                               | m1.tiny ()                                   |

| hostId                               |                                               |

| id                                   | de88100a-47f1-4be5-b54d-e14d828e1150          |

| image                                | cirros (2df37e06-ed46--b5d0-f643640b6a52) |

| key_name                             | mykey                                         |

| metadata                             | {}                                            |

| name                                 | private-instance                              |

| os-extended-volumes:volumes_attached | []                                            |

| progress                             |                                              |

| security_groups                      | default                                       |

| status                               | BUILD                                         |

| tenant_id                            | a152b2b891a147dfa3068d66311ad0c3              |

| updated                              | --05T12::27Z                          |

| user_id                              | 182ee839b7584748aedb1cbda6d55ce2              |

+--------------------------------------+-----------------------------------------------+

[root@controller ~]#nova list #检查实例的状态
+--------------------------------------+------------------+--------+------------+-------------+--------------------+

| ID                                   | Name             | Status | Task State | Power State | Networks           |

+--------------------------------------+------------------+--------+------------+-------------+--------------------+

| de88100a-47f1-4be5-b54d-e14d828e1150 | private-instance | ACTIVE | -          | Running     | private=172.16.1.3 |

+--------------------------------------+------------------+--------+------------+-------------+--------------------+

[root@controller ~]#  nova get-vnc-console private-instance novnc #获取实例的 Virtual Network Computing (VNC) 会话URL并从web浏览器访问它
+-------+---------------------------------------------------------------------------------+

| Type  | Url                                                                             |

+-------+---------------------------------------------------------------------------------+

| novnc | http://controller:6080/vnc_auto.html?token=ffec3792-a83a-4c2e-a138-bac3f8c7595d |

+-------+---------------------------------------------------------------------------------+
访问url:http://controller:6080/vnc_auto.html?token=ffec3792-a83a-4c2e-a138-bac3f8c7595d #浏览器需要可以解析域名或者直接输入IP

#默认密码是 cirros用户是cubswin:)
十、添加仪表盘(dashboard)
OpenStack Dashboard为人所知是一个web接口,使得云管理员和用户可以管理不同的OpenStack资源和服务。仪表盘使得通过OpenStack API与OpenStack计算云控制器进行基于web的交互成为可能。Horizon 允许自定义仪表板的商标。Horizon 提供了一套内核类和可重复使用的模板及工具。
安装和配置
[root@controller ~]# yum install openstack-dashboard -y

[root@controller ~]# vim /etc/openstack-dashboard/local_settings #编辑文件 /etc/openstack-dashboard/local_settings

OPENSTACK_HOST = "controller"  #在 controller 节点上配置仪表盘以使用 OpenStack 服务

ALLOWED_HOSTS = ['*', ]  #允许所有主机访问仪表板

CACHES = {     #配置 memcached 会话存储服务,并将其他的会话存储服务配置注释。

    'default': {

         'BACKEND': 'django.core.cache.backends.memcached.MemcachedCache',

         'LOCATION': 'controller:11211',

    }

}

OPENSTACK_KEYSTONE_DEFAULT_ROLE = "user"  #为通过仪表盘创建的用户配置默认的 user 角色

OPENSTACK_KEYSTONE_MULTIDOMAIN_SUPPORT = True  #启用multi-domain model

OPENSTACK_API_VERSIONS = {   #配置服务API版本,这样你就可以通过Keystone V3 API来登录dashboard

    "identity": ,

    "volume": ,

}

TIME_ZONE = "Asia/Shanghai"  #配置时区

===================================================

如果选择网络选项1,禁用支持3层网络服务,网络选项2默认即可:

OPENSTACK_NEUTRON_NETWORK = {

    ...

    'enable_router': False,

    'enable_quotas': False,

    'enable_distributed_router': False,

    'enable_ha_router': False,

    'enable_lb': False,

    'enable_firewall': False,

    'enable_vpn': False,

    'enable_fip_topology_check': False,

}
=====================================================

[root@controller ~]# systemctl enable httpd.service memcached.service  #启动web 服务器和会话存储服务,并配置它们随系统启动

[root@controller ~]# systemctl restart httpd.service memcached.service
在浏览器中输入 http://controller/dashboard 访问仪表盘(需要浏览器可以解析)
使用"admin"或"demo"用户登录,密码:123456

登录后:

#如果访问网站报500错误,错误日志中报如下错误

解决方法如下:
[root@controller ~]# grep "WSGIApplicationGroup"  -B  /etc/httpd/conf.d/openstack-dashboard.conf  #在WSGISocketPrefix run/wsgi下方添加一行内容 "WSGIApplicationGroup %{GLOBAL}"

WSGISocketPrefix run/wsgi

WSGIApplicationGroup %{GLOBAL}
由于篇幅有限,后续内容见 CentOS7.4安装部署openstack [Liberty版] (二)博客
CentOS7.4安装部署openstack [Liberty版] (一)的更多相关文章
- CentOS7.4安装部署openstack [Liberty版] (二)
继上一篇博客CentOS7.4安装部署openstack [Liberty版] (一),本篇继续讲述后续部分的内容 一.添加块设备存储服务 1.服务简述: OpenStack块存储服务为实例提供块存储 ...
- CentOS7.2非HA分布式部署Openstack Pike版 (实验)
部署环境 一.组网拓扑 二.设备配置 笔记本:联想L440处理器:i3-4000M 2.40GHz内存:12G虚拟机软件:VMware® Workstation 12 Pro(12.5.2 build ...
- centos7 下 安装部署nginx
centos7 下 安装部署nginx 1.nginx安装依赖于三个包,注意安装顺序 a.SSL功能需要openssl库,直接通过yum安装: #yum install openssl b.gzip模 ...
- centos7.8 安装部署 k8s 集群
centos7.8 安装部署 k8s 集群 目录 centos7.8 安装部署 k8s 集群 环境说明 Docker 安装 k8s 安装准备工作 Master 节点安装 k8s 版本查看 安装 kub ...
- 在Ubuntu 12.10 上安装部署Openstack
OpenStack系统有几个关键的项目,它们能够独立地安装但是能够在你的云计算中共同工作.这些项目包括:OpenStack Compute,OpenStack Object Storage,OpenS ...
- Docker(2)--Centos7 上安装部署
Centos7 上安装docker Docker从1.13版本之后采用时间线的方式作为版本号,分为社区版CE和企业版EE. 社区版是免费提供给个人开发者和小型团体使用的,企业版会提供额外的收费服务,比 ...
- Centos7下安装部署oracle数据库方法及问题汇总
目标:在centos7上配置oracle数据库服务器,并在win7上面使用pl/sql成功访问该oracle数据库 系统环境: 服务器:centos7 64位 客户端:win7 64位 注意cneto ...
- centos7 showdoc 安装部署
1.进入showdoc官网帮助目录下 https://www.showdoc.cc/web/#/help?page_id=828455960655160 阅读自动安装部署相关事项: 2.利用xshel ...
- CentOS7.5 安装部署Apache+Mysql+Php
系统:CentOS7.5 安装Apache 安装 yum -y install httpd 开启apache服务 systemctl start httpd.service 设置apache服务开机启 ...
随机推荐
- c#与C++类型转换网摘
转载自 C++和C#转换 https://www.cnblogs.com/zjoch/p/4147182.html c#与C++类型转换,网摘 //c++:HANDLE(void *) ...
- [转]linux中vim命令
在vi中按u可以撤销一次操作 u 撤销上一步的操作 ctrl+r 恢复上一步被撤销的操作 在vi中移动光标至: 行首:^或0 行尾:$ 页首:1G(或gg) 页尾:G(即shift+g) 显 ...
- jmeter—PerfMon Metrics Collector(附java.io.IOException: Agent is unreachable via TCP错误解决办法)
jmeter—PerfMon Metrics Collector(附java.io.IOException: Agent is unreachable via TCP错误解决办法 转自https:// ...
- itertools.groupby()/itertools.compress() 笔记
关于itertools.groupby() itertools.groupby()就是将相邻的并且相同的键值划分为同一组,相似功能可以看https://docs.python.org/3/librar ...
- Docker的一些概念
Docker的一些概念 2.1 什么是Docker? 说实话关于Docker是什么并太好说,下面我通过四点向你说明Docker到底是个什么东西. Docker 是世界领先的软件容器平台. Docker ...
- 解决nginx转发websocket报400错误
解决nginx转发websocket报400错误 说明 由于个人服务器上面有多个项目,配置了二级域名,需要对二级域名进行转发,在转发工作这快采取了大名鼎鼎的nginx.在这之前所有的项目运行转发都没问 ...
- 30 个java编程技巧(最佳实践的初学者)
1.return 一个空的集合,而不是 null 如果一个程序返回一个没有任何值的集合,请确保一个空集合返回,而不是空元素.这样你就不用去写一大堆 ”if else” 判断null元素. Java 的 ...
- STL进阶--狡猾的反向迭代器
反向迭代器 两种声明反向迭代器的方法 reverse_iterator<vector<int>::iterator> ritr; vector<int>::reve ...
- What does "exceeded limit of maxWarmingSearchers=X" mean?
Whenever a commit happens in Solr, a new "searcher" (with new caches) is opened, "war ...
- PyQt—QTableWidget实现翻页功能
主要使用QTableWidget中的三个函数实现: verticalScrollBar().setSliderPosition() 设置当前滑动条的位置 verticalScrollBar().max ...