nacos作为配置中心兼容xml配置文件
最近公司想要用配置中心,因为公司用的有传统的spring项目,有springboot项目,为了兼容都能够采用配置中心,做了一些尝试,经过比较还是倾向于使用nacos,传统dubbo采用spring方式读取xml读取配置文件的方式启动,其配置数据源,redis,rabbitmq等采用的是xml的配置,xml中取值是个问题,为了兼容xml能从远程配置中心更好的取值,做了一系列尝试。
比较当前的一些配置中心

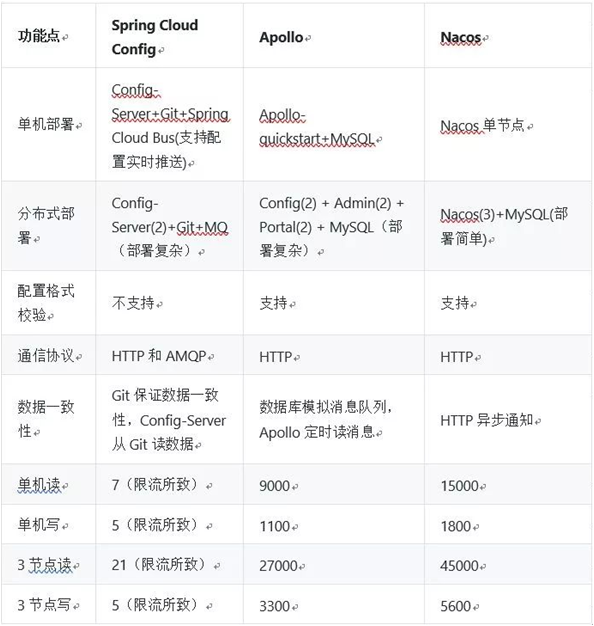
Nacos的部署结构比较简单,运维成本较低。Apollo部署组件较多,运维成本比Nacos高。Spring Cloud Config生产高可用的成本最高。
Apollo支持Spring Boot和Spring Cloud项目,但是实现方式不同于标准,无法做无缝迁移,从Spring Cloud迁移到Apollo,存在代码改造和兼容性成本。
Nacos通过Spring Cloud for Alibaba支持Spring Boot和Spring Cloud生态,符合Spring生态中的标准实现方式,可以无缝从Spring Cloud Conig迁移到Nacos。
Apollo和Nacos相对于Spring Cloud Config的生态支持更广,在配置管理流程上做的更好。
Apollo相对于Nacos在配置管理做的更加全面,但使用起来也要麻烦一些。
Nacos使用起来相对比较简洁,在对性能要求比较高的大规模场景更适合。此外,Nacos除了提供配置中心的功能,还提供了动态服务发现、服务共享与管理的功能,降低了服务化改造过程中的难度。Nacos目前项目上的人力投入、社区的活跃度等也比较高
整体上来看,Nacos的读写性能最高,Apollo次之,Spring Cloud Config的依赖Git场景不适合开放的大规模自动化运维API
一、传统的spring加载xml项目启动兼容
典型启动方式是:
 public static void main(String[] args) throws IOException {

         ClassPathXmlApplicationContext context = new ClassPathXmlApplicationContext(

                 new String[] {"applicationContext.xml"});

         context.start();

         System.out.println("------------");

         System.in.read(); // 为保证服务一直开着, 利用输入流的阻塞来模拟.

     }
这种项目不适合通过注解进行,所以只能采用配置,网上参考的有些坑,主要是jar包冲突的问题,这里放上我修改的jar依赖
<dependency>

            <groupId>com.alibaba.nacos</groupId>

            <artifactId>nacos-spring-context</artifactId>

            <version>0.3.0</version>

            <exclusions>

                <exclusion>

                    <groupId>org.springframework</groupId>

                    <artifactId>spring-context</artifactId>

                </exclusion>

            </exclusions>

        </dependency>
application-nacos.xml
 <?xml version="1.0" encoding="UTF-8" ?>

 <beans xmlns="http://www.springframework.org/schema/beans" xmlns:nacos="http://nacos.io/schema/nacos"

        xmlns:xsi="http://www.w3.org/2001/XMLSchema-instance"

        xsi:schemaLocation="http://nacos.io/schema/nacos http://nacos.io/schema/nacos.xsd

 http://www.springframework.org/schema/beans http://www.springframework.org/schema/beans/spring-beans.xsd">

     <!--nacos配置,这里是使用配置文件的方式,这只是其中的一种方式-->

     <!--开启注解-->

     <nacos:annotation-driven></nacos:annotation-driven>

     <!--指定nacos配置地址-->

     <nacos:global-properties server-addr="localhost:8848"/>

     <!--指定dataId,group-id, 是否是自动刷新-->

     <nacos:property-source data-id="dubbo-config" group-id="DEFAULT_GROUP" auto-refreshed="true"/>

 </beans>
同时需要将该xml导入到基本的application.xml中
<import resource="spring/applicationContext-nacos.xml" />
nacos配置中心上添加的配置内容需要什么配置什么即可。
采用注解形式
<?xml version="1.0" encoding="UTF-8" ?>

<beans xmlns="http://www.springframework.org/schema/beans" xmlns:nacos="http://nacos.io/schema/nacos"

       xmlns:xsi="http://www.w3.org/2001/XMLSchema-instance"

       xsi:schemaLocation="http://nacos.io/schema/nacos http://nacos.io/schema/nacos.xsd

http://www.springframework.org/schema/beans http://www.springframework.org/schema/beans/spring-beans.xsd">

    <!--开启注解-->

    <nacos:annotation-driven></nacos:annotation-driven>

</beans>
@Configuration

@EnableNacosConfig(globalProperties = @NacosProperties(serverAddr = "127.0.0.1:8848"))

@NacosPropertySource(dataId = "dubbo-config", autoRefreshed = true)

public class nacosConfig {

}
3、或者在application.xml里面整合好nacos的xml内容(命名空间,开启注解)采用注解
xmlns:nacos="http://nacos.io/schema/nacos"
xsi:schemaLocation="http://nacos.io/schema/nacos http://nacos.io/schema/nacos.xsd
同时需要注意
<nacos:annotation-driven></nacos:annotation-driven>放置的前后位置,不合适会报错,多更换几个位置试试就可以了,xml的加载顺序是从上到下来加载的
二、springboot项目兼容xml,这里有三种方式,可以采用上面的方式,也可以采用官方文档的注解方式,但是发现采用上面的方式配置动态刷新没有成功,而采用注解方式,需要注意的是注入值应该采用@NacosValue(value ="${xxxx}",autoRefreshed = true)方能能够实现自动刷新,而采用@Value("${xxxx}")不能实现自动刷新
第一种,采用同上面的方式
第二种,采用注解方式,jar包采用传统spring整合的jar包,依赖同上,
package com.topband.beings.config;

import com.alibaba.nacos.api.annotation.NacosProperties;

import com.alibaba.nacos.spring.context.annotation.config.EnableNacosConfig;

import com.alibaba.nacos.spring.context.annotation.config.NacosPropertySource;

import org.springframework.context.annotation.Configuration;

import org.springframework.context.annotation.ImportResource;

@Configuration

//@ImportResource({ "classpath:config/applicationContext-nacos.xml" })注:这个是采用xml配置需要添加的,因为不是采用显示加载application.xml启动

@EnableNacosConfig(globalProperties = @NacosProperties(serverAddr = "127.0.0.1:8848"))

@NacosPropertySource(dataId = "being-springboot-config", autoRefreshed = true)

public class NacosConfig {

}
然后在controller注入值时采用是注入值应该采用@NacosValue(value ="${xxxx}",autoRefreshed = true)即可实现实时刷新,并且访问数据库什么的都是正常的
第三种,采用如下jar包,然后完全按照官方文档来即可
 <dependency>

            <groupId>com.alibaba.boot</groupId>

            <artifactId>nacos-config-spring-boot-starter</artifactId>

            <version>0.2.1</version>

            <exclusions>

                <exclusion>

                    <groupId>org.springframework</groupId>

                    <artifactId>spring-context</artifactId>

                </exclusion>

            </exclusions>

        </dependency>
application.properties
nacos.config.server-addr=127.0.0.1:8848
启动类上加注解
@SpringBootApplication

@NacosPropertySource(dataId = "xxxx你nacos上的dataId", autoRefreshed = true)

public class NacosConfigApplication {

    public static void main(String[] args) {

        SpringApplication.run(NacosConfigApplication.class, args);

    }

}
同样的,采用@NacosValue(value ="${xxxx}",autoRefreshed = true)方能能够实现自动刷新,而采用@Value("${xxxx}")不能实现自动刷新,并且@NacosValue(value ="${xxxx}")也不能实时刷新,autoRefreshed默认为false
三、springboot直接采用springcloud的jar配置
      <dependency>

            <groupId>org.springframework.cloud</groupId>

            <artifactId>spring-cloud-starter-alibaba-nacos-config</artifactId>

            <version>0.2.1.RELEASE</version>

        </dependency>
采用上述jar包去兼容xml的取值时,报不能加载属性值错误。没有成功,后来发现是application-name写错了,修改过来后,直接可用兼容。
四、一个springboot集成springcloud jar无xml配置的demo
直接采用完全注解的方式加载,写了一个小demo,采用三中依赖,不用排除上面exclusions中的包,一个独立的demo,集成redis集群,运行ok
1、bootstrap.properties
server.port=8002

spring.application.name=xxx-test

spring.profiles.active=local

spring.cloud.nacos.config.file-extension=properties

spring.cloud.nacos.config.server-addr=127.0.0.1:8848

#spring.cloud.nacos.config.namespace=d6775f80-ed7a-409a-8dbc-49b2cddee4d1
在 Nacos Spring Cloud 中,dataId 的完整格式如下:
${prefix}-${spring.profile.active}.${file-extension}
prefix默认为spring.application.name的值,也可以通过配置项spring.cloud.nacos.config.prefix来配置。spring.profile.active即为当前环境对应的 profile,详情可以参考 Spring Boot文档。 注意:当spring.profile.active为空时,对应的连接符-也将不存在,dataId 的拼接格式变成${prefix}.${file-extension}file-exetension为配置内容的数据格式,可以通过配置项spring.cloud.nacos.config.file-extension来配置。目前只支持properties和yaml类型。
通过 Spring Cloud 原生注解 @RefreshScope 实现配置自动更新:
@RestController

@RefreshScope

public class TestController {

    private Logger logger = LoggerFactory.getLogger(this.getClass());

    @Autowired

    RedisTemplate<String,String> template;

    @Value("${id}")

    private String id;

    @GetMapping("/getId")

    public String getId(){

        logger.info("看一看id的变化: {}",id);

        template.opsForValue().set("hello","world");

        String result = template.opsForValue().get("hello");

        return "redis result: "+result+"\tid: "+id;

    }

}
Redis属性及配置
 package com.xx.test.config;

 import org.springframework.beans.factory.annotation.Value;

 import org.springframework.cloud.context.config.annotation.RefreshScope;

 import org.springframework.stereotype.Component;

 @Component

 @RefreshScope

 public class RedisProperties {

     @Value("${redis.expireSeconds}")

     private int expireSeconds;

     @Value("${redis.clusterNodes}")

     private String clusterNodes;

     @Value("${redis.commandTimeout}")

     private int commandTimeout;

     @Value("${redis.maxTotal}")

     private int maxTotal;

     @Value("${redis.maxTotal}")

     private int maxIdle;

     @Value("${redis.maxWaitMillis}")

     private int maxWaitMillis;

     @Value("${redis.testOnBorrow}")

     private boolean testOnBorrow;

     @Value("${redis.maxRedirects}")

     private int maxRedirects;

     public int getExpireSeconds() {

         return expireSeconds;

     }

     public void setExpireSeconds(int expireSeconds) {

         this.expireSeconds = expireSeconds;

     }

     public String getClusterNodes() {

         return clusterNodes;

     }

     public void setClusterNodes(String clusterNodes) {

         this.clusterNodes = clusterNodes;

     }

     public int getCommandTimeout() {

         return commandTimeout;

     }

     public void setCommandTimeout(int commandTimeout) {

         this.commandTimeout = commandTimeout;

     }

     public int getMaxTotal() {

         return maxTotal;

     }

     public void setMaxTotal(int maxTotal) {

         this.maxTotal = maxTotal;

     }

     public int getMaxIdle() {

         return maxIdle;

     }

     public void setMaxIdle(int maxIdle) {

         this.maxIdle = maxIdle;

     }

     public int getMaxWaitMillis() {

         return maxWaitMillis;

     }

     public void setMaxWaitMillis(int maxWaitMillis) {

         this.maxWaitMillis = maxWaitMillis;

     }

     public boolean isTestOnBorrow() {

         return testOnBorrow;

     }

     public void setTestOnBorrow(boolean testOnBorrow) {

         this.testOnBorrow = testOnBorrow;

     }

     public int getMaxRedirects() {

         return maxRedirects;

     }

     public void setMaxRedirects(int maxRedirects) {

         this.maxRedirects = maxRedirects;

     }

 }
config
 package com.xxx.test.config;

 import com.xxx.test.common.redis.JRedisClient;

 import org.springframework.beans.factory.annotation.Autowired;

 import org.springframework.context.annotation.Bean;

 import org.springframework.context.annotation.Configuration;

 import org.springframework.data.redis.connection.RedisClusterConfiguration;

 import org.springframework.data.redis.connection.RedisNode;

 import org.springframework.data.redis.connection.jedis.JedisConnectionFactory;

 import org.springframework.data.redis.core.RedisTemplate;

 import org.springframework.data.redis.serializer.StringRedisSerializer;

 import redis.clients.jedis.JedisPoolConfig;

 import java.util.ArrayList;

 import java.util.List;

 @Configuration

 public class RedisConfig {

     @Autowired

     private RedisProperties redisProperties;

     @Bean

     public RedisClusterConfiguration redisClusterConfiguration(){

         RedisClusterConfiguration redisClusterConfiguration = new RedisClusterConfiguration();

         redisClusterConfiguration.setMaxRedirects(redisProperties.getMaxRedirects());

         List<RedisNode> nodeList = new ArrayList<>();

         String[] cNodes = redisProperties.getClusterNodes().split(",");

         //分割出集群节点

         for(String node : cNodes) {

             String[] hp = node.split(":");

             System.out.println("addr: "+hp[0]+"\t ip:"+Integer.parseInt(hp[1]));

             nodeList.add(new RedisNode(hp[0], Integer.parseInt(hp[1])));

         }

         redisClusterConfiguration.setClusterNodes(nodeList);

         return redisClusterConfiguration;

     }

     @Bean

     public JedisPoolConfig jedisPoolConfig(){

         JedisPoolConfig jedisPoolConfig =  new JedisPoolConfig();

         jedisPoolConfig.setMaxIdle(redisProperties.getMaxIdle());

         jedisPoolConfig.setTestOnBorrow(redisProperties.isTestOnBorrow());

         jedisPoolConfig.setMaxTotal(redisProperties.getMaxTotal());

         jedisPoolConfig.setMaxWaitMillis(redisProperties.getMaxWaitMillis());

         return jedisPoolConfig;

     }

     @Bean

     public JedisConnectionFactory getConnectionFactory(){

         return new JedisConnectionFactory(redisClusterConfiguration(),jedisPoolConfig());

     }

     @Bean

     public StringRedisSerializer stringRedisSerializer(){

         return new StringRedisSerializer();

     }

     @Bean

     public RedisTemplate redisTemplate(){

         RedisTemplate redisTemplate = new RedisTemplate();

         redisTemplate.setConnectionFactory(getConnectionFactory());

         redisTemplate.setKeySerializer(stringRedisSerializer());

         redisTemplate.setHashKeySerializer(stringRedisSerializer());

         return redisTemplate;

     }

     @Bean

     public JRedisClient jRedisClient(){

         JRedisClient jRedisClient = new JRedisClient();

         jRedisClient.setRedisTemplate(redisTemplate());

         return jRedisClient;

     }

     @Bean

     public RedisTemplate redisTemplate2(){

         RedisTemplate redisTemplate = new RedisTemplate();

         redisTemplate.setConnectionFactory(getConnectionFactory());

         redisTemplate.setKeySerializer(stringRedisSerializer());

         redisTemplate.setHashKeySerializer(stringRedisSerializer());

         redisTemplate.setValueSerializer(stringRedisSerializer());

         return redisTemplate;

     }

     @Bean

     public JRedisClient jRedisClient2(){

         JRedisClient jRedisClient = new JRedisClient();

         jRedisClient.setRedisTemplate(redisTemplate2());

         return jRedisClient;

     }

 }
nacos上配置按照约定的dataid进行配置即可。
参考:官方文档https://nacos.io/zh-cn/docs/quick-start.html
https://blog.csdn.net/qq_25484147/article/details/86358209
@SpringBootApplication @NacosPropertySource(dataId = "example", autoRefreshed = true) public class NacosConfigApplication { public static void main(String[] args) { SpringApplication.run(NacosConfigApplication.class, args); } }
nacos作为配置中心兼容xml配置文件的更多相关文章
- Nacos(四):SpringCloud项目中接入Nacos作为配置中心
前言 通过前两篇文章: Nacos(二):Nacos与OpenFeign的对接使用 Nacos(三):SpringCloud项目中接入Nacos作为注册中心 相信大家已经对Nacos作为注册中心的基本 ...
- Nacos系列:基于Nacos的配置中心
前言 在看正文之前,我想请你回顾一下自己待过的公司都是怎么管理配置的,我想应该会有以下几种方式: 1.硬编码 没有什么配置不配置的,直接写在代码里面,比如使用常量类 优势:对开发友好,开发清楚地知道代 ...
- java架构之路-(微服务专题)feign的基本使用和nacos的配置中心
上次回归: 上次我们说了ribbon的基本使用,包括里面的内部算法,算法的细粒度配置,还有我们自己如何实现我们自己的算法,主要还是一些基本使用的知识,还不会使用ribbon的小伙伴可以回去看一下上一篇 ...
- nacos作为配置中心动态刷新@RefreshScope添加后取值为null的一个问题
之前springboot项目常量类如下形式: @Component @RefreshScope//nacos配置中心时添加上 public class Constants { @Value(" ...
- Nacos作为配置中心时,多个服务共用一个dataId的配置
写在前面 本文是对我之前一篇文章<Spring Cloud+nacos+Feign,实现注册中心及配置中心>的补充.此文章中简单写了如何将Nacos作为配置中心.在使用配置中心时,我们会遇 ...
- 程序员你是如何使用Nacos作为配置中心的?
假如你使用的是spring-cloud-alibaba微服务技术栈 单个服务独有配置文件 即去除应用程序的状态,配置统一外部化管理,方便进行水平的伸缩. 集成步骤: 假如我有一个应用app-desig ...
- 使用nacos作为配置中心统一管理配置
基础环境 引入所需依赖包 <dependency> <groupId>com.alibaba.cloud</groupId> <artifactId>s ...
- SpringBoot项目使用Nacos作为配置中心
前置条件:jdk.SpringBoot项目.Nacos.Linux服务器(可无) 具体版本:jdk11.SpringBoot 2.3.5.RELEASE.Nacos 2.0.3.Centos 6 目标 ...
- Spring Cloud Alibaba基础教程:使用Nacos作为配置中心
通过本教程的前两篇: <Spring Cloud Alibaba基础教程:使用Nacos实现服务注册与发现> <Spring Cloud Alibaba基础教程:支持的几种服务消费方 ...
随机推荐
- C语言与汇编的嵌入式编程:main中模拟函数的调用(两数交换)
编写一个两数交换函数swap,具体代码如下: #include<stdio.h> void swap(int *p1,int *p2) { int temp; temp = *p1; *p ...
- Vue-状态管理Vuex的使用
vuex是状态管理,是为了解决跨组件之间数据共享问题的,一个组件的数据变化会映射到使用这个数据的其他组件当中.如果刷新页面,之前存储的vuex数据全部都会被初始化掉.以一个全局单例模式管理当应用遇到多 ...
- 4_6 师兄帮帮忙(UVa12412)(选做)
你好,我是外国语学院的本科生.正如你所知道的,编程是一个 在我们大学必修课,即使他/她的专业是远离计算机科学.我根本不喜欢这个 课程,因为我不擅长电脑,我不想有任何编程的尝试! 但我不得不做作业: ...
- Bugku-CTF社工篇之信息查找
- 【代码学习】PYTHON中的静态方法和类方法
一.类方法 是类对象所拥有的方法,需要用修饰器@classmethod来标识其为类方法,对于类方法,第一个参数必须是类对象,一般以cls作为第一个参数(当然可以用其他名称的变量作为其第一个参数,但是大 ...
- idea 启动java项目报 java: 程序包org.apache.jasper.tagplugins.jstl.core不存在
File -- Project Structure
- PHP序列化与反序列化(二)
题目(攻防世界): __construct和__destruct的魔术方法是默认执行的,我们可以忽视他们,__wake up执行以后会返回当前主页上,需要绕过,下面的正则匹配preg_match也需要 ...
- Mybatis中mapper.xml的使用
详解多对多,mybatis多对多查询(xml方式和注解方式) 链接:https://blog.csdn.net/qq_42524262/article/details/98383977 链接:http ...
- HTTP接口调用方式
1.get方式,设置调用方式为get,参数直接在url中包含,直接调用获取返回值即可 2.post方式,content为application/x-www-form-urlencoded ,参数格式 ...
- C#上传数据到HTTP,HTTPS 代码示例
string param = string.Format("username={0}&password={1}", account, pwd); string result ...