maven/gradle 打包后自动上传到nexus仓库
前提:
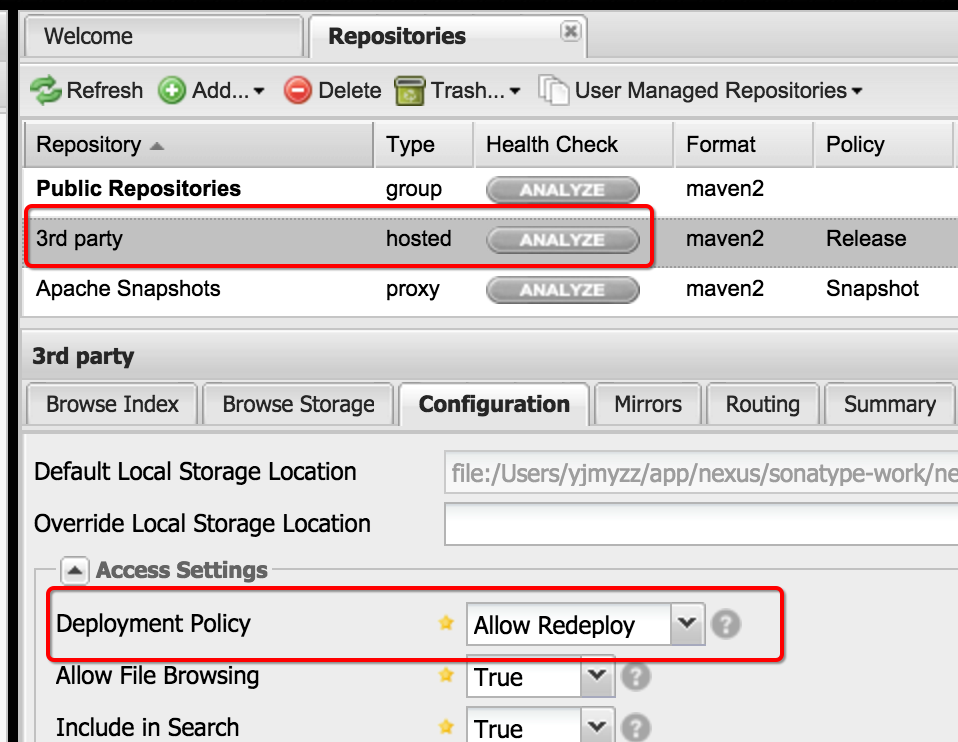
nexus的相关repository必须设置允许redeploy,参考下图:
maven项目:
pom.xml中增加以下节点:
    <distributionManagement>

        <repository>

            <id>nexus-3rd</id>

            <url>http://localhost:8081/nexus/content/repositories/thirdparty/</url>

        </repository>

    </distributionManagement>
一般上传到nexus,为了方便他人查看源码,也会上传源码包,建议在build/plugins节点里再增加以下节点,以便自动生成源码jar包
 <plugin>

     <groupId>org.apache.maven.plugins</groupId>

     <artifactId>maven-source-plugin</artifactId>

     <executions>

         <execution>

             <id>attach-sources</id>

             <goals>

                 <goal>jar</goal>

             </goals>

         </execution>

     </executions>

 </plugin>
上传到nexus时是需要身份验证的,所以还要在$M2_HOME/conf/settings.xml里添加以下内容:
     <servers>

         <server>

             <username>admin</username>

             <password>admin123</password>

             <id>nexus-3rd</id>

         </server>

     </servers>
注意:这里的id必须与pom.xml中distributionManagement/repository/id保持一致。
最后一步,执行mvn命令:
mvn deploy -Dmaven.test.skip=true
后面的-Dmaven.test.skip=true意为跳过单元测试,可以酌情删减,顺利的话,以输出中会看到类似内容:
...

Uploading: http://localhost:8081/nexus/content/repositories/thirdparty/xxx/xxx.jar

Uploaded: http://localhost:8081/nexus/content/repositories/thirdparty/xxx/xxx.jar (29582 KB at 18829.7 KB/sec)

...
gradle项目:
group 'my-company'

version '1.0'

def artifactId = "my-artifact"

apply plugin: 'java'

apply plugin: 'maven'

...

//打包源代码

task sourcesJar(type: Jar, dependsOn: classes) {

    classifier = 'sources'

    from sourceSets.main.allSource

}

artifacts {

    archives sourcesJar

}

...

//如果希望gradle install,安装到.m2本地仓库,参考下面的内容

install {

    repositories.mavenInstaller {

        pom.version = "$project.version"

        pom.artifactId = "$artifactId"

        pom.groupId = "$project.group"

    }

}

//上传到nexus

uploadArchives {

    repositories {

        mavenDeployer {

            repository(url: "http://localhost:8081/nexus/content/repositories/thirdparty") {

                authentication(userName: "admin", password: "admin123")

            }

            pom.version = "$project.version"

            pom.artifactId = "$artifactId"

            pom.groupId = "$project.group"

        }

    }

}
然后gradle upload即可
不同分支(环境)的管理问题:
实际开发中,不同的环境通常会对应不同的git分支,比如:开发环境对应dev分支,测试环境对应test分支,生产环境对应master分支,dev环境测试通过后,合并到test分支,test分支完成后合并到master分支。
但是这样有一个问题,nexus上的repository并没有区分环境,如果程序员A在日常开发中,把dev分支的artifact上传到了nexus,而部署人员在构建test环境的项目,这时从nexus上取到的就是dev环境里的东西,造成混乱,这里提供2种思路:
1)每个环境都搭一套nexus,各个环境完全隔离
优点:好管理,如果每个环境都通过统一的部署机器构建发布,结合host配置,可以将url也统一固定,只需要各环境部署机上的host配置好就行。
缺点:有点浪费资源
2)nexus只有一套,repository建多个,比如
http://localhost:8081/nexus/content/repositories/thirdparty_dev
http://localhost:8081/nexus/content/repositories/thirdparty_test
http://localhost:8081/nexus/content/repositories/thirdparty_prod
这样相对比较节省资源一点,gradle中可以这样配置:
def env = System.getProperty("env") ?: "local"

uploadArchives {

    repositories {

        mavenDeployer {

            repository(url: "http://localhost:8081/nexus/content/repositories/thirdparty_$env") {

                authentication(userName: "admin", password: "admin123")

            }

            pom.version = "$project.version"

            pom.artifactId = "$artifactId"

            pom.groupId = "$project.group"

        }

    }

}
然后gradle upload -Denv=dev 即可
另外:考虑到maven项目本机缓存的特性,建议在开发阶段将版本号设置成SNAPSHOT,正式发布时,再去掉SNAPSHOT。详情可见园友文章:理解Maven中的SNAPSHOT版本和正式版本
maven/gradle 打包后自动上传到nexus仓库的更多相关文章
- Gradle 打包上传至私有仓库配置
allprojects{ apply plugin: 'java' apply plugin: 'idea' apply plugin: 'maven' group 'com.xxxxx.base' ...
- maven项目打包后war文件丢失配置文件
使用maven package打包项目时出现配置文件丢失的现象,此类问题解决办法如下: 在web项目pom.xml 文件中添加如下: 在<build>标签中添加如下配置: <reso ...
- maven无法加载本地jar包以及maven项目打包后本地jar包没有打进项目的问题解决办法
1.首先设置依赖项,这样maven就会把该路径下的jar包导入项目引用 <dependency> <groupId>DPSDK-Manager</groupId> ...
- gradle 打包后第三方登录不上
使用 gradlew clean assembleReleaseChannels 生成不用的渠道包后 第三方登录不上 原因:打包未设置好APP的 .keystore
- 如何使用Gradle的maven-publish将jar包或者war包上传到nexus仓库
首先,在build.gradle里边声明依赖maven-publish插件: apply plugin: 'maven-publish' 然后,配置项目的信息和和nexus的信息: publishin ...
- Maven实战(十)利用 Nexus 来构建企业级 Maven 仓库
目录 一.简介 Nexus是Maven仓库管理器,用来搭建一个本地仓库服务器,这样做的好处是便于管理,节省网络资源,速度快,还有一个非常有用的功能就是可以通过项目的SNAPSHOT版本管理,来进行模块 ...
- (十二)maven之nexus仓库的基本用法
nexus仓库的基本用法 ① 启动nexus. 上一章有提到:https://www.cnblogs.com/NYfor2018/p/9079068.html ② 访问http://localhost ...
- Maven之搭建本地私服(nexus)仓库
摘要:现在越来越多的项目都在使用Maven管理项目,尤其是在大型的项目团队中使用Maven能带来更加多的好处,私服的好处我相信大家都明白,在这里我就不多说了,它最重要的作用就是可以让项目团队成员更加方 ...
- 使用gradle插件发布项目到nexus中央仓库
目录 简介 Gradle Nexus Publish Plugin历史 插件的使用 Groovy DSL Kotlin DSL 插件背后的故事 总结 简介 Sonatype 提供了一个叫做开源软件资源 ...
随机推荐
- Linux基礎知識 —— open&close
下面說一下在用戶空間調用open/close/dup跟驅動中的open和release的對應. 下面是測試驅動: #include <linux/module.h> #include &l ...
- spring boot(四):thymeleaf使用详解
在上篇文章springboot(二):web综合开发中简单介绍了一下thymeleaf,这篇文章将更加全面详细的介绍thymeleaf的使用.thymeleaf 是新一代的模板引擎,在spring4. ...
- ASP.NET Core 中文文档 第四章 MVC(2.1)模型绑定
原文:Model Binding 作者:Rachel Appel 翻译:娄宇(Lyrics) 校对:许登洋(Seay).何镇汐 模型绑定介绍 ASP.NET Core MVC 中的模型绑定从 HTTP ...
- LinqToDB 源码分析——处理表达式树
处理表达式树可以说是所有要实现Linq To SQL的重点,同时他也是难点.笔者看完作者在LinqToDB框架里面对于这一部分的设计之后,心里有一点不知所然.由于很多代码没有文字注解.所以笔者只能接合 ...
- js实现蛇形矩阵
参加腾讯前端实习生笔试,真的是被虐了千百遍,除了一条js程序题,其他半点前端都没有,都是考算法,计算机原理,数据结构.下面贴上腾讯笔试最后三大条中的一条,实现一个蛇形矩阵的输出.蛇形矩阵的什么样这里我 ...
- ASP.Net MVC Session和Cookies的简单使用
目标:用Session和Cookies实现登陆信息保存和展现 Cookies实现: Controller: //把登陆用户名存到cookies中 HttpCookie cook = new HttpC ...
- Entity Framework Plus 系列目录
Entity Framework Plus 系列文章计划的已经全部写完,可能还有其他功能没有写到,希望大家能够多动手,尝试一下使用,一定会给您带来一些帮助的.文章全部写完,也应该出一个目录方便查看,目 ...
- php N 维数组的读取、设置、删除
<?php // 例子 $rowList = array(); $rowList[] = array('A'=>'A_1','B'=>'A_1_1','C'=>'A_1_1_1 ...
- nginx添加 nginx_heath模块
原因?为什么会使用nginx_heath 这个模块,主要是如nginx+tomcat部署的时,tomcat挂了之后nginx->upstream 轮询是可以踢掉挂掉的tomcat服务的,如果部署 ...
- 记录一次bug解决过程:eclipse Installed JREs 配置引出的问题
一 总结 eclipse Installed JREs 配置引出的问题:编译以来JDK,不是JRE spring boot内嵌tomcat运行程序,tomcat:run 二 Bug描述:eclipse ...