Could not retrieve mirrorlist http://mirrorlist.centos.org/?release=7&arch=x86_64&repo=os&infra=stock32 error was 14: curl#6 - "Could not resolve host: mirrorlist.centos.org; Unknown error"
|
1
2
3
4
5
6
7
8
9
10
11
12
13
14
15
16
17
18
19
20
21
22
23
24
25
26
27
|
Could not retrieve mirrorlist http://mirrorlist.centos.org/?release=7&arch=x86_64&repo=os&infra=stock32 error was14: curl#6 - "Could not resolve host: mirrorlist.centos.org; Unknown error"One of the configured repositories failed (Unknown),and yum doesn't have enough cached data to continue. At this point the onlysafe thing yum can do is fail. There are a few ways to work "fix" this: 1. Contact the upstream for the repository and get them to fix the problem. 2. Reconfigure the baseurl/etc. for the repository, to point to a working upstream. This is most often useful if you are using a newer distribution release than is supported by the repository (and the packages for the previous distribution release still work). 3. Disable the repository, so yum won't use it by default. Yum will then just ignore the repository until you permanently enable it again or use --enablerepo for temporary usage: yum-config-manager --disable <repoid> 4. Configure the failing repository to be skipped, if it is unavailable. Note that yum will try to contact the repo. when it runs most commands, so will have to try and fail each time (and thus. yum will be be much slower). If it is a very temporary problem though, this is often a nice compromise: yum-config-manager --save --setopt=<repoid>.skip_if_unavailable=true |
googel了一下这个错误,发现报错原因是“本机无法连接网络的网络设置”的原因。
于是参照“How to Setup network on centos 7”这篇博文,配置了下DHPC,最终解决了这个error。
配置CentOS 7的网络,步骤如下:
1.在终端中输入以下命令,查看安装在本机的网卡:

|
1
2
3
4
5
6
|
[xi@localhost ~]$ nmcli d//以下显示是已经配置到网络后的本机网络状况。DEVICE TYPE STATE CONNECTION virbr0 bridge connected virbr0 eno16777736 ethernet connected eno16777736virbr0-nic ethernet disconnected -- lo loopback unmanaged -- |
2.GUI 或 命令模式的网络配置:
GUI模式:
Step #1 » 在终端中输入以下命令,打开网络管理员。接着选择“Edit a connection”后按回车键(使用TAB键进行选择的选项)。
|
1
|
[xi@localhost ~]$ nmtui |

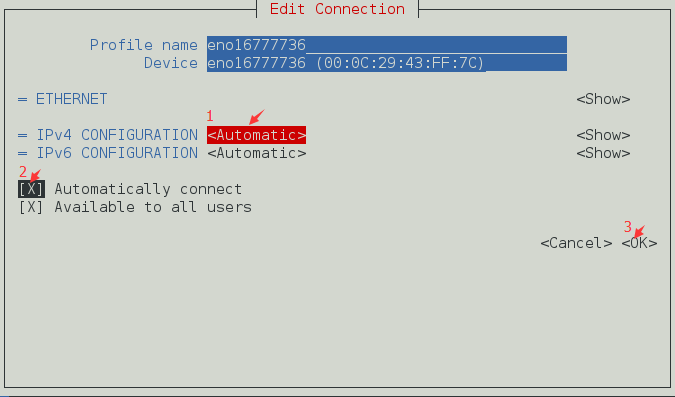
Step #2 » 现在你可以看到所有的网络接口,选择一个(我选择了“eno16777736”),然后点击“ Edit “。

Step 3 » 动态配置 或 静态配置
» 动态配置
1.在“IPv4 CONFIGURATION”配置选择“<Automatic>”;
2.选择“Automatically connect”复选框;
3.点击OK键,退出网络管理器。最后,通过键入以下命令重新启动网络服务。
|
1
|
[xi@localhost ~]$ systemctl restart network |
现在你的服务器将从DHCP获得IP地址。
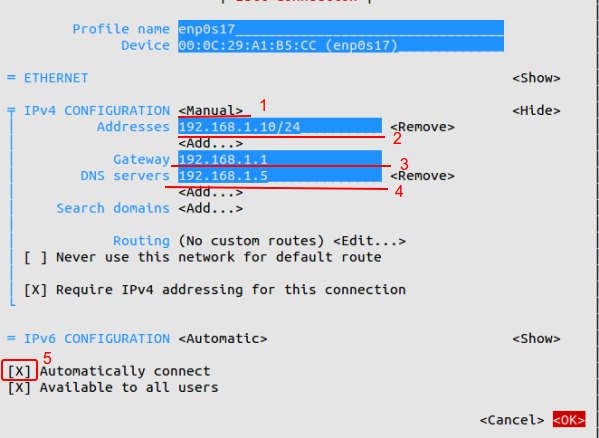
» 静态配置
1.在“IPv4 CONFIGURATION”配置选择”Manual”;
2.添加与子网掩码,网关和DNS服务器(参见下图)的IP地址;
3.选择“Automatically connect”复选框;
4.点击OK键,退出网络管理器。现在,通过键入以下命令重新启动网络服务。
|
1
|
[xi@localhost ~]$ systemctl restart network |
现在你的服务器具有静态IP。
命令模式:
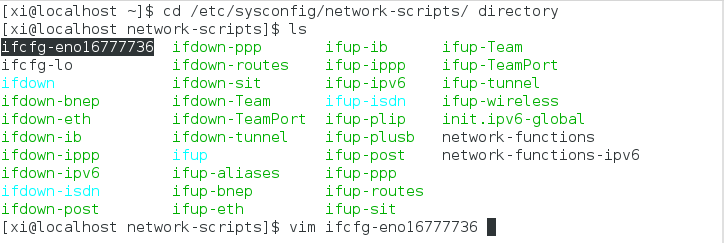
Step #1 » 切换到/etc/sysconfig/network-scripts/目录下,打开“ifcfg-eno16777736”文件:
|
1
|
xi@localhost network-scripts]$ cd /etc/sysconfig/network-scripts/ |
|
1
|
[xi@localhost network-scripts]$ vim ifcfg-eno16777736 |
打开ifcfg-eno16777736文件,展开如下:
|
1
2
3
4
5
6
7
8
9
10
11
12
13
14
15
16
|
1 TYPE=Ethernet2 BOOTPROTO=none3 DEFROUTE=yes4 IPV4_FAILURE_FATAL=no5 IPV6INIT=yes6 IPV6_AUTOCONF=yes7 IPV6_DEFROUTE=yes8 IPV6_FAILURE_FATAL=no9 NAME=enp0s1710 UUID=7f1aff2d-b154-4436-9497-e3a4dedddcef11 ONBOOT=no12 HWADDR=00:0C:29:A1:B5:D613 PEERDNS=yes14 PEERROUTES=yes15 IPV6_PEERDNS=yes16 IPV6_PEERROUTES=yes |
Step #3 » 动态配置 或 静态配置
» 动态配置
依次将第2行和第11行替换为:
BOOTPROTO=dhcp
ONBOOT=yes
然后,通过键入以下命令重新启动网络服务:
|
1
|
[xi@localhost ~]$ systemctl restart network |
连接外网,测试网络是否成功:
|
1
|
xi@localhost ~]$ ping www.baidu.com |
» 静态配置
依次将第2行和第11行替换为:
BOOTPROTO=static
ONBOOT=yes
然后,在文件末尾添加以下4行:
|
1
2
3
4
|
IPADDR=172.27.0.32NETMASK=255.255.255.0GATEWAY=172.27.0.1DNS1=172.27.0.5 |
最后,通过键入以下命令重新启动网络服务:
|
1
|
[xi@localhost ~]$ systemctl restart network |
现在你的服务器具有静态IP。
此外,你可以通过打开文件/ etc / sysconfig / network来修改主机名和DNS。
centos查询本机的外网输入 curl ifconfig.me 命令即可查看:

centos查询上网网关IP,tracepath www.baidu.com

|
1
2
3
4
|
HOSTNAME = server.krizna.comDNS1 = 192.168.1.5DNS2 = 8.8. 8.8SEARCH = krizna.com |
Could not retrieve mirrorlist http://mirrorlist.centos.org/?release=7&arch=x86_64&repo=os&infra=stock32 error was 14: curl#6 - "Could not resolve host: mirrorlist.centos.org; Unknown error"的更多相关文章
- CentOS报错:Could not retrieve mirrorlist http://mirrorlist.centos.org/?release=7&arch=x86_64&repo=os&infra=stock32 error was 14: curl#6 - "Could not resolve host: mirrorlist.centos.org; Unknown error"
今天安装完带图形界面的CentOS 7后,在Terminal中运行yum安装命令时报了以下错误: Could not retrieve mirrorlist http://mirrorlist.cen ...
- yum 安装报错:Could not retrieve mirrorlist http://mirrorlist.centos.org/?release=7&arch=x86_64&repo=os&infra=stock error was 14: curl#6 - "Could not resolve host: mirrorlist.centos.org; Unknown error"
[root@venn09 ~]# yum install -y vim Loaded plugins: fastestmirror Could not retrieve mirrorlist http ...
- Bug Could not retrieve mirrorlist http://mirrorlist.centos.org/?release=7&arch=x86_64&repo=os&infra=stock error was
yum -y install gcc 时候报bug: Could not retrieve mirrorlist http://mirrorlist.centos.org/?release=7& ...
- Could not retrieve mirrorlist http://mirrorlist.centos.org/?release=7&arch=x86_64&repo=os&infra=stoc
今天在使用yum安装文件时,出现了以下问题: root@localhost opt]# yum update Loaded plugins: fastestmirror Could not retri ...
- Linux安装yum install gcc-c++出错:Could not retrieve mirrorlist http://mirrorlist.centos.org/?release=7&arch=x86_64&repo=os&infra=stock error was 14: curl#6 - "Could not resolve host: mirrorlist.centos...
错误如图: 解决办法: 1.修改配置文件 /etc/resolv.conf,该配置文件如下: 2.输入:gedit resolv.conf,修改配置文件内容如下: 3.然后重启: 4.重新进行安装: ...
- 14: curl#6 - "Could not resolve host: mirrorlist.centos.org; 未知的错误"
14: curl#6 - "Could not resolve host: mirrorlist.centos.org; 未知的错误" One of the configured ...
- yum安装软件报错:curl#6 - "Could not resolve host: mirrorlist.centos.org; Temporary failure in name resolut
# yum install -y epel-release Loaded plugins: fastestmirror Repository base is listed more than once ...
- 安装时遇到:正在尝试其它镜像。 http://mirrors.btte.net/centos/7.2.1511/extras/x86_64/repodata/repomd.xml: [Errno 14] curl#6 - "Could not resolve host: mirrors.btte.net; 未知的错误"
我出现这种错误是因为网络链接问题,因为我设置虚拟机网络链接为VmNET8,设置了nat模式,使得我本地机可以访问虚拟机的linux服务器.但是打开虚拟机的浏览器却不能上网了.所以现在我用xshell装 ...
- Could not resolve host: mirrorlist.centos.org Centos 7 Unkown error
安装Centos7(core)以后,网卡默认不会启用.这是一个大坑,直接报错,这是一个过度优化,有几个开发人员/运维人员安装centos7(core)不用ssh去连接服务器的. 报错如下: Loade ...
随机推荐
- Java将数据按列写入Excel并设置格式(字体、背景色、自动列宽、对齐方式等)
本文使用jxl.jar工具类库将数据按列写入Excel并设置格式(字体.背景色.自动列宽.对齐方式等). /** * 按列写入Excel并设置格式 * * @param outputUrl * 输出路 ...
- 页面优化,谈谈重绘(repaint)和回流(reflow)
一.前言 偶尔在面试过程中遇到过重汇与回流reflow的问题,毕竟页面优化也是考核一个开发者能力的关键之一,上篇文章聊了下documentfragment也是为了减轻回流问题,那么本篇文章好好介绍下重 ...
- [SpringBoot guides系列翻译]通过JDBC和Spring访问关系数据库
原文 参考链接 hikaricp Spring Boot JDBC Starter Spring Boot Starter Parent h2 database introduction Autowi ...
- MySQL 笔记整理(13) --为什么数据表删掉一半,表文件大小不变?
笔记记录自林晓斌(丁奇)老师的<MySQL实战45讲> (本篇内图片均来自丁奇老师的讲解,如有侵权,请联系我删除) 13) --为什么数据表删掉一半,表文件大小不变? 我们还是以MySQL ...
- 2017年IT行业测试调查报告
在刚刚过去的2017年, 我们来一起看一下2017年IT行业测试调查报告 还是1到5名测试工程师最多 Test Architects 在北上广一线城市已经出现 https://www.lagou.co ...
- Memcache的 简介
MemCache memcache是一套分布式的高速缓存系统.目前被许多网站使用以提升网站的访问速度,尤其对于一些大型的.需要频繁访问数据库的网站访问速度提升效果十分显著,是一套开放源代码软件. 工作 ...
- foreach(Element elem in selections.Elements)无法实现
因为版本问题 原:foreach(Element elem in selections.Elements){ } 现: ElementSet selections = new ElementSet() ...
- 为什么单线程的Redis这么快?
一. Redis简介 Redis是一个开源的内存中的数据结构存储系统,它可以用作数据库.缓存和消息中间件. 它支持多种类型的数据结构,如 字符串(strings), 散列(hashes), 列表(li ...
- 原生jQuery代码
function myJquery(selector){ if(typeof selector=="string") { if (selector.charAt(0) == &qu ...
- TextSwitcher 文本切换器的功能与用法
TextSwitcher集成了ViewSwitcher, 因此它具有与ViewSwitcher相同的特性:可以在切换View组件时使用动画效果.与ImageSwitcher相似的是,使用TextSwi ...