嵌入式驱动开发之---Linux ALSA音频驱动(一)
本文的部分内容参考来自DroidPhone的博客(http://blog.csdn.net/droidphone/article/details/6271122),关于ALSA写得很不错的文章,只是少了实例。本文就是结合实例来分析ALSA音频驱动。
开发环境:ubuntu10.04
目标板:linux-2.6.37 (通过命令uname -r 查看linux内核版信息)
编译器:arm-none-linux-gnueabi- (none 代表编译器的制作者,比如:fsl代表飞思卡尔,内核里面谈EABI,OABI,其实相对于系统调用的方式,当然我们所说的系统限于arm系统)
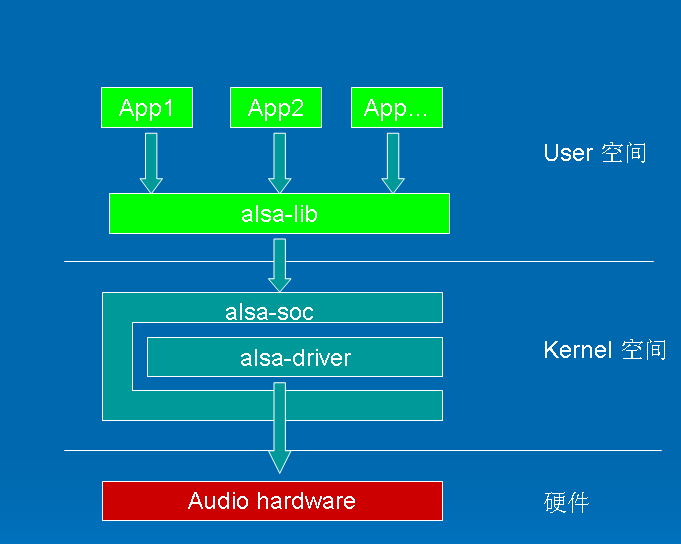
接下来,我们首先要了解的是ALSA整体架构,架构图如下:
在内核设备驱动层,ALSA提供了alsa-driver,同时在应用层,ALSA为我们提供了alsa-lib,应用程序只要调用alsa-lib提供的API(本开发板/usr/lib/libasound.so.2 和 libasound.so.2.0.0 下alsa-lib库asound),即可以完成对底层音频硬件的控制。内核空间中,alsa-soc其实是对alsa-driver的进一步封装,他针对嵌入式设备提供了一些列增强的功能。
接下来我们查看设备文件和sys系统接口:


我们可以看到以下设备文件:
controlC0 --> 用于声卡1的控制,例如通道选择,混音,麦克风的控制等
controlC1 --> 用于声卡2的控制,例如通道选择,混音,麦克风的控制等
midiC0D0 --> 用于播放midi音频 (我的驱动不具有)
pcmC0D0c --> 用于声卡1录音的pcm设备(tvp5158音频采集)
pcmC0D1c --> 用于声卡1录音的pcm设备(tlv320aic3x音频采集)
pcmC0D1P --> 用于声卡1播放的pcm设备(tlv320aic3x音频输出)
pcmC1D0p --> 用于声卡2播放的pcm设备(hdmi音频输出)
seq --〉 音序器 (我的驱动不具有)
timer --〉 定时器
由此可以看出具有2个声卡,声卡1具有2个录音设备和一个播放设备,声卡2只具有一个播放设备
其中,C0D0代表的是声卡0中的设备0,pcmC0D0c最后一个c代表capture,pcmC0D0p最后一个p代表playback,这些都是alsa-driver中的命名规则。
从上面的分析可以看出,我的声卡下挂了7个设备(其实这里的设备是实际设备的逻辑分类),根据声卡的实际能力,驱动实际上可以挂上更多种类的设备,在include/sound/core.h中,定义了以下设备类型:

typedef int __bitwise snd_device_type_t;

#define    SNDRV_DEV_TOPLEVEL    ((__force snd_device_type_t) 0)

#define    SNDRV_DEV_CONTROL    ((__force snd_device_type_t) 1) //控制类型

#define    SNDRV_DEV_LOWLEVEL_PRE    ((__force snd_device_type_t) 2)

#define    SNDRV_DEV_LOWLEVEL_NORMAL ((__force snd_device_type_t) 0x1000)

#define    SNDRV_DEV_PCM        ((__force snd_device_type_t) 0x1001) //pcm类型

#define    SNDRV_DEV_RAWMIDI    ((__force snd_device_type_t) 0x1002)

#define    SNDRV_DEV_TIMER        ((__force snd_device_type_t) 0x1003) //定时器类型

#define    SNDRV_DEV_SEQUENCER    ((__force snd_device_type_t) 0x1004) //音序器类型

#define    SNDRV_DEV_HWDEP        ((__force snd_device_type_t) 0x1005)

#define    SNDRV_DEV_INFO        ((__force snd_device_type_t) 0x1006)

#define    SNDRV_DEV_BUS        ((__force snd_device_type_t) 0x1007)

#define    SNDRV_DEV_CODEC        ((__force snd_device_type_t) 0x1008) //解码器类型

#define    SNDRV_DEV_JACK          ((__force snd_device_type_t) 0x1009)

#define    SNDRV_DEV_LOWLEVEL    ((__force snd_device_type_t) 0x2000)

下面我们开始分析代码:
首先我们有两个声卡,那这两个声卡怎么来的呢?
首先你应该知道声卡的创建过程:
<1> 了解声卡的结构体struct snd_card(snd_card的定义位于头文件中:include/sound/core.h)

struct snd_card {

    int number;            /* number of soundcard (index to

                                snd_cards) */

    char id[16];            /* id string of this card */

    char driver[16];        /* driver name */

    char shortname[32];        /* short name of this soundcard */

    char longname[80];        /* name of this soundcard */

    char mixername[80];        /* mixer name */

    char components[128];        /* card components delimited with

                                space */

    struct module *module;        /* top-level module */

    void *private_data;        /* private data for soundcard */

    void (*private_free) (struct snd_card *card); /* callback for freeing of

                                private data */

    struct list_head devices;    /* devices */

    unsigned int last_numid;    /* last used numeric ID */

    struct rw_semaphore controls_rwsem;    /* controls list lock */

    rwlock_t ctl_files_rwlock;    /* ctl_files list lock */

    int controls_count;        /* count of all controls */

    int user_ctl_count;        /* count of all user controls */

    struct list_head controls;    /* all controls for this card */

    struct list_head ctl_files;    /* active control files */

    struct snd_info_entry *proc_root;    /* root for soundcard specific files */

    struct snd_info_entry *proc_id;    /* the card id */

    struct proc_dir_entry *proc_root_link;    /* number link to real id */

    struct list_head files_list;    /* all files associated to this card */

    struct snd_shutdown_f_ops *s_f_ops; /* file operations in the shutdown

                                state */

    spinlock_t files_lock;        /* lock the files for this card */

    int shutdown;            /* this card is going down */

    int free_on_last_close;        /* free in context of file_release */

    wait_queue_head_t shutdown_sleep;

    struct device *dev;        /* device assigned to this card */

    struct device *card_dev;    /* cardX object for sysfs */

#ifdef CONFIG_PM

    unsigned int power_state;    /* power state */

    struct mutex power_lock;    /* power lock */

    wait_queue_head_t power_sleep;

#endif

#if defined(CONFIG_SND_MIXER_OSS) || defined(CONFIG_SND_MIXER_OSS_MODULE)

    struct snd_mixer_oss *mixer_oss;

    int mixer_oss_change_count;

#endif

};

struct list_head devices 记录该声卡下所有逻辑设备的链表
struct list_head controls 记录该声卡下所有的控制单元的链表
void *private_data 声卡的私有数据,可以在创建声卡时通过参数指定数据的大小
<2> 创建一个声卡的实例
在ASoC首先注册平台驱动,等待平台设备的到来,当驱动发现相应的设备时,调用驱动的probe, 然后调用snd_soc_register_card去创建声卡,声卡的专用数据,设备驱动的ID的名字,创建声卡的功能部件(如pcm, mixer, MIDI,control等),注册声卡。
1> 注册平台驱动

/* ASoC platform driver */

static struct platform_driver soc_driver = {

    .driver        = {

        .name        = "soc-audio",

        .owner        = THIS_MODULE,

        .pm        = &soc_pm_ops,

    },

    .probe        = soc_probe,

    .remove        = soc_remove,

};


static int __init snd_soc_init(void)

{

#ifdef CONFIG_DEBUG_FS

    debugfs_root = debugfs_create_dir("asoc", NULL);

    if (IS_ERR(debugfs_root) || !debugfs_root) {

        printk(KERN_WARNING

               "ASoC: Failed to create debugfs directory\n");

        debugfs_root = NULL;

    }

    if (!debugfs_create_file("codecs", 0444, debugfs_root, NULL,

                 &codec_list_fops))

        pr_warn("ASoC: Failed to create CODEC list debugfs file\n");

    if (!debugfs_create_file("dais", 0444, debugfs_root, NULL,

                 &dai_list_fops))

        pr_warn("ASoC: Failed to create DAI list debugfs file\n");

    if (!debugfs_create_file("platforms", 0444, debugfs_root, NULL,

                 &platform_list_fops))

        pr_warn("ASoC: Failed to create platform list debugfs file\n");

#endif

    return platform_driver_register(&soc_driver);

}

module_init(snd_soc_init);

static void __exit snd_soc_exit(void)

{

#ifdef CONFIG_DEBUG_FS

    debugfs_remove_recursive(debugfs_root);

#endif

    platform_driver_unregister(&soc_driver);

}

module_exit(snd_soc_exit);

snd_soc_init(sound/soc/soc-core.c)函数主要是创建debugfs文件系统接口和平台设备驱动的注册(platform_driver_register)。
这里我们解释下DebugFS,顾名思义,是一种用于内核调试的虚拟文件系统,内核开发者通过debugfs和用户空间交换数据。类似的虚拟文件系统还有procfs和sysfs等,这几种虚拟文件系统都并不实际存储在硬盘上,而是Linux内核运行起来后才建立起来。用户空间通过mount -t debugfs debugfs /a 挂载debugfs文件系统到a目录,查看a目录:

在目录下我们发现了asoc这文件夹,在这个文件夹包含我们创建的几个文件codecs, dais, platforms:

2> 注册平台设备(跟具体的平台相关,我们TI达芬奇系列芯片)

static int __init ti81xx_dvr_soc_init(void)

{

    int ret;

    ti81xx_pdev0 = platform_device_alloc("soc-audio", 0);

    if (!ti81xx_pdev0)

        return -ENOMEM;

    platform_set_drvdata(ti81xx_pdev0, &ti81xx_dvr_snd_card0);

    ret = platform_device_add(ti81xx_pdev0);

    if (ret) {

        printk(KERN_ERR "Can't add soc platform device\n");

        platform_device_put(ti81xx_pdev0);

        return ret;

    }

    ti81xx_pdev1 = platform_device_alloc("soc-audio", 1);

    if (!ti81xx_pdev1) {

        platform_device_put(ti81xx_pdev0);

        return -ENOMEM;

    }

    platform_set_drvdata(ti81xx_pdev1, &ti81xx_dvr_snd_card1);

    ret = platform_device_add(ti81xx_pdev1);

    if (ret) {

        printk(KERN_ERR "Can't add soc platform device\n");

        platform_device_put(ti81xx_pdev0);

        platform_device_put(ti81xx_pdev1);

        return ret;

    }

    return ret;

}

static void __exit ti81xx_dvr_soc_exit(void)

{

    platform_device_unregister(ti81xx_pdev0);

    platform_device_unregister(ti81xx_pdev1);

}

module_init(ti81xx_dvr_soc_init);

module_exit(ti81xx_dvr_soc_exit);

ti81xx_dvr_soc_init(sound/soc/davinci)函数主要是创建两个平台设备。platform_device_alloc()函数为平台设备分配空间,platform_set_drvdata()函数设置平台设备的私有数据,platform_device_add()函数向平台总线增加平台设备。
3> probe的实现
先看上面两段代码发现都有"soc-audio" 这个字符串,这个字符串决定了驱动和设备的匹配,而且发现注册了两个平台设备。当平台驱动匹配一个平台设备,调用一次porbe, 因为注册了两个同名的平台设备,所有probe被调用了两次。也就是申请两个声卡驱动。

/* probes a new socdev */

static int soc_probe(struct platform_device *pdev)

{

    struct snd_soc_card *card = platform_get_drvdata(pdev);

    int ret = 0;

    /* Bodge while we unpick instantiation */

    card->dev = &pdev->dev;

    INIT_LIST_HEAD(&card->dai_dev_list);

    INIT_LIST_HEAD(&card->codec_dev_list);

    INIT_LIST_HEAD(&card->platform_dev_list);

    printk(KERN_WARNING "soc audio probe!\n");

    ret = snd_soc_register_card(card);

    if (ret != 0) {

        dev_err(&pdev->dev, "Failed to register card\n");

        return ret;

    }

    return 0;

}

4> 声卡创建
主要分析snd_soc_register_card()函数。
嵌入式驱动开发之---Linux ALSA音频驱动(一)的更多相关文章
- 基于Linux ALSA音频驱动的wav文件解析及播放程序 2012
本设计思路:先打开一个普通wav音频文件,从定义的文件头前面的44个字节中,取出文件头的定义消息,置于一个文件头的结构体中.然后打开alsa音频驱动,从文件头结构体取出采样精度,声道数,采样频率三个重 ...
- (57)Linux驱动开发之三Linux字符设备驱动
1.一般情况下,对每一种设备驱动都会定义一个软件模块,这个工程模块包含.h和.c文件,前者定义该设备驱动的数据结构并声明外部函数,后者进行设备驱动的具体实现. 2.典型的无操作系统下的逻辑开发程序是: ...
- Linux ALSA声卡驱动之八:ASoC架构中的Platform
1. Platform驱动在ASoC中的作用 前面几章内容已经说过,ASoC被分为Machine,Platform和Codec三大部件,Platform驱动的主要作用是完成音频数据的管理,最终通过C ...
- Linux ALSA声卡驱动之二:声卡的创建
1. struct snd_card 1.1. snd_card是什么 snd_card可以说是整个ALSA音频驱动最顶层的一个结构,整个声卡的软件逻辑结构开始于该结构,几乎所有与声音相关的逻辑设备都 ...
- Linux ALSA声卡驱动之五:移动设备中的ALSA(ASoC)
转自http://blog.csdn.net/droidphone/article/details/7165482 1. ASoC的由来 ASoC--ALSA System on Chip ,是建立 ...
- Linux ALSA声卡驱动之三:PCM设备的创建
声明:本博内容均由http://blog.csdn.net/droidphone原创,转载请注明出处,谢谢! 1. PCM是什么 模数转换 模拟信号经过pcm(脉冲编码调制)后为pcm数据: PCM是 ...
- 在开发板Linux上挂载"驱动"挂载不成功,出现提示server 172.27.52.100 not responding, still trying
1.在开发板具体操作步骤如下: 1.1 :设置IP ifconfig eth0 172.27.52.200 1.2 :ping通 虚拟机Linux 主机Linux ping XXX.XXX.X ...
- alsa音频驱动科普第一课
做linux音频编程对alsa应该不陌生. 但是对于刚接触这块技术的同学来说是一件困难的事情.原因在于:网上关于alsa的资料太少了,特别国内的资料更是大部分重复.对于初学者来说特别苦恼. 由于笔者经 ...
- Linux ALSA声卡驱动之七:ASoC架构中的Codec
1. Codec简介(ad/da) 在移动设备中,Codec的作用可以归结为4种,分别是: 对PCM等信号进行D/A转换,把数字的音频信号转换为模拟信号 对Mic.Linein或者其他输入源的模拟信 ...
随机推荐
- 解决 Mac OS X 下 IntelliJ IDEA、jEdit 等 Java 程序中文标点输入无效的方法
Mac OS X 下基于 Java 的程序(如 IntelliJ IDEA.jEdit 等)会出现中文标点输入无效的问题,在中文输入法状态,可以输入中文字,但输入中文标点最后上去的是英文标点.查阅了相 ...
- hdu 1395(欧拉函数)
2^x mod n = 1 Time Limit: 2000/1000 MS (Java/Others) Memory Limit: 65536/32768 K (Java/Others)Tot ...
- NGINX配置获取CloudFlare 下的访客真实IP并记录到日志
我用的是lnmp.org的环境 /usr/local/nginx/conf/nginx.conf 在 http { } 部分增加 map $HTTP_CF_CONNECTING_IP $clientR ...
- jdbc in postgres
try { Class.forName("org.postgresql.Driver").newInstance(); String url = "jdbc:postgr ...
- 2018年东北农业大学春季校赛 E 阶乘后的0【数论】
链接:https://www.nowcoder.com/acm/contest/93/E来源:牛客网 时间限制:C/C++ 1秒,其他语言2秒 空间限制:C/C++ 262144K,其他语言52428 ...
- 2.搭建配置最简单的spring mvc 工程-基础版
目标:用最少的东西,搭建可以运行的最最基础的springMvc登陆校验项目! spring 4 1.首先配置pom.xml引入spring 相关jar, 引用都有注释, 无关的可以暂时不引用. < ...
- Python模拟浏览器上传文件脚本(Multipart/form-data格式)
http协议本身的原始方法不支持multipart/form-data请求,这个请求由原始方法演变而来的. multipart/form-data的基础方法是post,也就是说是由post方法来组合实 ...
- node/webpack/react
node是运行引擎,通过他可以直接在后端运行js语法 webpack是打包工具 react是前端框架 通过 npm 使用 React 我们建议在 React 中使用 CommonJS 模块系统,比如 ...
- JAVA Eclipse的Android的进程和生命周期是什么
安卓程序的生命周期是不受自己控制的,安卓的程序根据不同的重要性做了一些区分,最重要的进程仅仅在安卓已经崩溃或者卡死的情况下才会终止前台进程. Activity就是表现层的界面,它有三种常见的状态, ...
- GraphMatrix::BFS广度优先搜索
查找某一结点的邻居: virtual int firstNbr(int i) { return nextNbr(i, n); } //首个邻接顶点 virtual int nextNbr(int i, ...

