《精通Spring4.X企业应用开发实战》读后感第四章(BeanFactory生命周期)


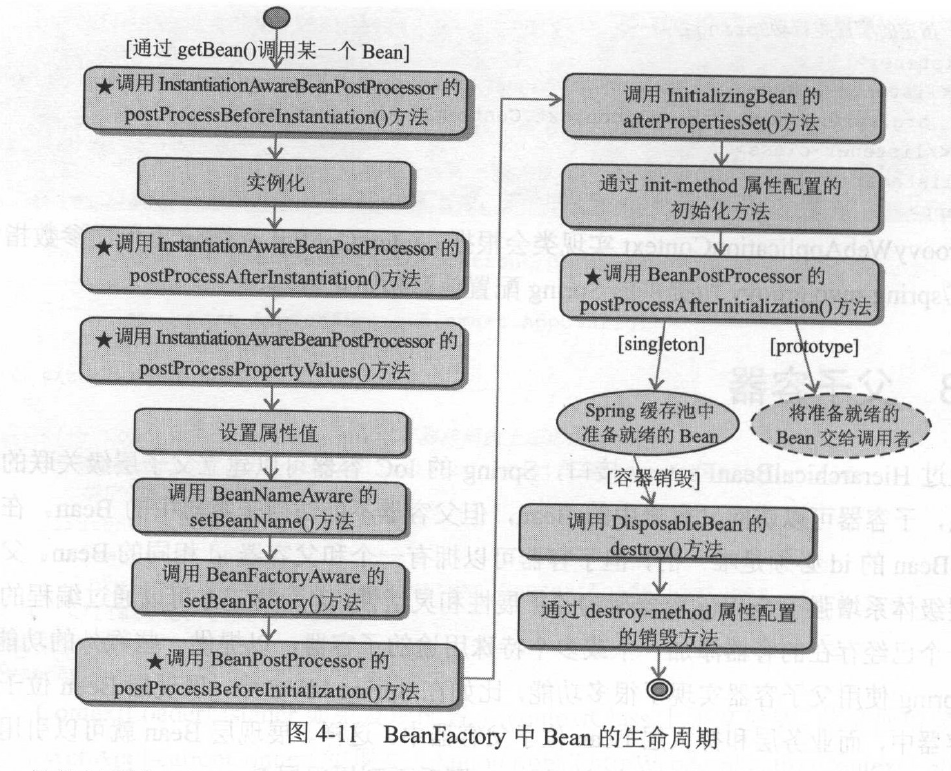


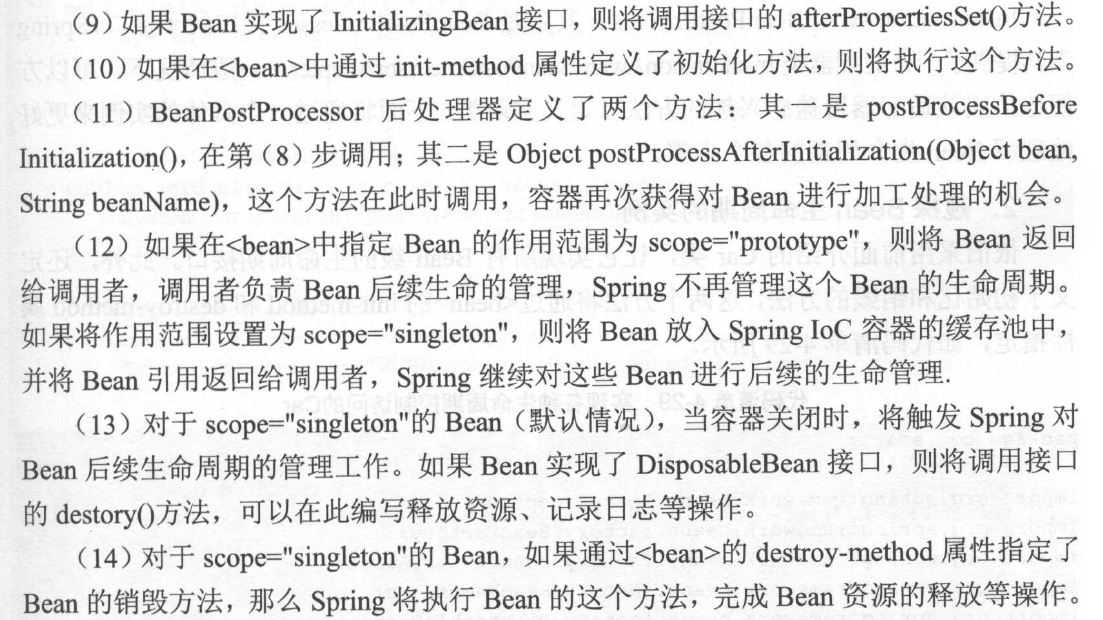
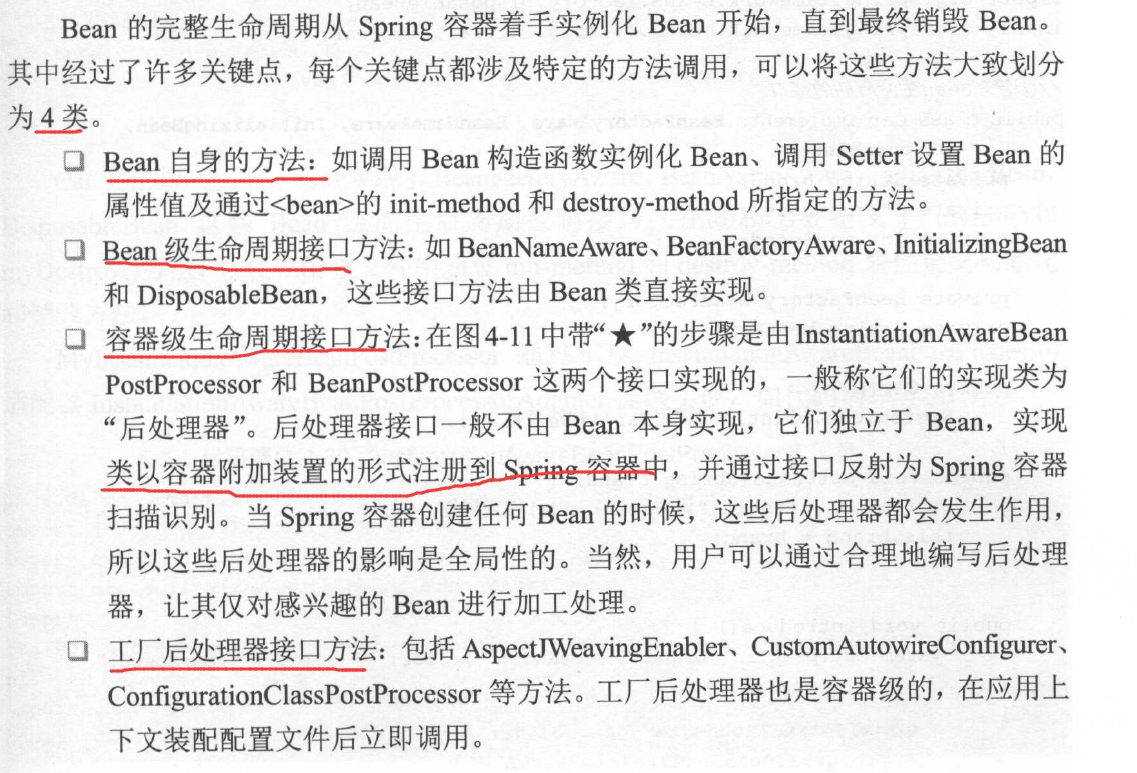


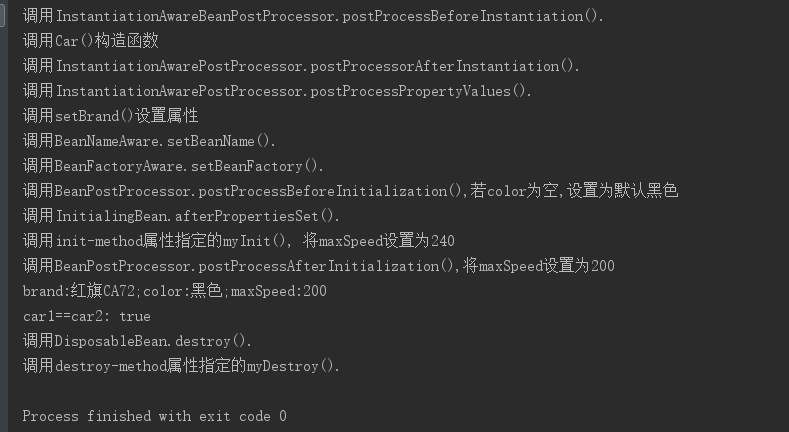
- package com.smart;
- import org.springframework.beans.BeansException;
- import org.springframework.beans.factory.*;
- public class Car implements BeanFactoryAware, BeanNameAware, InitializingBean, DisposableBean{
- private String brand;
- private String color;
- private int maxSpeed;
- private BeanFactory beanFactory;
- private String beanName;
- //默认构造函数
- public Car(){System.out.println("调用Car()构造函数");}
- //带参构造函数
- public Car(String brand, String color, int maxSpeed) {
- this.brand = brand;
- this.color = color;
- this.maxSpeed = maxSpeed;
- }
- //未带参方法
- public void introduce() {
- System.out.println("brand:" + brand + ";color:" + color + ";maxSpeed:" + maxSpeed);
- }
- public String getBrand() {
- return brand;
- }
- public void setBrand(String brand) {
- System.out.println("调用setBrand()设置属性");
- this.brand = brand;
- }
- public String getColor() {
- return color;
- }
- public void setColor(String color) {
- this.color = color;
- }
- public int getMaxSpeed() {
- return maxSpeed;
- }
- public void setMaxSpeed(int maxSpeed) {
- this.maxSpeed = maxSpeed;
- }
- // BeanFactoryAware接口方法
- public void setBeanFactory(BeanFactory beanFactory) throws BeansException {
- System.out.println("调用BeanFactoryAware.setBeanFactory().");
- this.beanFactory = beanFactory;
- }
- // BeanNameAware接口方法
- public void setBeanName(String s) {
- System.out.println("调用BeanNameAware.setBeanName().");
- this.beanName = s;
- }
- // DisposableBean接口方法
- public void destroy() throws Exception {
- System.out.println("调用DisposableBean.destroy().");
- }
- // InitializingBean接口方法
- public void afterPropertiesSet() throws Exception {
- System.out.println("调用InitialingBean.afterPropertiesSet().");
- }
- // 通过<bean>的init-method属性指定的初始方法
- public void myInit() {
- System.out.println("调用init-method属性指定的myInit(), 将maxSpeed设置为240");
- this.maxSpeed = 240;
- }
- //同过<bean>的destroy-method属性指定的销毁方法
- public void myDestroy() {
- System.out.println("调用destroy-method属性指定的myDestroy().");
- }
- }

- package com.smart.beanfactory;
- import org.springframework.beans.BeansException;
- import org.springframework.beans.PropertyValues;
- import org.springframework.beans.factory.config.InstantiationAwareBeanPostProcessorAdapter;
- import java.beans.PropertyDescriptor;
- public class MyInstantiationAwareBeanPostProcessor extends InstantiationAwareBeanPostProcessorAdapter {
- @Override
- // 1.接口方法,在实例化Bean前调用
- public Object postProcessBeforeInstantiation(Class<?> beanClass, String beanName) throws BeansException {
- // 1-1. 仅对容器中的car Bean进行处理
- if ("car".equals(beanName)) {
- System.out.println("调用InstantiationAwareBeanPostProcessor.postProcessBeforeInstantiation().");
- }
- return null;
- }
- @Override
- // 2.接口方法,在实例化Bean后调用
- public boolean postProcessAfterInstantiation(Object bean, String beanName) throws BeansException {
- if ("car".equals(beanName)) {
- System.out.println("调用InstantiationAwarePostProcessor.postProcessorAfterInstantiation().");
- }
- return true;
- }
- @Override
- // 3.接口方法,在设置某个属性时调用
- public PropertyValues postProcessPropertyValues(PropertyValues pvs, PropertyDescriptor[] pds, Object bean, String beanName) throws BeansException {
- // 3-1. 仅对容器中的car Bean进行处理, 还可以同过pds入参进行过滤
- if ("car".equals(beanName)) {
- System.out.println("调用InstantiationAwarePostProcessor.postProcessPropertyValues().");
- }
- return pvs;
- }
- }

- package com.smart.beanfactory;
- import com.smart.Car;
- import org.springframework.beans.BeansException;
- import org.springframework.beans.factory.config.BeanPostProcessor;
- public class MyBeanPostProcessor implements BeanPostProcessor {
- public Object postProcessBeforeInitialization(Object bean, String beanName) throws BeansException {
- if ("car".equals(beanName)) {
- Car car = (Car) bean;
- if (car.getColor() == null) {
- System.out.println("调用BeanPostProcessor.postProcessBeforeInitialization()," +
- "若color为空,设置为默认黑色");
- car.setColor("黑色");
- }
- }
- return bean;
- }
- public Object postProcessAfterInitialization(Object bean, String beanName) throws BeansException {
- if ("car".equals(beanName)) {
- Car car = (Car) bean;
- if (car.getMaxSpeed() >= 200) {
- System.out.println("调用BeanPostProcessor.postProcessAfterInitialization()," +
- "将maxSpeed设置为200");
- car.setMaxSpeed(200);
- }
- }
- return bean;
- }
- }

- <?xml version="1.0" encoding="UTF-8"?>
- <beans xmlns="http://www.springframework.org/schema/beans"
- xmlns:xsi="http://www.w3.org/2001/XMLSchema-instance" xmlns:p="http://www.springframework.org/schema/p"
- xsi:schemaLocation="http://www.springframework.org/schema/beans http://www.springframework.org/schema/beans/spring-beans.xsd">
- <bean id="car" class="com.smart.Car"
- init-method="myInit"
- destroy-method="myDestroy"
- p:brand="红旗CA72"
- p:maxSpeed="200"/>
- </beans>


- package com.smart.beanfactory;
- import com.smart.Car;
- import org.springframework.beans.factory.BeanFactory;
- import org.springframework.beans.factory.config.ConfigurableBeanFactory;
- import org.springframework.beans.factory.support.DefaultListableBeanFactory;
- import org.springframework.beans.factory.xml.XmlBeanDefinitionReader;
- import org.springframework.context.ApplicationContext;
- import org.springframework.context.support.ClassPathXmlApplicationContext;
- import org.springframework.core.io.ClassPathResource;
- import org.springframework.core.io.Resource;
- public class BeanLifeCycle {
- public static void lifeCycleInBeanFactory() {
- // 1. 装载配置文件并启动容器
- Resource res = new ClassPathResource("beans.xml");
- BeanFactory bf = new DefaultListableBeanFactory();
- XmlBeanDefinitionReader reader = new XmlBeanDefinitionReader((DefaultListableBeanFactory) bf);
- reader.loadBeanDefinitions(res);
- //后处理器的实际调用顺序与注册顺序无关,在具有多个后处理器的情况下,必须通过实现
- //org.springframework.core.Ordered接口来确定调用顺序
- // 2. 向容器中注册MyBeanPostProcessor后处理器
- ((ConfigurableBeanFactory) bf).addBeanPostProcessor(new MyBeanPostProcessor());
- // 3. 向容器中注册MyInstantiationAwareBeanPostProcessor后处理器
- ((ConfigurableBeanFactory) bf).addBeanPostProcessor(new MyInstantiationAwareBeanPostProcessor());
- // 4. 第一次从容器中获得car, 将触发容器实例化该Bean,这将引发Bean生命周期方法的调用
- Car car1 = (Car) bf.getBean("car");
- car1.introduce();
- car1.setColor("红色");
- // 5. 第二次从容器中获取car, 直接从缓存池中获取
- Car car2 = (Car) bf.getBean("car");
- // 6. 查看car1和car2是否指向同一引用
- System.out.println("car1==car2: " + (car1 == car2));
- // 7. 关闭容器
- ((DefaultListableBeanFactory) bf).destroySingleton("car");
- }
- public static void main(String[] args) {
- lifeCycleInBeanFactory();
- }
- }




《精通Spring4.X企业应用开发实战》读后感第四章(BeanFactory生命周期)的更多相关文章
- 《精通Spring4.x企业应用开发实战》第三章
这一章节主要介绍SpringBoot的使用,也是学习的重点内容,之后就打算用SpringBoot来写后台,所以提前看一下还是很有必要的. 3.SpringBoot概况 3.1.1SpringBoot发 ...
- 《精通Spring4.X企业应用开发实战》读后感第四章(资源访问)
package com.smart.resource; import org.springframework.core.io.ClassPathResource; import org.springf ...
- 《精通Spring4.X企业应用开发实战》读后感第七章(创建增强类)
- 《精通Spring4.X企业应用开发实战》读后感第七章(AOP基础知识、jdk动态代理,CGLib动态代理)
- 《精通Spring4.X企业应用开发实战》读后感第七章(AOP概念)
- 《精通Spring4.X企业应用开发实战》读后感第六章(容器事件)
- 《精通Spring4.X企业应用开发实战》读后感第六章(国际化)
- 《精通Spring4.X企业应用开发实战》读后感第六章(引用Bean的属性值)
- 《精通Spring4.X企业应用开发实战》读后感第六章(使用外部属性文件)
- 《精通Spring4.X企业应用开发实战》读后感第六章(属性编辑器)
随机推荐
- Circling Round Treasures CodeForces - 375C
C. Circling Round Treasures time limit per test 1 second memory limit per test 256 megabytes input s ...
- 【BZOJ1604】[Usaco2008 Open]Cow Neighborhoods 奶牛的邻居 Treap+并查集
[BZOJ1604][Usaco2008 Open]Cow Neighborhoods 奶牛的邻居 Description 了解奶牛们的人都知道,奶牛喜欢成群结队.观察约翰的N(1≤N≤100000) ...
- Python中属性
属性定义的两种方式: 1.num1=property(GetNum,SetNum) class Pro(): def __init__(self): self._num= def GetNum(s ...
- SecureCRT 会话设置项
登陆动作------自动登陆仿真------两个颜色复选框都勾上模式------光标键模式(2个复选框)映射键------使用windows复制和粘贴热键外观------字符编码:UTF-8外观--- ...
- 【题解】CF559C C. Gerald and Giant Chess(容斥+格路问题)
[题解]CF559C C. Gerald and Giant Chess(容斥+格路问题) 55336399 Practice: Winlere 559C - 22 GNU C++11 Accepte ...
- angularJs-HelloWorld
AngularJS使用了不同的方法,它尝试去补足HTML本身在构建应用方面的缺陷.AngularJS通过使用我们称为标识符(directives)的结构,让浏览器能够识别新的语法. 1使用双大括号{{ ...
- PAT 甲级 1128. N Queens Puzzle (20) 【STL】
题目链接 https://www.patest.cn/contests/pat-a-practise/1128 思路 可以 对每一个皇后 都判断一下 它的 行,列 ,左右对角线上 有没有皇后 深搜解决 ...
- maven GroupID和ArtifactID
GroupID是项目组织唯一的标识符,实际对应JAVA的包的结构,是main目录里java的目录结构. ArtifactID就是项目的唯一的标识符,实际对应项目的名称,就是项目根目录的名称.一般Gro ...
- 【LeetCode】求众数
给定一个大小为 n 的数组,找到其中的众数.众数是指在数组中出现次数大于 ⌊ n/2 ⌋ 的元素. 你可以假设数组是非空的,并且给定的数组总是存在众数. class Solution(object): ...
- matlab的数组
1.定义:同一类型的元素的集合. 2.生成:用[]创建,元素之间用逗号或者空格隔开. 第一例: >>a=[1,2,3,4] a = 1 2 3 4 注意,取矩阵的某几列,是这样a(:,2: ...
