Grunt学习笔记【8】---- grunt-angular-templates插件详解
本文主要讲如何用Grunt打包AngularJS的模板HTML。
一 说明
AngularJS中使用单独HTML模板文件的地方非常多,例如:自定义指令、ng-include、templateUrl等。通常这些文件都是独立的html文件,AngularJS中使用这些文件都是通过文件路径地址引用的。
当用Grunt打包压缩整个项目时,如何处理这些html模板文件呢?本文讲的grunt-angular-templates插件可以解决该问题。
grunt-angular-templates插件的基本原理:
该插件实际使用的是AngularJS的$templateCache服务,将这些模板文件都缓存起来,当自定义指令、ng-include等需要对应的html文件时,AngularJS首先会去$templateCache中找对应的文件,如果找到了就不在发送XHR请求。
使用$templateCache缓存模板可以减少XHR请求数,并实现html文件打包。
同时,在AngularJS内部,第一次请求到模板HTML后,都会被缓存到 $templateCache 服务中,这样就确保一个文件只被请求一次。
下边是使用$templateCache缓存html模板的方法:
 angular.module('app').run(["$templateCache", function($templateCache) {

   $templateCache.put("home.html",

     // contents for home.html ...

   );

   ...

   $templateCache.put("src/app/templates/button.html",

     // contents for button.html

   );

 }]);
二 安装
$ npm install grunt-angular-templates --save-dev
三 加载任务
grunt.loadNpmTasks('grunt-angular-templates');
四 配置
这里主要讲作者用到的几个常用配置:
4.1 src
要打包的模板文件路径。例如:'src/**/*.html'。
4.2 dest
输出打包好的文件地址。例如:'dist/tmp.js'。
4.3 options
各种设置都在options中,常用的有下边几个:
1)htmlmin
最小化html大小。设置了该项会去掉html的空格和换行等,可以减少压缩后文件大小。
官网推荐的设置如下:
 htmlmin :{

   collapseBooleanAttributes :true ,

   collapseWhitespace :是的,

   removeAttributeQuotes :true ,

   removeComments :true ,//  仅当您不使用comment指令时!

   removeEmptyAttributes :true ,

   removeRedundantAttributes :true ,

   removeScriptTypeAttributes :true ,

   removeStyleLinkTypeAttributes :true

 }
2)standalone
设置是否创建新的AngularJS模块,还是使用一个现有的AngularJS模块。
设置为true时,将创建一个新的AngularJS模块,类似angular.module('app', []);
设置为false时,将使用已有的模块,类似angular.module('app')。
说明:该模块用于提供$templateCache进行模板缓存;模块名来自于下边的module属性。
3)module
设置创建的Angular模块名字,默认值为target,即Grunt配置项中ngtemplates的下一级属性名。
注意:
module和上边的standalone接口配合起来使用,如果是新创建的模块,必须在AngularJS启动模块中将该模块依赖进来,否则会导致找不到模板报错;如果是使用已有模块,就必须确保在加载打包后的html模板js之前已经定义了对应的模块,否则也会报错。
4)prefix
将模块存入到$templateCache时,对key添加的前缀。
注意1:如果设置了该属性,就要确保自定义指令、ng-include等中设置的模板地址也带有该前缀。
注意2:最终存入的存入到$templateCache的key是prefix+src后的结果,这里的src就是上边接口。
5)bootstrap(module, script)
该回调函数用于自定义模板缓存创建。
如果不定义该函数,插件会自己创建或者获取AngularJS模块,并通过run方法将所有html模板缓存到$templateCache中。
如果定义了该函数,则必须自己实现模板缓存到$templateCache,并将对应的js代码返回。最终会将返回的结果合并到输出文件中。
使用场景:将模板注册成AMD或者commonJS模块。例如:在requireJS构建的项目中。
参数说明:
module:AngularJS模块。
script:$templateCache.put()方法调用的js代码,如下:
   $templateCache.put('/aa/src/button.html',

     "<button type=button>{{text}}</button>"

   );
五 实战
下边是一个实例项目:
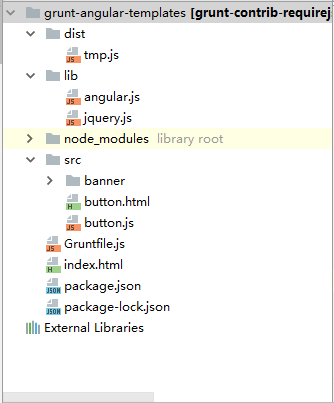
5.1 整体项目目录如下:
5.2 grunt配置文件如下:
 module.exports = function(grunt) {

     grunt.initConfig({

         // 清理空文件夹

         clean: {

             foo1: {

                 src: ['dist/*']

             }

         },

         ngtemplates: { // 将angular中html模板通过$templateCache进行合并

             'angular-my-directives': {

                 options: {

                     htmlmin: {

                         collapseBooleanAttributes: true,

                         collapseWhitespace: true,

                         removeAttributeQuotes: true,

                         removeComments: true, // Only if you don't use comment directives!

                         removeEmptyAttributes: true,

                         removeRedundantAttributes: true,

                         removeScriptTypeAttributes: true,

                         removeStyleLinkTypeAttributes: true

                     },

                     standalone: true, // 是否创建新的Angular模块

                     module: 'temp', // 设置创建的Angular模块名字,默认值为target,即'angular-my-directives'

                     // bootstrap: function (module, script) {

                     //     console.log(script);

                     //     return script;

                     // },

                     prefix: '/aa/'

                 },

                 src: 'src/**/*.html', // where my view files are

                 dest: 'dist/tmp.js' // single file of $templateCache

             }

         },

     });

     grunt.loadNpmTasks('grunt-angular-templates');

     grunt.loadNpmTasks('grunt-contrib-clean');

     // 默认被执行的任务列表。

     grunt.registerTask('default', [

         'clean',

         'ngtemplates'

     ]);

 };
5.3 button.html和banner.html是两个html模板,其中button.html是button.js中定义的mybutton指令的模板:
button.html代码如下:
<button type="button">{{text}}</button>
button.js代码如下:
 var component = angular.module("component", []);

 component.directive('myButton', myButton);

 myButton.$inject = [];

 function myButton() {

     return {

         restrict: 'E',

         priority: 999,

         scope: {

             text: '=',

         },

         templateUrl: '/aa/src/button.html',

         replace: true,

         link: function (scope, $element) {

         }

     };

 }
banner.html代码如下:
<div style="width: 100%;background-color:blue;height: 70px">This is banner!</div>
5.4 执行grunt命令后,压缩好的tmp.js文件如下:
 angular.module('temp', []).run(['$templateCache', function($templateCache) {

   'use strict';

   $templateCache.put('/aa/src/banner/banner.html',

     "<div style=\"width: 100%;background-color:blue;height: 70px\">This is banner!</div>"

   );

   $templateCache.put('/aa/src/button.html',

     "<button type=button>{{text}}</button>"

   );

 }]);
5.5 测试用例index.html代码如下:
 <!doctype html>

 <html>

 <head>

     <meta charset="utf-8"/>

     <title>测试</title>

 </head>

 <body>

 <div  ng-controller="DemoCtrl">

     <div ng-include="bannerTemplate"></div>

     <my-button text="buttonText"></my-button>

 </div>

 <!-- Load scripts. -->

 <script type="text/javascript" src="./lib/jquery.js"></script>

 <script type="text/javascript" src="./lib/angular.js"></script>

 <script type="text/javascript" src="./dist/tmp.js"></script>

 <script type="text/javascript" src="./src/button.js"></script>

 <script type="text/javascript">

     var app = angular.module("test", ["component", "temp"]);

     app.controller('DemoCtrl', function ($scope) {

         $scope.bannerTemplate = '/aa/src/banner/banner.html';

         $scope.buttonText = '确认';

     });

     angular.bootstrap($("html"), ["test"]);

 </script>

 </body>

 </html>
六 源码下载地址
https://gitee.com/bangbangwa/grunt/blob/master/grunt-angular-templates-test.rar
参考资料&内容来源
grunt官网:https://www.npmjs.com/package/grunt-angular-templates
博客园:https://www.cnblogs.com/ms-grf/p/6874256.html
Grunt学习笔记【8】---- grunt-angular-templates插件详解的更多相关文章
- Grunt学习笔记【6】---- grunt-contrib-requirejs插件详解
本文主要讲如何使用Grunt实现RequireJS文件压缩. 一 说明 ES6出来前,RequireJS是JavaScript模块化最常用的方式之一.对于使用RequireJS构建的项目,要实现打包压 ...
- Grunt学习笔记【7】---- grunt-contrib-less插件详解
本文主要讲如何使用Grunt实现less文件压缩. 一 说明 less是非常常用的样式框架之一,Grunt也提供了可以编译和打包less样式文件的插件:grunt-contrib-less. 实现原理 ...
- Linux防火墙iptables学习笔记(三)iptables命令详解和举例[转载]
Linux防火墙iptables学习笔记(三)iptables命令详解和举例 2008-10-16 23:45:46 转载 网上看到这个配置讲解得还比较易懂,就转过来了,大家一起看下,希望对您工作能 ...
- (转)live555学习笔记10-h264 RTP传输详解(2)
参考: 1,live555学习笔记10-h264 RTP传输详解(2) http://blog.csdn.net/niu_gao/article/details/6936108 2,H264 sps ...
- SNMP学习笔记之SNMP 原理与实战详解
原文地址:http://freeloda.blog.51cto.com/2033581/1306743 原创作品,允许转载,转载时请务必以超链接形式标明文章 原始出处 .作者信息和本声明.否则将追究法 ...
- Django学习笔记之Django Form表单详解
知识预览 构建一个表单 在Django 中构建一个表单 Django Form 类详解 使用表单模板 回到顶部 构建一个表单 假设你想在你的网站上创建一个简单的表单,以获得用户的名字.你需要类似这样的 ...
- JQuery学习笔记系列(一)----选择器详解
笔者好长时间没有更新过博客园的笔记了,一部分原因是去年刚刚开始工作一段时间忙碌的加班,体会了一种每天加班到凌晨的充实感,之后闲暇时间了也因为自己懒惰没有坚持记笔记的习惯,现在重新拾起来. 借用古人的一 ...
- SharpDevelop学习笔记(5)—— AddIns系统详解
在所有的插件被加载到指定的扩展点后,插件树就被创建完毕了, 但是,我们知道,插件树创建后,每个插件在插件树的位置在就固定的,但是,如果某些情况下,我们希望一些插件不可使用或应该隐藏起来, 或者说有的插 ...
- Hibernate学习笔记二:Hibernate缓存策略详解
一:为什么使用Hibernate缓存: Hibernate是一个持久层框架,经常访问物理数据库. 为了降低应用程序访问物理数据库的频次,从而提高应用程序的性能. 缓存内的数据是对物理数据源的复制,应用 ...
随机推荐
- GIS可视化——麻点图
一.引言 目前在客户端绘制POI(Point of Interest,兴趣点)的方式主要是div(Marker的形式).svg.canvas.VML(后边三种就是Vector Layer)几种方式,这 ...
- Loadrunner 使用过程常见问题
一.安装配置 解决LoadRunner参数化最多读取100个值数据限制的问题. 修改.\Program Files\HP\LoadRunner\config\ vugen.ini中[ParamTabl ...
- linux下内存
MMU由一个或一组芯片组成.其功能是把逻辑地址映射为物理地址,进行地址转换(MMU是CPU的一部分) 机器指令仍然用逻辑地址指定一个操作数的地址或一条指令的地址 每个逻辑地址都由一个段选择符(16位) ...
- "贪心法"
有没有想过 “==” 和“= =” 的区别 , 万一编译器曲解了你的意思,那不是爽歪歪! C语言编译器会把前面的符号当做一个整体,后面的不再. 当我们遇到指针相除时: y=x/*p 编译器会怎样? 和 ...
- Jquery.ajax报parseerror Invalid JSON错误的原因和解决方法:不能解析
(默认: 自动判断 (xml 或 html)) 请求失败时调用时间.参数有以下三个:XMLHttpRequest 对象.错误信息.(可选)捕获的错误对象.如果发生了错误,错误信息(第二个参数)除了得到 ...
- Node.js学习笔记(2)——关于异步编程风格
Node.js的异步编程风格是它的一大特点,在代码中就是体现在回调中. 首先是代码的顺序执行: function heavyCompute(n, callback) { var count = 0, ...
- Linux内存段的分析
Linux 应用程序的内存分配中,是用 segment(段)进行区别的,使用 size 命令进行查看: size a.out text data bss dec hex filename a. ...
- C#各种导入Excel文件的数据的方法总结
在导入前都需要将上传的文件保存到服务器,所以避免重复的写这些代码,先贴出上传文件并保存到服务器指定路径的代码 protected void btnImport_Click(object sender, ...
- SQL Server -使用表触发器记录表插入,更新,删除行数
1.如何使用sql获取当前session用户名和机器名 Select CURRENT_USER,Host_name() 2.如何在表触发器中获取当前表名称 SELECT OBJECT_SCHEMA_N ...
- CentOS中文乱码的问题
修改CentOS 6.4 root用户的系统默认语言设置 最近用Virtual Box 虚拟了一个CentOS系统,版本6.4,安装时使用简体中文.发现用普通用户登录的时候 设置语言环境为Englis ...