Android百分比支持布局库的使用和源码分析
Android-percent-support这个库
描述下这个support-lib。
这个库提供了:
两种布局供大家使用:
PercentRelativeLayout、PercentFrameLayout,通过名字就可以看出,这是继承自FrameLayout和RelativeLayout两个容器类;支持的属性有:
layout_widthPercent、layout_heightPercent、
layout_marginPercent、layout_marginLeftPercent、
layout_marginTopPercent、layout_marginRightPercent、
layout_marginBottomPercent、layout_marginStartPercent、layout_marginEndPercent。
可以看到支持宽高,以及margin。
也就是说,大家只要在开发过程中使用PercentRelativeLayout、PercentFrameLayout替换FrameLayout、RelativeLayout即可。
过没有LinearLayout,有人会说LinearLayout有weight属性呀。但是,weight属性只能支持一个方向,但可以去自定义一个PercentLinearLayout。
使用
关于使用,其实及其简单,并且github上也有例子,android-percent-support-lib-sample
build.gradle添加:
compile 'com.android.support:percent:22.2.0'
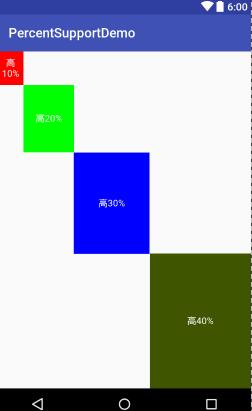
(一)PercentFrameLayout
<?xml version="1.0" encoding="utf-8"?>

<android.support.percent.PercentFrameLayout

    xmlns:android="http://schemas.android.com/apk/res/android"

    xmlns:app="http://schemas.android.com/apk/res-auto"

    xmlns:tools="http://schemas.android.com/tools"

    android:id="@+id/activity_main"

    android:layout_width="match_parent"

    android:layout_height="match_parent"

    tools:context="com.loaderman.percentsupportdemo.MainActivity">

    <TextView

        android:id="@+id/tv1"

        android:layout_width="wrap_content"

        android:layout_height="wrap_content"

        android:background="#ff0000"

        android:gravity="center"

        android:text="高10%"

        android:textColor="#ffffff"

        app:layout_heightPercent="10%"

        app:layout_widthPercent="10%"/>

    <TextView

        android:id="@+id/tv2"

        android:layout_width="wrap_content"

        android:layout_height="wrap_content"

        android:background="#00ff00"

        android:gravity="center"

        android:text="高20%"

        android:textColor="#ffffff"

        app:layout_heightPercent="20%"

        app:layout_marginLeftPercent="10%"

        app:layout_marginTopPercent="10%"

        app:layout_widthPercent="20%"/>

    <TextView

        android:id="@+id/tv3"

        android:layout_width="wrap_content"

        android:layout_height="wrap_content"

        android:background="#0000ff"

        android:gravity="center"

        android:text="高30%"

        android:textColor="#ffffff"

        app:layout_heightPercent="30%"

        app:layout_marginLeftPercent="30%"

        app:layout_marginTopPercent="30%"

        app:layout_widthPercent="30%"/>

    <TextView

        android:id="@+id/tv4"

        android:layout_width="wrap_content"

        android:layout_height="wrap_content"

        android:background="#3f5500"

        android:gravity="center"

        android:text="高40%"

        android:textColor="#ffffff"

        app:layout_heightPercent="40%"

        app:layout_marginLeftPercent="60%"

        app:layout_marginTopPercent="60%"

        app:layout_widthPercent="40%"/>

</android.support.percent.PercentFrameLayout>
效果图:
(二) PercentRelativeLayout
<?xml version="1.0" encoding="utf-8"?>

<android.support.percent.PercentRelativeLayout

    xmlns:android="http://schemas.android.com/apk/res/android"

    xmlns:app="http://schemas.android.com/apk/res-auto"

    xmlns:tools="http://schemas.android.com/tools"

    android:id="@+id/activity_main"

    android:layout_width="match_parent"

    android:layout_height="match_parent"

    tools:context="com.loaderman.percentsupportdemo.MainActivity">

    <TextView

        android:id="@+id/tv1"

        android:layout_width="wrap_content"

        android:layout_height="wrap_content"

        android:background="#ff0000"

        android:gravity="center"

        android:layout_alignParentBottom="true"

        android:text="高10%"

        android:textColor="#ffffff"

        app:layout_heightPercent="10%"

        app:layout_widthPercent="10%"/>

    <TextView

        android:id="@+id/tv2"

        android:layout_width="wrap_content"

        android:layout_height="wrap_content"

        android:background="#00ff00"

        android:gravity="center"

        android:layout_alignParentBottom="true"

        android:text="高20%"

        android:textColor="#ffffff"

        app:layout_heightPercent="20%"

        app:layout_marginLeftPercent="10%"

        app:layout_marginTopPercent="10%"

        app:layout_widthPercent="20%"/>

    <TextView

        android:id="@+id/tv3"

        android:layout_width="wrap_content"

        android:layout_height="wrap_content"

        android:background="#0000ff"

        android:gravity="center"

        android:text="高30%"

        android:textColor="#ffffff"

        android:layout_alignParentBottom="true"

        app:layout_heightPercent="30%"

        app:layout_marginLeftPercent="30%"

        app:layout_marginTopPercent="30%"

        app:layout_widthPercent="30%"/>

    <TextView

        android:id="@+id/tv4"

        android:layout_width="wrap_content"

        android:layout_height="wrap_content"

        android:background="#3f5500"

        android:gravity="center"

        android:text="高40%"

        android:layout_alignParentBottom="true"

        android:textColor="#ffffff"

        app:layout_heightPercent="40%"

        app:layout_marginLeftPercent="60%"

        app:layout_marginTopPercent="60%"

        app:layout_widthPercent="40%"/>

</android.support.percent.PercentRelativeLayout>
效果图:

(三)、实现PercentLinearlayout
package com.loaderman.percentsupportdemo;

import android.content.Context;

import android.content.res.TypedArray;

import android.support.percent.PercentLayoutHelper;

import android.util.AttributeSet;

import android.view.ViewGroup;

import android.widget.LinearLayout;

/**

 * Created by JCF on 2017/2/27.

 */

public class PercentLinearLayout extends LinearLayout {

    private PercentLayoutHelper mPercentLayoutHelper;

    public PercentLinearLayout(Context context, AttributeSet attrs) {

        super(context, attrs);

        mPercentLayoutHelper = new PercentLayoutHelper(this);

    }

    @Override

    protected void onMeasure(int widthMeasureSpec, int heightMeasureSpec) {

        mPercentLayoutHelper.adjustChildren(widthMeasureSpec, heightMeasureSpec);

        super.onMeasure(widthMeasureSpec, heightMeasureSpec);

        if (mPercentLayoutHelper.handleMeasuredStateTooSmall()) {

            super.onMeasure(widthMeasureSpec, heightMeasureSpec);

        }

    }

    @Override

    protected void onLayout(boolean changed, int l, int t, int r, int b) {

        super.onLayout(changed, l, t, r, b);

        mPercentLayoutHelper.restoreOriginalParams();

    }

    @Override

    public LayoutParams generateLayoutParams(AttributeSet attrs) {

        return new LayoutParams(getContext(), attrs);

    }

    public static class LayoutParams extends LinearLayout.LayoutParams

            implements PercentLayoutHelper.PercentLayoutParams {

        private PercentLayoutHelper.PercentLayoutInfo mPercentLayoutInfo;

        public LayoutParams(Context c, AttributeSet attrs) {

            super(c, attrs);

            mPercentLayoutInfo = PercentLayoutHelper.getPercentLayoutInfo(c, attrs);

        }

        @Override

        public PercentLayoutHelper.PercentLayoutInfo getPercentLayoutInfo() {

            return mPercentLayoutInfo;

        }

        @Override

        protected void setBaseAttributes(TypedArray a, int widthAttr, int heightAttr) {

            PercentLayoutHelper.fetchWidthAndHeight(this, a, widthAttr, heightAttr);

        }

        public LayoutParams(int width, int height) {

            super(width, height);

        }

        public LayoutParams(ViewGroup.LayoutParams source) {

            super(source);

        }

        public LayoutParams(MarginLayoutParams source) {

            super(source);

        }

    }

}
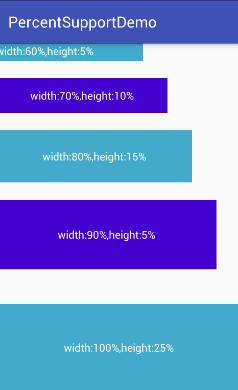
布局测试:
<?xml version="1.0" encoding="utf-8"?>

<com.loaderman.percentsupportdemo.PercentLinearLayout

    xmlns:android="http://schemas.android.com/apk/res/android"

    xmlns:app="http://schemas.android.com/apk/res-auto"

    android:layout_width="match_parent"

    android:layout_height="match_parent"

    android:orientation="vertical">

    <TextView

        android:layout_width="0dp"

        android:layout_height="0dp"

        android:background="#ff44aacc"

        android:text="width:60%,height:5%"

        android:textColor="#ffffff"

        app:layout_heightPercent="5%"

        app:layout_marginBottomPercent="5%"

        app:layout_widthPercent="60%"/>

    <TextView

        android:layout_width="0dp"

        android:layout_height="0dp"

        android:background="#ff4400cc"

        android:gravity="center"

        android:textColor="#ffffff"

        android:text="width:70%,height:10%"

        app:layout_heightPercent="10%"

        app:layout_marginBottomPercent="5%"

        app:layout_widthPercent="70%"/>

    <TextView

        android:layout_width="0dp"

        android:layout_height="0dp"

        android:background="#ff44aacc"

        android:gravity="center"

        android:text="width:80%,height:15%"

        android:textColor="#ffffff"

        app:layout_heightPercent="15%"

        app:layout_marginBottomPercent="5%"

        app:layout_widthPercent="80%"/>

    <TextView

        android:layout_width="0dp"

        android:layout_height="0dp"

        android:background="#ff4400cc"

        android:gravity="center"

        android:text="width:90%,height:5%"

        android:textColor="#ffffff"

        app:layout_heightPercent="20%"

        app:layout_marginBottomPercent="10%"

        app:layout_widthPercent="90%"/>

    <TextView

        android:layout_width="match_parent"

        android:layout_height="0dp"

        android:background="#ff44aacc"

        android:gravity="center"

        android:text="width:100%,height:25%"

        android:textColor="#ffffff"

        app:layout_heightPercent="25%"

        app:layout_marginBottomPercent="5%"

        />

</com.loaderman.percentsupportdemo.PercentLinearLayout>
效果图:
源码分析
其实细想一下,Google只是对我们原本熟悉的RelativeLayout和FrameLayout进行的功能的扩展,使其支持了percent相关的属性。
那么,我们考虑下,如果是我们添加这种扩展,我们会怎么做:
- 通过LayoutParams获取child设置的percent相关属性的值
- onMeasure的时候,将child的width,height的值,通过获取的自定义属性的值进行计算(eg:容器的宽 * fraction ),计算后传入给child.measure(w,h);
ok,有了上面的猜想,我们直接看PercentFrameLayout的源码。
public class PercentFrameLayout extends FrameLayout {

    private final PercentLayoutHelper mHelper = new PercentLayoutHelper(this);

    //省略了,两个构造方法

    public PercentFrameLayout(Context context, AttributeSet attrs) {

        super(context, attrs);

    }

    @Override

    public LayoutParams generateLayoutParams(AttributeSet attrs) {

        return new LayoutParams(getContext(), attrs);

    }

    @Override

    protected void onMeasure(int widthMeasureSpec, int heightMeasureSpec) {

        mHelper.adjustChildren(widthMeasureSpec, heightMeasureSpec);

        super.onMeasure(widthMeasureSpec, heightMeasureSpec);

        if (mHelper.handleMeasuredStateTooSmall()) {

            super.onMeasure(widthMeasureSpec, heightMeasureSpec);

        }

    }

    @Override

    protected void onLayout(boolean changed, int left, int top, int right, int bottom) {

        super.onLayout(changed, left, top, right, bottom);

        mHelper.restoreOriginalParams();

    }

    public static class LayoutParams extends FrameLayout.LayoutParams

            implements PercentLayoutHelper.PercentLayoutParams {

        private PercentLayoutHelper.PercentLayoutInfo mPercentLayoutInfo;

        public LayoutParams(Context c, AttributeSet attrs) {

            super(c, attrs);

            mPercentLayoutInfo = PercentLayoutHelper.getPercentLayoutInfo(c, attrs);

        }

        //省略了一些代码...

        @Override

        public PercentLayoutHelper.PercentLayoutInfo getPercentLayoutInfo() {

            return mPercentLayoutInfo;

        }

        @Override

        protected void setBaseAttributes(TypedArray a, int widthAttr, int heightAttr) {

            PercentLayoutHelper.fetchWidthAndHeight(this, a, widthAttr, heightAttr);

        }

    }

}
代码是相当的短,可以看到PercentFrameLayout里面首先重写了generateLayoutParams方法,当然了,由于支持了一些新的layout_属性,那么肯定需要定义对应的LayoutParams。
(一)percent相关属性的获取
可以看到PercentFrameLayout.LayoutParams在原有的FrameLayout.LayoutParams基础上,实现了PercentLayoutHelper.PercentLayoutParams接口。
这个接口很简单,只有一个方法:
public interface PercentLayoutParams {

        PercentLayoutInfo getPercentLayoutInfo();

}
而,这个方法的实现呢,也只有一行:return mPercentLayoutInfo;,那么这个mPercentLayoutInfo在哪完成赋值呢?
看PercentFrameLayout.LayoutParams的构造方法:
public LayoutParams(Context c, AttributeSet attrs) {

    super(c, attrs);

    mPercentLayoutInfo = PercentLayoutHelper.getPercentLayoutInfo(c, attrs);

}
可以看到,将attrs传入给getPercentLayoutInfo方法,那么不用说,这个方法的内部,肯定是获取自定义属性的值,然后将其封装到PercentLayoutInfo对象中,最后返回。代码如下:
public static PercentLayoutInfo getPercentLayoutInfo(Context context,

            AttributeSet attrs) {

        PercentLayoutInfo info = null;

        TypedArray array = context.obtainStyledAttributes(attrs, R.styleable.PercentLayout_Layout);

        float value = array.getFraction(R.styleable.PercentLayout_Layout_layout_widthPercent, 1, 1,

                -1f);

        if (value != -1f) {

            if (Log.isLoggable(TAG, Log.VERBOSE)) {

                Log.v(TAG, "percent width: " + value);

            }

            info = info != null ? info : new PercentLayoutInfo();

            info.widthPercent = value;

        }

        value = array.getFraction(R.styleable.PercentLayout_Layout_layout_heightPercent, 1, 1, -1f);

        if (value != -1f) {

            if (Log.isLoggable(TAG, Log.VERBOSE)) {

                Log.v(TAG, "percent height: " + value);

            }

            info = info != null ? info : new PercentLayoutInfo();

            info.heightPercent = value;

        }

        value = array.getFraction(R.styleable.PercentLayout_Layout_layout_marginPercent, 1, 1, -1f);

        if (value != -1f) {

            if (Log.isLoggable(TAG, Log.VERBOSE)) {

                Log.v(TAG, "percent margin: " + value);

            }

            info = info != null ? info : new PercentLayoutInfo();

            info.leftMarginPercent = value;

            info.topMarginPercent = value;

            info.rightMarginPercent = value;

            info.bottomMarginPercent = value;

        }

        value = array.getFraction(R.styleable.PercentLayout_Layout_layout_marginLeftPercent, 1, 1,

                -1f);

        if (value != -1f) {

            if (Log.isLoggable(TAG, Log.VERBOSE)) {

                Log.v(TAG, "percent left margin: " + value);

            }

            info = info != null ? info : new PercentLayoutInfo();

            info.leftMarginPercent = value;

        }

        value = array.getFraction(R.styleable.PercentLayout_Layout_layout_marginTopPercent, 1, 1,

                -1f);

        if (value != -1f) {

            if (Log.isLoggable(TAG, Log.VERBOSE)) {

                Log.v(TAG, "percent top margin: " + value);

            }

            info = info != null ? info : new PercentLayoutInfo();

            info.topMarginPercent = value;

        }

        value = array.getFraction(R.styleable.PercentLayout_Layout_layout_marginRightPercent, 1, 1,

                -1f);

        if (value != -1f) {

            if (Log.isLoggable(TAG, Log.VERBOSE)) {

                Log.v(TAG, "percent right margin: " + value);

            }

            info = info != null ? info : new PercentLayoutInfo();

            info.rightMarginPercent = value;

        }

        value = array.getFraction(R.styleable.PercentLayout_Layout_layout_marginBottomPercent, 1, 1,

                -1f);

        if (value != -1f) {

            if (Log.isLoggable(TAG, Log.VERBOSE)) {

                Log.v(TAG, "percent bottom margin: " + value);

            }

            info = info != null ? info : new PercentLayoutInfo();

            info.bottomMarginPercent = value;

        }

        value = array.getFraction(R.styleable.PercentLayout_Layout_layout_marginStartPercent, 1, 1,

                -1f);

        if (value != -1f) {

            if (Log.isLoggable(TAG, Log.VERBOSE)) {

                Log.v(TAG, "percent start margin: " + value);

            }

            info = info != null ? info : new PercentLayoutInfo();

            info.startMarginPercent = value;

        }

        value = array.getFraction(R.styleable.PercentLayout_Layout_layout_marginEndPercent, 1, 1,

                -1f);

        if (value != -1f) {

            if (Log.isLoggable(TAG, Log.VERBOSE)) {

                Log.v(TAG, "percent end margin: " + value);

            }

            info = info != null ? info : new PercentLayoutInfo();

            info.endMarginPercent = value;

        }

        array.recycle();

        if (Log.isLoggable(TAG, Log.DEBUG)) {

            Log.d(TAG, "constructed: " + info);

        }

        return info;

    }
是不是和我们平时的取值很类似,所有的值最终封装到PercentLayoutInfo对象中。
ok,到此我们的属性获取就介绍完成,有了这些属性,是不是onMeasure里面要进行使用呢?
(二) onMeasue中重新计算child的尺寸
@Override

    protected void onMeasure(int widthMeasureSpec, int heightMeasureSpec) {

        mHelper.adjustChildren(widthMeasureSpec, heightMeasureSpec);

        super.onMeasure(widthMeasureSpec, heightMeasureSpec);

        if (mHelper.handleMeasuredStateTooSmall()) {

            super.onMeasure(widthMeasureSpec, heightMeasureSpec);

        }

    }
可以看到onMeasure中的代码页很少,看来核心的代码都被封装在mHelper的方法中,我们直接看mHelper.adjustChildren方法。
/**

     * Iterates over children and changes their width and height to one calculated from percentage

     * values.

     * @param widthMeasureSpec Width MeasureSpec of the parent ViewGroup.

     * @param heightMeasureSpec Height MeasureSpec of the parent ViewGroup.

     */

    public void adjustChildren(int widthMeasureSpec, int heightMeasureSpec) {

        //...

        int widthHint = View.MeasureSpec.getSize(widthMeasureSpec);

        int heightHint = View.MeasureSpec.getSize(heightMeasureSpec);

        for (int i = 0, N = mHost.getChildCount(); i < N; i++) {

            View view = mHost.getChildAt(i);

            ViewGroup.LayoutParams params = view.getLayoutParams();

            if (params instanceof PercentLayoutParams) {

                PercentLayoutInfo info =

                        ((PercentLayoutParams) params).getPercentLayoutInfo();

                if (Log.isLoggable(TAG, Log.DEBUG)) {

                    Log.d(TAG, "using " + info);

                }

                if (info != null) {

                    if (params instanceof ViewGroup.MarginLayoutParams) {

                        info.fillMarginLayoutParams((ViewGroup.MarginLayoutParams) params,

                                widthHint, heightHint);

                    } else {

                        info.fillLayoutParams(params, widthHint, heightHint);

                    }

                }

            }

        }

    }
通过注释也能看出,此方法中遍历所有的孩子,通过百分比的属性重新设置其宽度和高度。
首先在widthHint、heightHint保存容器的宽、高,然后遍历所有的孩子,判断其LayoutParams是否是PercentLayoutParams类型,如果是,通过params.getPercentLayoutInfo拿出info对象。
是否还记得,上面的分析中,PercentLayoutInfo保存了percent相关属性的值。
如果info不为null,则判断是否需要处理margin;我们直接看fillLayoutParams方法(处理margin也是类似的)。
/**

         * Fills {@code ViewGroup.LayoutParams} dimensions based on percentage values.

         */

        public void fillLayoutParams(ViewGroup.LayoutParams params, int widthHint,

                int heightHint) {

            // Preserve the original layout params, so we can restore them after the measure step.

            mPreservedParams.width = params.width;

            mPreservedParams.height = params.height;

            if (widthPercent >= 0) {

                params.width = (int) (widthHint * widthPercent);

            }

            if (heightPercent >= 0) {

                params.height = (int) (heightHint * heightPercent);

            }

            if (Log.isLoggable(TAG, Log.DEBUG)) {

                Log.d(TAG, "after fillLayoutParams: (" + params.width + ", " + params.height + ")");

            }

        }
首先保存原本的width和height,然后重置params的width和height为(int) (widthHint * widthPercent)和(int) (heightHint * heightPercent);。
到此,其实我们的百分比转换就结束了,理论上就已经实现了对于百分比的支持,不过Google还考虑了一些细节。
我们回到onMeasure方法:
@Override

    protected void onMeasure(int widthMeasureSpec, int heightMeasureSpec) {

        mHelper.adjustChildren(widthMeasureSpec, heightMeasureSpec);

        super.onMeasure(widthMeasureSpec, heightMeasureSpec);

        if (mHelper.handleMeasuredStateTooSmall()) {

            super.onMeasure(widthMeasureSpec, heightMeasureSpec);

        }

    }
下面还有个mHelper.handleMeasuredStateTooSmall的判断,也就是说,如果你设置的百分比,最终计算出来的MeasuredSize过小的话,会进行一些操作。代码如下:
public boolean handleMeasuredStateTooSmall() {

        boolean needsSecondMeasure = false;

        for (int i = 0, N = mHost.getChildCount(); i < N; i++) {

            View view = mHost.getChildAt(i);

            ViewGroup.LayoutParams params = view.getLayoutParams();

            if (Log.isLoggable(TAG, Log.DEBUG)) {

                Log.d(TAG, "should handle measured state too small " + view + " " + params);

            }

            if (params instanceof PercentLayoutParams) {

                PercentLayoutInfo info =

                        ((PercentLayoutParams) params).getPercentLayoutInfo();

                if (info != null) {

                    if (shouldHandleMeasuredWidthTooSmall(view, info)) {

                        needsSecondMeasure = true;

                        params.width = ViewGroup.LayoutParams.WRAP_CONTENT;

                    }

                    if (shouldHandleMeasuredHeightTooSmall(view, info)) {

                        needsSecondMeasure = true;

                        params.height = ViewGroup.LayoutParams.WRAP_CONTENT;

                    }

                }

            }

        }

        if (Log.isLoggable(TAG, Log.DEBUG)) {

            Log.d(TAG, "should trigger second measure pass: " + needsSecondMeasure);

        }

        return needsSecondMeasure;

    }
首先遍历所有的孩子,拿出孩子的layoutparams,如果是PercentLayoutParams实例,则取出info。如果info不为null,调用shouldHandleMeasuredWidthTooSmall判断:
private static boolean shouldHandleMeasuredWidthTooSmall(View view, PercentLayoutInfo info) {

        int state = ViewCompat.getMeasuredWidthAndState(view) & ViewCompat.MEASURED_STATE_MASK;

        return state == ViewCompat.MEASURED_STATE_TOO_SMALL && info.widthPercent >= 0 &&

                info.mPreservedParams.width == ViewGroup.LayoutParams.WRAP_CONTENT;

}
这里就是判断,如果你设置的measuredWidth或者measureHeight过小的话,并且你在布局文件中layout_w/h 设置的是WRAP_CONTENT的话,将params.width / height= ViewGroup.LayoutParams.WRAP_CONTENT,然后重新测量。
哈,onMeasure终于结束了~~~现在我觉得应该代码结束了吧,尺寸都设置好了,还需要干嘛么,but,你会发现onLayout也重写了,我们又不改变layout规则,在onLayout里面干什么毛线:
@Override

    protected void onLayout(boolean changed, int left, int top, int right, int bottom) {

        super.onLayout(changed, left, top, right, bottom);

        mHelper.restoreOriginalParams();

    }
继续看mHelper.restoreOriginalParams
/**

     * Iterates over children and restores their original dimensions that were changed for

     * percentage values. Calling this method only makes sense if you previously called

     * {@link PercentLayoutHelper#adjustChildren(int, int)}.

     */

    public void restoreOriginalParams() {

        for (int i = 0, N = mHost.getChildCount(); i < N; i++) {

            View view = mHost.getChildAt(i);

            ViewGroup.LayoutParams params = view.getLayoutParams();

            if (Log.isLoggable(TAG, Log.DEBUG)) {

                Log.d(TAG, "should restore " + view + " " + params);

            }

            if (params instanceof PercentLayoutParams) {

                PercentLayoutInfo info =

                        ((PercentLayoutParams) params).getPercentLayoutInfo();

                if (Log.isLoggable(TAG, Log.DEBUG)) {

                    Log.d(TAG, "using " + info);

                }

                if (info != null) {

                    if (params instanceof ViewGroup.MarginLayoutParams) {

                        info.restoreMarginLayoutParams((ViewGroup.MarginLayoutParams) params);

                    } else {

                        info.restoreLayoutParams(params);

                    }

                }

            }

        }

    }
噗,原来是重新恢复原本的尺寸值,也就是说onMeasure里面的对值进行了改变,测量完成后。在这个地方,将值又恢复成如果布局文件中的值,上面写的都是0。恢复很简单:
public void restoreLayoutParams(ViewGroup.LayoutParams params) {

            params.width = mPreservedParams.width;

            params.height = mPreservedParams.height;

        }
你应该没有忘在哪存的把~忘了的话,麻烦Ctrl+F ‘mPreservedParams.width’ 。
也就是说,你去打印上面写法,布局文件中view的v.getLayoutParams().width,这个值应该是0。
这里感觉略微不爽~这个0没撒用处呀,还不如不重置~~
好了,到此就分析完了,其实主要就几个步骤:
- LayoutParams中属性的获取
- onMeasure中,改变params.width为百分比计算结果,测量
- 如果测量值过小且设置的w/h是wrap_content,重新测量
- onLayout中,重置params.w/h为布局文件中编写的值
可以看到,有了RelativeLayout、FrameLayout的扩展,竟然没有LinearLayout几个意思。好在,我们的核心代码都由PercentLayoutHelper封装了,自己扩展下LinearLayout也不复杂。
本文学习来源:http://blog.csdn.net/lmj623565791/article/details/46695347
Android百分比支持布局库的使用和源码分析的更多相关文章
- Android开发学习之路-LruCache使用和源码分析
LruCache的Lru指的是LeastRecentlyUsed,也就是近期最少使用算法.也就是说,当我们进行缓存的时候,如果缓存满了,会先淘汰使用的最少的缓存对象. 为什么要用LruCache?其实 ...
- 【转】用JitPack发布开源库时附加文档和源码
来自:http://www.gcssloop.com/course/jitpack-sources-javadoc 用JitPack发布开源库时附加文档和源码 很早之前写过一篇用JitPack发布An ...
- Android Debuggerd 简要介绍和源码分析(转载)
转载: http://dylangao.com/2014/05/16/android-debuggerd-%E7%AE%80%E8%A6%81%E4%BB%8B%E7%BB%8D%E5%92%8C%E ...
- Java并发编程(七)ConcurrentLinkedQueue的实现原理和源码分析
相关文章 Java并发编程(一)线程定义.状态和属性 Java并发编程(二)同步 Java并发编程(三)volatile域 Java并发编程(四)Java内存模型 Java并发编程(五)Concurr ...
- 【转载】Android异步消息处理机制详解及源码分析
PS一句:最终还是选择CSDN来整理发表这几年的知识点,该文章平行迁移到CSDN.因为CSDN也支持MarkDown语法了,牛逼啊! [工匠若水 http://blog.csdn.net/yanbob ...
- Kubernetes Job Controller 原理和源码分析(一)
概述什么是 JobJob 入门示例Job 的 specPod Template并发问题其他属性 概述 Job 是主要的 Kubernetes 原生 Workload 资源之一,是在 Kubernete ...
- Kubernetes Job Controller 原理和源码分析(二)
概述程序入口Job controller 的创建Controller 对象NewController()podControlEventHandlerJob AddFunc DeleteFuncJob ...
- Kubernetes Job Controller 原理和源码分析(三)
概述Job controller 的启动processNextWorkItem()核心调谐逻辑入口 - syncJob()Pod 数量管理 - manageJob()小结 概述 源码版本:kubern ...
- Quartz学习--二 Hello Quartz! 和源码分析
Quartz学习--二 Hello Quartz! 和源码分析 三. Hello Quartz! 我会跟着 第一章 6.2 的图来 进行同步代码编写 简单入门示例: 创建一个新的java普通工程 ...
随机推荐
- 【异常】Caused by: org.apache.phoenix.coprocessor.HashJoinCacheNotFoundException:
1 详细异常 Caused by: org.apache.phoenix.coprocessor.HashJoinCacheNotFoundException: ERROR 900 (HJ01): H ...
- SeekBar 滚动条
原seek_thumb样式----------------------------------------------------------------------↑↑↑↑↑ android:thu ...
- Mysqldump备份问题
1.1 Mysqldump文件数打开过多 mysql> mysqldump -uroot -p131400 --all-databases >/backup/mysql.sql mysql ...
- MyBatis Generator 移除字段前缀
在table标签内添加 <columnRenamingRule searchString="wrc_" replaceString=""/> < ...
- Tampermonkey油猴脚本管理插件-最强浏览器插件的安装使用全攻略
对于接触过谷歌浏览器插件的“玩家”们来说,应该没有人没听说过Tampermonkey用户脚本管理器,也就是中文所说的“油猴”这个chrome插件了. 油猴号称全商店最强的浏览器插件绝非浪得虚名,一 ...
- 第二章 Vue快速入门--12 事件修饰符的介绍
<!DOCTYPE html> <html lang="en"> <head> <meta charset="utf-8&quo ...
- Atcoder CODE FESTIVAL 2016 Final G - Zigzag MST[最小生成树]
题意:$n$个点,$q$次建边,每次建边选定$x,y$,权值$c$,然后接着$(y,x+1,c+1),(x+1,y+1,c+2),(y+1,x+2,c+3),(x+2,y+2,c+4)\dots$(画 ...
- 一例tornado框架下处理上传图片并生成缩略图的例子
class coachpic(RequestHandler): @gen.coroutine def post(self): picurl = self.request.files[] print(& ...
- Mybatis的@UpdateProvider注解的使用(转)
废话不多说,直接上代码 @UpdateProvider(type = AppProvider.class, method = "updateApp") Integer update ...
- 基于LVM 测试磁盘写性能.md
准备工作 /dev/sdb 创建一个卷组,基于卷组创建5个逻辑卷,各100G 在10.10.88.214 新建5台虚拟机,每台虚拟机用到lvm建的逻辑卷 dd 压测 在每台虚拟机上执行dd 命令: d ...