使用idea进行activiti工作流开发入门学习
1、安装插件
在idea里面,activiti的插件叫actiBPM,在插件库里面把它安装好,重启idea就行了。
2、新建一个maven项目,并更改pom.xml。pom中依赖如下:
<?xml version="1.0" encoding="UTF-8"?>

<project xmlns="http://maven.apache.org/POM/4.0.0"

         xmlns:xsi="http://www.w3.org/2001/XMLSchema-instance"

         xsi:schemaLocation="http://maven.apache.org/POM/4.0.0 http://maven.apache.org/xsd/maven-4.0.0.xsd">

    <modelVersion>4.0.0</modelVersion>

    <groupId>helloActiviti</groupId>

    <artifactId>helloActiviti</artifactId>

    <version>1.0-SNAPSHOT</version>

    <dependencies>

        <dependency>

            <groupId>org.activiti</groupId>

            <artifactId>activiti-spring</artifactId>

            <version>5.18.0</version>

        </dependency>

        <!--JUnit测试-->

        <dependency>

            <groupId>junit</groupId>

            <artifactId>junit</artifactId>

            <version>4.12</version>

        </dependency>

        <!--activiti-->

        <dependency>

            <groupId>org.activiti</groupId>

            <artifactId>activiti-engine</artifactId>

            <version>5.18.0</version>

            <exclusions>

                <exclusion>

                    <artifactId>slf4j-api</artifactId>

                    <groupId>org.slf4j</groupId>

                </exclusion>

                <exclusion>

                    <artifactId>spring-beans</artifactId>

                    <groupId>org.springframework</groupId>

                </exclusion>

                <exclusion>

                    <artifactId>jackson-core-asl</artifactId>

                    <groupId>org.codehaus.jackson</groupId>

                </exclusion>

                <exclusion>

                    <artifactId>commons-lang3</artifactId>

                    <groupId>org.apache.commons</groupId>

                </exclusion>

                <exclusion>

                    <artifactId>commons-lang3</artifactId>

                    <groupId>org.apache.commons</groupId>

                </exclusion>

            </exclusions>

        </dependency>

        <!--MySQL 驱动包,如果是其他库的话需要换驱动包-->

        <dependency>

            <groupId>mysql</groupId>

            <artifactId>mysql-connector-java</artifactId>

            <version>5.1.35</version>

        </dependency>

    </dependencies>

</project>
3、在src/main/resources下面新建一个BPMN文件
新建之后页面会变成如下图所示这样,中间是画布,右边是一些元素,左边是每个元素的一些详细信息,直接拖拽右边的元素就可以画流程了。
通过拖拽,完成简单的流程(这里只用到了StartEvent、UserTask、EndEvent),连接线需要悬停在对应元素上通过拖拽中心点来产生。
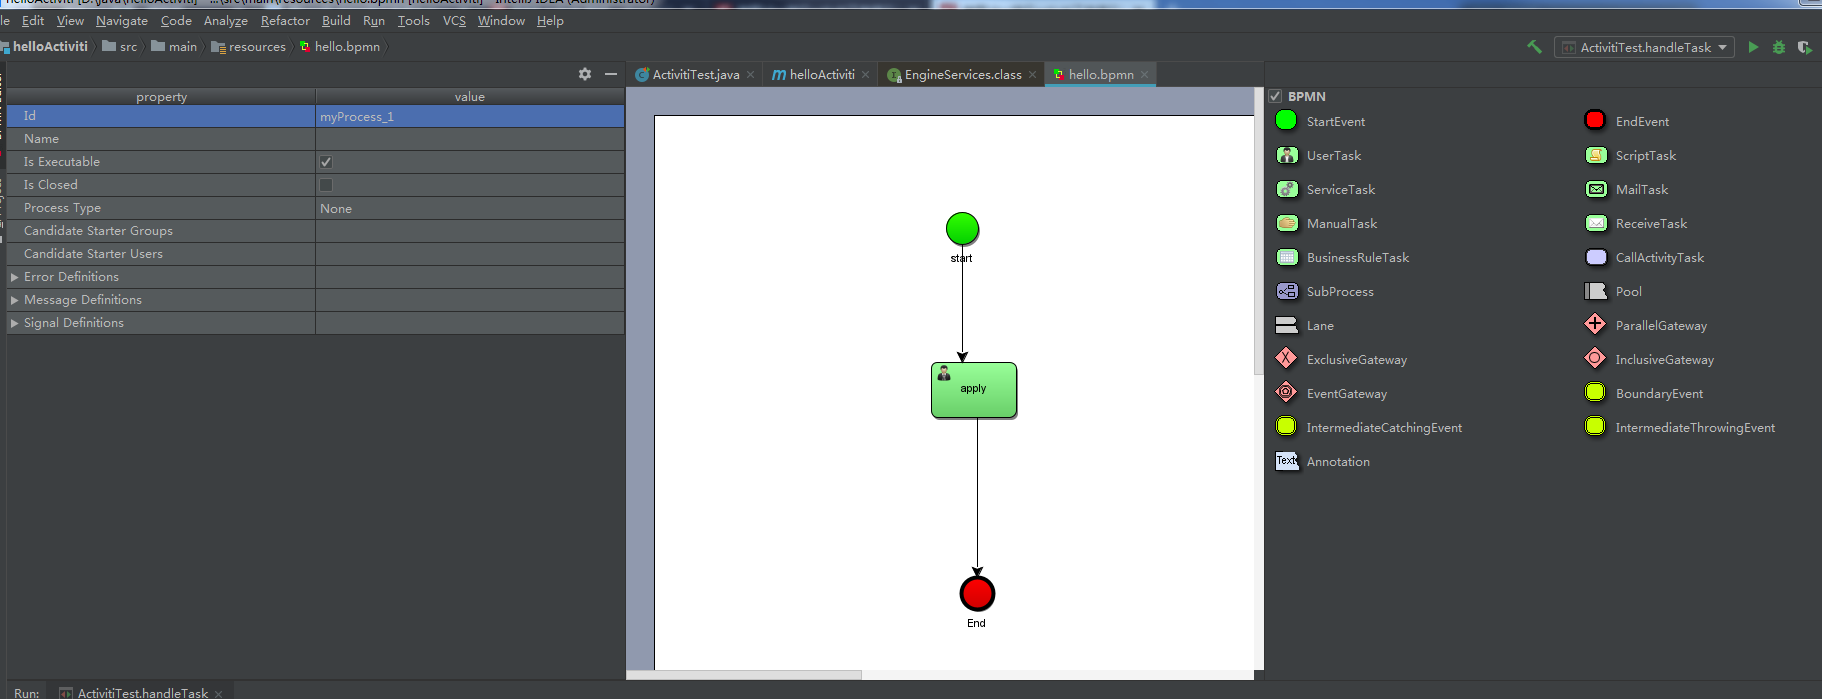
画完流程图之后要更改对应元素的name和assignee,我这里画的一个很简单的流程图,只用到了startEvent、endEvent和userTask。
接下来,创建一个Activiti类,在这里我直接和Test一起做了。同时,写好activiti的配置文件activiti.cfg.xml(PS:在写数据库连接的时候,要先创建对应的数据库和用户,数据库最好是新的,因为activiti会创建出24张它自己的表)。
目录结构:
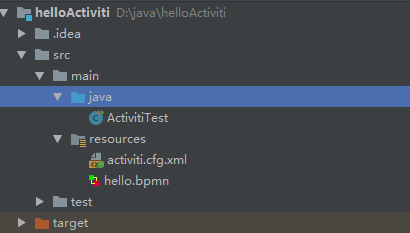
activiti.cfg.xml
<?xml version="1.0" encoding="UTF-8"?>
<beans xmlns="http://www.springframework.org/schema/beans"
xmlns:xsi="http://www.w3.org/2001/XMLSchema-instance"
xsi:schemaLocation="http://www.springframework.org/schema/beans http://www.springframework.org/schema/beans/spring-beans.xsd"> <bean id="processEngineConfiguration" class="org.activiti.engine.impl.cfg.StandaloneProcessEngineConfiguration">
<property name="jdbcDriver" value="com.mysql.jdbc.Driver"></property>
<property name="jdbcUrl" value="jdbc:mysql://localhost:3306/activiti?useUnicode=true&characterEncoding=utf8"></property>
<property name="jdbcUsername" value="root"></property>
<property name="jdbcPassword" value="root"></property>
<property name="databaseSchemaUpdate" value="true"></property>
</bean> </beans>
测试类:
import org.activiti.engine.*;

import org.activiti.engine.repository.DeploymentBuilder;

import org.junit.Test;

import org.activiti.engine.task.Task;

import java.util.List;

public class ActivitiTest {

    /**

     * 会默认按照Resources目录下的activiti.cfg.xml创建流程引擎

     */

    ProcessEngine processEngine = ProcessEngines.getDefaultProcessEngine();

    @Test

    public void test() { //以下两种方式选择一种创建引擎方式:1.配置写在程序里 2.读对应的配置文件

        //

        testCreateProcessEngine();

        //

        testCreateProcessEngineByCfgXml();

        deployProcess();

        startProcess();

        queryTask();

//handleTask();

    }

    /**

     * 测试activiti环境

     */

    @Test

    public void testCreateProcessEngine() {

        ProcessEngineConfiguration cfg = ProcessEngineConfiguration.createStandaloneProcessEngineConfiguration();

        cfg.setJdbcDriver("com.mysql.jdbc.Driver");

        cfg.setJdbcUrl("jdbc:mysql://127.0.0.1:3306/activiti");

        cfg.setJdbcUsername("root");

        cfg.setJdbcPassword("root"); //配置建表策略

        cfg.setDatabaseSchemaUpdate(ProcessEngineConfiguration.DB_SCHEMA_UPDATE_TRUE);

        ProcessEngine engine = cfg.buildProcessEngine();

    }

    /**

     * 根据配置文件activiti.cfg.xml创建ProcessEngine

     */

    @Test

    public void testCreateProcessEngineByCfgXml() {

        ProcessEngineConfiguration cfg = ProcessEngineConfiguration.createProcessEngineConfigurationFromResource("activiti.cfg.xml");

        ProcessEngine engine = cfg.buildProcessEngine();

    }

    /**

     * 发布流程

     * RepositoryService

     */

    @Test

    public void deployProcess() {

        RepositoryService repositoryService = processEngine.getRepositoryService();

        DeploymentBuilder builder = repositoryService.createDeployment();

        builder.addClasspathResource("hello.bpmn");

        builder.deploy();

    }

    /**

     * 启动流程

     * <p>

     * RuntimeService

     */

    @Test

    public void startProcess() {

        RuntimeService runtimeService = processEngine.getRuntimeService();

//可根据id、key、message启动流程

        runtimeService.startProcessInstanceByKey("myProcess_1");

    }

    /**

     * 查看任务

     * TaskService

     */

    @Test

    public void queryTask() {

        TaskService taskService = processEngine.getTaskService(); //根据assignee(代理人)查询任务

        String assignee = "emp";

        List<Task> tasks = taskService.createTaskQuery().taskAssignee(assignee).list();

        int size = tasks.size();

        for (int i = 0; i < size; i++) {

            Task task = tasks.get(i);

        }

        for (Task task : tasks) {

            System.out.println("taskId:" + task.getId() + ",taskName:" + task.getName() + ",assignee:" + task.getAssignee() + ",createTime:" + task.getCreateTime());

        }

    }

    /**

     * 办理任务

     */

    @Test

    public void handleTask() {

        TaskService taskService = processEngine.getTaskService(); //根据上一步生成的taskId执行任务

        String taskId = "2504";

        taskService.complete(taskId);

    }

}
启动流程之后就会有相应的任务产生,存在act_ru_task表中,可以查看任务节点
使用idea进行activiti工作流开发入门学习的更多相关文章
- 【转载】salesforce 零基础开发入门学习(六)简单的数据增删改查页面的构建
salesforce 零基础开发入门学习(六)简单的数据增删改查页面的构建 VisualForce封装了很多的标签用来进行页面设计,本篇主要讲述简单的页面增删改查.使用的内容和设计到前台页面使用的 ...
- 【转载】salesforce 零基础开发入门学习(五)异步进程介绍与数据批处理Batchable
salesforce 零基础开发入门学习(五)异步进程介绍与数据批处理Batchable 本篇知识参考:https://developer.salesforce.com/trailhead/for ...
- 【转载】salesforce 零基础开发入门学习(四)多表关联下的SOQL以及表字段Data type详解
salesforce 零基础开发入门学习(四)多表关联下的SOQL以及表字段Data type详解 建立好的数据表在数据库中查看有很多方式,本人目前采用以下两种方式查看数据表. 1.采用schem ...
- 【转载】salesforce 零基础开发入门学习(三)sObject简单介绍以及简单DML操作(SOQL)
salesforce 零基础开发入门学习(三)sObject简单介绍以及简单DML操作(SOQL) salesforce中对于数据库操作和JAVA等语言对于数据库操作是有一定区别的.salesfo ...
- 【转载】salesforce 零基础开发入门学习(二)变量基础知识,集合,表达式,流程控制语句
salesforce 零基础开发入门学习(二)变量基础知识,集合,表达式,流程控制语句 salesforce如果简单的说可以大概分成两个部分:Apex,VisualForce Page. 其中Apex ...
- 【转载】salesforce 零基础开发入门学习(一)Salesforce功能介绍,IDE配置以及资源下载
salesforce 零基础开发入门学习(一)Salesforce功能介绍,IDE配置以及资源下载 目前国内已经有很多公司做salesforce,但是国内相关的资料确是少之又少.上个月末跳槽去了新 ...
- Web开发入门学习笔记
公司web项目终于要启动了,本以为django学习可以在实战中进行,结果最终使用了Drupal框架,好吧,那我们就PHP走起,买了本<细说PHP>,先跟着过一遍Web开发入门. HTTP协 ...
- salesforce 零基础开发入门学习(三)sObject简单介绍以及简单DML操作(SOQL)
salesforce中对于数据库操作和JAVA等语言对于数据库操作是有一定区别的.salesforce中的数据库使用的是Force.com 平台的数据库,数据表一行数据可以理解成一个sObject变量 ...
- salesforce 零基础开发入门学习(一)Salesforce功能介绍,IDE配置以及资源下载
目前国内已经有很多公司做salesforce,但是国内相关的资料确是少之又少.上个月末跳槽去了新公司,主要做的就是salesforce,不过当时想要看一些相关资料确实比较难.为了避免想要零基础学习的人 ...
随机推荐
- golang GC(一 原理)
golang中的gc采用三色标记法.在讲三色标记法之前,先了解一下Mark and Sweep算法,因为Mark and Sweep算法是三个标记法的一个改进版. Mark and Sweep算法: ...
- Signal Processing and Pattern Recognition in Vision_15_RANSAC:Performance Evaluation of RANSAC Family——2009
此部分是 计算机视觉中的信号处理与模式识别 与其说是讲述,不如说是一些经典文章的罗列以及自己的简单点评.与前一个版本不同的是,这次把所有的文章按类别归了类,并且增加了很多文献.分类的时候并没有按照传统 ...
- DNS理解
前言 英译汉的时候会掩盖很多本质,导致很多问题稀里糊涂,问的人不知道怎么说,回答的人也是答非所问. DNS是Domain Name System缩写,不是Domain Name Server,或者Do ...
- Linux学习笔记(十五)用户和用户组
一.四个配置文件 解释: (1)当组内仅有一个用户且用户名和组名相同时,[组中用户列表]可省略不写 (2)root用户组的组号为0 (3)组号1-499位系统预留组号,是预留给安装在系统中的软件或服务 ...
- idou老师教你学istio 21:基于角色的访问控制
istio的授权功能,也称为基于角色的访问控制(RBAC),它为istio服务网格中的服务提供命名空间级别.服务级别和方法级别的访问控制.基于角色的访问控制具有简单易用.灵活和高性能等特性.本文介绍如 ...
- 【python】使用xlrd,xlwt来操作已存在的excel表
import xlrd import xlwt from xlutils.copy import copy # 打开想要更改的excel文件 old_excel = xlrd.open_workboo ...
- 什么是调整后的R方
当给模型增加自变量时,复决定系数也随之逐步增大,当自变量足够多时总会得到模型拟合良好,而实际却可能并非如此.于是考虑对R2进行调整,记为Ra2,称调整后复决定系数.R2=SSR/SST=1-SSE/S ...
- 【转】BSON数据格式
原文:https://www.e-learn.cn/content/qita/1999197 ----------------------------------------------------- ...
- resultSet.getMetaData() 获得表结构
1.得到查询结果,一个数据集 rs = stat.executeQuery("select * from " + table_name + " limit " ...
- PhpStudy升级MySQL版本到5.7
1:备份当前数据库数据. 最好是导成 SQL 文件 2:备份 PhpStudy 下的 MySQL 文件夹.以防升级失败.还可以使用旧版本的数据库 3:下载MySQL5.7.解压.然后放在 PhpStu ...