搭建自己的博客(十三):为博客后台添加ckeditor富文本编辑器
使用django默认的编辑器感觉功能太少了,所以集成一下富文本编辑器。
1、安装和使用
(1)、安装
pip install django-ckeditor
(2)、注册应用
在django的settings中添加‘ckeditor’的app
(3)、配置models
将需要用到富文本编辑器的字段改成RichTextField
上面三步配置过后是不能上传图片的,下面配置上传图片的功能。
(4)、安装pillow库
pip install pillow
(5)、注册应用
添加'ckeditor_uploader'这个app
(6)、在settings指定图片上传的目录
# media

MEDIA_URL='/media/'

MEDIA_ROOT=os.path.join(BASE_DIR,'media')

# 配置ckeditor

CKEDITOR_UPLOAD_PATH='upload/'
(7)、在urls中指定要上传的网址
from django.contrib import admin

from django.urls import path, include

from django.conf import settings

from django.conf.urls.static import static

from . import views

urlpatterns = [

    path('', views.home, name='home'),  # 主页路径

    path('admin/', admin.site.urls),

    path('ckeditor', include('ckeditor_uploader.urls')),  # 配置上传url

    path('blog/', include('blog.urls')),  # 博客app路径

]

# 设置ckeditor的上传

urlpatterns += static(settings.MEDIA_URL, document_root=settings.MEDIA_ROOT)
(8)、配置model
把字段改成RichTextUploadingField字段类型
(9)、官方文档
上面这几步差不多就行了,还需要扩展功能,前往-》官方文档
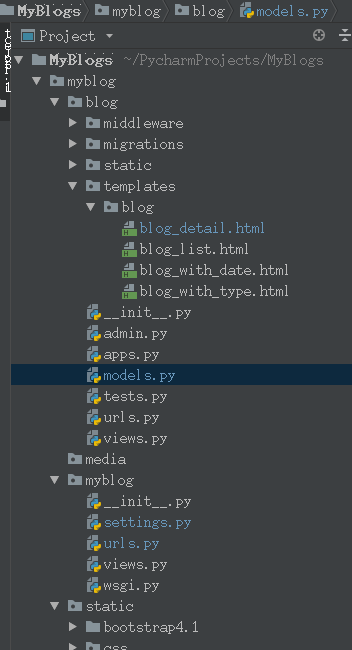
2、变化的部分:

3、上代码
{# 引用模板 #}

{% extends 'base.html' %}

{% load staticfiles %}

{% block header_extends %}

    <link rel="stylesheet" href="{% static 'blog/blog.css' %}">

{% endblock %}

{# 标题 #}

{% block title %}

    {{ blog.title }}

{% endblock %}

{# 内容#}

{% block content %}

    <div class="container">

        <div class="row">

            <div class="col-6 offset-1">

                <ul class="blog-info-description">

                    <h3>{{ blog.title }}</h3>

                    <li>作者:{{ blog.author }}</li>

                    {# 时间过滤器让时间按照自己需要的格式过滤 #}

                    <li>发布日期:{{ blog.created_time|date:"Y-m-d H:n:s" }}</li>

                    <li>分类:

                        <a href="{% url 'blogs_with_type' blog.blog_type.pk %}">

                            {{ blog.blog_type }}

                        </a>

                    </li>

                </ul>

                <p class="blog-content">{{ blog.content|safe }}</p>

                <p>上一篇:

                    {% if previous_blog %}

                       <a href="{% url 'blog_detail' previous_blog.pk %}">{{ previous_blog.title }}</a>

                    {% else %}

                        <span>没有了</span>

                    {% endif %}

                </p>

                <p>下一篇:

                    {% if next_blog %}

                        <a href="{% url 'blog_detail' next_blog.pk %}">{{ next_blog.title }}</a>

                    {% else %}

                        <span>没有了</span>

                    {% endif %}

                </p>

            </div>

        </div>

    </div>

{% endblock %}

{% block js %}

    <script>

        $(".nav-blog").addClass("active").siblings().removeClass("active");

    </script>

{% endblock %}
blog_detail.html
from django.db import models

from django.contrib.auth.models import User

from ckeditor_uploader.fields import RichTextUploadingField

# Create your models here.

# 博客分类

class BlogType(models.Model):

    type_name = models.CharField(max_length=15)  # 博客分类名称

    def __str__(self):  # 显示标签名

        return self.type_name

# 博客

class Blog(models.Model):

    title = models.CharField(max_length=50)  # 博客标题

    blog_type = models.ForeignKey(BlogType, on_delete=models.DO_NOTHING)  # 博客分类

    content = RichTextUploadingField()  # 博客内容,使用富文本编辑

    author = models.ForeignKey(User, on_delete=models.DO_NOTHING)  # 博客作者

    created_time = models.DateTimeField(auto_now_add=True)  # 博客创建时间

    last_updated_time = models.DateTimeField(auto_now=True)  # 博客更新事件

    def __str__(self):  # 显示标题名

        return "<Blog:{}>".format(self.title)

    class Meta:

        ordering = ['-created_time']  # 定义排序规则,按照创建时间倒序
models.py
"""

Django settings for myblog project.

Generated by 'django-admin startproject' using Django 2.1.3.

For more information on this file, see

https://docs.djangoproject.com/en/2.1/topics/settings/

For the full list of settings and their values, see

https://docs.djangoproject.com/en/2.1/ref/settings/

"""

import os

# Build paths inside the project like this: os.path.join(BASE_DIR, ...)

BASE_DIR = os.path.dirname(os.path.dirname(os.path.abspath(__file__)))

# Quick-start development settings - unsuitable for production

# See https://docs.djangoproject.com/en/2.1/howto/deployment/checklist/

# SECURITY WARNING: keep the secret key used in production secret!

SECRET_KEY = 'ea+kzo_5k^6r7micfg@lar1(rfdc08@b4*+w5d11=0mp1p5ngr'

# SECURITY WARNING: don't run with debug turned on in production!

DEBUG = True

ALLOWED_HOSTS = []

# Application definition

INSTALLED_APPS = [

    'django.contrib.admin',

    'django.contrib.auth',

    'django.contrib.contenttypes',

    'django.contrib.sessions',

    'django.contrib.messages',

    'django.contrib.staticfiles',

    'blog.apps.BlogConfig',  # 将自己创建的app添加到设置中

    'ckeditor',

    'ckeditor_uploader',

]

MIDDLEWARE = [

    'django.middleware.security.SecurityMiddleware',

    'django.contrib.sessions.middleware.SessionMiddleware',

    'django.middleware.common.CommonMiddleware',

    'django.middleware.csrf.CsrfViewMiddleware',

    'django.contrib.auth.middleware.AuthenticationMiddleware',

    'django.contrib.messages.middleware.MessageMiddleware',

    'django.middleware.clickjacking.XFrameOptionsMiddleware',

    'blog.middleware.mymiddleware.My404',  # 添加自己的中间件

]

ROOT_URLCONF = 'myblog.urls'

TEMPLATES = [

    {

        'BACKEND': 'django.template.backends.django.DjangoTemplates',

        'DIRS': [

            os.path.join(BASE_DIR, 'templates'),

        ],

        'APP_DIRS': True,

        'OPTIONS': {

            'context_processors': [

                'django.template.context_processors.debug',

                'django.template.context_processors.request',

                'django.contrib.auth.context_processors.auth',

                'django.contrib.messages.context_processors.messages',

            ],

        },

    },

]

WSGI_APPLICATION = 'myblog.wsgi.application'

# Database

# https://docs.djangoproject.com/en/2.1/ref/settings/#databases

DATABASES = {

    # 'default': {

    #     'ENGINE': 'django.db.backends.sqlite3',

    #     'NAME': os.path.join(BASE_DIR, 'db.sqlite3'),

    # }

    'default': {

        'ENGINE': 'django.db.backends.mysql',

        'NAME': 'myblogs',  # 要连接的数据库,连接前需要创建好

        'USER': 'root',  # 连接数据库的用户名

        'PASSWORD': 'felixwang',  # 连接数据库的密码

        'HOST': '127.0.0.1',  # 连接主机,默认本级

        'PORT': 3306  # 端口 默认3306

    }

}

# Password validation

# https://docs.djangoproject.com/en/2.1/ref/settings/#auth-password-validators

AUTH_PASSWORD_VALIDATORS = [

    {

        'NAME': 'django.contrib.auth.password_validation.UserAttributeSimilarityValidator',

    },

    {

        'NAME': 'django.contrib.auth.password_validation.MinimumLengthValidator',

    },

    {

        'NAME': 'django.contrib.auth.password_validation.CommonPasswordValidator',

    },

    {

        'NAME': 'django.contrib.auth.password_validation.NumericPasswordValidator',

    },

]

# Internationalization

# https://docs.djangoproject.com/en/2.1/topics/i18n/

# LANGUAGE_CODE = 'en-us'

# 语言

LANGUAGE_CODE = 'zh-hans'

# TIME_ZONE = 'UTC'

# 时区

TIME_ZONE = 'Asia/Shanghai'

USE_I18N = True

USE_L10N = True

# 不考虑时区

USE_TZ = False

# Static files (CSS, JavaScript, Images)

# https://docs.djangoproject.com/en/2.1/howto/static-files/

STATIC_URL = '/static/'

STATICFILES_DIRS = [

    os.path.join(BASE_DIR, "static")

]

# media

MEDIA_URL='/media/'

MEDIA_ROOT=os.path.join(BASE_DIR,'media')

# 配置ckeditor

CKEDITOR_UPLOAD_PATH='upload/'

# 自定义参数

EACH_PAGE_BLOGS_NUMBER = 7
settings.py
"""myblog URL Configuration

The `urlpatterns` list routes URLs to views. For more information please see:

    https://docs.djangoproject.com/en/2.1/topics/http/urls/

Examples:

Function views

    1. Add an import:  from my_app import views

    2. Add a URL to urlpatterns:  path('', views.home, name='home')

Class-based views

    1. Add an import:  from other_app.views import Home

    2. Add a URL to urlpatterns:  path('', Home.as_view(), name='home')

Including another URLconf

    1. Import the include() function: from django.urls import include, path

    2. Add a URL to urlpatterns:  path('blog/', include('blog.urls'))

"""

from django.contrib import admin

from django.urls import path, include

from django.conf import settings

from django.conf.urls.static import static

from . import views

urlpatterns = [

    path('', views.home, name='home'),  # 主页路径

    path('admin/', admin.site.urls),

    path('ckeditor', include('ckeditor_uploader.urls')),  # 配置上传url

    path('blog/', include('blog.urls')),  # 博客app路径

]

# 设置ckeditor的上传

urlpatterns += static(settings.MEDIA_URL, document_root=settings.MEDIA_ROOT)
urls.py
搭建自己的博客(十三):为博客后台添加ckeditor富文本编辑器的更多相关文章
- springboot中使用kindeditor富文本编辑器实现博客功能
kindeditor在之前已经用过,现在在springboot项目中使用.并且也在里面使用了图片上传以及回显等功能. 其实主要的功能是图片的处理:kindeditor对输入的内容会作为html标签处理 ...
- python 全栈开发,Day83(博客系统子评论,后台管理,富文本编辑器kindeditor,bs4模块)
一.子评论 必须点击回复,才是子评论!否则是根评论点击回复之后,定位到输入框,同时加入@评论者的用户名 定位输入框 focus focus:获取对象焦点触发事件 先做样式.点击回复之后,定位到输入框, ...
- PHP如何搭建百度Ueditor富文本编辑器
本文为大家分享了PHP搭建百度Ueditor富文本编辑器的方法,供大家参考,具体内容如下 下载UEditor 官网:下载地址 将下载好的文件解压到thinkphp项目中,本文是解压到PUBLIC目录下 ...
- 万里长征第二步——django个人博客(第六步 ——添加富文本编辑器)
下载kindeditor 在admin.py文件中配置链接 class Media: js = ( '/static/js/kindeditor-4.1.10/kindeditor-min.js', ...
- [BBS]搭建开源论坛之JForum富文本编辑器更换
本文作者:sushengmiyan 本文地址:http://blog.csdn.net/sushengmiyan/article/details/47866905 上一节我们将开发环境搭建完成,我们 ...
- Django1.9开发博客(11)- 富文本与代码高亮
TinyMCE是一个轻量级的基于浏览器的所见即所得编辑器,支持目前流行的各种浏览器,由JavaScript写成. 功能配置灵活简单(两行代码就可以将编辑器嵌入网页中),支持AJAX.另一特点是加载速度 ...
- Django实现的博客系统中使用富文本编辑器ckeditor
操作系统为OS X 10.9.2,Django为1.6.5. 1.下载和安装 1.1 安装 ckeditor 下载地址 https://github.com/shaunsephton/django-c ...
- 【网站搭建】搭建独立域名博客 -- 独立域名博客上线了 www.hanshuliang.com
博客是安装在阿里云的服务器上. 小结 : -- 进入数据库命令 :mysql -uroot -p123456 ; -- 检查nginx配置语法 :.../nginx/sbin/nginx -t; -- ...
- 搭建独立域名博客 -- 独立域名博客上线了 www.hanshuliang.com
博客是安装在阿里云的服务器上. 小结 : -- 进入数据库命令 :mysql -uroot -p123456 ; -- 检查nginx配置语法 :.../nginx/sbin/nginx -t; -- ...
随机推荐
- spring的事务解决方案之@Transactional注解
首先此注解位于 org.springframework.transaction.annotation 这个包路径下面, 事务有两种类别,一种是编程式事务,另一种是声明式事务,显然此注解是声明式事务,这 ...
- centos7安装oracle11g(根据oracle官方文档安装,解决图形界面安装问题)
一.系统及安装包 操作系统:centos 7.4 oracle版本:oracle 11g r2 二.centos环境配置 安装数据库所需要的软件包 [root@localhost data]# yum ...
- vmware vcsa-故障1
1.重启vcsa后不能登陆webclient 做实验得时候重启vcsa后不能登陆 web client 开启vcsa直接进入命令模式,命令行登陆后提示:failed to connect to se ...
- SQL根据指定节点ID获取所有父级节点和子级节点(转载)
--根据指定节点ID获取所有子节点-- WITH TEMP AS ( ' --表的主键ID UNION ALL SELECT T0.* FROM TEMP,table_name T0 WHERE TE ...
- Django2.0 分页的应用
#分页例子from django.core.paginator import Paginatordef blog_list(request): blog_all_list = models. ...
- VBA用户自定义函数(十五)
函数是一组可重复使用的代码,可以在程序中的任何地方调用.这消除了一遍又一遍地编写相同的代码的需要.这使程序员能够将一个大程序划分成许多小的可管理的功能模块. 除了内置函数外,VBA还允许编写用户定义的 ...
- bootstrap环境搭建
Bootstrap 是stwitter公司的两名前端设计师设计的基于html css javascript的超强的前端框架. Bootstrap 是一移动设备为优先,pc机,平板,手机皆适用的框架. ...
- FICO-清帐函数
转载:https://www.cnblogs.com/caizjian/p/8067071.html https://blog.csdn.net/sapliumeng/article/details/ ...
- Windows环境下实现Jenkins自动化部署
详见:https://blog.csdn.net/Try_harder_every_day/article/details/79170065 Jenkins自动化部署: 几条具体的思路:1.开发人员将 ...
- centos7 配置yum源
简单粗暴方法: 1.首先在本机上测试 ping www.baidu.com 是否通,不通的话配置网卡ip.dns等. 2.进入yum路径下: cd /etc/yum.repos.d/ 3.下载repo ...
