Rancher + K8S RestApi使用
1前言
1.1使用的软件及版本
|
软件 |
版本号 |
|
Rancher |
1.6stable |
|
Kubernetes |
1.8.3 |
|
Docker |
1.12.6 |
1.2 Rancher与K8S的RESTAPI差异
因为目前使用Rancher作为K8S的部署工具,Rancher封装了K8S的REST API(仅仅是做了一层代理),且K8S apiserver是作为内部服务(没有开放对外端口),因此无法直接访问K8S的api。不过可以通过Rancher开放的端口访问,其他内容还是没有变化的。
原K8S的REST API访问链接
https://k8s_apiserver_ip:6443/api/v1/namespaces/default/
现Rancher提供的RESTAPI链接
http://rancher_server_ip:8080/r/projects/1a7/kubernetes:6443/v1/namespaces/default/
2 REST API授权
要访问K8S的RESTAPI需要提供认证信息API Key。
API Key使用Bearer认证,包含集群所有者的两部分内容:Access Key和Secret Key。这两个信息都可以通过在RancherUI中获得。
具体获取方式如下:
①使用该集群所有者信息登录RancherUI,点击【API】> 【密钥】

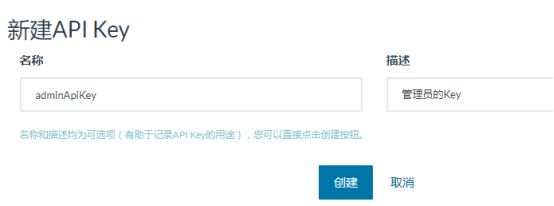
②点击【添加账号API Key】
这里Api Key的名称和描述仅仅作为辅助作用,点创建会弹出真正需要记录的内容。

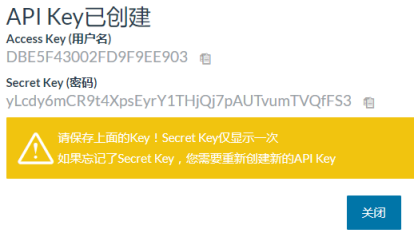
③点击【创建】
图片中的警告信息说明的已经很清晰了,不再解释。

④根据Access Key和Secret Key计算认证信息。
先获取 <AccessKey>:<SecretKey> 的Base64编码,长度84,记做KeyCode84
再获取 Basic <KeyCode84> 的Base64编码,长度120,记做KeyCode120
⑤使用
发起REST API请求的时候,在请求头里加上以下认证信息即可:
Authorization:Bearer <KeyCode120>
例如:
Authorization:Bearer
QmFzaWMgTXpjNVFVSkRRalJCT1RRMFJUQTFPRVF5UlVZNldXbFJNbmM1UVcxUVIzaEZlbHBrTlc1NU56VnZRbmhCY1RreFIxRjBObU55ZVRsRVFuVnRhdz09
QmFzaWMgTUVNME0wWXpPVU0wTmtNek5USXhNRVV4TWpRNmVHMDFhRlY2WkRnelMxazBjM2xTT0ZKa2MyTnJTRFJUYm1seGFXTktOelI2Tm5ONmFYUkJXQT09
3 REST API使用
3.1 api功能分类
官方api的使用文档,https://kubernetes.io/docs/api-reference/v1.9
访问http://rancher_server_ip:8080/r/projects/1a7/kubernetes:6443可以获取到所有支持的接口:
{
"paths": [
"/api",
"/api/v1", //蓝色部分是核心API Group
"/apis",
"/apis/",
"/apis/apiextensions.k8s.io",
"/apis/apiextensions.k8s.io/v1beta1",
"/apis/apiregistration.k8s.io",
"/apis/apiregistration.k8s.io/v1beta1",
"/apis/apps",
"/apis/apps/v1beta1",
"/apis/apps/v1beta2",
"/apis/authentication.k8s.io",
"/apis/authentication.k8s.io/v1",
"/apis/authentication.k8s.io/v1beta1",
"/apis/authorization.k8s.io",
"/apis/authorization.k8s.io/v1",
"/apis/authorization.k8s.io/v1beta1",
"/apis/autoscaling",
"/apis/autoscaling/v1",
"/apis/autoscaling/v2beta1",
"/apis/batch",
"/apis/batch/v1",
"/apis/batch/v1beta1",
"/apis/batch/v2alpha1",
"/apis/certificates.k8s.io",
"/apis/certificates.k8s.io/v1beta1",
"/apis/extensions",
"/apis/extensions/v1beta1", //扩展组
"/apis/networking.k8s.io",
"/apis/networking.k8s.io/v1",
"/apis/policy",
"/apis/policy/v1beta1",
"/apis/rbac.authorization.k8s.io",
"/apis/rbac.authorization.k8s.io/v1",
"/apis/rbac.authorization.k8s.io/v1beta1",
"/apis/storage.k8s.io",
"/apis/storage.k8s.io/v1",
"/apis/storage.k8s.io/v1beta1",//其他APIGroup
"/healthz",
"/healthz/autoregister-completion",
"/healthz/etcd",
"/healthz/ping",
"/healthz/poststarthook/apiservice-openapi-controller",
"/healthz/poststarthook/apiservice-registration-controller",
"/healthz/poststarthook/apiservice-status-available-controller",
"/healthz/poststarthook/bootstrap-controller",
"/healthz/poststarthook/ca-registration",
"/healthz/poststarthook/generic-apiserver-start-informers",
"/healthz/poststarthook/kube-apiserver-autoregistration",
"/healthz/poststarthook/start-apiextensions-controllers",
"/healthz/poststarthook/start-apiextensions-informers",
"/healthz/poststarthook/start-kube-aggregator-informers",
"/healthz/poststarthook/start-kube-apiserver-informers",
"/logs",
"/metrics",
"/swagger-2.0.0.json",
"/swagger-2.0.0.pb-v1",
"/swagger-2.0.0.pb-v1.gz",
"/swagger.json",
"/swaggerapi",
"/ui",
"/ui/",
"/version"
]
}
Kubernetes主要管理三种资源:Pod,replicationController,service
这里有一篇针对这三个资源的RESTAPI文档:
至于其他API,暂未找到好的较好的,如果想获取某操作的API url,可以通过kubectl执行操作的时候添加-v=8来获得。例如删除pod
kubectl delete pods ubuntu1 -v=8
得到

4. JavaClient 的使用
KubernetesAPIJavaClient
Rancher + K8S RestApi使用的更多相关文章
- Rancher+K8S部署手册
目前创建K8S集群的安装程序最受欢迎的有Kops,Kubespray,kubeadm,rancher,以及个人提供的脚本集等. Kops和Kubespary在国外用的比较多,没有处理中国的网络问题,没 ...
- Rancher + k8s + docker 部署资料
一.k8s 文档: https://jimmysong.io/kubernetes-handbook/concepts/deployment.html 命令行大全 https://kubernetes ...
- (转)清除已运行过Rancher和K8S的主机上的环境数据
文章转自 https://blog.csdn.net/CSDN_duomaomao/article/details/77684571?locationNum=5&fps=1 本文命令主要是参考 ...
- 使用Rancher的RKE快速部署Kubernetes集群
简要说明: 本文共涉及3台Ubuntu机器,1台RKE部署机器(192.168.3.161),2台Kubernetes集群机器(3.162和3.163). 先在Windows机器上,将rke_linu ...
- Rancher2.0构建kubernetes(K8S)集群
一.环境准备 1.准备至少3台CentOS7版本的虚拟机 # IP地址 主机名称 192.168.1.160 rancher 192.168.1.161 master 192.168.1.162 no ...
- Docker 编排工具Rancher 1.6.18
使用docker获取rancher [root@localhost /]# docker pull rancher/server:stable [root@localhost /]# docker i ...
- 使用Rancher的RKE部署Kubernetes要点
简要说明: RKE (Rancher Kubernetes Engine)是RancherLabs提供的一个工具,可以在裸机.虚拟机.公私有云上快速安装Kubernetes集群.整个集群的部署只需要一 ...
- 使用Rancher管理Docker
使用命令: sudo docker run -it -d --restart=always -p : --name docker-rancher rancher/server 为了更快速的下载应用,推 ...
- k8s集群问题记录
k8s集群问题记录 k8s学习方案 问题解决思路 主要学习路径: rancher(k8s)->rke->helm->kubectl->k8s(k8s中文api) 常见问题总结: ...
随机推荐
- 160804、oracle查询:取出每组中的第一条记录
oracle查询:取出每组中的第一条记录按type字段分组,code排序,取出每组中的第一条记录 方法一: select type,min(code) from group_info group by ...
- Less-mixin函数基础二
//mixin函数 基础使用方法 --包含选择器,example: .test(){ &:hover{ border:1px solid red; } } button{ .test; } / ...
- delphi中 ExecSQL 与 open
对于不用返回结果集的要用execsql反之则用open;insert ,update,delete就要用到execsql;select就要用open 说得对,例子:with query1 do clo ...
- Powershell Exchange Message Per Day Sent and Reveive
Powershell Exchange Message Per Day Sent and Reveive # Initialize some variables used for counting a ...
- tomcat 日志目录 介绍
[root@mysql tomcat]# ll 总用量 drwxr-x---. root root 11月 : bin -rw-r-----. root root 11月 : BUILDING.txt ...
- Linux的进程/线程通信方式总结(转)
Linux系统中的进程通信方式主要以下几种: 同一主机上的进程通信方式 * UNIX进程间通信方式: 包括管道(PIPE), 有名管道(FIFO), 和信号(Signal) * System V进程通 ...
- 删除pentaho用户和用户文件夹
获取所有用户 http://xxxxxxxx.com:8888/pentaho/api/repo/files/home/children 获取单个用户 http://whfxpt.itestcn.co ...
- ajax异步请求返回对象
使用ajax异步请求返回一个对象. java code: @RequestMapping({"getAstSingleWheelImg_bbs"+Constant.JSON}) @ ...
- Levenshtein距离
Levenshtein Distance,又称Edit Distance,在自然语言处理中有着广泛的应用.Levenshtein Distance 指的是两个字符串之间,由一个转换成另一个所需的最少 ...
- $python正则表达式系列(3)——正则内置属性
本文主要总结一下python正则的一些内置属性的用法. 1. 编译标志:flags 首先来看一下re.findall函数的函数原型: import re print('[Output]') print ...
