[Axiom3D]第一个Axiom3D程序
Axiom3D程序的基本渲染流程
 #region Namespace Declarations

 using System;

 using System.Linq;

 using Axiom.Core;

 using Axiom.Framework.Configuration;

 using Axiom.Graphics;

 using Vector3 = Axiom.Math.Vector3;

 #endregion Namespace Declarations

 namespace Axiom.Framework

 {

     public abstract class Game : IDisposable, IWindowEventListener

     {

         protected Root Engine;

         protected IConfigurationManager ConfigurationManager;

         protected ResourceGroupManager Content;

         protected SceneManager SceneManager;

         protected Camera Camera;

         protected Viewport Viewport;

         protected RenderWindow Window;

         protected Axiom.Graphics.RenderSystem RenderSystem;

         protected SharpInputSystem.InputManager InputManager;

         protected SharpInputSystem.Mouse mouse;

         protected SharpInputSystem.Keyboard keyboard;

         public virtual void Run()

         {

             PreInitialize();

             LoadConfiguration();

             Initialize();

             CreateRenderSystem();

             CreateRenderWindow();

             LoadContent();

             CreateSceneManager();

             CreateCamera();

             CreateViewports();

             CreateInput();

             CreateScene();

             this.Engine.StartRendering();

         }

         private void PreInitialize()

         {

             this.ConfigurationManager = new DefaultConfigurationManager();

             // instantiate the Root singleton

             this.Engine = new Root( this.ConfigurationManager.LogFilename );

             // add event handlers for frame events

             this.Engine.FrameStarted += Engine_FrameRenderingQueued;

         }

         public virtual void LoadConfiguration()

         {

             this.ConfigurationManager.RestoreConfiguration( this.Engine );

         }

         private void Engine_FrameRenderingQueued( object source, FrameEventArgs e )

         {

             Update( e.TimeSinceLastFrame );

         }

         public virtual void Initialize()

         {

         }

         public virtual void CreateRenderSystem()

         {

             if ( this.Engine.RenderSystem == null )

             {

                 this.RenderSystem = this.Engine.RenderSystem = this.Engine.RenderSystems.First().Value;

             }

             else

             {

                 this.RenderSystem = this.Engine.RenderSystem;

             }

         }

         public virtual void CreateRenderWindow()

         {

             this.Window = Root.Instance.Initialize( true, "Axiom Framework Window" );

             WindowEventMonitor.Instance.RegisterListener( this.Window, this );

         }

         public virtual void LoadContent()

         {

             ResourceGroupManager.Instance.InitializeAllResourceGroups();

         }

         public virtual void CreateSceneManager()

         {

             // Get the SceneManager, a generic one by default

             this.SceneManager = this.Engine.CreateSceneManager( "DefaultSceneManager", "GameSMInstance" );

             this.SceneManager.ClearScene();

         }

         public virtual void CreateCamera()

         {

             // create a camera and initialize its position

             this.Camera = this.SceneManager.CreateCamera( "MainCamera" );

             this.Camera.Position = new Vector3( , ,  );

             this.Camera.LookAt( new Vector3( , , - ) );

             // set the near clipping plane to be very close

             this.Camera.Near = ;

             this.Camera.AutoAspectRatio = true;

         }

         public virtual void CreateViewports()

         {

             // create a new viewport and set it's background color

             this.Viewport = this.Window.AddViewport( this.Camera, , , 1.0f, 1.0f,  );

             this.Viewport.BackgroundColor = ColorEx.SteelBlue;

         }

         public virtual void CreateInput()

         {

             var pl = new SharpInputSystem.ParameterList();

             pl.Add( new SharpInputSystem.Parameter( "WINDOW", this.Window[ "WINDOW" ] ) );

             if ( this.RenderSystem.Name.Contains( "DirectX" ) )

             {

                 //Default mode is foreground exclusive..but, we want to show mouse - so nonexclusive

                 pl.Add( new SharpInputSystem.Parameter( "w32_mouse", "CLF_BACKGROUND" ) );

                 pl.Add( new SharpInputSystem.Parameter( "w32_mouse", "CLF_NONEXCLUSIVE" ) );

             }

             //This never returns null.. it will raise an exception on errors

             this.InputManager = SharpInputSystem.InputManager.CreateInputSystem( pl );

             //mouse = InputManager.CreateInputObject<SharpInputSystem.Mouse>( true, "" );

             //keyboard = InputManager.CreateInputObject<SharpInputSystem.Keyboard>( true, "" );

         }

         public abstract void CreateScene();

         public virtual void Update( float timeSinceLastFrame )

         {

         }

         #region IDisposable Implementation

         #region IsDisposed Property

         /// <summary>

         /// Determines if this instance has been disposed of already.

         /// </summary>

         public bool IsDisposed { get; set; }

         #endregion IsDisposed Property

         /// <summary>

         /// Class level dispose method

         /// </summary>

         /// <remarks>

         /// When implementing this method in an inherited class the following template should be used;

         /// protected override void dispose( bool disposeManagedResources )

         /// {

         ///     if ( !IsDisposed )

         ///     {

         ///         if ( disposeManagedResources )

         ///         {

         ///             // Dispose managed resources.

         ///         }

         ///

         ///         // If there are unmanaged resources to release,

         ///         // they need to be released here.

         ///     }

         ///

         ///     // If it is available, make the call to the

         ///     // base class's Dispose(Boolean) method

         ///     base.dispose( disposeManagedResources );

         /// }

         /// </remarks>

         /// <param name="disposeManagedResources">True if Unmanaged resources should be released.</param>

         protected virtual void dispose( bool disposeManagedResources )

         {

             if ( !IsDisposed )

             {

                 if ( disposeManagedResources )

                 {

                     if ( this.Engine != null )

                     {

                         // remove event handlers

                         this.Engine.FrameStarted -= Engine_FrameRenderingQueued;

                     }

                     if ( this.SceneManager != null )

                     {

                         this.SceneManager.RemoveAllCameras();

                     }

                     this.Camera = null;

                     if ( Root.Instance != null )

                     {

                         Root.Instance.RenderSystem.DetachRenderTarget( this.Window );

                     }

                     if ( this.Window != null )

                     {

                         WindowEventMonitor.Instance.UnregisterWindow( this.Window );

                         this.Window.Dispose();

                     }

                     if ( this.Engine != null )

                     {

                         this.Engine.Dispose();

                     }

                 }

                 // There are no unmanaged resources to release, but

                 // if we add them, they need to be released here.

             }

             IsDisposed = true;

         }

         /// <summary>

         /// Call to when class is no longer needed

         /// </summary>

         public void Dispose()

         {

             dispose( true );

             GC.SuppressFinalize( this );

         }

         ~Game()

         {

             dispose( false );

         }

         #endregion IDisposable Implementation

         #region IWindowEventListener Implementation

         /// <summary>

         /// Window has moved position

         /// </summary>

         /// <param name="rw">The RenderWindow which created this event</param>

         public void WindowMoved( RenderWindow rw )

         {

         }

         /// <summary>

         /// Window has resized

         /// </summary>

         /// <param name="rw">The RenderWindow which created this event</param>

         public void WindowResized( RenderWindow rw )

         {

         }

         /// <summary>

         /// Window has closed

         /// </summary>

         /// <param name="rw">The RenderWindow which created this event</param>

         public void WindowClosed( RenderWindow rw )

         {

             // Only do this for the Main Window

             if ( rw == this.Window )

             {

                 Root.Instance.QueueEndRendering();

             }

         }

         /// <summary>

         /// Window lost/regained the focus

         /// </summary>

         /// <param name="rw">The RenderWindow which created this event</param>

         public void WindowFocusChange( RenderWindow rw )

         {

         }

         #endregion

     }

 }
查看Run()方法。
public virtual void Run()
{
PreInitialize();
LoadConfiguration();//加载配置
Initialize();
CreateRenderSystem();//创建渲染系统
CreateRenderWindow();//创建渲染窗体
LoadContent();
CreateSceneManager();//创建场景管理器
CreateCamera();//设置相机
CreateViewports();//设置视口
CreateInput();
CreateScene();//构建场景
this.Engine.StartRendering();//开始渲染
}
基本流程:实例化Root,加载配置文件,创建渲染系统,创建渲染窗体,创建场景管理器,设置相机,设置视口,构建场景,开始渲染流程。
新建C#项目,命名为AppAxiom,添加引用Axiom.Engine。
新建类MyGame,继承自Game,编写代码如下:
  public class myGame : Game

         {

             public override void CreateScene()

             {

                 SceneManager.SetSkyDome(true, "Examples/CloudySky", , );

                 SceneManager.AmbientLight = new ColorEx(0.3f, 0.3f, 0.3f);

                 SceneManager.CreateLight("ParticleSampleLight").Position = new Vector3(, , );

                 Entity ogreHead = SceneManager.CreateEntity("OgreHead", "ogrehead.mesh");

                 // Load muiltiple heads for box select and demonstrating single select with stacked objects

                 // create a scene node for each entity and attach the entity

                 SceneNode ogreHead1Node;

                 ogreHead1Node = SceneManager.RootSceneNode.CreateChildSceneNode("OgreHeadNode", Vector3.Zero, Quaternion.Identity);

                 ogreHead1Node.AttachObject(ogreHead);

                 SceneNode ogreHead2Node;

                 Entity ogreHead2 = SceneManager.CreateEntity("OgreHead2", "ogrehead.mesh");

                 ogreHead2Node = SceneManager.RootSceneNode.CreateChildSceneNode("OgreHead2Node", new Vector3(-, , ),

                                                                                  Quaternion.Identity);

                 ogreHead2Node.AttachObject(ogreHead2);

                 SceneNode ogreHead3Node;

                 Entity ogreHead3 = SceneManager.CreateEntity("OgreHead3", "ogrehead.mesh");

                 ogreHead3Node = SceneManager.RootSceneNode.CreateChildSceneNode("OgreHead3Node", new Vector3(+, , ),

                                                                                  Quaternion.Identity);

                 ogreHead3Node.AttachObject(ogreHead3);

             }

             public override void CreateCamera()

             {

                 // create a camera and initialize its position

                 this.Camera = this.SceneManager.CreateCamera("MainCamera");

                 this.Camera.Position = new Vector3(, , );

                 this.Camera.LookAt(new Vector3(, , ));

                 // set the near clipping plane to be very close

                 this.Camera.Near = ;

                 this.Camera.AutoAspectRatio = true;

             }

         }
添加项目配置文件App.Config,内容如下:
 <?xml version="1.0"?>

 <configuration>

   <configSections>

     <section name="axiom" type="Axiom.Framework.Configuration.AxiomConfigurationSection, Axiom.Framework" />

   </configSections>

   <startup useLegacyV2RuntimeActivationPolicy="true">

     <supportedRuntime version="v4.0" sku=".NETFramework,Version=v4.0,Profile=Client" />

   </startup>

   <axiom xmlns="http://www.axiom3d.net/schemas/configuration/v1.0">

     <resourceLocations>

       <!-- Resource Group : Essential -->

       <resourceLocation type="ZipFile" group="Essential" path="../../media/archives/SdkTrays.zip" recurse="false" />

       <resourceLocation type="Folder" group="Essential" path="../../media/thumbnails" recurse="false" />

       <resourceLocation type="Folder" group="Essential" path="../../media/icons" recurse="false" />

       <!-- Resource Group : Popular -->

       <resourceLocation type="ZipFile" group="Popular" path="../../media/archives/cubemap.zip" recurse="false" />

       <resourceLocation type="ZipFile" group="Popular" path="../../media/archives/cubemapsjs.zip" recurse="false" />

       <!-- resourceLocation type="ZipFile" group="Popular" path="../../media/archives/dragon.zip" recurse="false" /-->

       <!-- resourceLocation type="ZipFile" group="Popular" path="../../media/archives/fresneldemo.zip" recurse="false" /-->

       <!-- resourceLocation type="ZipFile" group="Popular" path="../../media/archives/ogretestmap.zip" recurse="false" /-->

       <resourceLocation type="ZipFile" group="Popular" path="../../media/archives/skybox.zip" recurse="false" />

       <resourceLocation type="ZipFile" group="Popular" path="../../media/archives/sinbad.zip" recurse="false" />

       <resourceLocation type="Folder" group="Popular" path="../../media/fonts" recurse="false" />

       <resourceLocation type="Folder" group="Popular" path="../../media/programs" recurse="false" />

       <resourceLocation type="Folder" group="Popular" path="../../media/materials" recurse="false" />

       <resourceLocation type="Folder" group="Popular" path="../../media/particles" recurse="false" />

       <resourceLocation type="Folder" group="Popular" path="../../media/textures" recurse="false" />

       <resourceLocation type="Folder" group="Popular" path="../../media/meshes" recurse="false" />

       <!-- resourceLocation type="Folder" group="Popular" path="../../media/deferredshadingmedia" recurse="false" / -->

       <!-- resourceLocation type="Folder" group="Popular" path="../../media/pczappmedia" recurse="false" / -->

     </resourceLocations>

     <renderSystems>

       <renderSystem name="Xna">

         <options>

           <option name="Video Mode" value="1280 x 720 @ 32-bit color" />

           <option name="Full Screen" value="Yes" />

           <option name="VSync" value="No" />

           <option name="Anti aliasing" value="None" />

           <option name="Floating-point mode" value="Fastest" />

           <option name="Allow NVPerfHUD" value="No" />

           <option name="Save Generated Shaders" value="No" />

           <option name="Use Content Pipeline" value="No" />

         </options>

       </renderSystem>

       <renderSystem name="DirectX9">

         <options>

           <option name="Video Mode" value="800 x 600 @ 32-bit colour" />

           <option name="Full Screen" value="No" />

           <option name="VSync" value="No" />

           <option name="Anti aliasing" value="None" />

           <option name="Floating-point mode" value="Fastest" />

           <option name="Allow NVPerfHUD" value="No" />

         </options>

       </renderSystem>

       <renderSystem name="OpenGL">

         <options>

           <option name="Video Mode" value="1280 x 720" />

           <option name="Color Depth" value="" />

           <option name="Display Frequency" value="N/A" />

           <option name="Full Screen" value="Yes" />

           <option name="FSAA" value="" />

           <option name="VSync" value="No" />

           <option name="RTT Preferred Mode" value="FBO" />

         </options>

       </renderSystem>

     </renderSystems>

   </axiom>

 </configuration>
在Main方法下添加代码:
  static void Main()

         {

             myGame my = new myGame();

             my.Run();

         }
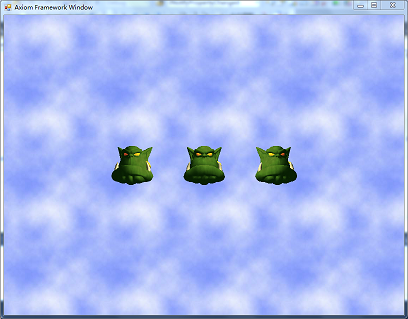
将材质文件Material放在debug同一级目录下,将dll放在Debug目录下,运行效果如下。
奇怪的是同样的D3D、Vs配置在XP系统中无法运行!
[Axiom3D]第一个Axiom3D程序的更多相关文章
- DirectX游戏编程(一):创建一个Direct3D程序
一.环境 Visual Studio 2012,DirectX SDK (June 2010) 二.准备 1.环境变量(如没有配置请添加) 变量名:DXSDK_DIR 变量值:D:\Software\ ...
- 第一个python程序
一个python程序的两种执行方式: 1.第一种方式是通过python解释器: cmd->python->进入python解释器->编写python代码->回车. 2.第二种方 ...
- 编写第一个MapReduce程序—— 统计气温
摘要:hadoop安装完成后,像学习其他语言一样,要开始写一个“hello world!” ,看了一些学习资料,模仿写了个程序.对于一个C#程序员来说,写个java程序,并调用hadoop的包,并跑在 ...
- 1.3 第一个C#程序
几乎没一门编程语言的第一个程序都叫“你好,世界”,所以先在visual studio 中创建一个Helloworld程序. 各部分的详细内容: Main方法是程序运行的起点,最重要的代码就写在Main ...
- 一个.net程序员的安卓之旅-Eclipse设置代码智能提示功能
一个.net程序员的安卓之旅-代码智能提示功能 过完年回来就决心开始学安卓开发,就网上买了个内存条加在笔记本上(因为笔记本原来2G内存太卡了,装了vs2010.SQL Server 2008.orac ...
- MFC-01-Chapter01:Hello,MFC---1.3 第一个MFC程序(02)
1.3.1 应用程序对象 MFC应用程序的核心就是基于CWinApp类的应用程序对象,CWinApp提供了消息循环来检索消息并将消息调度给应用程序的窗口.当包含头文件<afxwin.h>, ...
- Go! new Hello World, 我的第一个Go程序
以下语句摘自百度百科: Go语言是谷歌2009发布的第二款开源编程语言. Go语言专门针对多处理器系统应用程序的编程进行了优化,使用Go编译的程序可以媲美C或C++代码的速度,而且更加安全.支持并行进 ...
- 搭建java开发环境、使用eclipse编写第一个java程序
搭建java开发环境.使用eclipse编写第一个java程序 一.Java 开发环境的搭建 1.首先安装java SDK(简称JDK). 点击可执行文件 jdk-6u24-windows-i586. ...
- 第一个ruby程序
老实说不是很喜欢去讨论ruby和python的对比,似乎总是把两个语言放在对立的位置上,我觉得没有必要,同样是动态语言,同样是解释型脚本语言,很多特性都是互相影响的,语言本身也在不断进化,我们更应该关 ...
随机推荐
- mybatis传递Map和List集合示例
1.List示例 java文件: dao: public List<ServicePort> selectByIps(List<String> ips); xml文件: < ...
- 关于android 调用网页隐藏地址栏
首先创建项目,在main.xml里 添加好WebView控件R.id为webview1. HelloWebView.java 代码 package liu.ming.com; import andro ...
- ASP.NET中相对路径的使用总结
如果有一个网站上的图片的路径是这样的: http://localhost:2008/websit1/images/1.jpg websit1表示的是虚拟路径或者是站点 在asp.net中,如果我们在. ...
- Oracle 11gR2 11.2.0.1 ( 11.2.0.1的BUG?):ohasd不能正常启动:ioctl操作:npohasd的问题:【chmod a+wr /var/tmp/.oracle/npohasd】
问题1:执行安装,编译成功后,执行asmca时,失败,无法成功创建后台相关服务 问题2:os系统重启后,ohasd无法正常启动,css服务失败 原因:11.2.0.1的BUG:/var/tmp/.or ...
- MySQL性能优化(一)-- 存储引擎和三范式
一.MySQL存储引擎 存储引擎说白了就是如何存储数据.如何为存储的数据建立索引和如何更新.查询数据等技术的实现方法.因为在关系数据库中数据的存储是以表的形式存储的,所以存储引擎也可以称为表类型(即存 ...
- Python 列表表达式与生成器表达式
列表表达式: (1) 语法1:[表达式 for 变量 in 列表],表示把得到的每一个变量值都放到 for 前面的表达式中计算 ,然后生成一个列表(2) 语法2:[表达式 for 变量 in 列表 i ...
- webstrom如何配置babel来转换es6
网上有很多关于如何设置babel的.我学习着设置,但总差那么几步,没能满足我的需求. 我使用的是webStorm2017.1版本. babel安装准备 使用webStorm自带的filewatcher ...
- php学习七:时间和日期
在学习php中的时间和日期的时候,必须要了解什么是时间戳,那么什么是时间戳呢,请看一下的定义 时间戳:从 Unix 纪元(格林威治时间 1970 年 1 月 1 日 00:00:00)到当前时间的秒数 ...
- c++11 处理时间和日期
c++11提供了日期时间相关的库 chrono,通过chrono库可以很方便的处理日期和时间. 1. 记录时间长度的duration template<class Rep, class Peri ...
- activemq 实战 一
This chapter covers Introduction to the use case for each of the book examples Use of Maven for ...