Android中数据的保存
1. 概述
在Android中有以下几种保存数据方式:
1). 使用sharedPreference去保存:只有应用程序自己可以访问
2). 保存在应用程序私有的文件夹下:只有应用程序自己可以访问
3). 使用File形式保存在file/cache目录下
4). 保存到公共的sd卡上:其他的应用程序也可以访问
5). 使用数据库去保存(MySQL)
其中1.2.3的共性都是保存在当前应用的目录下的私有数据
2. 方法一:File方式保存
@Override
protected void onCreate(Bundle savedInstanceState) {
super.onCreate(savedInstanceState);
setContentView(R.layout.activity_main);
try{
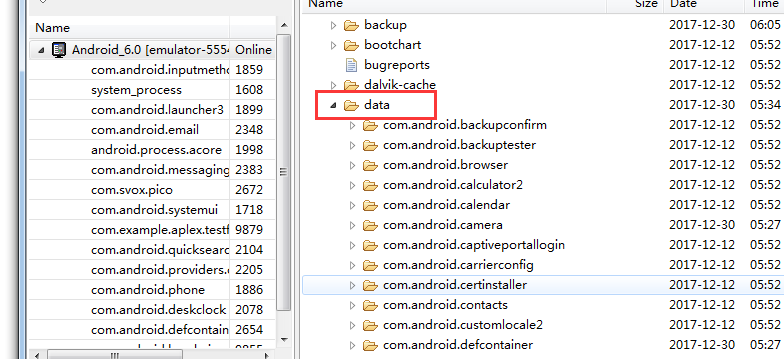
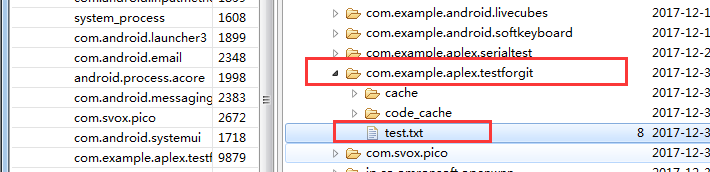
File f = new File("/data/data/com.example.aplex.testforgit/test.txt");
BufferedWriter writer = new BufferedWriter(new FileWriter(f)) ;
writer.write("hahahehe");
writer.close();
}catch (IOException e){
e.printStackTrace();
} }
3. 方法二:File方式保存(data/cache目录下)
protected void onCreate(Bundle savedInstanceState) {

        super.onCreate(savedInstanceState);

        setContentView(R.layout.activity_main);

        try{

            //1. 保存在应用的cache中

            {

                File f = new File(getCacheDir(),"cache.txt");

                BufferedWriter writer = new BufferedWriter(new FileWriter(f)) ;

                writer.write("hahahehe");

                writer.close();

            }

        }catch (IOException e){

            e.printStackTrace();

        }

        //2. 保存在应用的file中

            try {

                File f = new File(getFilesDir(),"file.txt");

                BufferedWriter writer = new BufferedWriter(new FileWriter(f)) ;

                writer.write("hahahehe");

                writer.close();

            } catch (IOException e) {

                e.printStackTrace();

            }

    }

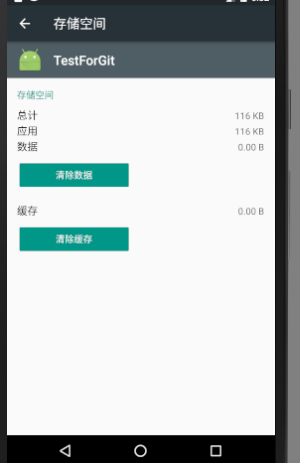
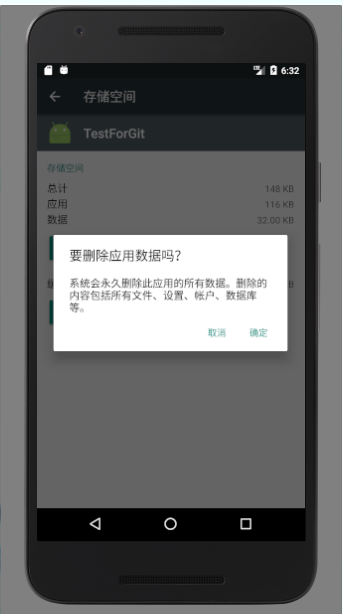
注意:清除数据会把data目录下改应用的所有数据都清除掉,而清除缓存则只会清除cache目录下的数据
4. 方法三:使用sharedPreference去保存
Xml 文件可以用来保存数据
注意: 使用sharedPreferences保存数据时, 生成的xml 文件是
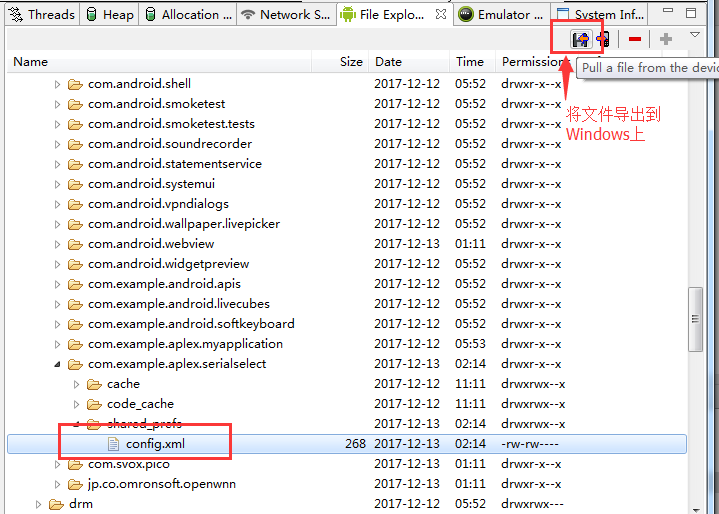
在 /data/data/包名/shared_prefs 目录下.
<?xml version="1.0" encoding="utf-8"?>
<LinearLayout xmlns:android="http://schemas.android.com/apk/res/android"
xmlns:app="http://schemas.android.com/apk/res-auto"
xmlns:tools="http://schemas.android.com/tools"
android:layout_width="match_parent"
android:layout_height="match_parent"
android:orientation="vertical"
tools:context="com.example.aplex_new1.myapplication.MainActivity"> <EditText
android:layout_width="match_parent"
android:layout_height="wrap_content"
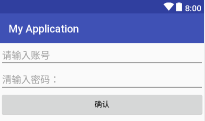
android:hint="请输入账号"
android:inputType="number"
android:id="@+id/ed"/>
<EditText
android:layout_width="match_parent"
android:layout_height="wrap_content"
android:hint="清输入密码:"
android:inputType="numberPassword"
android:id="@+id/ed2"/>
<Button
android:layout_width="match_parent"
android:layout_height="wrap_content"
android:text="确认"
android:id="@+id/bt" /> </LinearLayout>
package com.example.aplex_new1.myapplication;

import android.content.SharedPreferences;

import android.support.v7.app.AppCompatActivity;

import android.os.Bundle;

import android.view.View;

import android.widget.Button;

import android.widget.EditText;

public class MainActivity extends AppCompatActivity {

    Button bt1;

    EditText accountView;

    EditText pwdView;

    @Override

    protected void onCreate(Bundle savedInstanceState) {

        super.onCreate(savedInstanceState);

        setContentView(R.layout.activity_main);

        bt1 = findViewById(R.id.bt);

        accountView = findViewById(R.id.ed);

        pwdView = findViewById(R.id.ed2);

        //获取到mydata.xml对象,没有则会创建一个

        SharedPreferences sp = getSharedPreferences("mydata", 0);

        //拿到编辑器

        SharedPreferences.Editor ed = sp.edit();

        //获取出mydata.xml中键值为account的数据

        String account = sp.getString("account", "");

        //获取出mydata.xml中键值为pwd的数据

        String pwd = sp.getString("pwd","");

        //显示出来

        accountView.setText(account);

        pwdView.setText(pwd);

        bt1.setOnClickListener(new View.OnClickListener() {

            @Override

            public void onClick(View view) {

                SharedPreferences sp = getSharedPreferences("mydata", 0);

                SharedPreferences.Editor ed = sp.edit();

                String account = accountView.getText().toString();

                String pwd = pwdView.getText().toString();

                //放入数据中

                ed.putString("account", account);

                ed.putString("pwd", pwd);

                //提交

                ed.apply();

            }

        });

    }

}
现象:第一次点击应用
账号密码都为空
在输入完账号密码后,退出,再次点击,则会回显出来
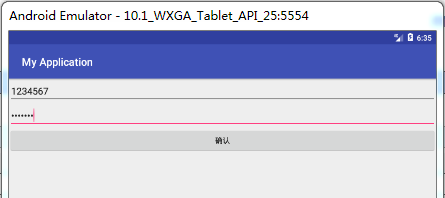
因为数据已经保存进了XML文件中去了


打开mydata.xml
<?xml version='1.0' encoding='utf-8' standalone='yes' ?>

<map>

    <string name="account">1234567</string>

    <string name="pwd">1234567</string>

</map>
4. 方法四:保存到公共的sd卡上:
1. 概念和代码
AndroidManifest.xml
<!-- 在SDCard中创建与删除文件权限 -->
<uses-permission android:name="android.permission.MOUNT_UNMOUNT_FILESYSTEMS" />
<!-- 往SDCard写入数据权限 -->
<uses-permission android:name="android.permission.WRITE_EXTERNAL_STORAGE" />
<application

        android:allowBackup="true"

        android:icon="@mipmap/ic_launcher"

        android:label="@string/app_name"

        android:roundIcon="@mipmap/ic_launcher_round"

        android:supportsRtl="true"

        android:theme="@style/AppTheme">

        <activity android:name=".MainActivity">

            <intent-filter>

                <action android:name="android.intent.action.MAIN" />

                <category android:name="android.intent.category.LAUNCHER" />

            </intent-filter>

        </activity>

</application>
SDFileHelper.java
public class SDFileHelper {

    String TAG = "SDFileHelper";

    private Context context;

    public SDFileHelper() {

    }

    public SDFileHelper(Context context) {

        super();

        this.context = context;

    }

    //往SD卡写入文件的方法

    public void savaFileToSD(String filename, String filecontent) throws Exception {

        //如果手机已插入sd卡,且app具有读写sd卡的权限

        if (Environment.getExternalStorageState().equals(Environment.MEDIA_MOUNTED)) {

            filename = Environment.getExternalStorageDirectory().getCanonicalPath() + "/" + filename;

            Log.d(TAG,"文件名:"+filename);

            //这里就不要用openFileOutput了,那个是往手机内存中写数据的

            FileOutputStream output = new FileOutputStream(filename);

            output.write(filecontent.getBytes());

            //将String字符串以字节流的形式写入到输出流中

            output.close();

            //关闭输出流

        } else Toast.makeText(context, "SD卡不存在或者不可读写", Toast.LENGTH_SHORT).show();

    }

    //读取SD卡中文件的方法

    //定义读取文件的方法:

    public String readFromSD(String filename) throws IOException {

        StringBuilder sb = new StringBuilder("");

        if (Environment.getExternalStorageState().equals(Environment.MEDIA_MOUNTED)) {

            filename = Environment.getExternalStorageDirectory().getCanonicalPath() + "/" + filename;

            //打开文件输入流

            FileInputStream input = new FileInputStream(filename);

            byte[] temp = new byte[];

            int len = ;

            //读取文件内容:

            while ((len = input.read(temp)) > ) {

                sb.append(new String(temp, , len));

            }

            //关闭输入流

            input.close();

        }

        return sb.toString();

    }

}
MainActivity.java
public class MainActivity extends AppCompatActivity implements View.OnClickListener{
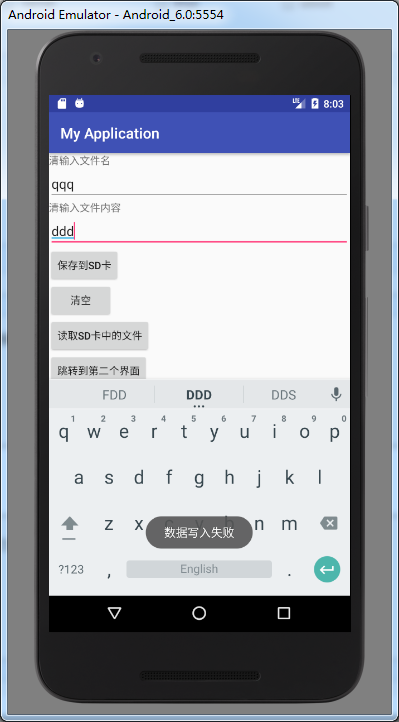
private EditText editname;
private EditText editdetail;
private Button btnsave;
private Button btnclean;
private Button btnread;
private Context mContext;
@Override
protected void onCreate(Bundle savedInstanceState) {
super.onCreate(savedInstanceState);
setContentView(R.layout.activity_main);
mContext = getApplicationContext();
bindViews();
}
private void bindViews() {
editname = (EditText) findViewById(R.id.edittitle);
editdetail = (EditText) findViewById(R.id.editdetail);
btnsave = (Button) findViewById(R.id.btnsave);
btnclean = (Button) findViewById(R.id.btnclean);
btnread = (Button) findViewById(R.id.btnread);
btnsave.setOnClickListener(this);
btnclean.setOnClickListener(this);
btnread.setOnClickListener(this);
}
@Override
public void onClick(View v) {
switch (v.getId()){
case R.id.btnclean:
editdetail.setText("");
editname.setText("");
break;
case R.id.btnsave:
String filename = editname.getText().toString();
String filedetail = editdetail.getText().toString();
SDFileHelper sdHelper = new SDFileHelper(mContext);
try
{
sdHelper.savaFileToSD(filename, filedetail);
Toast.makeText(getApplicationContext(), "数据写入成功", Toast.LENGTH_SHORT).show();
}
catch(Exception e){
e.printStackTrace();
Toast.makeText(getApplicationContext(), "数据写入失败", Toast.LENGTH_SHORT).show();
}
break;
case R.id.btnread:
String detail = "";
SDFileHelper sdHelper2 = new SDFileHelper(mContext);
try
{
String filename2 = editname.getText().toString();
detail = sdHelper2.readFromSD(filename2);
}
catch(IOException e){e.printStackTrace();}
Toast.makeText(getApplicationContext(), detail, Toast.LENGTH_SHORT).show();
break;
}
}
}
2. 6.0上SD卡的权限和动态申请权限的问题(重点!!)
Android6.0之后系统对权限的管理更加严格了,不但要在AndroidManifest中添加,还要在应用运行的时候动态申请。下面是动态申请SD卡读写的权限
1. 在AndroidManifest中添加SD卡读写的权限
    <uses-permission android:name="android.permission.WRITE_EXTERNAL_STORAGE" />

    <uses-permission android:name="android.permission.READ_EXTERNAL_STORAGE" />
2. 申请权限
申请权限有两种方式:
1). 手动打开权限:
Settings-->Apps-->找到所需要的应用-->Permissions-->打开权限
2). 在程序中动态申请权限(重点):
 private static final int REQUEST_EXTERNAL_STORAGE = ;

    private static String[] PERMISSIONS_STORAGE = {

            "android.permission.READ_EXTERNAL_STORAGE",

            "android.permission.WRITE_EXTERNAL_STORAGE" };

    public static void verifyStoragePermissions(Activity activity) {

        try {

        //检测是否有写的权限

            int permission = ActivityCompat.checkSelfPermission(activity,

                    "android.permission.WRITE_EXTERNAL_STORAGE");

            if (permission != PackageManager.PERMISSION_GRANTED) {

        // 没有写的权限,去申请写的权限,会弹出对话框

                ActivityCompat.requestPermissions(activity, PERMISSIONS_STORAGE,REQUEST_EXTERNAL_STORAGE);

            }

        } catch (Exception e) {

            e.printStackTrace();

        }

    }
5. 方法五:使用数据库(MySQL)去保存
Android中数据的保存的更多相关文章
- Android中数据存储(一)
国庆没有给国家添堵,没有勾搭妹子,乖乖的写着自己的博客..... 本文将为大家介绍Android中数据存储的五种方式,数据存储可是非常重要的知识哦. 一,文件存储数据 ①在ROM存储数据 关于在ROM ...
- Android笔记——Android中数据的存储方式(二)
我们在实际开发中,有的时候需要储存或者备份比较复杂的数据.这些数据的特点是,内容多.结构大,比如短信备份等.我们知道SharedPreferences和Files(文本文件)储存这种数据会非常的没有效 ...
- Android笔记——Android中数据的存储方式(一)
Android中数据的存储方式 对于开发平台来讲,如果对数据的存储有良好的支持,那么对应用程序的开发将会有很大的促进作用. 总体的来讲,数据存储方式有三种:一个是文件,一个是数据库,另一个则是网络.其 ...
- android中数据存储
android中数据存储 Android 中存储数据的方式有五种:SQLite数据库.文件存储.内容提供者.网络.SharedPreferences(Key----value)五种存储方式. ...
- Android菜鸟的成长笔记(14)—— Android中的状态保存探究(上)
原文:[置顶] Android菜鸟的成长笔记(14)—— Android中的状态保存探究(上) 我们在用手机的时候可能会发现,即使应用被放到后台再返回到前台数据依然保留(比如说我们正在玩游戏,突然电话 ...
- Android菜鸟的成长笔记(15)—— Android中的状态保存探究(下)
原文:Android菜鸟的成长笔记(15)-- Android中的状态保存探究(下) 在上一篇中我们简单了解关于Android中状态保存的过程和原理,这一篇中我们来看一下在系统配置改变的情况下保存数据 ...
- Android中数据存储(三)——SQLite数据库存储数据
当一个应用程序在Android中安装后,我们在使用应用的过程中会产生很多的数据,应用都有自己的数据,那么我们应该如何存储数据呢? 数据存储方式 Android 的数据存储有5种方式: 1. Share ...
- 【matlab】将matlab中数据输出保存为txt或dat格式
将matlab中数据输出保存为txt或dat格式 总结网上各大论坛,主要有三种方法. 第一种方法:save(最简单基本的) 具体的命令是:用save *.txt -ascii x x为变量 *.txt ...
- Android中数据存储(四)——ContentProvider存储数据
目录(?)[+] 当一个应用程序在Android中安装后,我们在使用应用的过程中会产生很多的数据,应用都有自己的数据,那么我们应该如何存储数据呢? 数据存储方式 Android 的数据存储有5种方 ...
随机推荐
- 再编写代码中报错:CS8107 C# 7.0 中不支持功能“xxxxxx”。请使用 7.1 或更高的语言版本。
解决方法:项目右键属性 ---> 生成 ---> 找到最下面的高级按钮,点击高级按钮 ---> 常规 ---> 语言版本 ---> 选择 C#最新次要版本,或者比当前版本 ...
- 视频video遇到一些坑
1.video层级最高问题 解决方案思路:当点击其他按钮触发事件时,视频层级挡住其他外层,比如会挡住弹窗,这是应该让视频暂停播放且隐藏,这是视频这个地方会空一个位置可以放一张封面占位,这样就解决视频层 ...
- 设置、读取、删除cookie
刚才用虚拟机当服务器,开了两个服务(端口号不同),发现同样的cookie:在别的网站下面没有发现该cookie.说明cookie只是对应相应的网站的(自己得出的结论) ---------------- ...
- Linux 环境变量加强
Linux 环境变量加强 # 前言 今天,主要是之前搭建 GO 环境包的使用发现自己对 Linux 环境变量还不是很熟悉. 遇到环境变量的问题还是会有些懵逼.所以,今天写点Linux 环境变量的文章, ...
- 安装gensim报错:Original error was: DLL load failed: 找不到指定的模块。 Command "python setup.py egg_info" failed with error code 1 in C:\Users\xubing\AppData\Local\Temp\pip-install-nta89iep\gensim\
1.pip install --upgrade setuptools #安装或升级 2.如果是基于numpy的python 包,升级numpy pip install -U numpy 3.重新pip ...
- Struts2运行原理
一个请求在Struts2框架中的处理大概分为以下几个步骤: 1 客户端发送请求:2 这个请求经过一系列的过滤器(Filter)(这些过滤器中有一个叫做ActionContextCleanUp的可选过滤 ...
- 深度解析CNN
[1]Deep learning简介 [2]Deep Learning训练过程 [3]Deep Learning模型之:CNN卷积神经网络推导和实现 [4]Deep Learning模型之:CNN的反 ...
- c++之函数形参和实参
c++之函数形参和实参讲解 1.非地址型参数 在c++中实现模块化编程时,我们形成会遇到对自定义的函数模块传入参数的操作,即形参.这里主要讲解一个非地址型的形参. 不多说,先看代码: #include ...
- 【Quartz】一个小Demo
Quartz是一个优秀的框架,功能强大,用法简单,比如说下面这个例子. (1)引入Jar包 <!-- quartz 模块 --> <dependency> <groupI ...
- 使用GPIO监听中断
#include<stdlib.h> #include<stdio.h> #include<string.h> #include<unistd.h> # ...