【linux】制作deb包方法 **
前言
- 制作deb的方式很多
- 使用 dpkg-deb 方式
- 使用 checkinstall 方式
- 使用 dh_make 方式
- 修改原有的 deb 包
概念 **
- deb包
- deb包是在linux系统下的一种安装包
- 它是基于tar包的
- 所以同样会记录着文件的权限信息(读、写、可执行)、所有者、用户组等
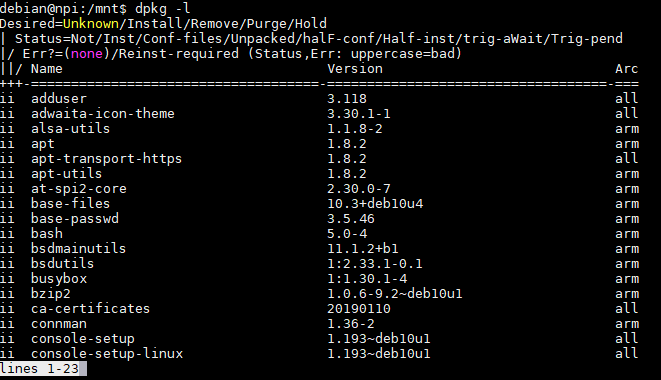
- 可以使用
dpkg -l命令来查看系统以及安装了哪些deb包。
- deb包组成(一般分成两部)**
- 控制信息 (放在 DEBIAN 目录下)
- 本 deb 包的 DEBIAN 目录下有 changelog、control、copyright、postinst、postrm 等文件(不一定全部都要有)
- changelog
- 记录了该deb包的作者、版本以及最后一次更新日期等信息
- control
- 记录了包名、版本号、架构、维护者及描述等信息
- copyright
- 文件记录了一些版权信息
- postinst
- 安装后执行的配置文件
- postrm
- 软件卸载后需要执行的脚本
- changelog
- 本 deb 包的 DEBIAN 目录下有 changelog、control、copyright、postinst、postrm 等文件(不一定全部都要有)
- 安装的内容
- 目录方式和文件系统根目录一样
- 最终存放着需要运行的脚本
- 控制信息 (放在 DEBIAN 目录下)
创建自己的deb包
创建目录
- 创建目录 myDeb
- 创建目录 myDeb/DEBIAN
- 创建目录 myDeb/home/lss/work
创建文件
- 在 myDeb/DEBIAN 目录下
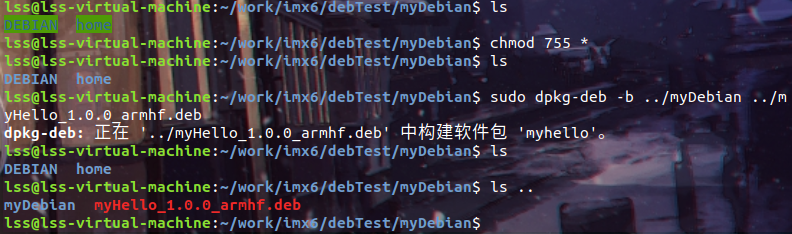
构建 deb 包
运行
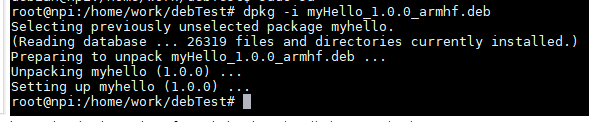
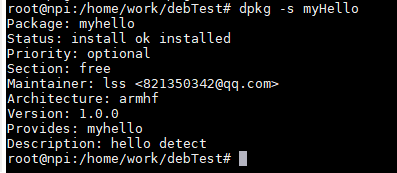
sudo dpkg-deb -b ../mydeb ../MyAdcSoftware_1.0.0_armhf.debsdpkg -c myHello_1.0.0_armhf.deb查看制作包的内容sdpkg -i myHello_1.0.0_armhf.deb安装了该软件sdpkg -s myHello查看是否安装了该软件运行效果

文件源码
- myDeb/home/lss/work/myHello.sh
#/** @file         myHello.sh

# *  @brief        简要说明

# *  @details      详细说明

# *  @author       lzm

# *  @date         2020-11-08 19:33:53

# *  @version      v1.0

# *  @copyright    Copyright By lizhuming, All Rights Reserved

# *

# **********************************************************

# *  @LOG 修改日志:

# **********************************************************

#*/

#!/bin/bash

echo hello
- myDeb/DEBIAN/control
Package: myHello

Version: 1.0.0

Section: free

Priority: optional

Essential: no

Architecture: armhf

Maintainer: lss <821350342@qq.com>

Provides: MyHello

Description: hello detect
- myDeb/DEBIAN/postinst
if [ "$1" = "upgrade" ] || [ "$1" = "install" ];then

  echo "install"

fi
- myDeb/DEBIAN/postrm
if [ "$1" = "upgrade" ] ; then

echo "upgrade"

elif [ "$1" = "remove" ] || [ "$1" = "purge" ] ; then

echo "remove"

fi
【linux】制作deb包方法 **的更多相关文章
- 用dpkg命令制作deb包方法总结
用dpkg命令制作deb包方法总结 如何制作Deb包和相应的软件仓库,其实这个很简单.这里推荐使用dpkg来进行deb包的创建.编辑和制作. 首先了解一下deb包的文件结构: deb 软件包里面的结构 ...
- 从源代码制作deb包的两种方法以及修改已有deb包(转载)
From:http://yysfire.github.io/linux/%E4%BB%8E%E6%BA%90%E4%BB%A3%E7%A0%81%E5%88%B6%E4%BD%9Cdeb%E5%8C% ...
- Ubuntu下制作deb包的方法详解
1 认识deb包 1.1 认识deb包 deb是Unix系统(其实主要是Linux)下的安装包,基于 tar 包,因此本身会记录文件的权限(读/写/可执行)以及所有者/用户组. 由于 Unix ...
- ubuntu 制作deb 包
ubuntu下打包制作deb安装包 http://www.th7.cn/system/lin/201406/61012.shtml 2014-06-22 20:16:45CSDN-yangbing ...
- [deb]制作deb包
转自:http://www.cnblogs.com/Genesis-007/p/5219960.html 查看系统安装了哪些deb包: dpkg -l 打包: dpkg -b dir result.d ...
- dpkg制作deb包
deb包的文件结构: deb包里面的结构:DEBIAN目录 和 软件具体安装目录(模拟安装目录)(如etc, usr, opt, tmp等). 在DEBIAN目录中至少有control文件,还可能有p ...
- Linux 之 deb 包生成、安装、卸载
Linux 之 deb 包的生成.安装和卸载 deb DEB 是 Debian 软件包格式的文件扩展名,是 Unixar 的标准归档,将包文件信息以及包内容,经过 gzip 和 tar 打包而成. d ...
- Fedora Linux安装deb包
前言: 我们知道,在Linux系统上有两种主要的软件包格式,分别是RPM和deb. RPM是"RPM Package Manager(RPM软件包管理器)"的递归缩写.RPM是一种 ...
- Linux制作deb
1.新建一个我们临时的工作目录mkdir deb 2.新建我们程序的目录mkdir hello 3.编写我们的程序 我们以我们最熟悉的helloworld程序做起,hello.c代码如下#includ ...
随机推荐
- 你不知道的 JS (系列丛书) - 第二版
你不知道的 JS (系列丛书) - 第二版 You Don't Know JS (book series) - 2nd Edition https://github.com/learning-js-b ...
- how to read the system information by using the node cli tool?
how to read the system information by using the node cli tool? node cli & get system info demos ...
- Chrome offline game & source codes hacker
Chrome offline game & source codes hacker dino === little dinosaur chrome://dino/ 手动 offline htt ...
- koa response image
koa response image koa.js v1.x generator *function v2.x Async/Await koajs/examples https://github.co ...
- CSS 实现文本的竖向排版
CSS 实现文本的竖向排版 demos .text{ word-wrap: break-word; width: 0px; } writing-mode .text{ writing-mode: ve ...
- 转换时间戳,兼容webkit和IE
var date="2018-6-6"; var test=Date.parse(date.replace(/-/g,"/"));console.log(tes ...
- SPC空投火爆来袭!区块链技术落地加速!
经历市场狂热后,区块链逐渐恢复合理性,在政策红利.技术等多力推进下,各行各业开始涌入区块链行业.在这波浪潮中,SPC侧链代币项目显得格外亮眼,其空投已经发放至第二轮,仅SPC空投月收益就达23%左右, ...
- [Python学习笔记]调试
编码占了编程工作量的90%,调试占了另外90%,这是一个流传着的笑话.调试在编程中占有很大的分量,即使专业的程序员也一直在制造缺陷. 抛出异常 抛出异常相当于是说:"停止运行这个函数中的代码 ...
- www.yimitv.cc免费观看2020最新电影、电视剧、综艺栏目
神奇的微信公众号 '德佑小站', 可以看最新上映电影.看小说.看直播!重要的是免费,csdn已加速. 壹米影视:www.yimitv.cc 德佑小说:www.deyouxs.cc
- 在测试自定义starter时,若出现无法找到helloservice的Bean的解决方法
import org.springframework.beans.factory.annotation.Autowired; import org.springframework.boot.autoc ...