SpringCache整合Redis
之前一篇文章 SpringBoot整合Redis 已经介绍了在SpringBoot中使用redisTemplate手动
操作redis数据库的方法了。其实这个时候我们就已经可以拿redis来做项目了,需要缓存服务的地方
就引入redisTemplate就行啦。
但是这里有个问题,缓存归根结底不是业务的核心,只是作为功能和效率上的辅助,如果我现在在某个
项目中用到缓存的地方特别多,那岂不是意味着我需要大量的写redisTempate的增删改的方法。而且还需要很多判断,
比如查询的时候判断缓存是否已经存在,如果存在则直接返回,如果不存在则先去查询关系型数据库,再将返回的值存入缓存,
在返回给控制器,类似这样的逻辑要是多了还是比较麻烦,比如下面这段伪代码。
1 if(cache.has(userId))

2     return cache.get(userId);

3 else

4 {

5   User user = db.get(userId);

6   cache.put(userId, user);

7   return user;

8 }
这个时候怎么办呢,我们可以很自然的想到Spring的核心之一AOP,它可以帮助我们实现横切关注点分离。就是把分散在
各段代码里面的非业务逻辑给抽取成一个切面,然后在需要切面的方法上加上注解。我们再看上面的场景,不难发现,针对redis
增删改的操作都可以抽取出来,我们自己只需要编写必需的业务逻辑,比如我从mysql查询某个用户,这段代码自己实现,然后加上注解
之后,会通过动态代理在我的方法前后加上对应的缓存逻辑。
说了这么多,就是让看官知道此处切面的必要性。那么可能看官又要问了,我们自己需要去实现这些切面,一个切面还好,要是针对不同的方法
有不同的切面,那也很麻烦啊。不用慌,Spring已经为我们考虑到了。Spring3.0后提供了Cache和CacheManager等接口,其他缓存服务
可以去实现Spring的接口,然后按Spring的语法来使用,我这里使用是Redis来和SpringCache做集成。
关于SpringCache的详细知识和代码需要看官自行研究,本文只是浅显的介绍使用,其原理的实现我也还没太搞清楚。
下面请看代码实现:
开启Spring对缓存的支持
@EnableCaching注解
1 @SpringBootApplication

2 @EnableCaching

3 public class RedisApplication {

4

5     public static void main(String[] args) {

6         SpringApplication.run(RedisApplication.class, args);

7     }

8

9 }
编写业务逻辑
User
 1 package com.example.redis.domain;

 2

 3 import java.io.Serializable;

 4

 5 public class User implements Serializable {

 6

 7     private static final long serialVersionUID = 10000000L;

 8

 9     private Long id;

10

11     private String name;

12

13     private Integer age;

14

15     public User() {

16

17     }

18

19     public User(Long id, String name, Integer age) {

20         this.id = id;

21         this.name = name;

22         this.age = age;

23     }

24

25     public Long getId() {

26         return id;

27     }

28

29     public void setId(Long id) {

30         this.id = id;

31     }

32

33     public String getName() {

34         return name;

35     }

36

37     public void setName(String name) {

38         this.name = name;

39     }

40

41     public Integer getAge() {

42         return age;

43     }

44

45     public void setAge(Integer age) {

46         this.age = age;

47     }

48

49     @Override

50     public String toString() {

51         return "User{" +

52                 "id=" + id +

53                 ", username='" + name + '\'' +

54                 ", age=" + age +

55                 '}';

56     }

57

58 }
UserService
 1 package com.example.redis.service;

 2

 3 import com.example.redis.domain.User;

 4

 5 public interface UserService {

 6

 7     /**

 8      * 删除

 9      *

10      * @param user 用户对象

11      * @return 操作结果

12      */

13     User saveOrUpdate(User user);

14

15     /**

16      * 添加

17      *

18      * @param id key值

19      * @return 返回结果

20      */

21     User get(Long id);

22

23     /**

24      * 删除

25      *

26      * @param id key值

27      */

28     void delete(Long id);

29

30 }
UserServiceImpl
 1 package com.example.redis.service;

 2

 3 import com.example.redis.domain.User;

 4 import org.slf4j.Logger;

 5 import org.slf4j.LoggerFactory;

 6 import org.springframework.cache.annotation.CacheEvict;

 7 import org.springframework.cache.annotation.CachePut;

 8 import org.springframework.cache.annotation.Cacheable;

 9 import org.springframework.stereotype.Service;

10

11 import java.util.HashMap;

12 import java.util.Map;

13

14 @Service

15 public class UserServiceImpl implements UserService{

16

17     private static final Map<Long, User> DATABASES = new HashMap<>();

18

19     static {

20         DATABASES.put(1L, new User(1L, "张三", 18));

21         DATABASES.put(2L, new User(2L, "李三", 19));

22         DATABASES.put(3L, new User(3L, "王三", 20));

23     }

24

25     private static final Logger log = LoggerFactory.getLogger(UserServiceImpl.class);

26

27     @Cacheable(value = "user", unless = "#result == null")

28     @Override

29     public User get(Long id) {

30         // TODO 我们就假设它是从数据库读取出来的

31         log.info("进入 get 方法");

32         return DATABASES.get(id);

33     }

34

35     @CachePut(value = "user")

36     @Override

37     public User saveOrUpdate(User user) {

38         DATABASES.put(user.getId(), user);

39         log.info("进入 saveOrUpdate 方法");

40         return user;

41     }

42

43     @CacheEvict(value = "user")

44     @Override

45     public void delete(Long id) {

46         DATABASES.remove(id);

47         log.info("进入 delete 方法");

48     }

49

50 }
UserServcieImpl这里面就是重头戏了,可以看到其中的每个方法上面都有@Cache...注解,我先介绍一下
这些注解是干嘛的。
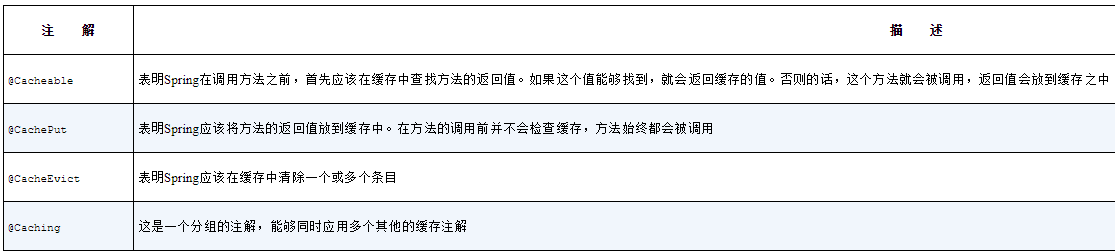
我简单的归纳一下,@Cacheable注解适用于查询,@CachePut适用于修改和新增,@CacheEvict则适用于删除。
@Caching呢我还没用使用,就不说了,也简单。
对应到UserServiceImpl中的get,saveOrUpdate,delete三个方法则很好理解了,我描述一下增删改查的逻辑哈:
查询:如果缓存中由则直接返回,如果无则从数据源中拿到,放入缓存中。
新增和修改:如果缓存中没有则新增,如果有则修改。
删除:如果由则删除。
注意我这里的数据源使用的是Map,因为电脑上没有安装Mysql所以就简单直接使用map了。

就把map当成一个简单的mysql数据库吧。
业务逻辑写完了还需要配置一下,因为SpringCache最终操作redis数据库也要用到redisTemplate,而redisTemplate
默认使用的序列化器是JdkSerializationRedisSerializer,对中文和对象的支持不太友好,所以需要配置下redisTemplate的
序列化器:
 1 package com.example.redis.config;

 2

 3 import org.springframework.boot.autoconfigure.AutoConfigureAfter;

 4 import org.springframework.boot.autoconfigure.data.redis.RedisAutoConfiguration;

 5 import org.springframework.context.annotation.Bean;

 6 import org.springframework.context.annotation.Configuration;

 7 import org.springframework.data.redis.connection.lettuce.LettuceConnectionFactory;

 8 import org.springframework.data.redis.core.RedisTemplate;

 9 import org.springframework.data.redis.serializer.GenericJackson2JsonRedisSerializer;

10 import org.springframework.data.redis.serializer.StringRedisSerializer;

11

12 import java.io.Serializable;

13

14 @Configuration

15 @AutoConfigureAfter(RedisAutoConfiguration.class)

16 public class RedisConfig {

17

18     /**

19      * 配置自定义redisTemplate

20      */

21     @Bean

22     public RedisTemplate<String, Serializable> redisTemplate(LettuceConnectionFactory redisConnectionFactory) {

23         RedisTemplate<String, Serializable> template = new RedisTemplate<>();

24         template.setKeySerializer(new StringRedisSerializer());

25         template.setValueSerializer(new GenericJackson2JsonRedisSerializer());

26         template.setConnectionFactory(redisConnectionFactory);

27         return template;

28     }

29

30 }
然后还需要配置一下CacheManager,主要配置自定义的key的超时时间,是否使用前缀来拼接key,是否允许空值入库
等等。另外还定义了key的生成器,因为像@Cacheable(value = "user", unless = "#result == null")这种没有定义key的,
默认的keyGenerator会使用方法的参数来拼凑一个key出来。拼凑的规则就像下面这样:

这样的话是有问题的,因为很多方法可能具有相同的参数名,它们生成的key是一样的,这样就会取到同一个键对象。
所以需要自定义一个keyGenerator。
 1 package com.example.redis.config;

 2

 3 import com.example.redis.utils.BaseUtil;

 4 import org.slf4j.Logger;

 5 import org.slf4j.LoggerFactory;

 6 import org.springframework.beans.factory.annotation.Autowired;

 7 import org.springframework.cache.CacheManager;

 8 import org.springframework.cache.annotation.CachingConfigurerSupport;

 9 import org.springframework.cache.interceptor.KeyGenerator;

10 import org.springframework.context.annotation.Configuration;

11 import org.springframework.data.redis.cache.RedisCacheConfiguration;

12 import org.springframework.data.redis.cache.RedisCacheManager;

13 import org.springframework.data.redis.cache.RedisCacheWriter;

14 import org.springframework.data.redis.connection.lettuce.LettuceConnectionFactory;

15 import org.springframework.data.redis.core.script.DigestUtils;

16 import org.springframework.data.redis.serializer.GenericJackson2JsonRedisSerializer;

17 import org.springframework.data.redis.serializer.RedisSerializationContext;

18 import org.springframework.data.redis.serializer.StringRedisSerializer;

19

20 import java.lang.reflect.Field;

21 import java.lang.reflect.Method;

22 import java.time.Duration;

23

24 @Configuration

25 //@AutoConfigureAfter(RedisCacheConfiguration.class)

26 public class RedisCacheConfig extends CachingConfigurerSupport {

27

28     private Logger logger = LoggerFactory.getLogger(RedisCacheConfig.class);

29

30     @Autowired

31     private LettuceConnectionFactory redisConnectionFactory;

32

33     @Override

34     public CacheManager cacheManager() {

35         // 重新配置缓存

36         RedisCacheConfiguration redisCacheConfiguration = RedisCacheConfiguration.defaultCacheConfig();

37

38         //设置缓存的默认超时时间:30分钟

39         redisCacheConfiguration = redisCacheConfiguration.entryTtl(Duration.ofMinutes(30L))

40                 .disableCachingNullValues()

41                 .disableKeyPrefix()

42                 .serializeKeysWith(RedisSerializationContext.SerializationPair.fromSerializer(new StringRedisSerializer()))

43                 .serializeValuesWith(RedisSerializationContext.SerializationPair.fromSerializer((new GenericJackson2JsonRedisSerializer())));

44

45         return RedisCacheManager.builder(RedisCacheWriter

46                 .nonLockingRedisCacheWriter(redisConnectionFactory))

47                 .cacheDefaults(redisCacheConfiguration).build();

48     }

49

50     @Override

51     public KeyGenerator keyGenerator(){

52         return new KeyGenerator() {

53             @Override

54             public Object generate(Object target, Method method, Object... params) {

55                 StringBuilder sb = new StringBuilder();

56                 sb.append(target.getClass().getName());

57                 sb.append("&");

58                 for (Object obj : params) {

59                     if (obj != null){

60                         if(!BaseUtil.isBaseType(obj)) {

61                             try {

62                                 Field id = obj.getClass().getDeclaredField("id");

63                                 id.setAccessible(true);

64                                 sb.append(id.get(obj));

65                             } catch (NoSuchFieldException | IllegalAccessException e) {

66                                 logger.error(e.getMessage());

67                             }

68                         } else{

69                             sb.append(obj);

70                         }

71                     }

72                 }

73

74                 logger.info("redis cache key str: " + sb.toString());

75                 logger.info("redis cache key sha256Hex: " + DigestUtils.sha1DigestAsHex(sb.toString()));

76                 return DigestUtils.sha1DigestAsHex(sb.toString());

77             }

78         };

79     }

80 }
需要说明的是,这里的keyGenerator和cacheManager需要各位看官根据自己的业务场景来自行定义,
切勿模仿,我都是乱写的。
另外还有配置文件怎么配置的,很简单,我直接贴出来:
application.yml
server:

  port: 80

spring:

  cache:

    type:

      redis

  profile: dev
application-dev.yml
spring:

  redis:

    host: localhost

    port: 6379

    # 如果使用的jedis 则将lettuce改成jedis即可

    lettuce:

      pool:

        # 最大活跃链接数 默认8

        max-active: 8

        # 最大空闲连接数 默认8

        max-idle: 8

        # 最小空闲连接数 默认0

        min-idle: 0
我本地做测试把配置文件分成了两个,看官合成一个就可以了。
好,到此一步,逻辑、Java配置和配置文件都编写好了,接下来测试程序:
 1 package com.example.redis;

 2

 3 import com.example.redis.domain.User;

 4 import com.example.redis.service.UserService;

 5 import org.junit.runner.RunWith;

 6 import org.slf4j.Logger;

 7 import org.slf4j.LoggerFactory;

 8 import org.springframework.beans.factory.annotation.Autowired;

 9 import org.springframework.boot.test.context.SpringBootTest;

10 import org.springframework.test.context.junit4.SpringRunner;

11

12 @RunWith(SpringRunner.class)

13 @SpringBootTest

14 public class Test {

15

16     private static final Logger log = LoggerFactory.getLogger(Test.class);

17

18     @Autowired

19     private UserService userService;

20

21     @org.junit.Test

22     public void contextLoads() {

23         User user = userService.saveOrUpdate(new User(1L, "张三", 21));

24         log.info("[saveOrUpdate] - [{}]", user);

25         final User user1 = userService.get(1L);

26         log.info("[get] - [{}]", user1);

27     }

28 }
再来看一下数据源里面有哪些数据:
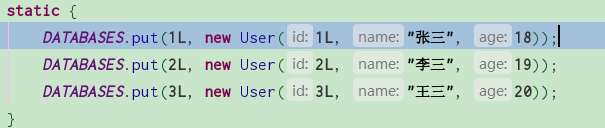
现在的张三是{id:1, name:'张三',age:18},我对id为1这条数据修改一下,把age改成了21,按照我们之前的
逻辑此时应该修改完成之后会把修改的结果放入缓存中,那么下面查询的时候应该不会走真实的查询逻辑,而是直接从
缓存里面取数据,此时查询不应该输出log.info("进入 get 方法");这段日志。
运行程序看下结果:
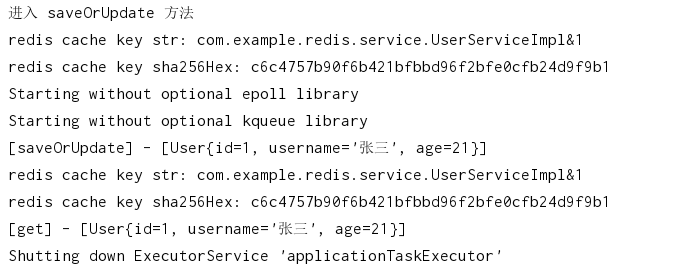
从日志上看是没啥问题的,再看看redis数据库:

对的,存的确实是修改过后的值21,所以我们就算是基本成功了。
需要说明的是,关于SpringCache这块还有很多需要学习的地方,比如如何配置多个缓存服务,如何配置二级缓存等等,
我也还在学习中。
本文到此结束,谢谢各位看官。
参考资料
《Spring实践》第四版,也就是《Spring In Action》
https://www.jianshu.com/p/6ba2d2dbf36e
https://www.iteye.com/blog/412887952-qq-com-2397144
https://www.iteye.com/blog/anhongyang125-2354554
https://www.cnblogs.com/wsjun/p/9777575.html
https://www.jianshu.com/p/2a584aaafad3
SpringCache整合Redis的更多相关文章
- SpringBoot30 整合Mybatis-Plus、整合Redis、利用Ehcache实现二级缓存、利用SpringCache和Redis作为缓存
1 环境说明 JDK: 1.8 MAVEN: 3. SpringBoot: 2.0.4 2 SpringBoot集成Mybatis-Plus 2.1 创建SpringBoot 利用IDEA创建Spri ...
- Spring+Mybatis基于注解整合Redis
基于这段时间折腾redis遇到了各种问题,想着整理一下.本文主要介绍基于Spring+Mybatis以注解的形式整合Redis.废话少说,进入正题. 首先准备Redis,我下的是Windows版,下载 ...
- (转)Spring整合Redis作为缓存
采用Redis作为Web系统的缓存.用Spring的Cache整合Redis. 一.关于redis的相关xml文件的写法 <?xml version="1.0" ...
- spring整合redis之hello
1.pom.xml文件 <dependencies> <!-- spring核心包 --> <dependency> <groupId>org.spri ...
- Spring+SpringMVC+Mybatis整合redis
SSM整合redis redis是一种非关系型数据库,与mongoDB不同的是redis是内存数据库,所以访问速度很快.常用作缓存和发布-订阅式的消息队列. 这里用的是ssm框架+maven构建的项目 ...
- Spring优雅整合Redis缓存
“小明,多系统的session共享,怎么处理?”“Redis缓存啊!” “小明,我想实现一个简单的消息队列?”“Redis缓存啊!” “小明,分布式锁这玩意有什么方案?”“Redis缓存啊!” “小明 ...
- springmvc整合redis架构搭建实例
新换环境,又有新东西可以学习了,哈皮! 抽空学习之余看了一下redis,个人对Springmvc的爱是忠贞不渝,所以整理了一下Springmvc整合redis的环境搭建.分享学习. 第一步: 创建ma ...
- 深入浅出Redis-Spring整合Redis
概述: 在之前的博客中,有提到过Redis 在服务端的一些相关知识,今天主要讲一下Java 整合Redis的相关内容. 下面是Jedis 的相关依赖: <dependency> <g ...
- SSM之整合Redis
Redis安装与使用 第一步当然是安装Redis,这里以Windows上的安装为例. 首先下载Redis,可以选择msi或zip包安装方式 zip方式需打开cmd窗口,在解压后的目录下运行redis- ...
随机推荐
- 故障:fork failed:Resource Temporarily Unavailable解决方案
故障:fork failed:Resource Temporarily Unavailable解决方案 AIX在一次crontab bkapp.txt导入N多定时任务时候,该用户无法执行任何命令,再s ...
- Maven 仓库镜像设置
<mirror> <id>alimaven</id> <mirrorOf>central</mirrorOf> <name>al ...
- 三层架构的一点理解以及Dapper一对多查询
1.首先说一下自己对三层架构的一点理解 论坛里经常说会出现喜欢面相对象的写法,所以使用EF的,我个人觉得他俩没啥关系,先别反对,先听听我怎么说吧. 三层架构,基本都快说烂了,但今天还是说三层架构:UI ...
- 逆向工程,生成pojo、xml、mapper
package com.how2java; import java.io.File; import java.io.InputStream; import java.util.ArrayList; i ...
- 10 张图聊聊线程的生命周期和常用 APIs
上一篇文章我们聊了多线程的基础内容,比如为什么要使用多线程,线程和进程之间的不同,以及创建线程的 4 种方式.本文已收录至我的 Github: https://github.com/xiaoqi666 ...
- kali命令大全
arch 显示机器的处理器架构(1)uname -m 显示机器的处理器架构(2)uname -r 显示正在使用的内核版本dmidecode -q 显示硬件系统部件 - (SMBIOS / DMI)hd ...
- CDH5.16.1集群企业真正离线部署
一.准备工作 1.离线部署主要分为三块: MySQL离线部署 CM离线部署 Parcel文件离线源部署 2.规划 节点 MySQL部署组件 Parcel文件离线源 CM服务进程 大数据组件 hadoo ...
- java实现内网通信
package newTest; import java.io.OutputStream; import java.net.ServerSocket; import java.net.Socket; ...
- robotframework运行时后台报错UnicodeDecodeError,无日志输出
解决办法: 1.找到对应位置的testrunner.py文件,修改字符集为GBK 2.删除同级目录下的testrunner.pyc 3.重启ride
- Jack Straws(POJ 1127)
原题如下: Jack Straws Time Limit: 1000MS Memory Limit: 10000K Total Submissions: 5555 Accepted: 2536 ...