《Asp.Net Core3 + Vue3入坑教程》 - 6.异常处理与UserFriendlyException
简介
《Asp.Net Core3 + Vue3入坑教程》 此教程适合新手入门或者前后端分离尝试者。可以根据图文一步一步进操作编码也可以选择直接查看源码。每一篇文章都有对应的源码
目录
《Asp.Net Core3 + Vue3入坑教程》系列教程目录
Asp.Net Core后端项目
- 后端项目搭建与Swagger配置步骤
- 配置CROS策略解决跨域问题
- AutoMapper & Restful API & DI
- EF Core & Postgresql
- .Net Core 3升级成 .Net 5 & JWT
- (本文)异常处理与UserFriendlyException
Vue3 前端项目
- 使用vue-cli创建vue项目
- (暂未发表敬请期待...)使用Ant Design of Vue编写页面 & vue-router 初试
- (暂未发表敬请期待...)将Antd导航菜单与vue-router绑定
- (暂未发表敬请期待...) 保存用户登入状态vuex初试
本文简介
本文为《Asp.Net Core3 + Vue3入坑教程》系列教程的后端第六篇 - 异常处理与UserFriendlyException上文已经为Simple项目升级了SDK并且应用了JWT,本文继续为Simple项目增加异常处理与使用友好异常(UserFriendlyException)。
为什么需要使用友好异常的方式进行开发呢?
在很多情况下,我们在一个方法中往往包含着校验参数与返回结果两个动作,这时候我们的返回结果就需要考虑用对象来包裹校验结果与返回结果。 如果我们使用友好异常,默认方法能顺利通过校验并返回正确的结果,如果校验出现失败的情况则将失败原因通过友好异常的方式返回给调用者,可以让方法的返回内容不需要考虑校验的结果,代码更简洁明了!
用户友好参照了开源项目ABP项目 https://docs.abp.io/zh-Hans/abp/latest/Exception-Handling
异常处理与UserFriendlyException
第一步先增加测试代码,修改SqlCommanderRepo.cs
代码调整如下:
using Simple_Asp.Net_Core.Models;

using Simple_Asp.Net_Core.ServiceProvider;

using System;

using System.Collections.Generic;

using System.Linq;

namespace Simple_Asp.Net_Core.Data

{

    public class SqlCommanderRepo : ICommanderRepo

    {

        private readonly CommanderContext _context;

        public SqlCommanderRepo(CommanderContext context)

        {

            _context = context;

        }

        public void CreateCommand(Command cmd)

        {

            if (cmd == null)

            {

                throw new ArgumentNullException(nameof(cmd));

            }

            _context.Commands.Add(cmd);

        }

        public void DeleteCommand(Command cmd)

        {

            if (cmd == null)

            {

                throw new ArgumentNullException(nameof(cmd));

            }

            _context.Commands.Remove(cmd);

        }

        public IEnumerable<Command> GetAllCommands()

        {

            return _context.Commands.ToList();

        }

        public Command GetCommandById(int id)

        {

            if (id == 0)

                throw new Exception("id不能为0!");

            return _context.Commands.First(p => p.Id == id);

        }

        public bool SaveChanges()

        {

            return (_context.SaveChanges() >= 0);

        }

        public void UpdateCommand(Command cmd)

        {

            //Nothing

        }

    }

}
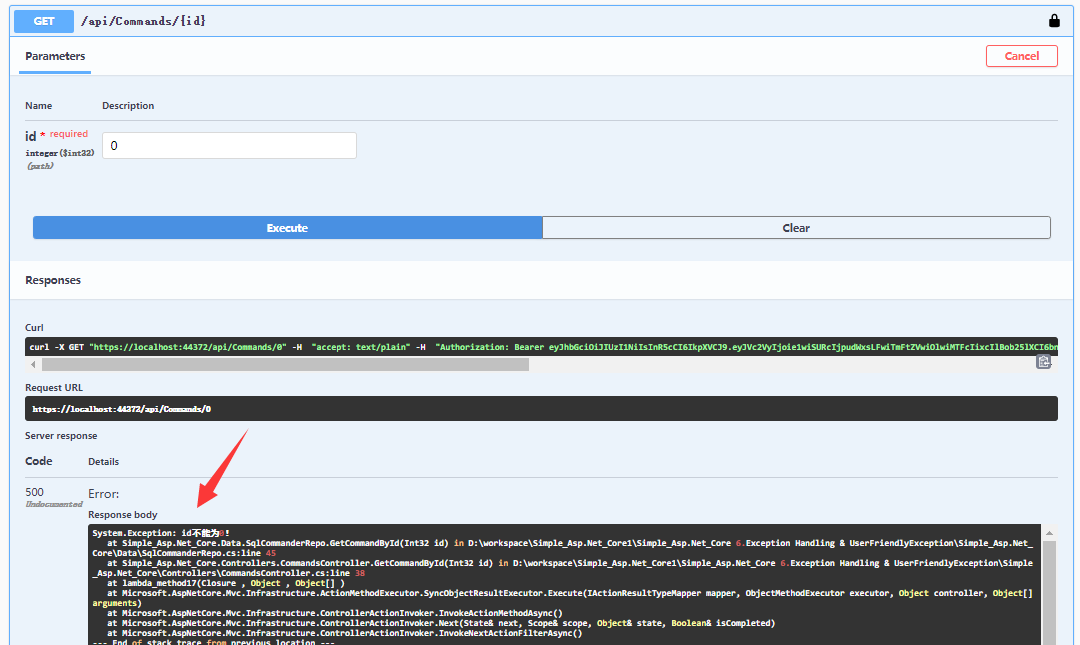
运行项目,调用接口api/commands/{id}接口,当请求参数id设置为0时,后端会抛出异常信息。
当前的异常信息将程序内部内容都暴露出来,并且返回信息也不清晰,调用者难以处理。

接着在ServiceProvider文件夹下增加自定义异常类UserFriendlyException.cs
代码如下:
using System;

namespace Simple_Asp.Net_Core.ServiceProvider

{

    public class UserFriendlyException : Exception

    {

        public UserFriendlyException(string message) : base(message)

        {

        }

        public UserFriendlyException(string message, Exception inner) : base(message, inner)

        {

        }

    }

}
在ServiceProvider文件夹下增加类ExceptionHandler.cs,用来处理异常
在捕捉到程序异常的时候需要写入日志方便问题追踪
代码如下:
using Microsoft.AspNetCore.Diagnostics;

using Microsoft.AspNetCore.Http;

using Newtonsoft.Json;

using System.Text;

using System.Threading.Tasks;

namespace Simple_Asp.Net_Core.ServiceProvider

{

    public class ExceptionHandler

    {

        public static Task ErrorEvent(HttpContext context)

        {

            var feature = context.Features.Get<IExceptionHandlerFeature>();

            var error = feature?.Error;

            if (error.GetType() == typeof(UserFriendlyException))

            {

                SetResponse(context);

                var content = GetApiResponse(error.Message);

                return context.Response.WriteAsync(JsonConvert.SerializeObject(content), Encoding.UTF8);

            }

            else

            {

                // 写入日志

                // error.Message

                // error.StackTrace

                SetResponse(context);

                var content = GetApiResponse("程序发生错误,请联系客服!");

                return context.Response.WriteAsync(JsonConvert.SerializeObject(content), Encoding.UTF8);

            }

        }

        /// <summary>

        /// 解决异常消息返回跨域问题

        /// </summary>

        private static void SetResponse(HttpContext context)

        {

            context.Response.Clear();

            context.Response.Headers.Add("Access-Control-Allow-Origin", "*");

            context.Response.Headers.Add("Access-Control-Allow-Methods", "POST,GET");

            context.Response.ContentType = "application/json";

        }

        /// <summary>

        /// 响应Response

        /// </summary>

        private static ErrorResponse GetApiResponse(string message)

        {

            return new ErrorResponse() { success = false, message = message };

        }

        private class ErrorResponse

        {

            public bool success { get; set; }

            public bool Success { get { return success; } }

            public string message { get; set; }

            public string Message { get { return message; } }

        }

    }

}
调整Startup.cs,增加异常捕捉
代码如下:
using Microsoft.AspNetCore.Builder;

using Microsoft.AspNetCore.Hosting;

using Microsoft.EntityFrameworkCore;

using Microsoft.Extensions.DependencyInjection;

using Microsoft.Extensions.Hosting;

using Newtonsoft.Json.Serialization;

using Simple_Asp.Net_Core.Data;

using Simple_Asp.Net_Core.ServiceProvider;

using System;

namespace Simple_Asp.Net_Core

{

    public class Startup

    {

        // This method gets called by the runtime. Use this method to add services to the container.

        // For more information on how to configure your application, visit https://go.microsoft.com/fwlink/?LinkID=398940

        public void ConfigureServices(IServiceCollection services)

        {

            services.AddJWT();

            services.AddDbContext<CommanderContext>(options =>

                options.UseNpgsql("Host=localhost;Database=postgres;Username=postgres;Password=123456"));

            services.AddCORS();

            services.AddMvc();

            services.AddSwagger();

            services.AddAutoMapper(AppDomain.CurrentDomain.GetAssemblies());

            services.AddScoped<ICommanderRepo, SqlCommanderRepo>();

            services.AddControllers().AddNewtonsoftJson(s =>

            {

                s.SerializerSettings.ContractResolver = new CamelCasePropertyNamesContractResolver();

            });

        }

        // This method gets called by the runtime. Use this method to configure the HTTP request pipeline.

        public void Configure(IApplicationBuilder app, IWebHostEnvironment env)

        {

            if (env.IsDevelopment())

            {

                app.UseDeveloperExceptionPage();

                app.UseSwagger();

                app.UseSwaggerUI(c =>

                {

                    c.SwaggerEndpoint("/swagger/v1/swagger.json", "ApiHelp V1");

                });

            }

            app.UseExceptionHandler(builder => builder.Run(async context => await ExceptionHandler.ErrorEvent(context)));

            app.UseCors("CorsTest");

            app.UseAuthentication();

            app.UseRouting();

            app.UseAuthorization();

            app.UseEndpoints(endpoints => endpoints.MapDefaultControllerRoute());

        }

    }

}
启动项目,调用api/commands/{id}接口,可以看出后端的接口发生了异常,此时的异常比较清晰。

最后我们将SqlCommanderRepo.cs里的异常改为友好异常
再次修改SqlCommanderRepo.cs
代码调整如下:
using Simple_Asp.Net_Core.Models;

using Simple_Asp.Net_Core.ServiceProvider;

using System;

using System.Collections.Generic;

using System.Linq;

namespace Simple_Asp.Net_Core.Data

{

    public class SqlCommanderRepo : ICommanderRepo

    {

        private readonly CommanderContext _context;

        public SqlCommanderRepo(CommanderContext context)

        {

            _context = context;

        }

        public void CreateCommand(Command cmd)

        {

            if (cmd == null)

            {

                throw new ArgumentNullException(nameof(cmd));

            }

            _context.Commands.Add(cmd);

        }

        public void DeleteCommand(Command cmd)

        {

            if (cmd == null)

            {

                throw new ArgumentNullException(nameof(cmd));

            }

            _context.Commands.Remove(cmd);

        }

        public IEnumerable<Command> GetAllCommands()

        {

            return _context.Commands.ToList();

        }

        public Command GetCommandById(int id)

        {

            if (id == 0)

                throw new Exception("id不能为0!");

            return _context.Commands.First(p => p.Id == id);

        }

        public bool SaveChanges()

        {

            return (_context.SaveChanges() >= 0);

        }

        public void UpdateCommand(Command cmd)

        {

            //Nothing

        }

    }

}
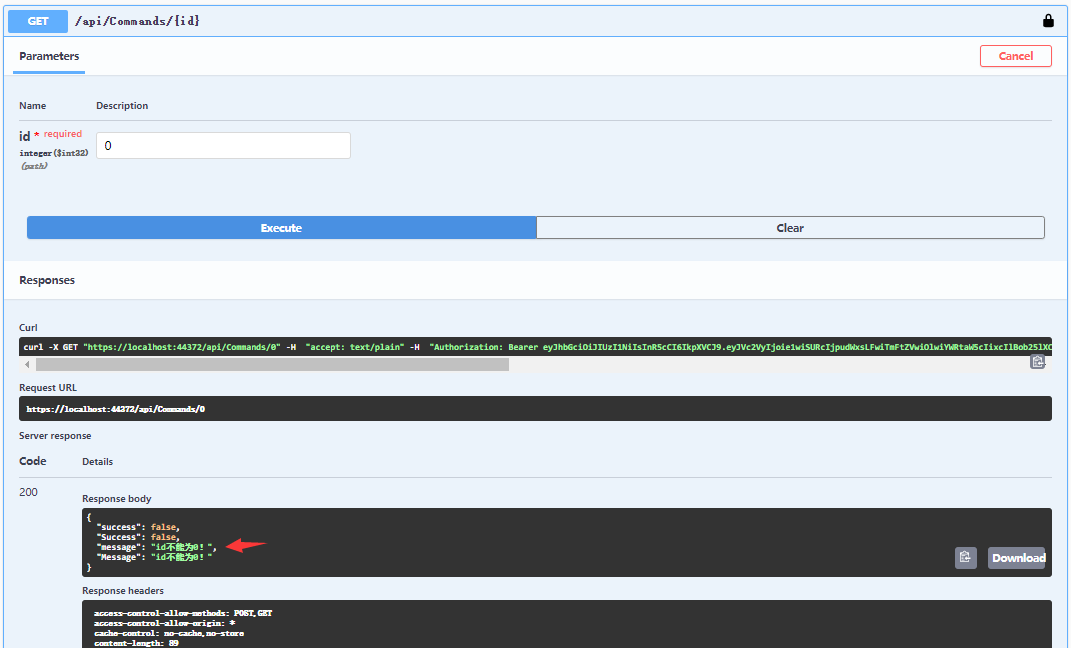
最后启动项目,调用api/commands/{id}接口,这时候我们可以得到友好的提示!

总结
本文为Simple项目增加异常处理与使用友好异常(UserFriendlyException),在捕捉到程序异常的时候需要写入日志方便问题追踪!
目前Simple项目还未使用日志组件,后续会补上
异常捕捉为了能够将异常内容进行收集,并且能以统一的方式返回给客户端,保证服务器的安全、帮助我们追踪问题并且客户端的体验也能有所保证。
异常捕捉结合友好异常的方式能够为我们减少代码量,并且让代码更直观明了,推荐大家一试!
GitHub源码
注意:源码调试过程中如果出现xml文件路径错误,需要参照第一章(后端项目搭建与Swagger配置步骤)Swagger配置“配置XML 文档文件”步骤,取消勾选然后再选中 ,将XML路径设置成与你的电脑路径匹配!
参考资料
ABP开源项目异常处理 https://docs.abp.io/zh-Hans/abp/latest/Exception-Handling
《Asp.Net Core3 + Vue3入坑教程》 - 6.异常处理与UserFriendlyException的更多相关文章
- 《Asp.Net Core3 + Vue3入坑教程》-Net Core项目搭建与Swagger配置步骤
简介 <Asp.Net Core3 + Vue3入坑教程> 此教程仅适合新手入门或者前后端分离尝试者.可以根据图文一步一步进操作编码也可以选择直接查看源码.每一篇文章都有对应的源码 教程后 ...
- 《Asp.Net Core3 + Vue3入坑教程》 - Vue 1.使用vue-cli创建vue项目
简介 <Asp.Net Core3 + Vue3入坑教程> 此教程适合新手入门或者前后端分离尝试者.可以根据图文一步一步进操作编码也可以选择直接查看源码.每一篇文章都有对应的源码 目录 & ...
- Vue入坑教程(二)——项目结构详情介绍
之前已经介绍了关于Vue的脚手架vue-cli的安装,以及一些文件目录介绍.具体可以查看<vue 入坑教程(一)--搭建vue-cli脚手架> 下面简单说一下具体的文件介绍 (一) pac ...
- Docker 入坑教程笔记
Docker 入坑教程笔记 视频网址B站:点这里 查询命令 man docker 简单启动和退出 docker run --name [容器名] -i -t ubuntu /bin/bash 交互启动 ...
- Vue2.0史上最全入坑教程(下)—— 实战案例
书接上文 前言:经过前两节的学习,我们已经可以创建一个vue工程了.下面我们将一起来学习制作一个简单的实战案例. 说明:默认我们已经用vue-cli(vue脚手架或称前端自动化构建工具)创建好项目了 ...
- Vue入坑教程(一)——搭建vue-cli脚手架
1. Vue简介 详细内容可以参考官网Vue.js 1)兼容性 Vue 不支持 IE8 及以下版本,因为 Vue 使用了 IE8 无法模拟的 ECMAScript 5 特性.但它支持所有兼容 ECMA ...
- Vue2.0史上最全入坑教程(上)—— 搭建Vue脚手架(vue-cli)
ps: 想了解更多vue相关知识请点击VUE学习目录汇总 Vue作为前端三大框架之一截至到目前在github上以收获44,873颗星,足以说明其以悄然成为主流.16年10月Vue发布了2.x版本,经过 ...
- vue入坑教程(一)
1.脚手架搭配webpack的安装 (1)需要检查自己的电脑有没有安装node和npm 如果没有安装可以参考官网,以及安装的步骤 官方中文网地址:http://nodejs.cn/ (2)下载webp ...
- vue入坑教程(三)vue父子组件之间互相调用方法以及互相传递数据
1.父组件调用子组件的方法 父组件: <template> <div> <button v-on:click="clickParent">点击& ...
随机推荐
- Python内置模块(你还在pip install time?)&& apt-get install -f
一.内置模块 之前不知道time是python自带的,还用pip安装.......还报错..... Python中有以下模块不用单独安装 1.random模块 2.sys模块 3.time模块 4.o ...
- enumerate() -- Python
#!usr/bin/env python #coding:utf-8 ''' enumerate()说明: 1.enumerate()是Python的内置函数: 2.enumerate字面上是枚举.列 ...
- Python3.7.9+Locust1.4.3版本性能测试工具案例分享
一.Locust工具介绍 1.概述 Locust是一款易于使用的分布式负载测试工具,完全基于事件,使用python开发,即一个locust节点也可以在一个进程中支持数千并发用户,不使用回调,通过gev ...
- Logstash 日志收集(补)
收集 Tomcat 日志 安装 Tomcat # 安装 jdk [root@web01 ~]# rpm -ivh jdk-8u181-linux-x64.rpm # 下载 [root@web01 ~] ...
- 鸟哥的linux私房菜——第六章学习(Linux文件与目录管理)
******************第六章学习****************** 1.[文件与目录管理] 在所有目录下面都会存在的两个目录,分别是 "." 与 "..& ...
- codeforces 858A
A. k-rounding time limit per test 1 second memory limit per test 256 megabytes input standard input ...
- python阿里云api查询域名是否可以注册(CheckDomain)
import requests from fun import * from urllib import parse url ='http://domain.aliyuncs.com/?' acces ...
- React hox
React hox https://github.com/umijs/hox
- WEB 硬件设备联网
在js中与第三方设备的通信 这是一个Xbox One手柄的demo,将手柄使用USB连接到PC上: See also: video Device APIs 通过JavaScript与蓝牙设备通信 在网 ...
- nodejs 在windows10中设置动态(视频)壁纸
github 项目地址 node版本 λ node -v v12.16.2 main.js const ffi = require("@saleae/ffi"); const ch ...
