React Native 列表的总结
React Native 列表的总结
FlatList和SectionList都是React Native中高性能的列表组件。这些新的列表组件在性能方面都有了极大的提升, 其中最主要的一个是无论列表有多少行,它的内存使用都是常数级的。他们有着共同的特点:
- 完全跨平台。
- 行组件显示或隐藏时可配置回调事件。
- 支持单独的头部组件。
- 支持单独的尾部组件。
- 支持自定义行间分隔线。
- 支持下拉刷新。
- 支持上拉加载。
实质两者都是基于VirtualizedList组件的封装,因此需要注意:
- 当某行滑出渲染区域之外后,其内部状态将不会保留。请确保你在行组件以外的地方保留了数据。
- 为了优化内存占用同时保持滑动的流畅,列表内容会在屏幕外异步绘制。这意味着如果用户滑动的速度超过渲染的速度,则会先看到空白的内容。这是为了优化不得不作出的妥协,而官方也在设法持续改进。
- 本组件继承自
PureComponent而非通常的Component,这意味着如果其props在浅比较中是相等的,则不会重新渲染。所以请先检查你的renderItem函数所依赖的props数据(包括data属性以及可能用到的父组件的state),如果是一个引用类型(Object或者数组都是引用类型),则需要先修改其引用地址(比如先复制到一个新的Object或者数组中),然后再修改其值,否则界面很可能不会刷新。 - 默认情况下每行都需要提供一个不重复的key属性。你也可以提供一个keyExtractor函数来生成key。
当然,他们也有着一些不同的特性,下面来主要说明一下。
FlatList
FlatList是一个高性能的简单列表组件,用于显示一个垂直的滚动列表,其中的元素之间结构近似而仅数据不同。
除了上述的特性外,FlatList还有:
- 支持水平布局模式。
- 支持跳转到指定行(ScrollToIndex)
FlatList更适于长列表数据,且元素个数可以增删。和ScrollView不同的是,FlatList并不立即渲染所有元素,而是优先渲染屏幕上可见的元素。
FlatList组件必须的两个属性是data和renderItem。data是列表的数据源,而renderItem则从数据源中逐个解析数据,然后返回一个设定好格式的组件来渲染。
简单的例子:
<FlatList

  data={[{key: 'a'}, {key: 'b'}]}

  renderItem={({item}) => <Text>{item.key}</Text>}

/>
FlatList主要属性
| 属性 | 说明 |
|---|---|
| data | 为了简化起见,data属性目前只支持普通数组。如果需要使用其他特殊数据结构,例如immutable数组,请直接使用更底层的VirtualizedList组件。 |
| getItemLayout | getItemLayout是一个可选的优化,用于避免动态测量内容尺寸的开销,不过前提是你可以提前知道内容的高度。如果你的行高是固定的,getItemLayout用起来就既高效又简单,类似下面这样:getItemLayout={(data, index) => ( {length: 行高, offset: 行高 * index, index} )} |
| keyExtractor | 此函数用于为给定的item生成一个不重复的key。Key的作用是使React能够区分同类元素的不同个体,以便在刷新时能够确定其变化的位置,减少重新渲染的开销。若不指定此函数,则默认抽取item.key作为key值。若item.key也不存在,则使用数组下标。 |
| renderItem | 根据行数据data渲染每一行的组件。 |
FlatList主要的方法
| 方法 | 说明 | 代码 |
|---|---|---|
| scrollTo() | 滚动到指定的x, y偏移处。第三个参数为是否启用平滑滚动动画。 | scrollTo(([y]: number), object, ([x]: number), ([animated]: boolean)); |
| scrollToEnd() | 滚动到视图底部(水平方向的视图则滚动到最右边)。加上动画参数scrollToEnd({animated: true})则启用平滑滚动动画,或是调用scrollToEnd({animated: false})来立即跳转。如果不使用参数,则animated选项默认启用。 | scrollToEnd(([options]: object)); |
| flashScrollIndicators() | 短暂地显示滚动指示器。 | flashScrollIndicators(); |
实例:电影列表
以下是获取豆瓣电影数据并展示成列表的实例。
import React, {Component} from "react";

import {ActivityIndicator, FlatList, Image, StyleSheet, Text, View} from "react-native";

const REQUEST_URL =

    "http://api.douban.com/v2/movie/top250?count=50";

export class SampleAppMovies extends Component {

    static navigationOptions = {

        title: '电影列表页      ',

        headerStyle: {

            backgroundColor: '#8bc9ff',

        }

    };

    constructor(props) {

        super(props);

        this.state = {

            data: [],

            loaded: false

        };

        // 在ES6中,如果在自定义的函数里使用了this关键字,则需要对其进行“绑定”操作,否则this的指向会变为空

        // 像下面这行代码一样,在constructor中使用bind是其中一种做法(还有一些其他做法,如使用箭头函数等)

        this.fetchData = this.fetchData.bind(this);

    }

    componentDidMount() {

        this.fetchData();

    }

    fetchData() {

        fetch(REQUEST_URL)

            .then(response => response.json())

            .then(responseData => {

                this.setState({

                    data: this.state.data.concat(responseData.subjects),

                    loaded: true

                });

            });

    }

    static renderLoadingView() {

        return (

            <View style={styles.container}>

                <ActivityIndicator size="large" color="#8bc9ff"/>

            </View>

        );

    }

    static renderMovie({item}) {

        // { item }是一种“解构”写法,请阅读ES2015语法的相关文档

        // item也是FlatList中固定的参数名,请阅读FlatList的相关文档

        return (

            <View style={styles.container}>

                <Image

                    source={{uri: item.images.medium}}

                    style={styles.thumbnail}/>

                <View style={styles.rightContainer}>

                    <Text style={styles.title}>{item.title}</Text>

                    <Text style={styles.year}>{item.year}</Text>

                    <Text style={styles.introduce}>{"评分:"}

                        <Text

                            style={styles.ratingNum}>{item.rating.average === 0 ? "暂无评价" : item.rating.average}

                        </Text>

                    </Text>

                    <Text numberOfLines={1} style={styles.introduce}>{"导演:"}

                        <Text style={styles.info}>{item.directors[0].name}</Text>

                    </Text>

                    <Text numberOfLines={1} style={styles.introduce}>{"演员:"}

                        <Text style={styles.info}>{item.casts[0].name + " "}</Text>

                        <Text style={styles.info}>{item.casts[1].name + " "}</Text>

                        <Text style={styles.info}>{item.casts[2].name}</Text>

                    </Text>

                </View>

            </View>

        );

    }

    render() {

        if (!this.state.loaded) {

            return SampleAppMovies.renderLoadingView();

        }

        return (

            <FlatList

                data={this.state.data}

                ItemSeparatorComponent={ItemDivideComponent}

                renderItem={SampleAppMovies.renderMovie}

                style={styles.list}

                keyExtractor={(item, index) => item.id}

            />

        );

    }

}

class ItemDivideComponent extends Component {

    render() {

        return (

            <View style={{height: 0.5, backgroundColor: 'gray'}}/>

        );

    }

}

const styles = StyleSheet.create({

    container: {

        flex: 1,

        flexDirection: "row",

        justifyContent: "center",

        backgroundColor: "#F5FCFF",

        padding: 5

    },

    rightContainer: {

        flex: 1,

        marginLeft: 10,

        flexDirection: 'column',

    },

    title: {

        color: '#000',

        fontWeight: 'bold',

        fontSize: 20,

        marginBottom: 9,

        justifyContent: 'flex-start',

    },

    year: {

        fontSize: 15,

        marginBottom: 5,

    },

    introduce: {

        flex: 1,

        fontSize: 14,

        color: '#000',

        marginBottom: 5,

    },

    ratingNum: {

        flex: 1,

        fontSize: 20,

        fontWeight: 'bold',

        color: '#ffad24'

    },

    info: {

        fontSize: 16,

        color: '#000',

        marginRight: 3,

        marginBottom: 5,

    },

    thumbnail: {

        width: 90,

        height: 145

    },

    list: {

        backgroundColor: "#FFF"

    }

});

SectionList
如果要渲染的是一组需要分组的数据,也许还带有分组标签的,那么SectionList将是个不错的选择。
SectionList是高性能的分组(section)列表组件。除了最一开始说明的共性外,它还有:
- 支持分组的头部组件。
- 支持分组的分隔线。
- 支持多种数据源结构。
简单的例子:
<SectionList

  renderItem={({item}) => <ListItem title={item.title} />}

  renderSectionHeader={({section}) => <H1 title={section.key} />}

  sections={[ // homogeneous rendering between sections

    {data: [...], key: ...},

    {data: [...], key: ...},

    {data: [...], key: ...},

  ]}

/>

<SectionList

  sections={[ // heterogeneous rendering between sections

    {data: [...], key: ..., renderItem: ...},

    {data: [...], key: ..., renderItem: ...},

    {data: [...], key: ..., renderItem: ...},

  ]}

/>
SectionList主要属性
| 属性 | 说明 |
|---|---|
| sections | 用来渲染的数据,类似于FlatList中的data属性。 |
| renderItem | 用来渲染每一个section中的每一个列表项的默认渲染器。可以在section级别上进行覆盖重写。必须返回一个react组件。 |
| keyExtractor | 此函数用于为给定的item生成一个不重复的key。Key的作用是使React能够区分同类元素的不同个体,以便在刷新时能够确定其变化的位置,减少重新渲染的开销。若不指定此函数,则默认抽取item.key作为key值。若item.key也不存在,则使用数组下标。注意这只设置了每行(item)的key,对于每个组(section)仍然需要另外设置key。 |
SectionList主要的方法
| 方法 | 说明 | 代码 |
|---|---|---|
| scrollToLocation() | 将可视区内位于特定sectionIndex 或 itemIndex (section内)位置的列表项,滚动到可视区的制定位置。 | scrollToLocation(params);parms在下面说明 |
| recordInteraction() | 主动通知列表发生了一个事件,以使列表重新计算可视区域。比如说当waitForInteractions 为 true 并且用户没有滚动列表时,就可以调用这个方法。不过一般来说,当用户点击了一个列表项,或发生了一个导航动作时,我们就可以调用这个方法。 | recordInteraction(); |
| flashScrollIndicators() | 短暂地显示滚动指示器。 | flashScrollIndicators(); |
Valid
paramskeys are:
animated(boolean) - Whether the list should do an animation while scrolling. Defaults to true.itemIndex(number) - Index within section for the item to scroll to. Required.sectionIndex(number) - Index for section that contains the item to scroll to. Required.viewOffset(number) - 一个以像素为单位,到最终位置偏移距离的固定值,比如为了弥补粘接的header所占据的空间。viewPosition(number) - A value of 0 places the item specified by index at the top, 1 at the bottom, and 0.5 centered in the middle.
对于scrollToLocation(params);还有需要注意的地方: 如果没有设置getItemLayout或是onScrollToIndexFailed,就不能滚动到位于外部渲染区的位置。
SectionList注意点
对于计算滑动到那个点,可以使用scrollToLocation,
this.sectionList.scrollToLocation({

  sectionIndex: 2,

  itemIndex: 2,

viewOffset: 30,

})

....

<SectionList

    ref={ref => this.sectionList = ref}

/>
但是如果要调用scrollToLocation的时候很可能页面还没渲染好,RN并不知道需要滚动到哪个位置,这个时候需要配合getItemLayout来使用。如果在sectionList中使用了该属性,RN会调用此方法计算列表中各项的显示位置,从而提前得知怎么处理滚动。
getItemLayout={(data, index) => ({

    index,

    offset: OFFSET_FROM_TOP,

    length: ITEM_HEIGHT.

    })

  }
不过对于SectionList计算滚动到那个点的位置是比较困难的,要计算section头部高度,也要计算item的高度,同时如果存在下画线也需要考虑在内,这就如果滑动时可能会出现偏移。
在这里可以使用库rn-section-list-get-item-layout来帮助我们解决问题:
...

constructor(props) {

    super(props)

    this.getItemLayout = sectionListGetItemLayout({

      // The height of the row with rowData at the given sectionIndex and rowIndex

      getItemHeight: (rowData, sectionIndex, rowIndex) => sectionIndex === 0 ? 100 : 50,

      // These four properties are optional

      getSeparatorHeight: () => 1 / PixelRatio.get(), // The height of your separators

      getSectionHeaderHeight: () => 20, // The height of your section headers

      getSectionFooterHeight: () => 10, // The height of your section footers

      listHeaderHeight: 40, // The height of your list header

    })

  }

...
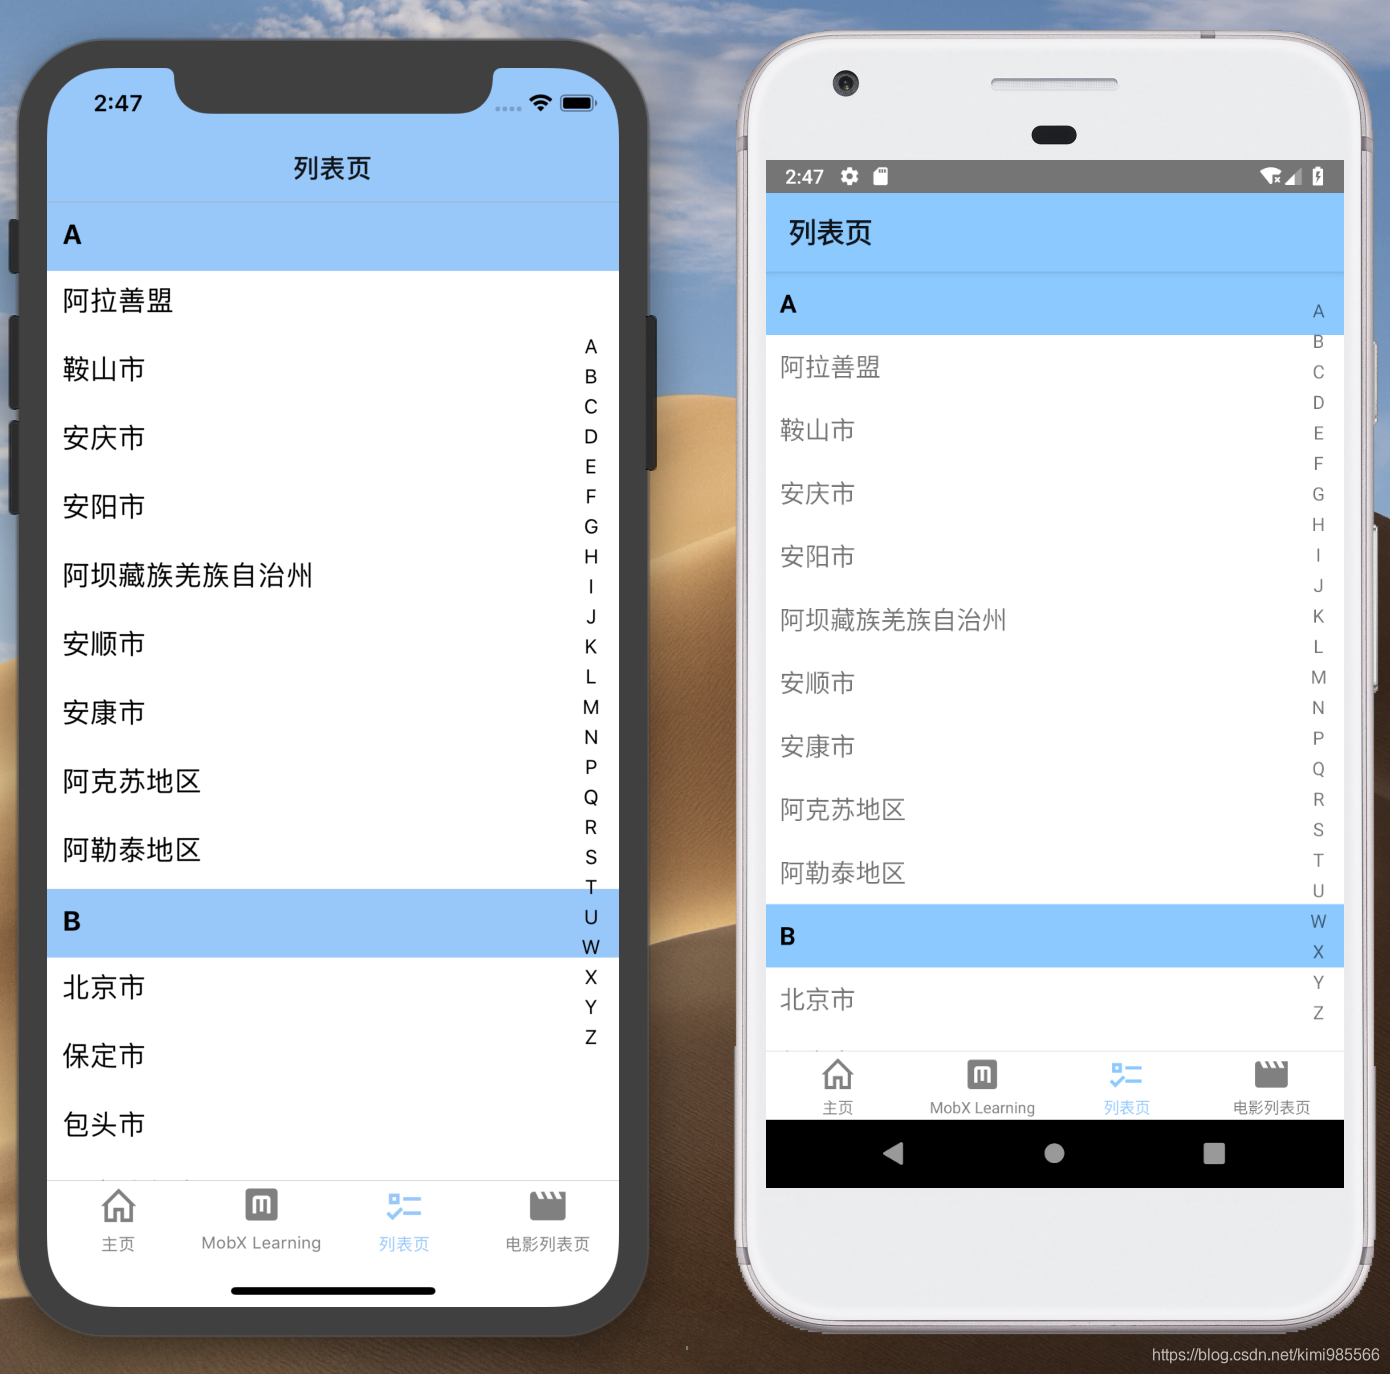
实例:城市选择列表
import React, {Component} from 'react';

import {SectionList, StyleSheet, Text, ToastAndroid, TouchableOpacity, View} from 'react-native';

import sectionListGetItemLayout from 'react-native-section-list-get-item-layout'

import _ from 'lodash';

import cityData from '../json/city.json'

const ITEM_HEIGHT = 45;

//城市字母

const letters = _

    .range('A'.charCodeAt(0), 'Z'.charCodeAt(0) + 1)

    .map(n => String.fromCharCode(n).substr(0));

_.pull(letters, 'O', 'V');

//城市的数组

let city = [];

export class CitySelectList extends Component {

    static navigationOptions = {

        title: '列表页      ',

        headerStyle: {

            backgroundColor: '#8bc9ff',

        }

    };

    constructor(props) {

        super(props);

        this.getItemLayout = sectionListGetItemLayout({

            getItemHeight: (rowData, sectionIndex, rowIndex) => ITEM_HEIGHT,

            getSeparatorHeight: () => 0,

            getSectionHeaderHeight: () => ITEM_HEIGHT,

            getSectionFooterHeight: () => 0,

            listHeaderHeight: 0

        })

    }

    componentWillMount() {

        //把城市放到对应的字母中

        for (let j = 0; j < letters.length; j++) {

            let each = [];

            for (let i = 0; i < cityData.CITIES.length; i++) {

                if (letters[j] === cityData.CITIES[i].name_en.substr(0, 1)) {

                    each.push(cityData.CITIES[i].name);

                }

            }

            let _city = {};

            _city.key = letters[j];

            _city.data = each;

            city.push(_city)

        }

        //同步城市信息

        this.setState({

            data: city

        })

    }

    //滑动到

    scrollTo(index) {

        this.sectionListRef.scrollToLocation({

            animated: true,

            sectionIndex: index,

            itemIndex: 0,

            viewPosition: 0,

            viewOffset: ITEM_HEIGHT

        });

    }

    //右侧城市首字母列表

    renderLetters(letter, index) {

        return (

            <TouchableOpacity key={index} activeOpacity={0.6} onPress={() => {

                this.scrollTo(index)

            }}>

                <Text style={styles.letterText}>{letter}</Text>

            </TouchableOpacity>

        )

    }

    //城市Item

    renderCityItem(item) {

        return (

            <TouchableOpacity activeOpacity={0.6} onPress={() => {

                ToastAndroid.show(item, ToastAndroid.SHORT)

            }}>

                <Text style={styles.item}>{item}</Text>

            </TouchableOpacity>

        )

    }

    render() {

        return (

            <View style={styles.container}>

                <SectionList

                    sections={this.state.data}

                    initialNumToRender={383}

                    ref={ref => (this.sectionListRef = ref)}

                    renderItem={({item}) => this.renderCityItem(item)}

                    renderSectionHeader={({section}) => <Text style={styles.sectionHeader}>{section.key}</Text>}

                    keyExtractor={(item, index) => index}

                    refreshing={false}

                    getItemLayout={this.getItemLayout}

                    stickySectionHeadersEnabled={true}

                    showsVerticalScrollIndicator={false}

                />

                <View style={styles.letters}>

                    {letters.map((letter, index) => this.renderLetters(letter, index))}

                </View>

            </View>

        )

            ;

    }

}

const styles = StyleSheet.create({

    container: {

        flex: 1

    },

    sectionHeader: {

        paddingTop: 5,

        paddingLeft: 10,

        paddingRight: 10,

        paddingBottom: 5,

        fontSize: 18,

        fontWeight: 'bold',

        color: '#000',

        height: ITEM_HEIGHT,

        backgroundColor: '#8bc9ff',

    },

    item: {

        padding: 10,

        fontSize: 18,

        height: ITEM_HEIGHT,

    }, letters: {

        position: 'absolute',

        top: 0,

        bottom: 0,

        right: 10,

        backgroundColor: 'transparent',

        justifyContent: 'center',

        alignItems: 'center',

    }, letterText: {

        padding: 2,

        fontSize: 13,

    }

});
来源:https://blog.csdn.net/kimi985566/article/details/85088889
React Native 列表的总结的更多相关文章
- React Native ——实现一个简单的抓取github上的项目数据列表
/** * Sample React Native App * https://github.com/facebook/react-native */ 'use strict'; var React ...
- React Native学习(七)—— FlatList实现横向滑动列表效果
本文基于React Native 0.52 Demo上传到Git了,有需要可以看看,写了新内容会上传的.Git地址 https://github.com/gingerJY/React-Native-D ...
- 《React Native 精解与实战》书籍连载「React Native 网络请求与列表绑定」
此文是我的出版书籍<React Native 精解与实战>连载分享,此书由机械工业出版社出版,书中详解了 React Native 框架底层原理.React Native 组件布局.组件与 ...
- React Native之获取通讯录信息并实现类通讯录列表(ios android)
React Native之获取通讯录信息并实现类通讯录列表(ios android) 一,需求分析 1,获取通讯录信息,筛选出通讯录里有多少好友在使用某个应用. 2,获取通讯录信息,实现类通讯录,可拨 ...
- React Native :加载新闻列表
代码地址如下:http://www.demodashi.com/demo/13212.html 标签与内容页联动 上一节(React Native : 自定义视图)做到了点击标签自动移动,还差跟下面的 ...
- React Native组件介绍
1.React Native目前已有的组件 ActivityIndicatorIOS:标准的旋转进度轮; DatePickerIOS:日期选择器: Image:图片控件: ListView:列表控件: ...
- windows 7下React Native环境配置
React Native 是 Facebook 推出的一个用 Java 语言就能同时编写 ios,android,以及后台的一项技术,它可以做到实时热更新 .FaceBook 也号称这们技术是 “Le ...
- React Native初探
前言 很久之前就想研究React Native了,但是一直没有落地的机会,我一直认为一个技术要有落地的场景才有研究的意义,刚好最近迎来了新的APP,在可控的范围内,我们可以在上面做任何想做的事情. P ...
- React Native:使用 JavaScript 构建原生应用
[转载] 本篇为联合翻译,译者:寸志,范洪春,kmokidd,姜天意 数月前,Facebook 对外宣布了正在开发的 React Native 框架,这个框架允许你使用 JavaScript 开发原生 ...
随机推荐
- C#自动切换Windows窗口程序,如何才能调出主窗口?
namespace AutoChangeWindow { partial class Form1 { /// <summary> /// 必需的设计器变量. /// </summ ...
- 链表的艺术——Linux内核链表分析
引言: 链表是数据结构中的重要成员之中的一个.因为其结构简单且动态插入.删除节点用时少的长处,链表在开发中的应用场景许多.仅次于数组(越简单应用越广). 可是.正如其长处一样,链表的缺点也是显而易见的 ...
- Spark中经常使用工具类Utils的简明介绍
<深入理解Spark:核心思想与源代码分析>一书前言的内容请看链接<深入理解SPARK:核心思想与源代码分析>一书正式出版上市 <深入理解Spark:核心思想与源代码分析 ...
- 使用nginx搭建https服务器(转)
最近在研究nginx,整好遇到一个需求就是希望服务器与客户端之间传输内容是加密的,防止中间监听泄露信息,但是去证书服务商那边申请证书又不合算,因为访问服务器的都是内部人士,所以自己给自己颁发证书,忽略 ...
- MySQL优化时可以设置的几个参数
back_log:back_log值指出在MySQL暂时停止回答新请求之前的短时间内多少个请求可以被存在堆栈中.也就是说,如果MySql的连接数据达到max_connections时,新来的请求将会被 ...
- 【cocos2dx开发技巧10】cocosStudio的集成以及c++11的新特性
转发.请保持地址:http://blog.csdn.net/stalendp/article/details/38880997 非常长时间没有碰cocos2dx了,近期又用起来了.花了好几个小时又一次 ...
- unity3d动态加载资源
在Unity3D的网络游戏中实现资源动态加载 分类: 最新学习2012-06-14 13:35 1127人阅读 评论(0) 收藏 举报 网络游戏nullvectorjson游戏string 用Unit ...
- watch 命令
watch是一个非常实用的命令,基本所有的Linux发行版都带有这个小工具,如同名字一样,watch可以帮你监测一个命令的运行结果,省得你一遍遍的手动运行.在Linux下,watch是周期性的执行下个 ...
- Java应用一般架构
转载一下文章: 自己连看三便方的其要点精髓. 当我们架设一个系统的时候通常需要考虑到如何与其他系统交互,所以我们首先需要知道各种系统之间是如何交互的,使用何种技术实现. 1. 不同系统不同语言之间的交 ...
- CLR内存回收总结,代龄机制
关键字:对象可达图,代龄机制,终止化对象. 代龄机制: 0代满了之后,GC开始回收,剩下的对象升级为1代.(只有不可达的对象才会被回收.) 0代再回收几次之后,1代的对象慢慢增多然后达到阈值,GC同时 ...