吴裕雄 python深度学习与实践(11)
import numpy as np
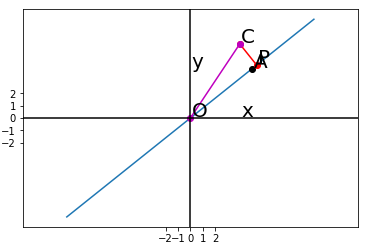
from matplotlib import pyplot as plt A = np.array([[5],[4]])
C = np.array([[4],[6]])
B = A.T.dot(C)
AA = np.linalg.inv(A.T.dot(A))
l=AA.dot(B)
P=A.dot(l)
x=np.linspace(-2,2,10)
x.shape=(1,10)
xx=A.dot(x)
fig = plt.figure()
ax= fig.add_subplot(111)
ax.plot(xx[0,:],xx[1,:])
ax.plot(A[0],A[1],'ko') ax.plot([C[0],P[0]],[C[1],P[1]],'r-o')
ax.plot([0,C[0]],[0,C[1]],'m-o') ax.axvline(x=0,color='black')
ax.axhline(y=0,color='black') margin=0.1
ax.text(A[0]+margin, A[1]+margin, r"A",fontsize=20)
ax.text(C[0]+margin, C[1]+margin, r"C",fontsize=20)
ax.text(P[0]+margin, P[1]+margin, r"P",fontsize=20)
ax.text(0+margin,0+margin,r"O",fontsize=20)
ax.text(0+margin,4+margin, r"y",fontsize=20)
ax.text(4+margin,0+margin, r"x",fontsize=20)
plt.xticks(np.arange(-2,3))
plt.yticks(np.arange(-2,3)) ax.axis('equal')
plt.show()
x = [(2, 0, 3), (1, 0, 3), (1, 1, 3), (1,4, 2), (1, 2, 4)]

y = [5, 6, 8, 10, 11]

alpha = 0.02

diff = [0, 0]

error0 = 0

error1 = 0

w0 = 0

w1 = 0

w2 = 0

cnt = 0

while True:

    cnt += 1

    for i in range(len(x)):

        diff[0] = (w0 * x[i][0] + w1 * x[i][1] + w2 * x[i][2]) - y[i]

        w0 -= alpha * diff[0] * x[i][0]

        w1 -= alpha * diff[0] * x[i][1]

        w2 -= alpha * diff[0] * x[i][2]

    error1 = 0

    for lp in range(len(x)):

        error1 += (y[lp] - (w0 + w1 * x[lp][1] + w2 * x[lp][2])) ** 2 / 2

    if abs(error1 - error0) < 0.002:

        break

    else:

        error0 = error1

print('theta0 : %f, theta1 : %f, theta2 : %f, error1 : %f' % (w0, w1, w2, error1))

print('Done: theta0 : %f, theta1 : %f, theta2 : %f' % (w0, w1, w2))

print('迭代次数: %d' % cnt)

import math

import random

import numpy as np

def rand(a, b):

    return (b - a) * random.random() + a

def make_matrix(m,n,fill=0.0):

    mat = []

    for i in range(m):

        mat.append([fill] * n)

    return mat

def sigmoid(x):

    return 1.0 / (1.0 + math.exp(-x))

def sigmod_derivate(x):

    return x * (1 - x)

class BPNeuralNetwork:

    def __init__(self):

        self.input_n = 0

        self.hidden_n = 0

        self.output_n = 0

        self.input_cells = []

        self.hidden_cells = []

        self.output_cells = []

        self.input_weights = []

        self.output_weights = []

    def setup(self,ni,nh,no):

        self.input_n = ni + 1

        self.hidden_n = nh

        self.output_n = no

        self.input_cells = [1.0] * self.input_n

        self.hidden_cells = [1.0] * self.hidden_n

        self.output_cells = [1.0] * self.output_n

        self.input_weights = make_matrix(self.input_n,self.hidden_n)

        self.output_weights = make_matrix(self.hidden_n,self.output_n)

        # random activate

        for i in range(self.input_n):

            for h in range(self.hidden_n):

                self.input_weights[i][h] = rand(-0.2, 0.2)

        for h in range(self.hidden_n):

            for o in range(self.output_n):

                self.output_weights[h][o] = rand(-2.0, 2.0)

    def predict(self,inputs):

        for i in range(self.input_n - 1):

            self.input_cells[i] = inputs[i]

        for j in range(self.hidden_n):

            total = 0.0

            for i in range(self.input_n):

                total += self.input_cells[i] * self.input_weights[i][j]

            self.hidden_cells[j] = sigmoid(total)

        for k in range(self.output_n):

            total = 0.0

            for j in range(self.hidden_n):

                total += self.hidden_cells[j] * self.output_weights[j][k]

            self.output_cells[k] = sigmoid(total)

        return self.output_cells[:]

    def back_propagate(self,case,label,learn):

        self.predict(case)

        #计算输出层的误差

        output_deltas = [0.0] * self.output_n

        for k in range(self.output_n):

            error = label[k] - self.output_cells[k]

            output_deltas[k] = sigmod_derivate(self.output_cells[k]) * error

        #计算隐藏层的误差

        hidden_deltas = [0.0] * self.hidden_n

        for j in range(self.hidden_n):

            error = 0.0

            for k in range(self.output_n):

                error += output_deltas[k] * self.output_weights[j][k]

            hidden_deltas[j] = sigmod_derivate(self.hidden_cells[j]) * error

        #更新输出层权重

        for j in range(self.hidden_n):

            for k in range(self.output_n):

                self.output_weights[j][k] += learn * output_deltas[k] * self.hidden_cells[j]

        #更新隐藏层权重

        for i in range(self.input_n):

            for j in range(self.hidden_n):

                self.input_weights[i][j] += learn * hidden_deltas[j] * self.input_cells[i]

        error = 0

        for o in range(len(label)):

            error += 0.5 * (label[o] - self.output_cells[o]) ** 2

        return error

    def train(self,cases,labels,limit = 100,learn = 0.05):

        for i in range(limit):

            error = 0

            for i in range(len(cases)):

                label = labels[i]

                case = cases[i]

                error += self.back_propagate(case, label, learn)

        pass

    def test(self):

        cases = [

            [0, 0],

            [0, 1],

            [1, 0],

            [1, 1],

        ]

        labels = [[0], [1], [1], [0]]

        self.setup(2, 5, 1)

        self.train(cases, labels, 100000, 0.001)

        for case in cases:

            print(self.predict(case))

if __name__ == '__main__':

    nn = BPNeuralNetwork()

    nn.test()

吴裕雄 python深度学习与实践(11)的更多相关文章
- 吴裕雄 python深度学习与实践(16)
import struct import numpy as np import matplotlib.pyplot as plt dateMat = np.ones((7,7)) kernel = n ...
- 吴裕雄 python深度学习与实践(7)
import cv2 import numpy as np img = np.mat(np.zeros((,))) cv2.imshow("test",img) cv2.waitK ...
- 吴裕雄 python深度学习与实践(18)
# coding: utf-8 import time import numpy as np import tensorflow as tf import _pickle as pickle impo ...
- 吴裕雄 python深度学习与实践(17)
import tensorflow as tf from tensorflow.examples.tutorials.mnist import input_data import time # 声明输 ...
- 吴裕雄 python深度学习与实践(15)
import tensorflow as tf import tensorflow.examples.tutorials.mnist.input_data as input_data mnist = ...
- 吴裕雄 python深度学习与实践(14)
import numpy as np import tensorflow as tf import matplotlib.pyplot as plt threshold = 1.0e-2 x1_dat ...
- 吴裕雄 python深度学习与实践(13)
import numpy as np import matplotlib.pyplot as plt x_data = np.random.randn(10) print(x_data) y_data ...
- 吴裕雄 python深度学习与实践(12)
import tensorflow as tf q = tf.FIFOQueue(,"float32") counter = tf.Variable(0.0) add_op = t ...
- 吴裕雄 python深度学习与实践(10)
import tensorflow as tf input1 = tf.constant(1) print(input1) input2 = tf.Variable(2,tf.int32) print ...
随机推荐
- Vagrant 创建虚拟环境
1. 添加box vagrant box add --name centos6.8/cms boxname.box 2.初始化admin环境 vagrant init centos6.8/cms ad ...
- yaf nginx 设置
#test1server { listen 80; listen [::]:80; root /vagrant_data/aaa/public; index index.html index.htm ...
- centos7通过yum安装mysql,并授权远程连接 【转】
http://blog.csdn.net/u012367513/article/details/40538267 用于备忘
- centos安装redis步骤
1.官网或wget下载redis-4.0.9.tar.gz: cd /home/tar wget http://download.redis.io/releases/redis-4.0.9.tar.g ...
- Go Example--格式化字符串
package main import ( "fmt" "os" ) type point struct { x, y int } func main() { ...
- vue学习笔记——路由
1 路由配置 在vue.config中配置,则在代码中可以使用 @来表示src目录下 import aa from '@/aa/index.js' 2 单页面可以懒加载 3 创建动态路由 路由中定义: ...
- tmpfs临时文件系统,是一种基于内存的文件系统
在Linux系统内存中的虚拟磁盘映射,可以理解为使用物理内存当做磁盘,利用这种文件系统,可以有效提高在高并发场景下的磁盘读写,但是重启后数据会丢失. 1.查看tmpfs路径 (系统默认开启,大小约为物 ...
- mvc项目用log4net 记录错误日志
1. 首先下载lognet 下载地址 http://logging.apache.org/log4net/download_log4net.cgi 2.找到bin文件中的net文件夹 之后看你电脑 ...
- 查看linux系统CPU及内存配置
总核数 = 物理CPU个数 X 每颗物理CPU的核数 总逻辑CPU数 = 物理CPU个数 X 每颗物理CPU的核数 X 超线程数 查看物理CPU个数 cat /proc/cpuinfo| grep & ...
- Eclipse+PyDev 安装和配置
Eclipse+PyDev 安装和配置 2012-03-17 23:23:23 | 17465次阅读 | 评论:0 条 | Python开发有很多工具,其中Eclipse+Pydev 是最常见的一种 ...