java之IDEA中使用Maven
Maven的安装与使用
安装
1、下载,官网下载。
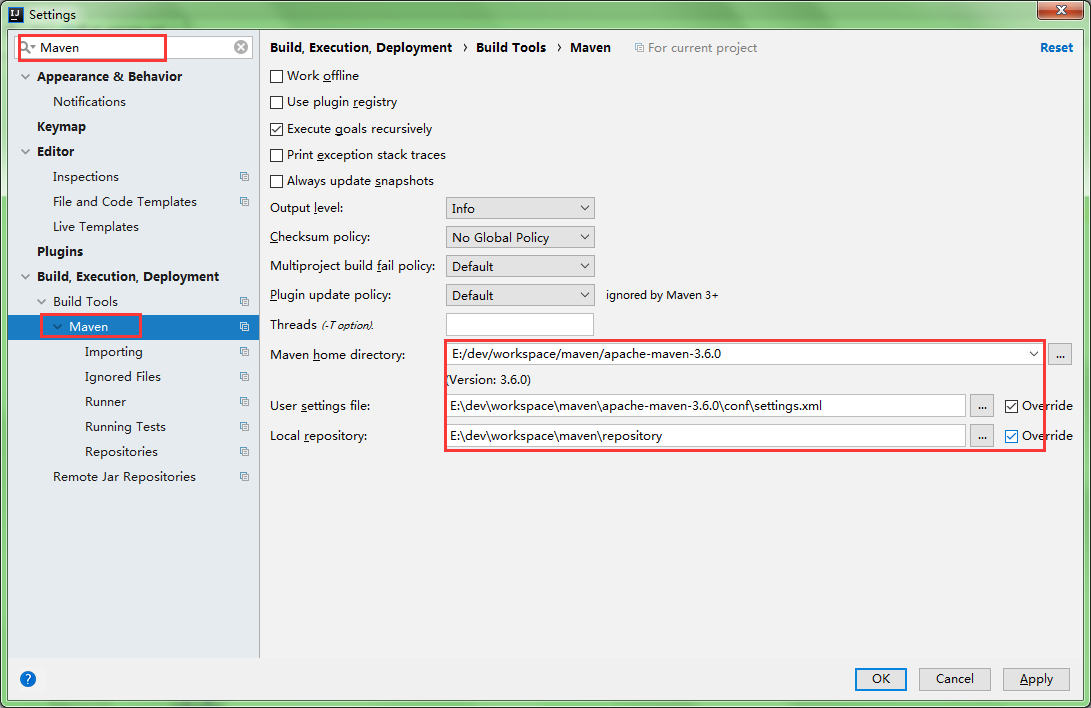
2、解压,存放路径中不可包含空格和中文。如:"E:\dev\workspace\maven\apache-maven-3.6.0"
3、配置本地仓库,进入 "conf/settings.xml" 中,在 settings 节下开启如下配置,该路径就是指向本地仓库的路径:
<localRepository>E:\dev\workspace\maven\repository</localRepository>
Maven 在查找 jar 时遵循什么样的顺序呢?
- 优先在本地仓库中查找。
- 如果本地仓库中找不到,则从私服查找,找到后下载到本地仓库。
- 如果私服中找不到,则从中央仓库查找,找到后下载带私服,最后下载到本地仓库。
为方便使用,这里提供了已包含常用 jar 包的本地仓库,点击下载。
三套生命周期
Maven 对项目构建过程分为三套相互独立的生命周期,请注意这里说的是“三套”,而且“相互独立”,这三套生命周期分别是:
- Clean Lifecycle:在进行真正的构建之前进行一些清理工作。
- Default Lifecycle:构建的核心部分,如编辑、测试、打包、部署等等。
- Site Lifecycle:生成项目报告、站点、发布站点。
每一个阶段都有一个对应的命令,且有相应的插件来支持命令的执行。
注:属于同一个命令周期内的命令,当执行后面的命令时,前面的命令会自动执行。
常用命令
- complie:编译命令,作用是将 'src/main/java' 下的 java 源文件编译为 class 文件并输出到 target 下的 classes 目录下。
ZHANGZHONGEN+zze@ZHANGZHONGEN MINGW64 /f/idea//helloworld

$ mvn compile

[INFO] Scanning for projects...

[INFO]

[INFO] -------------------------< com.zze:helloworld >-------------------------

[INFO] Building helloworld Maven Webapp 1.0-SNAPSHOT

[INFO] --------------------------------[ war ]---------------------------------

[INFO]

[INFO] --- maven-resources-plugin:3.0.:resources (default-resources) @ helloworld ---

[INFO] Using 'UTF-8' encoding to copy filtered resources.

[INFO] skip non existing resourceDirectory F:\idea\\helloworld\src\main\resources

[INFO]

[INFO] --- maven-compiler-plugin:3.8.:compile (default-compile) @ helloworld ---

[INFO] Nothing to compile - all classes are up to date

[INFO] ------------------------------------------------------------------------

[INFO] BUILD SUCCESS

[INFO] ------------------------------------------------------------------------

[INFO] Total time:  0.763 s

[INFO] Finished at: --21T15::+:

[INFO] ------------------------------------------------------------------------
例:
- clean:清除命令,执行 clean 会删除 target 目录及其目录下所有内容。
ZHANGZHONGEN+zze@ZHANGZHONGEN MINGW64 /f/idea//helloworld

$ mvn clean

[INFO] Scanning for projects...

[INFO]

[INFO] -------------------------< com.zze:helloworld >-------------------------

[INFO] Building helloworld Maven Webapp 1.0-SNAPSHOT

[INFO] --------------------------------[ war ]---------------------------------

[INFO]

[INFO] --- maven-clean-plugin:3.1.:clean (default-clean) @ helloworld ---

[INFO] Deleting F:\idea\\helloworld\target

[INFO] ------------------------------------------------------------------------

[INFO] BUILD SUCCESS

[INFO] ------------------------------------------------------------------------

[INFO] Total time:  0.359 s

[INFO] Finished at: --21T15::+:

[INFO] ------------------------------------------------------------------------
例:
- test:测试命令,会执行 'src/main/java' 下的单元测试类。
ZHANGZHONGEN+zze@ZHANGZHONGEN MINGW64 /f/idea//helloworld

$ mvn test

[INFO] Scanning for projects...

[INFO]

[INFO] -------------------------< com.zze:helloworld >-------------------------

[INFO] Building helloworld Maven Webapp 1.0-SNAPSHOT

[INFO] --------------------------------[ war ]---------------------------------

[INFO]

[INFO] --- maven-resources-plugin:3.0.:resources (default-resources) @ helloworld ---

[INFO] Using 'UTF-8' encoding to copy filtered resources.

[INFO] skip non existing resourceDirectory F:\idea\\helloworld\src\main\resources

[INFO]

[INFO] --- maven-compiler-plugin:3.8.:compile (default-compile) @ helloworld ---

[INFO] Nothing to compile - all classes are up to date

[INFO]

[INFO] --- maven-resources-plugin:3.0.:testResources (default-testResources) @ helloworld ---

[INFO] Using 'UTF-8' encoding to copy filtered resources.

[INFO] skip non existing resourceDirectory F:\idea\\helloworld\src\test\resources

[INFO]

[INFO] --- maven-compiler-plugin:3.8.:testCompile (default-testCompile) @ helloworld ---

[INFO] Changes detected - recompiling the module!

[INFO] Compiling  source file to F:\idea\\helloworld\target\test-classes

[INFO]

[INFO] --- maven-surefire-plugin:2.22.:test (default-test) @ helloworld ---

[INFO]

[INFO] -------------------------------------------------------

[INFO]  T E S T S

[INFO] -------------------------------------------------------

[INFO] Running com.zze.test1.DemoTest

[INFO] Tests run: , Failures: , Errors: , Skipped: , Time elapsed: 0.019 s - in com.zze.test1.DemoTest

[INFO]

[INFO] Results:

[INFO]

[INFO] Tests run: , Failures: , Errors: , Skipped:

[INFO]

[INFO] ------------------------------------------------------------------------

[INFO] BUILD SUCCESS

[INFO] ------------------------------------------------------------------------

[INFO] Total time:  2.414 s

[INFO] Finished at: --21T15::+:

[INFO] ------------------------------------------------------------------------
例:
- package:打包命令,执行 package 命令对于 java 工程会打成 jar 包,对于 web 工程会打成 war 包。
ZHANGZHONGEN+zze@ZHANGZHONGEN MINGW64 /f/idea//helloworld

$ mvn package

[INFO] Scanning for projects...

[INFO]

[INFO] -------------------------< com.zze:helloworld >-------------------------

[INFO] Building helloworld Maven Webapp 1.0-SNAPSHOT

[INFO] --------------------------------[ war ]---------------------------------

[INFO]

[INFO] --- maven-resources-plugin:3.0.:resources (default-resources) @ helloworld ---

[INFO] Using 'UTF-8' encoding to copy filtered resources.

[INFO] skip non existing resourceDirectory F:\idea\\helloworld\src\main\resources

[INFO]

[INFO] --- maven-compiler-plugin:3.8.:compile (default-compile) @ helloworld ---

[INFO] Nothing to compile - all classes are up to date

[INFO]

[INFO] --- maven-resources-plugin:3.0.:testResources (default-testResources) @ helloworld ---

[INFO] Using 'UTF-8' encoding to copy filtered resources.

[INFO] skip non existing resourceDirectory F:\idea\\helloworld\src\test\resources

[INFO]

[INFO] --- maven-compiler-plugin:3.8.:testCompile (default-testCompile) @ helloworld ---

[INFO] Changes detected - recompiling the module!

[INFO] Compiling  source file to F:\idea\\helloworld\target\test-classes

[INFO]

[INFO] --- maven-surefire-plugin:2.22.:test (default-test) @ helloworld ---

[INFO]

[INFO] -------------------------------------------------------

[INFO]  T E S T S

[INFO] -------------------------------------------------------

[INFO] Running com.zze.test1.DemoTest

[INFO] Tests run: , Failures: , Errors: , Skipped: , Time elapsed: 0.018 s - in com.zze.test1.DemoTest

[INFO]

[INFO] Results:

[INFO]

[INFO] Tests run: , Failures: , Errors: , Skipped:

[INFO]

[INFO]

[INFO] --- maven-war-plugin:3.2.:war (default-war) @ helloworld ---

[INFO] Packaging webapp

[INFO] Assembling webapp [helloworld] in [F:\idea\\helloworld\target\helloworld]

[INFO] Processing war project

[INFO] Copying webapp resources [F:\idea\\helloworld\src\main\webapp]

[INFO] Webapp assembled in [ msecs]

[INFO] Building war: F:\idea\\helloworld\target\helloworld.war

[INFO] ------------------------------------------------------------------------

[INFO] BUILD SUCCESS

[INFO] ------------------------------------------------------------------------

[INFO] Total time:  2.752 s

[INFO] Finished at: --21T15::+:

[INFO] ------------------------------------------------------------------------
例:
- install:安装命令,执行 install 会将项目打成 jar 或 war 包发布到本地仓库。
ZHANGZHONGEN+zze@ZHANGZHONGEN MINGW64 /f/idea//helloworld

$ mvn install

[INFO] Scanning for projects...

[INFO]

[INFO] -------------------------< com.zze:helloworld >-------------------------

[INFO] Building helloworld Maven Webapp 1.0-SNAPSHOT

[INFO] --------------------------------[ war ]---------------------------------

[INFO]

[INFO] --- maven-resources-plugin:3.0.:resources (default-resources) @ helloworld ---

[INFO] Using 'UTF-8' encoding to copy filtered resources.

[INFO] skip non existing resourceDirectory F:\idea\\helloworld\src\main\resources

[INFO]

[INFO] --- maven-compiler-plugin:3.8.:compile (default-compile) @ helloworld ---

[INFO] Nothing to compile - all classes are up to date

[INFO]

[INFO] --- maven-resources-plugin:3.0.:testResources (default-testResources) @ helloworld ---

[INFO] Using 'UTF-8' encoding to copy filtered resources.

[INFO] skip non existing resourceDirectory F:\idea\\helloworld\src\test\resources

[INFO]

[INFO] --- maven-compiler-plugin:3.8.:testCompile (default-testCompile) @ helloworld ---

[INFO] Nothing to compile - all classes are up to date

[INFO]

[INFO] --- maven-surefire-plugin:2.22.:test (default-test) @ helloworld ---

[INFO]

[INFO] -------------------------------------------------------

[INFO]  T E S T S

[INFO] -------------------------------------------------------

[INFO] Running com.zze.test1.DemoTest

[INFO] Tests run: , Failures: , Errors: , Skipped: , Time elapsed: 0.021 s - in com.zze.test1.DemoTest

[INFO]

[INFO] Results:

[INFO]

[INFO] Tests run: , Failures: , Errors: , Skipped:

[INFO]

[INFO]

[INFO] --- maven-war-plugin:3.2.:war (default-war) @ helloworld ---

[INFO] Packaging webapp

[INFO] Assembling webapp [helloworld] in [F:\idea\\helloworld\target\helloworld]

[INFO] Processing war project

[INFO] Copying webapp resources [F:\idea\\helloworld\src\main\webapp]

[INFO] Webapp assembled in [ msecs]

[INFO] Building war: F:\idea\\helloworld\target\helloworld.war

[INFO]

[INFO] --- maven-install-plugin:2.5.:install (default-install) @ helloworld ---

[INFO] Installing F:\idea\\helloworld\target\helloworld.war to E:\dev\workspace\maven\repository\com\zze\helloworld\1.0-SNAPSHOT\helloworld-1.0-SNAPSHOT.war

[INFO] Installing F:\idea\\helloworld\pom.xml to E:\dev\workspace\maven\repository\com\zze\helloworld\1.0-SNAPSHOT\helloworld-1.0-SNAPSHOT.pom

[INFO] ------------------------------------------------------------------------

[INFO] BUILD SUCCESS

[INFO] ------------------------------------------------------------------------

[INFO] Total time:  2.544 s

[INFO] Finished at: --21T15::+:

[INFO] ------------------------------------------------------------------------
例:
依赖管理
依赖的范围
- compile:编译范围,默认值
compile 是默认的范围;如果没有提供一个范围,那该依赖的范围就是编译范围。编译范围依赖在所有的 classpath 中可用,同时它们也会被打包。
- provided:已提供范围
provided 依赖只有在当 JDK 或者一个容器已提供该依赖之后才使用。例如, 如果你开发了一个 web 应用,你可能在编译 classpath 中需要可用的 Servlet API 来编译一个 Servlet,但是你不会想要在打包好的 war 中包含这个 Servlet API;这个 Servlet API JAR 由你的应用服务器或者 Servlet 容器提供。已提供范围的依赖在编译 classpath (不是运行时)可用。它们不是传递性的,也不会被打包。
- runtime:运行时范围
runtime 依赖在运行和测试系统的时候需要,但在编译的时候不需要。比如,你可能在编译的时候只需要 JDBC API JAR,而只有在运行的时候才需要 JDBC 驱动实现。
- test:测试范围
test 范围依赖在一般的编译和运行时都不需要,它们只有在测试编译和测试运行阶段可用。
- system:系统范围
system 范围依赖与 provided 类似,但是你必须显式的提供一个对于本地系统中JAR 文件的路径。这么做是为了允许基于本地对象编译,而这些对象是系统类库的一部分。这样的构件应该是一直可用的,Maven 也不会在仓库中去寻找它。如果你将一个依赖范围设置成系统范围,你必须同时提供一个 systemPath 元素。注意该范围是不推荐使用的(你应该一直尽量去从公共或定制的 Maven 仓库中引用依赖)。
依赖的传递
参考工程的继承与聚合,它其实就是使用依赖的传递来实现的。
排除依赖
创建工程,引入 'struts2-core' 依赖:
<?xml version="1.0" encoding="UTF-8"?>

<project xmlns="http://maven.apache.org/POM/4.0.0"

         xmlns:xsi="http://www.w3.org/2001/XMLSchema-instance"

         xsi:schemaLocation="http://maven.apache.org/POM/4.0.0 http://maven.apache.org/xsd/maven-4.0.0.xsd">

    <modelVersion>4.0.0</modelVersion>

    <groupId>com.zze</groupId>

    <artifactId>A</artifactId>

    <version>1.0-SNAPSHOT</version>

    <dependencies>

        <dependency>

            <groupId>org.apache.struts</groupId>

            <artifactId>struts2-core</artifactId>

            <version>2.3.37</version>

        </dependency>

    </dependencies>

</project>
pom.xml
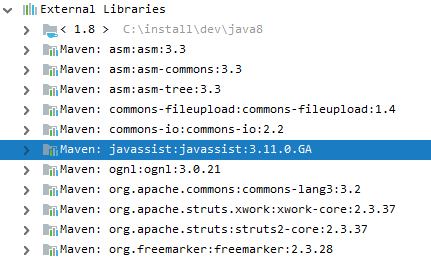
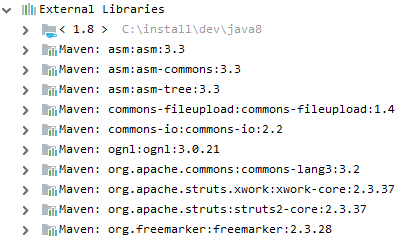
假如我们不想使用传递进来的 'javassist',那么我们可以通过配置将其排除:
<?xml version="1.0" encoding="UTF-8"?>

<project xmlns="http://maven.apache.org/POM/4.0.0"

         xmlns:xsi="http://www.w3.org/2001/XMLSchema-instance"

         xsi:schemaLocation="http://maven.apache.org/POM/4.0.0 http://maven.apache.org/xsd/maven-4.0.0.xsd">

    <modelVersion>4.0.0</modelVersion>

    <groupId>com.zze</groupId>

    <artifactId>A</artifactId>

    <version>1.0-SNAPSHOT</version>

    <dependencies>

        <dependency>

            <groupId>org.apache.struts</groupId>

            <artifactId>struts2-core</artifactId>

            <version>2.3.37</version>

            <exclusions>

                <exclusion>

                    <groupId>javassist</groupId>

                    <artifactId>javassist</artifactId>

                </exclusion>

            </exclusions>

        </dependency>

    </dependencies>

</project>
pom.xml
路径近者优先
创建工程,引入'struts2-spring-plugin' 依赖:
<?xml version="1.0" encoding="UTF-8"?>

<project xmlns="http://maven.apache.org/POM/4.0.0"

         xmlns:xsi="http://www.w3.org/2001/XMLSchema-instance"

         xsi:schemaLocation="http://maven.apache.org/POM/4.0.0 http://maven.apache.org/xsd/maven-4.0.0.xsd">

    <modelVersion>4.0.0</modelVersion>

    <groupId>com.zze</groupId>

    <artifactId>A</artifactId>

    <version>1.0-SNAPSHOT</version>

    <dependencies>

        <dependency>

            <groupId>org.apache.struts</groupId>

            <artifactId>struts2-spring-plugin</artifactId>

            <version>2.3.37</version>

        </dependency>

    </dependencies>

</project>
pom.xml
接着引入 'spring-beans' 的依赖:
<?xml version="1.0" encoding="UTF-8"?>

<project xmlns="http://maven.apache.org/POM/4.0.0"

         xmlns:xsi="http://www.w3.org/2001/XMLSchema-instance"

         xsi:schemaLocation="http://maven.apache.org/POM/4.0.0 http://maven.apache.org/xsd/maven-4.0.0.xsd">

    <modelVersion>4.0.0</modelVersion>

    <groupId>com.zze</groupId>

    <artifactId>A</artifactId>

    <version>1.0-SNAPSHOT</version>

    <dependencies>

        <dependency>

            <groupId>org.apache.struts</groupId>

            <artifactId>struts2-spring-plugin</artifactId>

            <version>2.3.37</version>

        </dependency>

        <dependency>

            <groupId>org.springframework</groupId>

            <artifactId>spring-beans</artifactId>

            <version>4.2.4.RELEASE</version>

        </dependency>

    </dependencies>

</project>

pom.xml
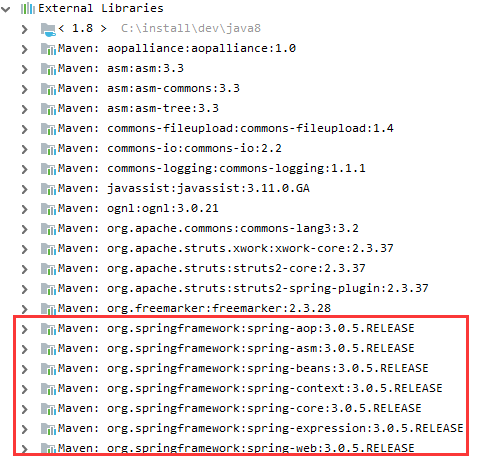
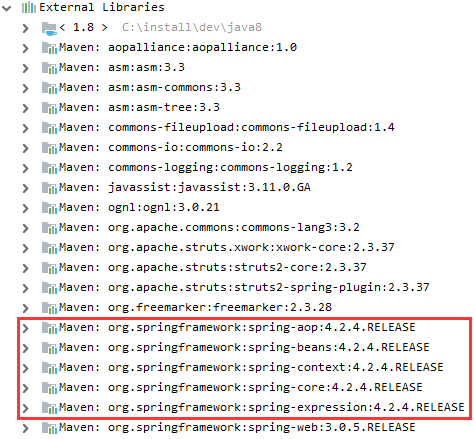
此时会发现 'spring-beans' 的版本为下面直接声明的版本,因为它是直接引入,相对传进进来路径更近。
第一声明者优先
创建工程,引入 'struts2-spring-plugin' 依赖:
<?xml version="1.0" encoding="UTF-8"?>

<project xmlns="http://maven.apache.org/POM/4.0.0"

         xmlns:xsi="http://www.w3.org/2001/XMLSchema-instance"

         xsi:schemaLocation="http://maven.apache.org/POM/4.0.0 http://maven.apache.org/xsd/maven-4.0.0.xsd">

    <modelVersion>4.0.0</modelVersion>

    <groupId>com.zze</groupId>

    <artifactId>A</artifactId>

    <version>1.0-SNAPSHOT</version>

    <dependencies>

        <dependency>

            <groupId>org.apache.struts</groupId>

            <artifactId>struts2-spring-plugin</artifactId>

            <version>2.3.37</version>

        </dependency>

    </dependencies>

</project>
pom.xml
接着引入 'spring-context' 依赖:
<?xml version="1.0" encoding="UTF-8"?>

<project xmlns="http://maven.apache.org/POM/4.0.0"

         xmlns:xsi="http://www.w3.org/2001/XMLSchema-instance"

         xsi:schemaLocation="http://maven.apache.org/POM/4.0.0 http://maven.apache.org/xsd/maven-4.0.0.xsd">

    <modelVersion>4.0.0</modelVersion>

    <groupId>com.zze</groupId>

    <artifactId>A</artifactId>

    <version>1.0-SNAPSHOT</version>

    <dependencies>

        <dependency>

            <groupId>org.apache.struts</groupId>

            <artifactId>struts2-spring-plugin</artifactId>

            <version>2.3.37</version>

        </dependency>

        <dependency>

            <groupId>org.springframework</groupId>

            <artifactId>spring-context</artifactId>

            <version>4.2.4.RELEASE</version>

        </dependency>

    </dependencies>

</project>

pom.xml
此时会发现 'spring-beans' 的版本依旧是 'struts2-spring-plugin' 传递进来的,因为 'struts2-spring-plugin' 是先声明的。
交换 'struts2-spring-plugin' 和 'spring-context' 依赖的声明顺序:
<?xml version="1.0" encoding="UTF-8"?>

<project xmlns="http://maven.apache.org/POM/4.0.0"

         xmlns:xsi="http://www.w3.org/2001/XMLSchema-instance"

         xsi:schemaLocation="http://maven.apache.org/POM/4.0.0 http://maven.apache.org/xsd/maven-4.0.0.xsd">

    <modelVersion>4.0.0</modelVersion>

    <groupId>com.zze</groupId>

    <artifactId>A</artifactId>

    <version>1.0-SNAPSHOT</version>

    <dependencies>

        <dependency>

            <groupId>org.springframework</groupId>

            <artifactId>spring-context</artifactId>

            <version>4.2.4.RELEASE</version>

        </dependency>

        <dependency>

            <groupId>org.apache.struts</groupId>

            <artifactId>struts2-spring-plugin</artifactId>

            <version>2.3.37</version>

        </dependency>

    </dependencies>

</project>
pom.xml
此时 'spring-beans' 的版本就改为 'spring-context' 传递进来的版本了,因为 'spring-context' 是先声明的。
版本锁定
版本锁定一般在父子工程间使用,创建父工程 A,锁定 'spring-beans' 的版本:
<?xml version="1.0" encoding="UTF-8"?>

<project xmlns="http://maven.apache.org/POM/4.0.0" xmlns:xsi="http://www.w3.org/2001/XMLSchema-instance"

         xsi:schemaLocation="http://maven.apache.org/POM/4.0.0 http://maven.apache.org/xsd/maven-4.0.0.xsd">

    <modelVersion>4.0.0</modelVersion>

    <groupId>com.zze</groupId>

    <artifactId>A</artifactId>

    <version>1.0-SNAPSHOT</version>

    <packaging>pom</packaging>

    <modules>

        <module>../B</module>

    </modules>

    <dependencyManagement>

        <!--dependencyManagement 下的 dependencies 节只是用来预先锁定指定依赖的版本,并不会真的引入依赖-->

        <dependencies>

            <dependency>

                <groupId>org.springframework</groupId>

                <artifactId>spring-beans</artifactId>

                <version>4.2.4.RELEASE</version>

            </dependency>

        </dependencies>

    </dependencyManagement>

</project>
pom.xml [A]
创建子工程 B ,继承父工程 A,引入 'spring-beans' 依赖:
<?xml version="1.0" encoding="UTF-8"?>

<project xmlns="http://maven.apache.org/POM/4.0.0"

         xmlns:xsi="http://www.w3.org/2001/XMLSchema-instance"

         xsi:schemaLocation="http://maven.apache.org/POM/4.0.0 http://maven.apache.org/xsd/maven-4.0.0.xsd">

    <parent>

        <artifactId>A</artifactId>

        <groupId>com.zze</groupId>

        <version>1.0-SNAPSHOT</version>

        <relativePath>../A/pom.xml</relativePath>

    </parent>

    <modelVersion>4.0.0</modelVersion>

    <artifactId>B</artifactId>

    <dependencies>

        <!--因为在父工程中已经锁定了 spring-beans 的版本,所以在子工程中不用指定版本-->

        <dependency>

            <groupId>org.springframework</groupId>

            <artifactId>spring-beans</artifactId>

        </dependency>

    </dependencies>

</project>
pom.xml [B]
因为在父工程中已经锁定了 'spring-beans' 的版本,所以在子工程中不指定版本会默认引用父工程锁定的版本。
版本常量使用
创建工程,创建版本常量,在依赖中引用版本常量:
<?xml version="1.0" encoding="UTF-8"?>

<project xmlns="http://maven.apache.org/POM/4.0.0" xmlns:xsi="http://www.w3.org/2001/XMLSchema-instance"

         xsi:schemaLocation="http://maven.apache.org/POM/4.0.0 http://maven.apache.org/xsd/maven-4.0.0.xsd">

    <modelVersion>4.0.0</modelVersion>

    <groupId>com.zze</groupId>

    <artifactId>A</artifactId>

    <version>1.0-SNAPSHOT</version>

    <packaging>pom</packaging>

    <properties>

        <!--创建版本常量-->

        <spring.version>4.2.4.RELEASE</spring.version>

    </properties>

    <dependencyManagement>

        <dependencies>

            <dependency>

                <groupId>org.springframework</groupId>

                <artifactId>spring-beans</artifactId>

                <!--引用版本常量-->

                <version>${spring.version}</version>

            </dependency>

            <dependency>

                <groupId>org.springframework</groupId>

                <artifactId>spring-context</artifactId>

                <version>${spring.version}</version>

            </dependency>

        </dependencies>

    </dependencyManagement>

</project>
pom.xml
工程的继承与聚合
继承
创建一个父工程 A,再创建一个子工程 B 继承 A:
<?xml version="1.0" encoding="UTF-8"?>

<project xmlns="http://maven.apache.org/POM/4.0.0" xmlns:xsi="http://www.w3.org/2001/XMLSchema-instance"

         xsi:schemaLocation="http://maven.apache.org/POM/4.0.0 http://maven.apache.org/xsd/maven-4.0.0.xsd">

    <modelVersion>4.0.0</modelVersion>

    <groupId>com.zze</groupId>

    <artifactId>A</artifactId>

    <version>1.0-SNAPSHOT</version>

    <packaging>pom</packaging>

    <modules>

        <module>../B</module>

    </modules>

    <dependencies>

        <dependency>

            <groupId>org.apache.struts</groupId>

            <artifactId>struts2-core</artifactId>

            <version>2.3.37</version>

        </dependency>

    </dependencies>

</project>
pom.xml [A]
 <?xml version="1.0" encoding="UTF-8"?>

<project xmlns="http://maven.apache.org/POM/4.0.0"

         xmlns:xsi="http://www.w3.org/2001/XMLSchema-instance"

         xsi:schemaLocation="http://maven.apache.org/POM/4.0.0 http://maven.apache.org/xsd/maven-4.0.0.xsd">

    <parent>

        <artifactId>A</artifactId>

        <groupId>com.zze</groupId>

        <version>1.0-SNAPSHOT</version>

        <relativePath>../A/pom.xml</relativePath>

    </parent>

    <modelVersion>4.0.0</modelVersion>

    <packaging>jar</packaging>

    <artifactId>B</artifactId>

</project>
pom.xml [B]
A 的 依赖会传递给B,此时就可以直接在子工程 B 中使用父工程 A 依赖了,这就是工程的继承。
聚合
创建工程 A,再创建工程 B 依赖工程 A:
<?xml version="1.0" encoding="UTF-8"?>

<project xmlns="http://maven.apache.org/POM/4.0.0"

         xmlns:xsi="http://www.w3.org/2001/XMLSchema-instance"

         xsi:schemaLocation="http://maven.apache.org/POM/4.0.0 http://maven.apache.org/xsd/maven-4.0.0.xsd">

    <modelVersion>4.0.0</modelVersion>

    <groupId>com.zze</groupId>

    <artifactId>A</artifactId>

    <version>1.0-SNAPSHOT</version>

    <dependencies>

        <dependency>

            <groupId>org.apache.struts</groupId>

            <artifactId>struts2-core</artifactId>

            <version>2.3.37</version>

        </dependency>

    </dependencies>

</project>
pom.xml [A]
<?xml version="1.0" encoding="UTF-8"?>

<project xmlns="http://maven.apache.org/POM/4.0.0"

         xmlns:xsi="http://www.w3.org/2001/XMLSchema-instance"

         xsi:schemaLocation="http://maven.apache.org/POM/4.0.0 http://maven.apache.org/xsd/maven-4.0.0.xsd">

    <modelVersion>4.0.0</modelVersion>

    <groupId>com.zze</groupId>

    <artifactId>B</artifactId>

    <version>1.0-SNAPSHOT</version>

    <dependencies>

        <dependency>

            <groupId>com.zze</groupId>

            <artifactId>A</artifactId>

            <version>1.0-SNAPSHOT</version>

        </dependency>

    </dependencies>

</project>
pom.xml [B]
此时 A 的依赖会传递给 B ,在工程 B 就可以直接使用工程 A 引入的依赖了,这就是工程的聚合。
IDEA中使用Maven
配置
1、快捷键 CTRL+ALT+S 打开 IDEA 设置,配置 Maven 地址:
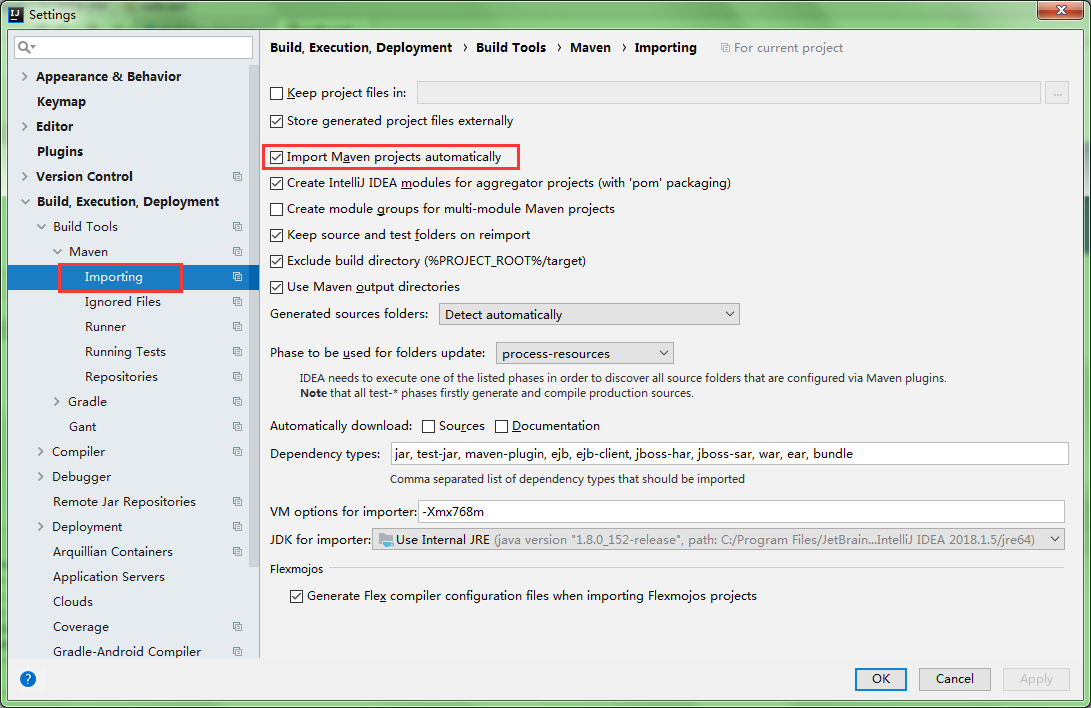
2、在 Importing 页中勾选如图项:
3、配置 Runner 页中属性 '-DarchetypeCatalog=internal',防止未联网情况不能创建 Maven 工程。

创建工程
创建java工程
1、新建项目,选中 Maven,直接 Next:

2、输入坐标,再次 Next:

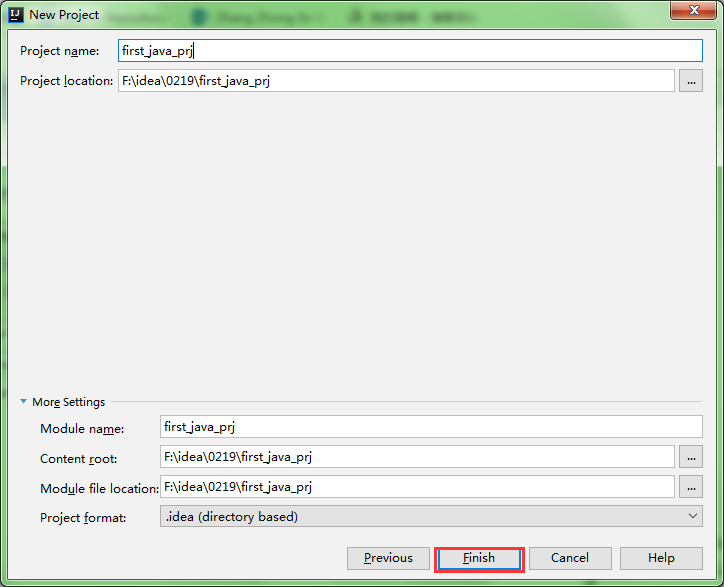
3、直接 Finish:
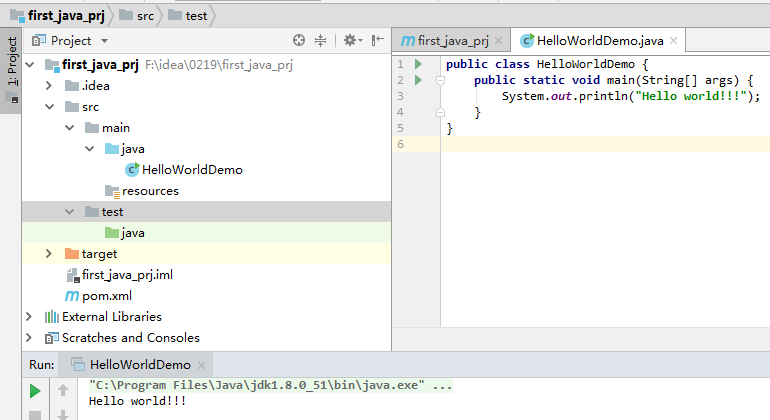
4、创建完成,编写代码测试:
创建web工程
1、新建项目,选中 Maven,如图选择 web 工程骨架,Next:
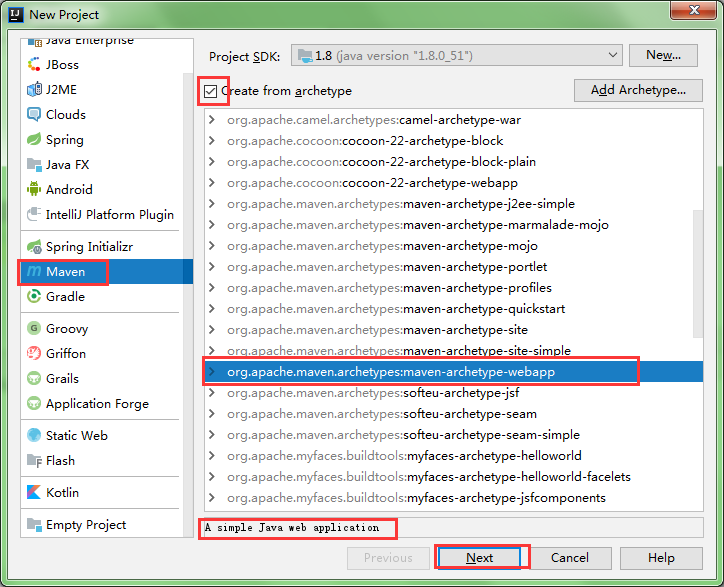
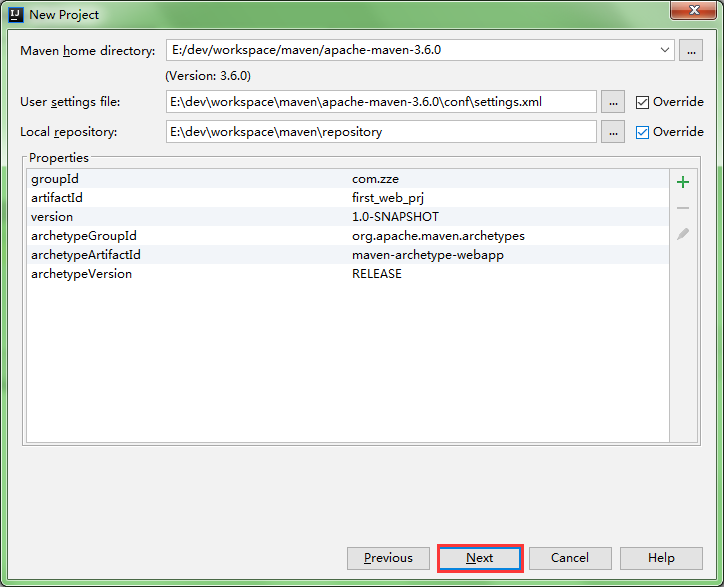
2、选择自己配置的 Maven 目录,Next:
3、直接 Finish:

4、输出如图则创建成功:

web项目的运行
准备
下面以运行一个 HelloWorld 程序为例:
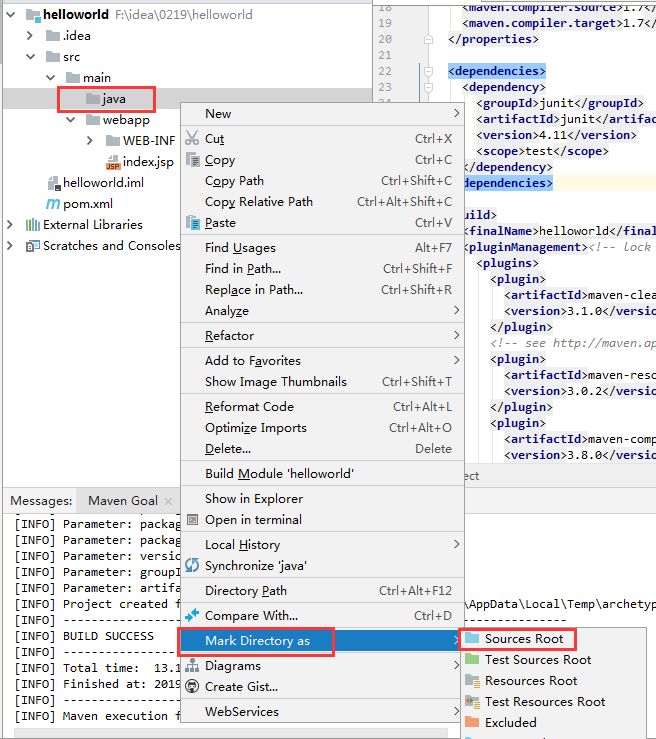
1、新建 web 项目,在 'src/main' 下 java 创建文件夹,并标记其为 Sources Root 文件夹,执行完这个操作后 java 文件夹就相当于普通工程的 classpath 根目录了。
2、在 pom 文件中引入 Servlet 开发依赖 jar:
<dependency>

  <groupId>javax.servlet</groupId>

  <artifactId>servlet-api</artifactId>

  <version>2.5</version>

  <scope>provided</scope>

</dependency>

<dependency>

  <groupId>javax.servlet.jsp</groupId>

  <artifactId>jsp-api</artifactId>

  <version>2.0</version>

  <scope>provided</scope>

</dependency>
注意:因为 maven web 工程后续运行时使用 maven 提供的 tomcat 环境,这里要设置引入 jar 的 scope 为 provided,否则会因为 jar 包重复出异常。
3、在 'src\main\java' 下创建 Servlet 如下:
package com.zze.servlet;

import javax.servlet.ServletException;

import javax.servlet.http.HttpServlet;

import javax.servlet.http.HttpServletRequest;

import javax.servlet.http.HttpServletResponse;

import java.io.IOException;

public class HelloServlet extends HttpServlet {

    protected void doGet(HttpServletRequest request, HttpServletResponse response) throws ServletException, IOException {

        response.getWriter().write("Hello world!!!");

    }

}
com.zze.servlet.HelloServlet
<servlet>

    <servlet-name>helloServlet</servlet-name>

    <servlet-class>com.zze.servlet.HelloServlet</servlet-class>

</servlet>

<servlet-mapping>

    <servlet-name>helloServlet</servlet-name>

    <url-pattern>/hello</url-pattern>

</servlet-mapping>
WEB-INF/web.xml
运行方式一:命令运行
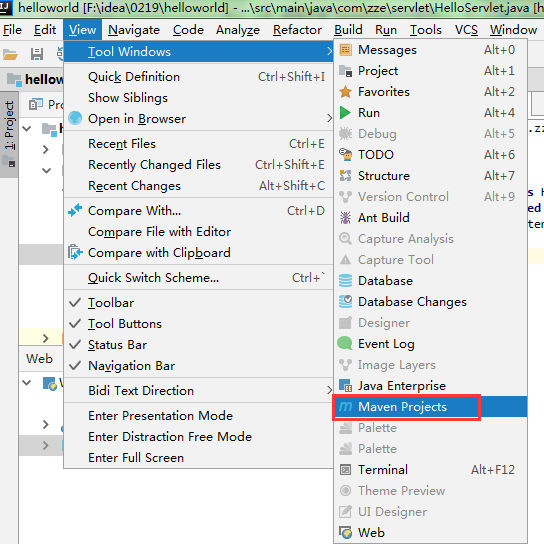
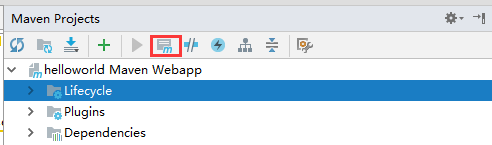
1、打开 MavenProjects 窗口:
2、点击如图按钮:
3、输入 'tomcat:run' 指令,Execute:
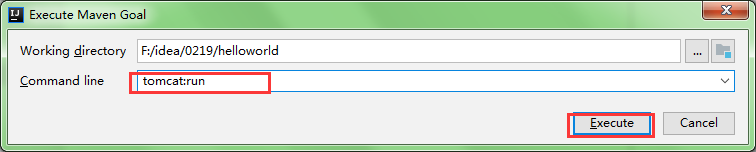
4、此时项目就以被部署到 tomcat 并运行:

5、访问 'localhost:8080/helloworld/hello' 测试:

运行方式二:配置运行
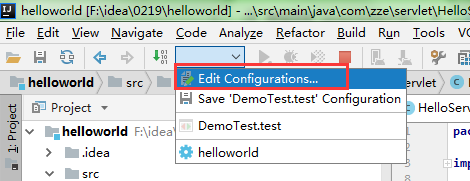
1、进入 Edit Configurations:
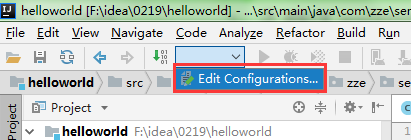
2、选择 Maven:

3、输入如下,Apply:

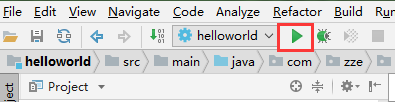
4、此时就可直接点击该图标启动项目了:
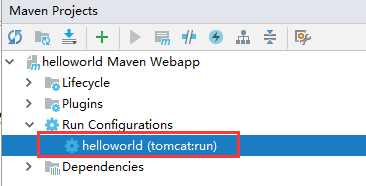
5、还可在 Maven Projects 窗口中双击该配置启动:
运行方式三:本地Tomcat运行
1、进入 Edit Configurations:
2、选择 Tomcat 下的 Local 项:

3、选择 Deployment 栏,点击 + 号:

3、选择 Artifact:
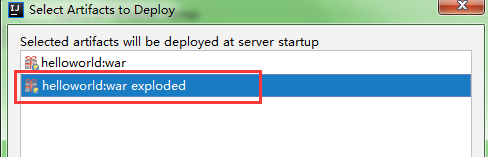
4、选择 war exploded 结尾项:

5、OK,接下来就可以像运行普通 web 工程一样启动 maven 项目:


补充
配置国内仓库源
在 "conf/settings.xml" 文件中的 mirrors 节下选下面一个节点添加即可:
<mirror>

  <id>alimaven</id>

  <name>aliyun maven</name>

  <url>http://maven.aliyun.com/nexus/content/groups/public/</url>

  <mirrorOf>central</mirrorOf>

</mirror>
阿里云
<mirror>

    <id>jboss-public-repository-group</id>

    <mirrorOf>central</mirrorOf>

    <name>JBoss Public Repository Group</name>

    <url>http://repository.jboss.org/nexus/content/groups/public</url>

</mirror>
jboss
配置Tomcat插件
<!--使用 tomcat7:run-->

<plugin>

  <groupId>org.apache.tomcat.maven</groupId>

  <artifactId>tomcat7-maven-plugin</artifactId>

  <version>2.2</version>

  <configuration>

    <port>8080</port>

    <path>/</path>

  </configuration>

</plugin>
聚合工程整合SSH示例

IDEA创建Maven工程常用骨架
下面是我习惯使用的骨架:
创建普通 java 工程:不使用骨架;
创建父工程:maven-archetype-site-simple;
创建 web 工程:maven-archetype-webapp;
java之IDEA中使用Maven的更多相关文章
- Java web项目中新建maven项目出现的问题
1.首先新建maven项目,新建Maven时出现了版本问题,报错 第一个错误:jdk版本与project facets不匹配(大概是这样,忘记截图了),那么解决办法是: 在项目右击--->Pro ...
- Java 在windows中配置Maven环境和阿里云镜像
目录 1. 下载Maven 2. 配置环境变量 3. 配置镜像 4. 配置本地仓库 1. 下载Maven 官网:https://maven.apache.org/ 下载:apache-maven-3. ...
- 在Eclipse中使用Maven插件 博客分类: Java相关技术
简介 本文介绍如何在Eclipse中通过maven插件编写java项目和web项目. 安装Maven 下载Maven最新版本,见:maven.apache.org/download.html 当前版本 ...
- eclipse中使用Maven管理java工程设置jdk版本为jdk1.8
使用Maven管理Java工程时,maven可以自动下载工程中依赖的jar包,这对于大型的项目非常方便.但在初次使用eclipse新建maven工程时遇到一些问题,我的jdk安装的是1.8版本,在配置 ...
- Java全栈程序员之07:IDEA中使用MAVEN构架生产级的Web项目
在上一篇我们介绍了如何在IDEA中使用MAVEN,以及如何创建依赖等.那么在这一篇中,我们就试图搭建一个生产级的解决方案,大家可以使用这个解决方案作为骨架代码来搭建自己的开发环境. 在这里,我们要完成 ...
- idea/ecipse中使用maven集成springmvc相关jar包时候,出错:java.lang.ClassNotFoundException: org.springframework.web.servlet.DispatcherServlet
参考stackoverflow:https://stackoverflow.com/questions/11227395/java-lang-classnotfoundexception-org-sp ...
- Java 笔记——在 IDEA 中使用 Maven 配置和使用 MyBatis
1.前言 MyBatis 是什么? MyBatis 是一款优秀的持久层框架,它支持定制化 SQL.存储过程以及高级映射. MyBatis 避免了几乎所有的 JDBC 代码和手动设置参数以及获取结果集. ...
- Java归去来第4集:java实战之Eclipse中创建Maven类型的SSM项目
一.前言 如果还不了解剧情,请返回第3集的剧情 Java归去来第3集:Eclipse中给动态模块升级 二.在Eclipse中创建Maven类型的SSM项目 2.1:SSM简介 SSM ...
- 【maven】【IDEA】idea中使用maven编译项目,报错java: 错误: 找不到符号 【2】
=================================================================================== idea中使用maven编译项目 ...
随机推荐
- jQuery(三) javascript跨域问题(JSONP解决)
加油~ --WH 一.什么是javascript跨域问题? 域:服务器域名,唯一标识(协议,域名,端口)必须保证一致,说明域相同 跨域:在一个服务器上,去访问另一个服务器上,并且得到另一个服务器返回回 ...
- [docker]通过阿里云源安装docker && flannel不通问题解决(try this guy out)
docker清理容器 # 容器停止后就自动删除: docker run --rm centos /bin/echo "One"; # 杀死所有正在运行的容器: docker kil ...
- bootstrapTable treegrid的使用
最近打算自己弄一个后台,在整顿树形插件的时候,遇到问题,bootstrapTable treegrid最开始是怎么都显示不了树形,然后是数据出不来, 现在来记录下. 问题1:最开始怎么都显示不出来的问 ...
- go语言fallthrough的用法心得
fallthrough:Go里面switch默认相当于每个case最后带有break,匹配成功后不会自动向下执行其他case,而是跳出整个switch, 但是可以使用fallthrough强制执行后面 ...
- GeForce GTX 1080 ti安装记录
安装GeForce GTX 1080ti 安装GeForce GTX 1080ti,8+8pin需要全接,接4pin就开机显示器上会提示电源线没接完,将显示器线接在显卡上. 设置Win 10 pro ...
- Swagger UI 与SpringMVC的整合
关于 Swagger Swagger能成为最受欢迎的REST APIs文档生成工具之一,有以下几个原因: Swagger 可以生成一个具有互动性的API控制台,开发者可以用来快速学习和尝试API. S ...
- ReentrantLock可重入锁的理解和源码简单分析
import java.util.concurrent.TimeUnit; import java.util.concurrent.locks.ReentrantLock; /** * @author ...
- 同时使用Union和Order by问题(ORA-00933错误)解决
之前,同事在编写视图的过程中遇到这样了这个错误.我把简化后的语句整理如下: 1: select 2: '2016' as nf, 3: qxdm, 4: round(sum(tbdlmj)/10000 ...
- cdh 安装调研
解决:No module named site http://blog.csdn.net/amgang/article/details/7030642 因为安装greenplum导致yum报如下错误: ...
- js 注意
1.如果想要动态加清除浮动的代码,可以这样做: document.getElementById("mainBody").innerHTML += "<div sty ...