android 之TCP客户端编程
补充,由于这篇文章是自己入门的时候写的,随着Android系统的升级可能有发送需要在任务
中进行,如有问题请百度 thread
或者看下面链接的文章
https://www.cnblogs.com/yangfengwu/category/1187355.html

吸取教训!!!本来花了5个小时写完了,没想到,,,因为没点上面的自动保存查看一下,全没了,重新写呗
关于网络通信:每一台电脑都有自己的ip地址,每台电脑上的网络应用程序都有自己的通信端口,张三的电脑(ip:192.168.1.110)上有一个网络应用程序A(通信端口5000),李四的电脑(ip:192.168.1.220)上有一个网络应用程序B(通信端口8000),张三给李四发消息,首先你要知道李四的ip地址,向指定的ip(李四ip:192.168.1.220)发信息,信息就发到了李四的电脑。再指定一下发送的端口号(通信端口8000),信息就发到了李四电脑的网络应用程序B上。
TCP--一种网络通信方式而已。分为服务器(网络应用程序)和客户端(网络应用程序),TCP通信过程,首先打开服务器,监听自己的网络通信端口(假设为9000),打开客户端,设置好要连接的ip地址和服务器的网络通信端口(9000),这样服务器一旦监听到网络通信端口有连接,二者就建立了连接。
好一步一步写程序(最后有源码!!!!!!!)
怎样建立工程就不说了,本来写好了并贴了图,网络一有问题全没了。抱怨一下,博客传图片真麻烦。竟然不支持复制 粘贴。各位朋友有什么方便的方法请告知。
在布局文件里加入两个按钮(button),一个控制连接,一个控制发送消息;四个输入文本框(edittext),一个填写发送的信息内容,一个显示服务器发来的消息。一个填写要链接的ip地址,一个填写要链接的端口号
布局代码
<RelativeLayout xmlns:android="http://schemas.android.com/apk/res/android"
xmlns:tools="http://schemas.android.com/tools"
android:layout_width="match_parent"
android:layout_height="match_parent"
android:paddingBottom="@dimen/activity_vertical_margin"
android:paddingLeft="@dimen/activity_horizontal_margin"
android:paddingRight="@dimen/activity_horizontal_margin"
android:paddingTop="@dimen/activity_vertical_margin"
tools:context="com.wifi123.MainActivity" >以上都不用管的,软件自动生成的,配置界面的
<!--显示的标题:目标IP地址-->
<TextView
android:textSize="20dp"字体大小
android:id="@+id/IP_tv" id号
android:text="目标IP地址" 显示的内容
android:layout_width="wrap_content" 宽度随内容而定
android:layout_height="wrap_content" 高度度随内容而定
/>
<!--显示的标题:目标端口号-->
<TextView
android:textSize="20dp"
android:id="@+id/Port_tv"
android:text="目标端口号"
android:layout_width="wrap_content"
android:layout_height="wrap_content"
android:layout_below="@id/IP_tv" 在<!--显示的标题:目标IP地址-->的下面
android:layout_marginTop="30dp" 离它上面那个组件(<!--显示的标题:目标IP地址-->)的距离
/>
<!-- 用于填写ip地址的文本框-->
<EditText
android:text="192.168.4.1"
android:id="@+id/ip_ET"
android:layout_width="wrap_content"
android:layout_height="wrap_content"
android:layout_toRightOf="@id/IP_tv" 在<!--显示的标题:目标IP地址-->的右面
/>
<!-- 用于填写端口号的文本框-->
<EditText
android:text="8080"
android:id="@+id/Port_ET"
android:layout_width="wrap_content"
android:layout_height="wrap_content"
android:layout_toRightOf="@id/Port_tv" 还是在谁谁谁的右面
android:layout_alignBottom="@id/Port_tv" 本元素的下边缘和某元素的的下边缘对齐
/>
<!-- 用于发送信息的文本框-->
<EditText
android:id="@+id/Send_ET"
android:layout_width="match_parent"
android:layout_height="wrap_content"
android:layout_below="@id/Port_tv" 在某元素的下方
/>
<!-- 用于连接的按钮-->
<Button
android:text="连接"
android:id="@+id/Connect_Bt"
android:layout_width="wrap_content"
android:layout_height="wrap_content"
android:onClick="Connect_onClick"设置按钮的动作监听函数,其实有几种写法,就用最简单的一种
android:layout_below="@id/Send_ET" 在某元素的下方
/>
<!-- 用于发送信息的按钮-->
<Button
android:text="发送"
android:id="@+id/Send_Bt"
android:layout_width="wrap_content"
android:layout_height="wrap_content"
android:onClick="Send_onClick"
android:layout_below="@id/Send_ET"
android:layout_alignParentRight="true" 贴紧父元素的右边缘,指的是整体的界面
/>
<!-- 用于接收信息的文本框-->
<EditText
android:background="@android:color/darker_gray"
android:id="@+id/Receive_ET"
android:layout_width="match_parent"
android:layout_height="wrap_content"
android:layout_below="@id/Connect_Bt"
android:layout_alignParentBottom="true" 贴紧父元素的下边缘
/>
</RelativeLayout>
看看布局界面
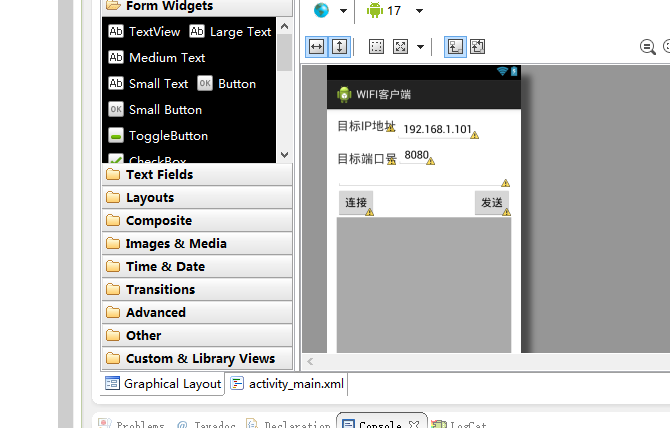
接着开始编写功能程序
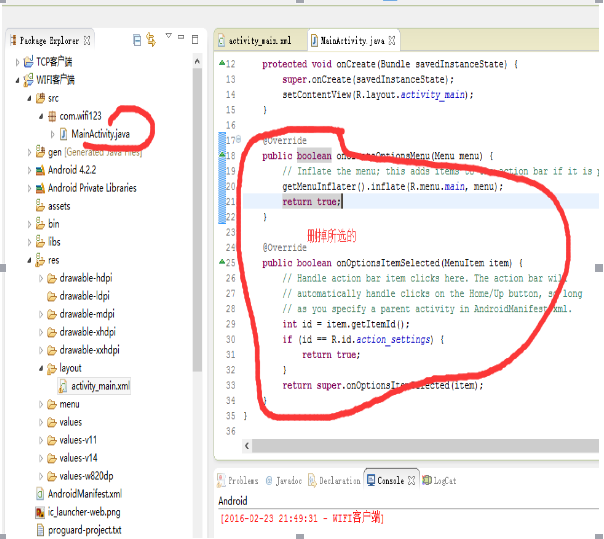
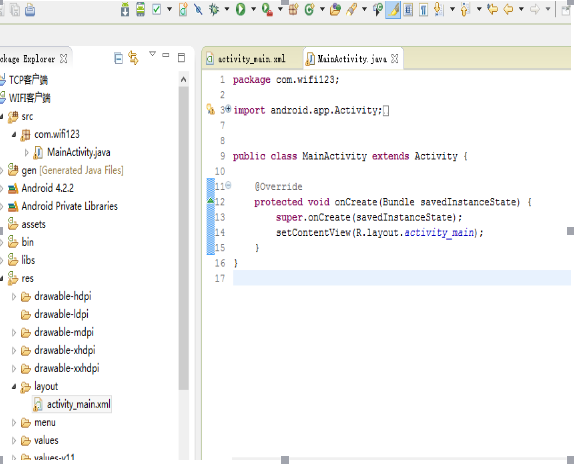
先做点击连接按钮就连接服务器
查看java的API文档,里面封装了专门用于TCP客户端通信的类,和方法
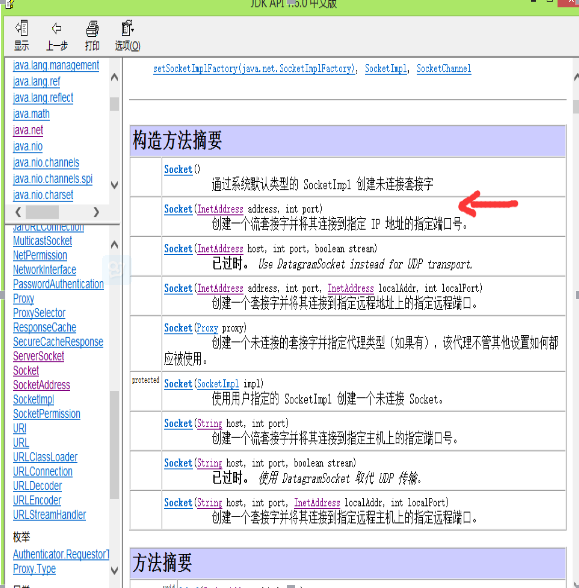
里面有一个类Socket (客服端),有一个它的构造方法
Socket(InetAddress address, int port)
创建一个流套接字并将其连接到指定 IP 地址的指定端口号。
意思是Socket socket = new Socket(InetAddress address, int port) ;//创建连接地址和端口,就去连接指定的ip和端口号去了,address填ip地址,port填端口号
只不过InetAddress是一个类,我们打开看一下
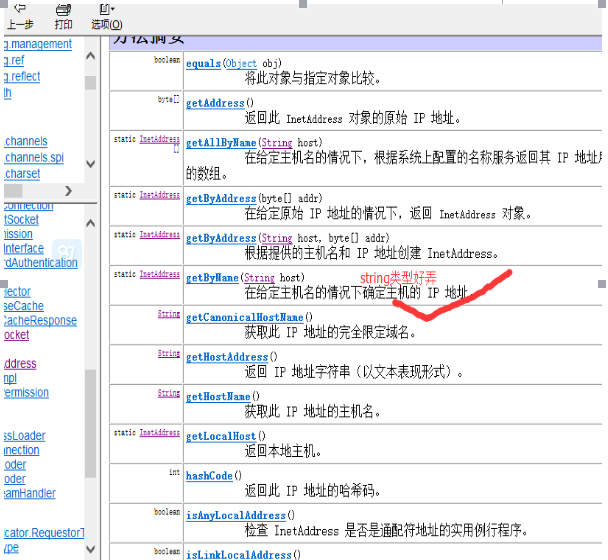
那么
InetAddress ipAddress = InetAddress.getByName("192.168.4.1");
socket = new Socket(ipAddress, 8080);//创建连接地址和端口--------------就完了,客户端就去连接了
但是ip地址和端口被我们定死了,,,,可不好玩,我们就设置成获取ip文本框中的ip,端口号文本框中的端口号
InetAddress ipAddress = InetAddress.getByName(IPEditText.getText().toString());
int port =Integer.valueOf(PortText.getText().toString());//获取端口号
socket = new Socket(ipAddress, port);//创建连接地址和端口-------------------这样就好多了
但是由于在android几开始,不允许在主线程里连接服务器,所以只好让按钮点击后启动一个线程里面写上面的东西
package com.wifi123;
import java.net.InetAddress;
import java.net.Socket;
import java.net.UnknownHostException;
import android.app.Activity;
import android.os.Bundle;
import android.view.Menu;
import android.view.MenuItem;
import android.view.View;
import android.widget.Button;
import android.widget.EditText;
import android.widget.Toast;
public class MainActivity extends Activity {
Button ConnectButton;//定义连接按钮
Button SendButton;//定义发送按钮
EditText IPEditText;//定义ip输入框
EditText PortText;//定义端口输入框
EditText MsgText;//定义信息输出框
EditText RrceiveText;//定义信息输入框
Socket socket = null;//定义socket
@Override
protected void onCreate(Bundle savedInstanceState) {
super.onCreate(savedInstanceState);
setContentView(R.layout.activity_main);
ConnectButton = (Button) findViewById(R.id.Connect_Bt);//获得按钮对象
SendButton = (Button) findViewById(R.id.Send_Bt);//获得按钮对象
IPEditText = (EditText) findViewById(R.id.ip_ET);//获得ip文本框对象
PortText = (EditText) findViewById(R.id.Port_ET);//获得端口文本框按钮对象
}
public void Connect_onClick(View v) {
//启动连接线程
Connect_Thread connect_Thread = new Connect_Thread();
connect_Thread.start();
}
class Connect_Thread extends Thread//继承Thread
{
public void run()//重写run方法
{
try
{
if (socket == null) //如果已经连接上了,就不再执行连接程序
{
//用InetAddress方法获取ip地址
InetAddress ipAddress = InetAddress.getByName(IPEditText.getText().toString());
int port =Integer.valueOf(PortText.getText().toString());//获取端口号
socket = new Socket(ipAddress, port);//创建连接地址和端口-------------------这样就好多了
}
}
catch (Exception e)
{
// TODO Auto-generated catch block
e.printStackTrace();
}
}
}
}
对了需要添加两个权限,一个是wifi权限,一个是internet
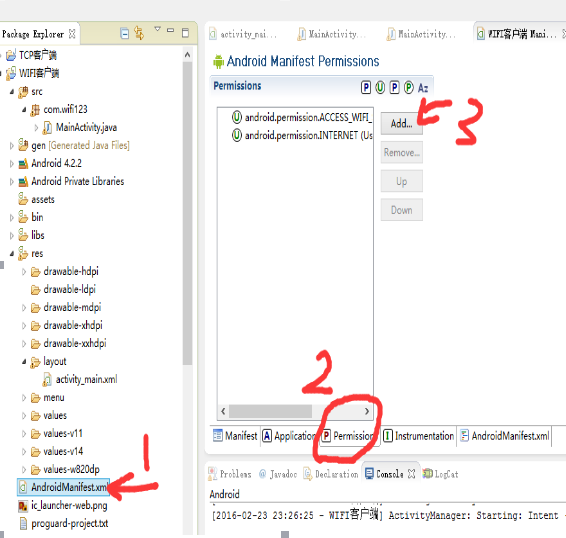

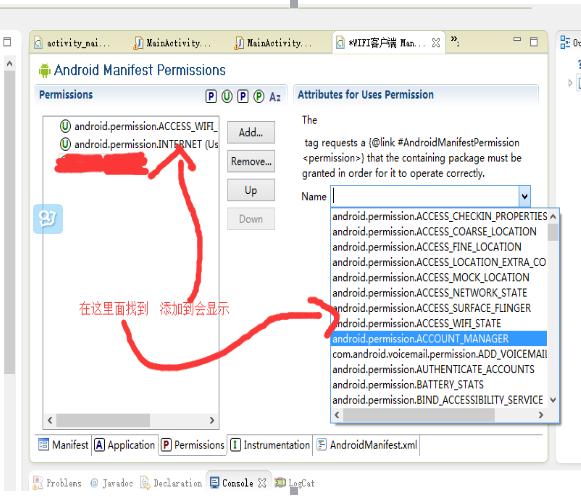

然后下载到手机因为我的电脑的ip为192.168.1.101,所以我把192.168.4.1改了,192.168.4.1是为了做与wifi模块EPS8266通信使得

然后打开网络调试助手,点击连接(可以关闭电脑防火墙),然后点击手机上的连接

好接着,连接按钮按一下连接,再按一下断开连接,并且,连接后按钮上显示断开,断开后按钮上显示连接
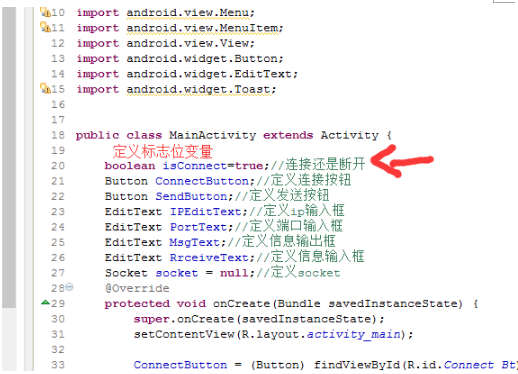
按钮事件改为
public void Connect_onClick(View v) {
if (isConnect == true) //标志位 = true表示连接
{
isConnect = false;//置为false
ConnectButton.setText("断开");//按钮上显示--断开
//启动连接线程
Connect_Thread connect_Thread = new Connect_Thread();
connect_Thread.start();
}
else //标志位 = false表示退出连接
{
isConnect = true;//置为true
ConnectButton.setText("连接");//按钮上显示连接
try
{
socket.close();//关闭连接
socket=null;
}
catch (IOException e)
{
// TODO Auto-generated catch block
e.printStackTrace();
}
}
}
你可以试一试了
接着写点击发送按钮把发送信息文本框的内容发送出去

先贴代码
public void Send_onClick(View v) {
try
{
//获取输出流
outputStream = socket.getOutputStream();
//发送数据
outputStream.write(MsgEditText.getText().toString().getBytes());
//outputStream.write("0".getBytes());
}
catch (Exception e)
{
// TODO Auto-generated catch block
e.printStackTrace();
}
}
看看javaAPI
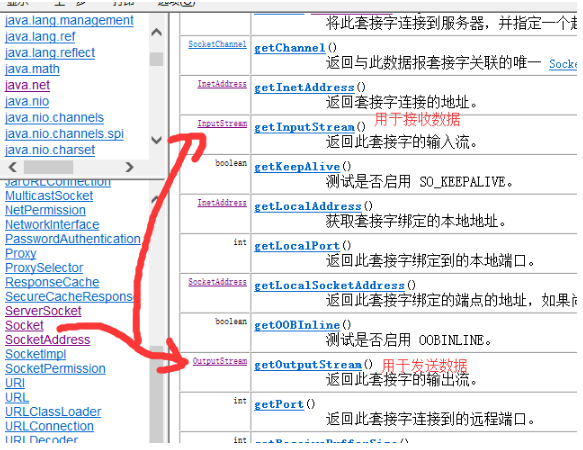
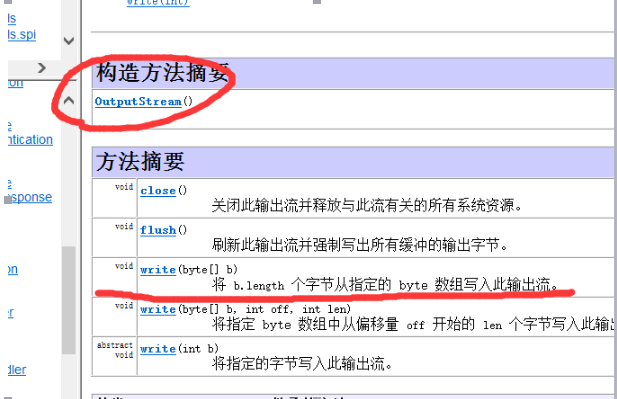
所以才有了
//获取输出流
OutputStream outputStream = socket.getOutputStream();
//发送数据
outputStream.write(MsgEditText.getText().toString().getBytes());


接收数据并在信息框显示出来
创建一个接收线程,在连接线程成功建立连接后启动接收线程
//接收线程
class Receive_Thread extends Thread
{
public void run()//重写run方法
{
try
{
while (true)
{
final byte[] buffer = new byte[1024];//创建接收缓冲区
inputStream = socket.getInputStream();
final int len = inputStream.read(buffer);//数据读出来,并且返回数据的长度
runOnUiThread(new Runnable()//不允许其他线程直接操作组件,用提供的此方法可以
{
public void run()
{
// TODO Auto-generated method stub
RrceiveEditText.setText(new String(buffer,0,len));
}
});
}
}
catch (IOException e)
{
// TODO Auto-generated catch block
e.printStackTrace();
}
}
}
//连接线程
class Connect_Thread extends Thread//继承Thread
{
public void run()//重写run方法
{
try
{
if (socket == null)
{
//用InetAddress方法获取ip地址
InetAddress ipAddress = InetAddress.getByName(IPEditText.getText().toString());
int port =Integer.valueOf(PortText.getText().toString());//获取端口号
socket = new Socket(ipAddress, port);//创建连接地址和端口-------------------这样就好多了
//在创建完连接后启动接收线程
Receive_Thread receive_Thread = new Receive_Thread();
receive_Thread.start();
}
}
catch (Exception e)
{
// TODO Auto-generated catch block
e.printStackTrace();
}
}
}
下面贴全部源码
activity_mian.xml源码
<RelativeLayout xmlns:android="http://schemas.android.com/apk/res/android"
xmlns:tools="http://schemas.android.com/tools"
android:layout_width="match_parent"
android:layout_height="match_parent"
android:paddingBottom="@dimen/activity_vertical_margin"
android:paddingLeft="@dimen/activity_horizontal_margin"
android:paddingRight="@dimen/activity_horizontal_margin"
android:paddingTop="@dimen/activity_vertical_margin"
tools:context="com.wifi123.MainActivity" >
<!--显示的标题:目标IP地址-->
<TextView
android:textSize="20dp"
android:id="@+id/IP_tv"
android:text="目标IP地址"
android:layout_width="wrap_content"
android:layout_height="wrap_content"
/>
<!--显示的标题:目标端口号-->
<TextView
android:textSize="20dp"
android:id="@+id/Port_tv"
android:text="目标端口号"
android:layout_width="wrap_content"
android:layout_height="wrap_content"
android:layout_below="@id/IP_tv"
android:layout_marginTop="30dp"
/>
<!-- 用于填写ip地址的文本框-->
<EditText
android:text="192.168.1.101"
android:id="@+id/ip_ET"
android:layout_width="wrap_content"
android:layout_height="wrap_content"
android:layout_toRightOf="@id/IP_tv"
/>
<!-- 用于填写端口号的文本框-->
<EditText
android:text="8080"
android:id="@+id/Port_ET"
android:layout_width="wrap_content"
android:layout_height="wrap_content"
android:layout_toRightOf="@id/Port_tv"
android:layout_alignBottom="@id/Port_tv"
/>
<!-- 用于发送信息的文本框-->
<EditText
android:id="@+id/Send_ET"
android:layout_width="match_parent"
android:layout_height="wrap_content"
android:layout_below="@id/Port_tv"
/>
<!-- 用于连接的按钮-->
<Button
android:text="连接"
android:id="@+id/Connect_Bt"
android:layout_width="wrap_content"
android:layout_height="wrap_content"
android:onClick="Connect_onClick"
android:layout_below="@id/Send_ET"
/>
<!-- 用于发送信息的按钮-->
<Button
android:text="发送"
android:id="@+id/Send_Bt"
android:layout_width="wrap_content"
android:layout_height="wrap_content"
android:onClick="Send_onClick"
android:layout_below="@id/Send_ET"
android:layout_alignParentRight="true"
/>
<!-- 用于接收信息的文本框-->
<EditText
android:background="@android:color/darker_gray"
android:id="@+id/Receive_ET"
android:layout_width="match_parent"
android:layout_height="wrap_content"
android:layout_below="@id/Connect_Bt"
android:layout_alignParentBottom="true"
/>
</RelativeLayout>
MainActivity.java源码
package com.wifi123;
import java.io.IOException;
import java.io.InputStream;
import java.io.OutputStream;
import java.net.InetAddress;
import java.net.Socket;
import java.net.UnknownHostException;
import android.app.Activity;
import android.os.Bundle;
import android.view.Menu;
import android.view.MenuItem;
import android.view.View;
import android.widget.Button;
import android.widget.EditText;
import android.widget.Toast;
public class MainActivity extends Activity {
boolean isConnect=true;//连接还是断开
Button ConnectButton;//定义连接按钮
Button SendButton;//定义发送按钮
EditText IPEditText;//定义ip输入框
EditText PortText;//定义端口输入框
EditText MsgEditText;//定义信息输出框
EditText RrceiveEditText;//定义信息输入框
Socket socket = null;//定义socket
private OutputStream outputStream=null;//定义输出流
private InputStream inputStream=null;//定义输入流
@Override
protected void onCreate(Bundle savedInstanceState) {
super.onCreate(savedInstanceState);
setContentView(R.layout.activity_main);
ConnectButton = (Button) findViewById(R.id.Connect_Bt);//获得连接按钮对象
SendButton = (Button) findViewById(R.id.Send_Bt);//获得发送按钮对象
IPEditText = (EditText) findViewById(R.id.ip_ET);//获得ip文本框对象
PortText = (EditText) findViewById(R.id.Port_ET);//获得端口文本框按钮对象
MsgEditText = (EditText) findViewById(R.id.Send_ET);//获得发送消息文本框对象
RrceiveEditText = (EditText) findViewById(R.id.Receive_ET);//获得接收消息文本框对象
}
public void Connect_onClick(View v) {
if (isConnect == true) //标志位 = true表示连接
{
isConnect = false;//置为false
ConnectButton.setText("断开");//按钮上显示--断开
//启动连接线程
Connect_Thread connect_Thread = new Connect_Thread();
connect_Thread.start();
}
else //标志位 = false表示退出连接
{
isConnect = true;//置为true
ConnectButton.setText("连接");//按钮上显示连接
try
{
socket.close();//关闭连接
socket=null;
}
catch (IOException e)
{
// TODO Auto-generated catch block
e.printStackTrace();
}
}
}
public void Send_onClick(View v) {
try
{
//获取输出流
outputStream = socket.getOutputStream();
//发送数据
outputStream.write(MsgEditText.getText().toString().getBytes());
//outputStream.write("0".getBytes());
}
catch (Exception e)
{
// TODO Auto-generated catch block
e.printStackTrace();
}
}
//连接线程
class Connect_Thread extends Thread//继承Thread
{
public void run()//重写run方法
{
try
{
if (socket == null)
{
//用InetAddress方法获取ip地址
InetAddress ipAddress = InetAddress.getByName(IPEditText.getText().toString());
int port =Integer.valueOf(PortText.getText().toString());//获取端口号
socket = new Socket(ipAddress, port);//创建连接地址和端口-------------------这样就好多了
//在创建完连接后启动接收线程
Receive_Thread receive_Thread = new Receive_Thread();
receive_Thread.start();
}
}
catch (Exception e)
{
// TODO Auto-generated catch block
e.printStackTrace();
}
}
}
//接收线程
class Receive_Thread extends Thread
{
public void run()//重写run方法
{
try
{
while (true)
{
final byte[] buffer = new byte[1024];//创建接收缓冲区
inputStream = socket.getInputStream();
final int len = inputStream.read(buffer);//数据读出来,并且返回数据的长度
runOnUiThread(new Runnable()//不允许其他线程直接操作组件,用提供的此方法可以
{
public void run()
{
// TODO Auto-generated method stub
RrceiveEditText.setText(new String(buffer,0,len));
}
});
}
}
catch (IOException e)
{
// TODO Auto-generated catch block
e.printStackTrace();
}
}
}
}
android 之TCP客户端编程的更多相关文章
- Android之TCP服务器编程
推荐一个学java或C++的网站http://www.weixueyuan.net/,本来想自己学了总结出来再写博客,现在没时间,打字太慢!!!!,又想让这好东西让许多人知道. 关于网络通信:每一台电 ...
- TCP 客户端编程
1.Qt中TCP客户端编程 对Qt编程而言,网络只是数据传输的通道: Qt提供了QTcpSocket类(封装了TCP协议细节): 将QTcpSocket的对象当做黑盒使用,进行数据首发. 1.1QTc ...
- android之TCP客户端框架
一.程序框架 1.1 创建方法 onCreate 1.1.1 创建连接按键线程,并使能线程(触发原因:可按键.其他操作,并进行状态判断): Connect_Thread connect_Thread ...
- python网络编程socketserver模块(实现TCP客户端/服务器)
摘录python核心编程 socketserver(python3.x版本重新命名)是标准库中的网络编程的高级模块.通过将创建网络客户端和服务器所必须的代码封装起来,简化了模板,为你提供了各种各样的类 ...
- 24-ESP8266 SDK开发基础入门篇--Android TCP客户端.控制 Wi-Fi输出PWM的占空比,调节LED亮度
https://www.cnblogs.com/yangfengwu/p/11204436.html 刚才有人说需要点鸡汤.... 我想想哈;我还没问关于哪方面的鸡汤呢!!! 我所一直走的路线 第一: ...
- 23-ESP8266 SDK开发基础入门篇--编写Android TCP客户端 , 加入消息处理
https://www.cnblogs.com/yangfengwu/p/11203546.html 先做接收消息 然后接着 public class MainActivity extends App ...
- 系统编程-网络-tcp客户端服务器编程模型(续)、连接断开、获取连接状态场景
相关博文: 系统编程-网络-tcp客户端服务器编程模型.socket.htons.inet_ntop等各API详解.使用telnet测试基本服务器功能 接着该上篇博文,咱们继续,首先,为了内容的完整性 ...
- --系统编程-网络-tcp客户端服务器编程模型、socket、htons、inet_ntop等各API详解、使用telnet测试基本服务器功能
PART1 基础知识 1. 字节序 网络字节序是大端字节序(低地址存放更高位的字节), 所以,对于字节序为小端的机器需要收发网络数据的场景,要对这些数据进行字节序转换. 字节序转换函数,常用的有四个: ...
- Python--网络编程学习笔记系列02 附:tcp服务端,tcp客户端
Python--网络编程学习笔记系列02 TCP和UDP的概述: udp通信模型类似于写信,不需要建立相关链接,只需要发送数据即可(现在几乎不用:不稳定,不安全) tcp通信模型类似于打电话,一定要建 ...
随机推荐
- video自动禁止全屏
在微信浏览器.苹果等其他浏览器,里面使用video标签,会自动变成全屏,改成下面就好了,起码可以在video标签之上加入其他元素 webkit-playsinline playsinline x ...
- win7 x64 +vs2015 + cmake3.10.3编译opencv-3.4.1+opencv_contrib-3.4.1源码,并进行配置
简介: 一直以来都是在ubuntu下使用opencv,最近因为有<图像处理与模式识别>这门课,需要使用vs2015+opencv提交课程作业,因为opencv官方编译好的exe没有cont ...
- WebGL学习笔记(一)
作者:朱金灿 来源:http://blog.csdn.net/clever101 (一)WebGL是什么? WebGL是一门在网页上显示三维图形的技术,你可以把它理解为把OpenGL从C/S端搬到了B ...
- 利用火车头采集A67手机电影教程一
今天将讲述:利用火车头采集A67手机电影,并导入到网站中,如果你要更多更快的教程,请访问:http://www.it28.cn/category-191.html 现在以A67中的电影中的动作片为例: ...
- Visualforce简介
Visualforce Visualforce是一个和Apex语言相匹配的开发框架.开发者可以使用Visualforce和Apex建立自定义网络应用程序. Visualforce的基本功能类似于前端框 ...
- 安卓开发_浅谈Fragment之ListFragment
ListFragment,即Fragment的一个子类,当我们用的一个Fragment只需要一个listview视图的时候使用 该类有几个特点: 1.ListFragment 本身具只有一个ListV ...
- 创建Android Apps的30个经验教训
这个世界上有两种人-从经验教训中学习的人以及听从别人建议的人.这里是我一路走来学到的一些东西,分享给大家: 在添加任何第三方party之前,请三思:这真的是一个成熟的项目吗? 如果一个东西用户看不到, ...
- Ubuntu16下配置支持Windows访问的samba共享
一.安装Ubuntu samba服务器 $ sudo apt-get install samba $ sudo apt-get install smbclient # Linux客户端测试用 二.创建 ...
- 《R数据挖掘入门》彩色插图(第9章)
图9.5 图9.9
- weblogic系列漏洞整理 -- 4. weblogic XMLDecoder 反序列化漏洞(CVE-2017-10271、CVE-2017-3506)
目录 四. weblogic XMLDecoder 反序列化漏洞(CVE-2017-10271) 0. 漏洞分析 1. 利用过程 2. 修复建议 一.weblogic安装 http://www.cnb ...
