使用docker compose编排容器
一、安装docker compose
二进制包安装
1、安装 Docker Compose 从 官方 GitHub Release 处直接下载编译好的二进制文件即可
# curl -L https://github.com/docker/compose/releases/download/1.8.0/docker-compose-`uname -s`-`uname -m` > /usr/local/bin/docker-compose
[root@bogon ~]# curl -L https://github.com/docker/compose/releases/download/1.8.0/docker-compose-`uname -s`-`uname -m` > /usr/local/bin/docker-compose

  % Total    % Received % Xferd  Average Speed   Time    Time     Time  Current

                                 Dload  Upload   Total   Spent    Left  Speed

                              --:--:--  :: --:--:--

 7783k   7783k            471k        ::  :: --:--:-- 1484k

[root@bogon ~]#

[root@bogon ~]# cd /usr/local/bin/

[root@bogon bin]#

[root@bogon bin]# ls

docker-compose

[root@bogon bin]# ll

total

-rw-r--r--.  root root  Apr   : docker-compose

[root@bogon bin]#
2、并为安装脚本添加执行权限
# chmod 755 docker-compose
[root@bogon bin]# chmod  docker-compose

[root@bogon bin]#

[root@bogon bin]# ll

total

-rwxr-xr-x.  root root  Apr   : docker-compose

[root@bogon bin]#
3、查看安装是否成功
# docker-compose -v
[root@bogon bin]# docker-compose -v

docker-compose version 1.8., build f3628c7
4、对于卸载如果是二进制包方式安装的,删除二进制文件即可。
# rm -rf /usr/local/bin/docker-compose
二、使用docker-compose
1、为项目创建一个目录
# mkdir composetest
# cd composetest/
[root@localhost ~]# mkdir composetest

[root@localhost ~]#

[root@localhost ~]# cd composetest/

[root@localhost composetest]#
2、创建一个app.py在项目目录中调用的文件:
# vi app.py
[root@localhost composetest]# vi app.py

import time

import redis

from flask import Flask

app = Flask(__name__)

cache = redis.Redis(host='redis', port=)

def get_hit_count():

    retries =

    while True:

        try:

            return cache.incr('hits')

        except redis.exceptions.ConnectionError as exc:

            if retries == :

                raise exc

            retries -=

            time.sleep(0.5)

@app.route('/')

def hello():

    count = get_hit_count()

    return 'Hello World! I have been seen {} times.\n'.format(count)

if __name__ == "__main__":

    app.run(host="0.0.0.0", debug=True)
redis是应用程序网络上redis容器的主机名。我们使用Redis的默认端口6379
3、创建requirements.txt项目目录中调用的另一个文件
# vi requirements.txt
[root@localhost composetest]# vi requirements.txt

flask

redis
4、创建dockerfile文件
# vi Dockerfile
[root@localhost composetest]# vi Dockerfile

FROM python:3.4-alpine

ADD . /code

WORKDIR /code

RUN pip install -r requirements.txt

CMD ["python", "app.py"]
说明:
FROM:从Python 3.4镜像开始构建映像
ADD:添加当前目录文件到code
WORKDIR:定义工作目录code
RUN:在构建的镜像中运行命令
CMD:将容器的默认命令设置为python app.py
5、在Compose文件中定义服务
创建docker-compose.yml
# vi docker-compose.yml
[root@localhost composetest]# vi docker-compose.yml

version: '2'

services:

  web:

    build: .

    ports:

     - "5000:5000"

  redis:

    image: "redis:alpine"
注意:官网上写的是version '3',然后运行docker-compose up命令时报错,然后把3改成2
[root@localhost composetest]# ls

app.py  docker-compose.yml  Dockerfile  requirements.txt

[root@localhost composetest]#

[root@localhost composetest]# docker-compose -v

docker-compose version 1.8., build f3628c7

[root@localhost composetest]#

[root@localhost composetest]# docker-compose up

ERROR: Version in "./docker-compose.yml" is unsupported. You might be seeing this error because you're using the wrong Compose file version. Either specify a version of "2" (or "2.0") and place your service definitions under the `services` key, or omit the `version` key and place your service definitions at the root of the file to use version 1.

For more on the Compose file format versions, see https://docs.docker.com/compose/compose-file/
此Compose文件定义了两个服务,web和redis
该web服务使用从Dockerfile当前目录中构建的镜像
将容器上的公开端口5000转发到主机上的端口5000。
我们使用Flask Web服务器的默认端口5000
6、使用Compose构建并运行您的应用程序
从项目目录中,通过运行启动应用程序
# docker-compose up
[root@localhost composetest]# docker-compose up

Creating network "composetest_default" with the default driver

Building web

Step / : FROM python:3.4-alpine

Trying to pull repository docker.io/library/python ...

3.4-alpine: Pulling from docker.io/library/python

8e402f1a9c57: Pull complete

cda9ba2397ef: Pull complete

aafecf9bbbfd: Pull complete

bc2e7e266629: Pull complete

e1977129b756: Pull complete

Digest: sha256:c210b660e2ea553a7afa23b41a6ed112f85dbce25cbcb567c75dfe05342a4c4b

Status: Downloaded newer image for docker.io/python:3.4-alpine

 ---> c06adcf62f6e

Step / : ADD . /code

 ---> d700bcab2d17

Removing intermediate container 3f5775b19826

Step / : WORKDIR /code

 ---> eefa4e6c6f62

Removing intermediate container 8bc944b6cf72

Step / : RUN pip install -r requirements.txt

 ---> Running in 7de50b315d7c

DEPRECATION: Python 3.4 support has been deprecated. pip 19.1 will be the last one supporting it. Please upgrade your Python as Python 3.4 won't be maintained after March 2019 (cf PEP 429).

Collecting flask (from -r requirements.txt (line ))

  Downloading https://files.pythonhosted.org/packages/7f/e7/08578774ed4536d3242b14dacb4696386634607af824ea997202cd0edb4b/Flask-1.0.2-py2.py3-none-any.whl (91kB)

Collecting redis (from -r requirements.txt (line ))

  Downloading https://files.pythonhosted.org/packages/ac/a7/cff10cc5f1180834a3ed564d148fb4329c989cbb1f2e196fc9a10fa07072/redis-3.2.1-py2.py3-none-any.whl (65kB)

Collecting Werkzeug>=0.14 (from flask->-r requirements.txt (line ))

  Downloading https://files.pythonhosted.org/packages/18/79/84f02539cc181cdbf5ff5a41b9f52cae870b6f632767e43ba6ac70132e92/Werkzeug-0.15.2-py2.py3-none-any.whl (328kB)

Collecting Jinja2>=2.10 (from flask->-r requirements.txt (line ))

  Downloading https://files.pythonhosted.org/packages/1d/e7/fd8b501e7a6dfe492a433deb7b9d833d39ca74916fa8bc63dd1a4947a671/Jinja2-2.10.1-py2.py3-none-any.whl (124kB)

Collecting click>=5.1 (from flask->-r requirements.txt (line ))

  Downloading https://files.pythonhosted.org/packages/fa/37/45185cb5abbc30d7257104c434fe0b07e5a195a6847506c074527aa599ec/Click-7.0-py2.py3-none-any.whl (81kB)

Collecting itsdangerous>=0.24 (from flask->-r requirements.txt (line ))

  Downloading https://files.pythonhosted.org/packages/76/ae/44b03b253d6fade317f32c24d100b3b35c2239807046a4c953c7b89fa49e/itsdangerous-1.1.0-py2.py3-none-any.whl

Collecting MarkupSafe>=0.23 (from Jinja2>=2.10->flask->-r requirements.txt (line ))

  Downloading https://files.pythonhosted.org/packages/b9/2e/64db92e53b86efccfaea71321f597fa2e1b2bd3853d8ce658568f7a13094/MarkupSafe-1.1.1.tar.gz

Building wheels for collected packages: MarkupSafe

  Building wheel for MarkupSafe (setup.py): started

  Building wheel for MarkupSafe (setup.py): finished with status 'done'

  Stored in directory: /root/.cache/pip/wheels/f2/aa//0edf07a1b8a5f5f1aed7580fffb69ce8972edc16a505916a77

Successfully built MarkupSafe

Installing collected packages: Werkzeug, MarkupSafe, Jinja2, click, itsdangerous, flask, redis

Successfully installed Jinja2-2.10. MarkupSafe-1.1. Werkzeug-0.15. click-7.0 flask-1.0. itsdangerous-1.1. redis-3.2.

 ---> 3be612bb7eee

Removing intermediate container 7de50b315d7c

Step / : CMD python app.py

 ---> Running in c6bd8cb54574

 ---> 70884628abf7

Removing intermediate container c6bd8cb54574

Successfully built 70884628abf7

WARNING: Image for service web was built because it did not already exist. To rebuild this image you must use `docker-compose build` or `docker-compose up --build`.

Pulling redis (redis:alpine)...

Trying to pull repository docker.io/library/redis ...

alpine: Pulling from docker.io/library/redis

8e402f1a9c57: Already exists

4c2113a1bbc9: Pull complete

a4b5ad98d179: Pull complete

779a3abe033a: Pull complete

84714e9d5602: Pull complete

8e66c4c614cb: Pull complete

Digest: sha256:a228f66132cd46a53fd818443c42458af5d6a3e1231df25184304b8e732e51c4

Status: Downloaded newer image for docker.io/redis:alpine

Creating composetest_web_1

Creating composetest_redis_1

Attaching to composetest_redis_1, composetest_web_1

redis_1  | :C  Apr  ::05.157 # oO0OoO0OoO0Oo Redis is starting oO0OoO0OoO0Oo

redis_1  | :C  Apr  ::05.158 # Redis version=5.0., bits=, commit=, modified=, pid=, just started

redis_1  | :C  Apr  ::05.158 # Warning: no config file specified, using the default config. In order to specify a config file use redis-server /path/to/redis.conf

redis_1  | :M  Apr  ::05.165 * Running mode=standalone, port=.

redis_1  | :M  Apr  ::05.165 # WARNING: The TCP backlog setting of  cannot be enforced because /proc/sys/net/core/somaxconn is set to the lower value of .

redis_1  | :M  Apr  ::05.165 # Server initialized

redis_1  | :M  Apr  ::05.165 # WARNING overcommit_memory is set to ! Background save may fail under low memory condition. To fix this issue add 'vm.overcommit_memory = 1' to /etc/sysctl.conf and then reboot or run the command 'sysctl vm.overcommit_memory=1' for this to take effect.

redis_1  | :M  Apr  ::05.165 # WARNING you have Transparent Huge Pages (THP) support enabled in your kernel. This will create latency and memory usage issues with Redis. To fix this issue run the command 'echo never > /sys/kernel/mm/transparent_hugepage/enabled' as root, and add it to your /etc/rc.local in order to retain the setting after a reboot. Redis must be restarted after THP is disabled.

redis_1  | :M  Apr  ::05.165 * Ready to accept connections

web_1    |  * Serving Flask app "app" (lazy loading)

web_1    |  * Environment: production

web_1    |    WARNING: Do not use the development server in a production environment.

web_1    |    Use a production WSGI server instead.

web_1    |  * Debug mode: on

web_1    |  * Running on http://0.0.0.0:5000/ (Press CTRL+C to quit)

web_1    |  * Restarting with stat

web_1    |  * Debugger is active!

web_1    |  * Debugger PIN: --

web_1    | 172.18.0.1 - - [/Apr/ ::] "GET / HTTP/1.1"  -

web_1    | 172.18.0.1 - - [/Apr/ ::] "GET /favicon.ico HTTP/1.1"  -

web_1    | 172.18.0.1 - - [/Apr/ ::] "GET / HTTP/1.1"  -
页面就停留在这里了,然后打开浏览器输入地址访问
http://IP地址:5000/
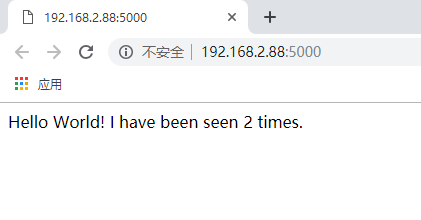
刷新页面,数字应该增加。
切换到另一个终端窗口,然后键入
# docker images
查看本地镜像
[root@localhost ~]# docker images

REPOSITORY          TAG                 IMAGE ID            CREATED             SIZE

composetest_web     latest              70884628abf7         minutes ago      84.5 MB

docker.io/python    3.4-alpine          c06adcf62f6e         weeks ago         72.9 MB

docker.io/redis     alpine              07103bda7d12         weeks ago         51.6 MB
通过docker-compose down 在第二个终端的项目目录中运行,或者在启动应用程序的原始终端中按CTRL + C来停止应用程序。
web_1    | 172.18.0.1 - - [/Apr/ ::] "GET / HTTP/1.1"  -

^CGracefully stopping... (press Ctrl+C again to force)

Stopping composetest_redis_1 ... done

Stopping composetest_web_1 ... done

[root@localhost composetest]#
7、编辑Compose文件以添加绑定装载
编辑docker-compose.yml在项目目录添加绑定安装的web服务:
# vi docker-compose.yml
version: ''

services:

  web:

    build: .

    ports:

     - "5000:5000"

    volumes:

     - .:/code

  redis:

    image: "redis:alpine"
新volumes密钥将主机上的项目目录(当前目录)/code安装到容器内部,允许您动态修改代码,而无需重建镜像。
8、使用Compose重新构建并运行应用程序
从项目目录中,键入docker-compose up以使用更新的Compose文件构建应用程序,然后运行它。
# docker-compose up
提示我这个项目正在运行,不能再次开启
[root@localhost composetest]# docker-compose up

Recreating composetest_web_1

Starting composetest_redis_1

ERROR: for web  Cannot start service web: driver failed programming external connectivity on endpoint composetest_web_1 (db4744d1208089127c52e9b1e201bfc0b94a66db86e4d266e356c15e7f24b147):  (iptables failed: iptables --wait -t nat -A DOCKER -p tcp -d / --dport  -j DNAT --to-destination 172.18.0.3: ! -i br-012aad8c1511: iptables: No chain/target/match by that name.

 (exit status ))

ERROR: Encountered errors while bringing up the project.
然后执行关闭命令
# docker-compose down
[root@localhost composetest]# docker-compose down

Stopping composetest_redis_1 ... done

Removing composetest_web_1 ... done

Removing composetest_redis_1 ... done

Removing 2386004fa63c_composetest_web_1 ... done

Removing network composetest_default

[root@localhost composetest]#
再次开启
# docker-compose up
[root@localhost composetest]# docker-compose up

Creating network "composetest_default" with the default driver

ERROR: Failed to Setup IP tables: Unable to enable SKIP DNAT rule:  (iptables failed: iptables --wait -t nat -I DOCKER -i br-12896ecfa420 -j RETURN: iptables: No chain/target/match by that name.

 (exit status ))
又报错了,还好这个错误很常见,重启docker服务即可解决
[root@localhost composetest]# systemctl restart docker

[root@localhost composetest]#

[root@localhost composetest]# docker-compose up

Creating network "composetest_default" with the default driver

Creating composetest_web_1

Creating composetest_redis_1

Attaching to composetest_redis_1, composetest_web_1

redis_1  | :C  Apr  ::11.016 # oO0OoO0OoO0Oo Redis is starting oO0OoO0OoO0Oo

redis_1  | :C  Apr  ::11.016 # Redis version=5.0., bits=, commit=, modified=, pid=, just started

redis_1  | :C  Apr  ::11.016 # Warning: no config file specified, using the default config. In order to specify a config file use redis-server /path/to/redis.conf

redis_1  | :M  Apr  ::11.018 * Running mode=standalone, port=.

redis_1  | :M  Apr  ::11.018 # WARNING: The TCP backlog setting of  cannot be enforced because /proc/sys/net/core/somaxconn is set to the lower value of .

redis_1  | :M  Apr  ::11.018 # Server initialized

redis_1  | :M  Apr  ::11.018 # WARNING overcommit_memory is set to ! Background save may fail under low memory condition. To fix this issue add 'vm.overcommit_memory = 1' to /etc/sysctl.conf and then reboot or run the command 'sysctl vm.overcommit_memory=1' for this to take effect.

redis_1  | :M  Apr  ::11.018 # WARNING you have Transparent Huge Pages (THP) support enabled in your kernel. This will create latency and memory usage issues with Redis. To fix this issue run the command 'echo never > /sys/kernel/mm/transparent_hugepage/enabled' as root, and add it to your /etc/rc.local in order to retain the setting after a reboot. Redis must be restarted after THP is disabled.

redis_1  | :M  Apr  ::11.018 * Ready to accept connections

web_1    |  * Serving Flask app "app" (lazy loading)

web_1    |  * Environment: production

web_1    |    WARNING: Do not use the development server in a production environment.

web_1    |    Use a production WSGI server instead.

web_1    |  * Debug mode: on

web_1    |  * Running on http://0.0.0.0:5000/ (Press CTRL+C to quit)

web_1    |  * Restarting with stat

web_1    |  * Debugger is active!

web_1    |  * Debugger PIN: --
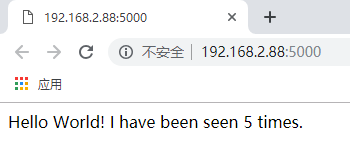
再次浏览器访问
9、更新应用程序
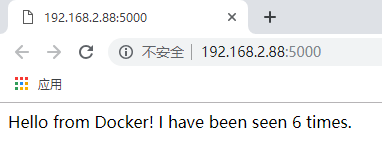
由于应用程序代码现在使用卷安装到容器中,因此您可以更改其代码并立即查看更改,而无需重建镜像。
更改问候语app.py并保存。例如,将Hello World!邮件更改为Hello from Docker!:
# vi app.py
[root@localhost ~]# cd composetest/

[root@localhost composetest]#

[root@localhost composetest]# ls

app.py  docker-compose.yml  Dockerfile  requirements.txt

[root@localhost composetest]#

[root@localhost composetest]# vi app.py

import time

import redis

from flask import Flask

app = Flask(__name__)

cache = redis.Redis(host='redis', port=)

def get_hit_count():

    retries =

    while True:

        try:

            return cache.incr('hits')

        except redis.exceptions.ConnectionError as exc:

            if retries == :

                raise exc

            retries -=

            time.sleep(0.5)

@app.route('/')

def hello():

    count = get_hit_count()

    return 'Hello from Docker! I have been seen {} times.\n'.format(count)

if __name__ == "__main__":

    app.run(host="0.0.0.0", debug=True)
刷新浏览器访问
10、尝试其他一些命令
如果要在后台运行服务,可以将-d标志(用于“分离”模式)传递给docker-compose up并使用docker-compose ps以查看当前正在运行的内容:
# docker-compose up -d
# docker-compose ps
[root@localhost composetest]# docker-compose ps

       Name                      Command               State    Ports

---------------------------------------------------------------------

composetest_redis_1   docker-entrypoint.sh redis ...   Exit

composetest_web_1     python app.py                    Exit

[root@localhost composetest]#

[root@localhost composetest]# docker-compose up -d

Starting composetest_web_1

Starting composetest_redis_1

[root@localhost composetest]#

[root@localhost composetest]# docker-compose ps

       Name                      Command               State           Ports

-------------------------------------------------------------------------------------

composetest_redis_1   docker-entrypoint.sh redis ...   Up      /tcp

composetest_web_1     python app.py                    Up      0.0.0.0:->/tcp

[root@localhost composetest]#
该docker-compose run命令允许您为服务运行一次性命令。例如,要查看web服务可用的环境变量 :
# docker-compose run web env
[root@localhost composetest]# docker-compose run web env

PATH=/usr/local/bin:/usr/local/sbin:/usr/local/bin:/usr/sbin:/usr/bin:/sbin:/bin

HOSTNAME=931311c9a4f2

TERM=xterm

LANG=C.UTF-

GPG_KEY=97FC712E4C024BBEA48A61ED3A5CA953F73C700D

PYTHON_VERSION=3.4.

PYTHON_PIP_VERSION=19.0.

HOME=/root
参阅其他可用命令
# docker-compose --help
[root@localhost composetest]# docker-compose --help

Define and run multi-container applications with Docker.

Usage:

  docker-compose [-f <arg>...] [options] [COMMAND] [ARGS...]

  docker-compose -h|--help

Options:

  -f, --file FILE             Specify an alternate compose file (default: docker-compose.yml)

  -p, --project-name NAME     Specify an alternate project name (default: directory name)

  --verbose                   Show more output

  -v, --version               Print version and exit

  -H, --host HOST             Daemon socket to connect to

  --tls                       Use TLS; implied by --tlsverify

  --tlscacert CA_PATH         Trust certs signed only by this CA

  --tlscert CLIENT_CERT_PATH  Path to TLS certificate file

  --tlskey TLS_KEY_PATH       Path to TLS key file

  --tlsverify                 Use TLS and verify the remote

  --skip-hostname-check       Don't check the daemon's hostname against the name specified

                              in the client certificate (for example if your docker host

                              is an IP address)

Commands:

  build              Build or rebuild services

  bundle             Generate a Docker bundle from the Compose file

  config             Validate and view the compose file

  create             Create services

  down               Stop and remove containers, networks, images, and volumes

  events             Receive real time events from containers

  exec               Execute a command in a running container

  help               Get help on a command

  kill               Kill containers

  logs               View output from containers

  pause              Pause services

  port               Print the public port for a port binding

  ps                 List containers

  pull               Pulls service images

  push               Push service images

  restart            Restart services

  rm                 Remove stopped containers

  run                Run a one-off command

  scale              Set number of containers for a service

  start              Start services

  stop               Stop services

  unpause            Unpause services

  up                 Create and start containers

  version            Show the Docker-Compose version information
停止服务
# docker-compose stop
[root@localhost composetest]# docker-compose ps

       Name                      Command               State           Ports

-------------------------------------------------------------------------------------

composetest_redis_1   docker-entrypoint.sh redis ...   Up      /tcp

composetest_web_1     python app.py                    Up      0.0.0.0:->/tcp

[root@localhost composetest]#

[root@localhost composetest]# docker-compose stop

Stopping composetest_redis_1 ... done

Stopping composetest_web_1 ... done

[root@localhost composetest]#

[root@localhost composetest]# docker-compose ps

       Name                      Command               State    Ports

---------------------------------------------------------------------

composetest_redis_1   docker-entrypoint.sh redis ...   Exit

composetest_web_1     python app.py                    Exit

[root@localhost composetest]#
完全删除容器。
# docker-compose down --volumes
--volumes:删除Redis容器使用的数据卷
[root@localhost composetest]# docker-compose down --volumes

Removing composetest_web_run_1 ... done

Removing composetest_redis_1 ... done

Removing composetest_web_1 ... done

Removing network composetest_default

[root@localhost composetest]#

[root@localhost composetest]# docker-compose ps

Name   Command   State   Ports

------------------------------

[root@localhost composetest]#
参考博客:
https://www.cnblogs.com/ee900222/p/docker_5.html
官方文档:
https://docs.docker.com/compose/gettingstarted/
使用docker compose编排容器的更多相关文章
- Docker(二十六)-Docker Compose编排容器
1. 前言 Docker Compose 是 Docker 容器进行编排的工具,定义和运行多容器的应用,可以一条命令启动多个容器. 使用Compose 基本上分为三步: Dockerfile 定义应用 ...
- Docker系列之(五):使用Docker Compose编排容器
1. 前言 Docker Compose 是 Docker 容器进行编排的工具,定义和运行多容器的应用,可以一条命令启动多个容器. 使用Compose 基本上分为三步: Dockerfile 定义应用 ...
- 使用Docker compose编排Laravel应用
前言 Laravel官方开发环境推荐的是Homestead(其实就是一个封装好的Vagrant box),我感觉这个比较重,于是自己用Docker compose编排了一套开发环境,在这里分享下. 环 ...
- Docker Compose之容器编排开发初探
1.前言 Docker Compose 是 Docker 官方编排(Orchestration)项目之一,负责快速在集群中部署分布式应用. Compose 是一个用于定义和运行多个 Docker 应用 ...
- docker compose 编排
Compose是Docker的服务编排工具,主要用来构建基于Docker的复杂应用,Compose 通过一个配置文件来管理多个Docker容器,非常适合组合使用多个容器进行开发的场景. 说明:Comp ...
- Docker Compose编排工具部署lnmp实践及理论(详细)
目录 一.理论概述 编排 部署 Compose原理 二.使用docker compose 部署lnmp 三.测试 四.总结 一.理论概述 Docker Compose是一个定义及运行多个Docker容 ...
- Docker深入浅出系列 | Docker Compose多容器实战
目录 前期准备 Docker Compose是什么 为什么要用Docker Compose Docker Compose使用场景 Docker Compose安装 Compose Yaml文件结构 C ...
- 使用Docker Compose编排Spring Cloud微服务
文章目录 微服务构建实例 简化Compose的编写 编排高可用的Eureka Server 编排高可用Spring Cloud微服务集群及动态伸缩 微服务项目名称 项目微服务中的角色 microser ...
- Docker学习笔记之使用 Docker Compose 管理容器
0x00 概述 通过之前的介绍,我们已经基本掌握了构建.运行容器的方法,但这还远远不够,由于 Docker 采用轻量级容器的设计,每个容器一般只运行一个软件,而目前绝大多数应用系统都绝不是一个软件所能 ...
随机推荐
- ThinkPHP5.0源码学习之执行应用
一.应用启动 在/thinkphp/start.php文件中,用一句代码App::run()->send();实现应用的启动. // 执行应用 App::run()->send(); ...
- Linux SSH登录很慢的解决方法
一:UseDNS OpenSSH在用户登录的时候会验证IP,它根据用户的IP使用反向DNS找到主机名,再使用DNS找到IP地址,最后匹配一下登录的IP是否合法.如果客户机的IP没有域名,或者DNS服务 ...
- Invalid demension,shape[-1,40,40,1]
代码里定一个了没有用的placeholder, 或者说没有给这个placeholder 传值
- cocoa pods自己的笔记
备注:这里只是个人的观点,有的地方也是copy,多多指教,个人笔记,有侵犯你们版权的地方还望海涵!!! 卡主不动 安装流程:http://www.tuicool.com/articles/qaMfuy ...
- eclipse工具类及插件(修改eclipse.ini文件及作者名字)
https://jingyan.baidu.com/album/9158e0005633c0a254122807.html?picindex=1 (修改eclipse.ini文件及作者名字) http ...
- go web framework gin 启动流程分析
最主要的package : gin 最主要的struct: Engine Engine 是整个framework的实例,它包含了muxer, middleware, configuration set ...
- oracle中next_day()、last_day()函数解析
oracle中next_day()函数解析 Sql代码 当前系统时间的下一星期一的时间select next_day(sysdate,1) from dual NEXT_DAY(date,char ...
- @Autowired Map<String , Object> xx
http://www.cnblogs.com/davidwang456/p/4432410.html @Autowired 标注作用于 Map 类型时,如果 Map 的 key 为 String 类型 ...
- Cordova编译报AAPT错误的解决方法
因为项目中同时使用cordova-hot-code-push-plugin和phonegap-plugin-barcodescanner,编译时报错:AAPT: error: resource and ...
- 脱产班第五次大作业-FTP服务器
下载项目 my_ftp #!/usr/bin/env python3 # -*- coding: utf-8 -*- import os import hmac import json import ...