Android开发 UI布局
Android开发 UI布局
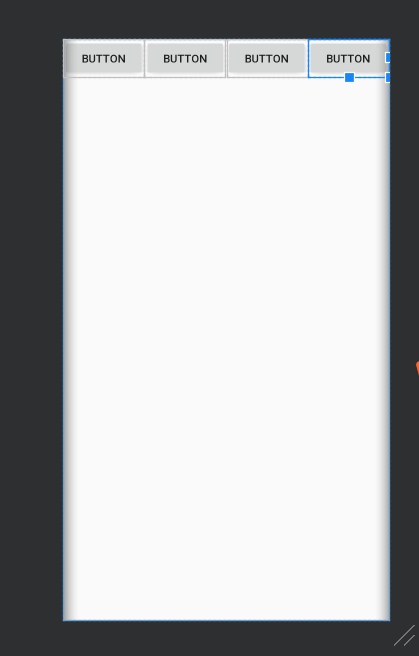
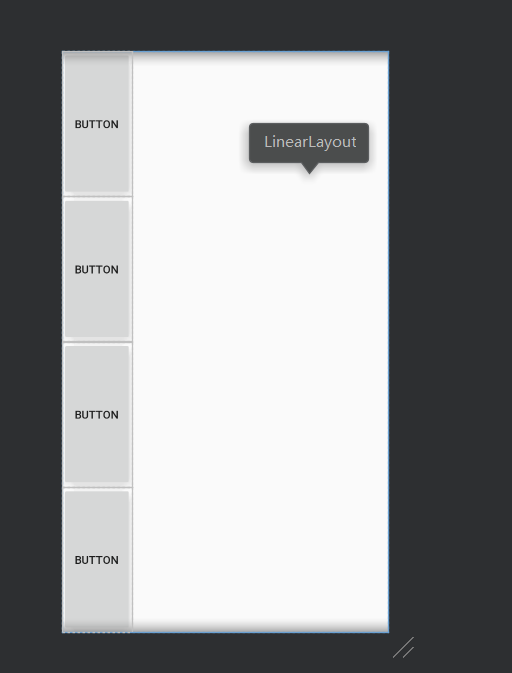
一、线性布局LinearLayout
什么是线性布局?
其实呢,线性布局就是把所有的孩子摆在同一条线上
 <?xml version="1.0" encoding="utf-8"?>

<LinearLayout

    xmlns:android="http://schemas.android.com/apk/res/android"

    android:layout_width="match_parent"

    android:layout_height="match_parent">

    <Button

        android:id="@+id/button"

        android:layout_width="wrap_content"

        android:layout_height="wrap_content"

        android:layout_weight="1"

        android:text="Button" />

    <Button

        android:id="@+id/button2"

        android:layout_width="wrap_content"

        android:layout_height="wrap_content"

        android:layout_weight="1"

        android:text="Button" />

    <Button

        android:id="@+id/button3"

        android:layout_width="wrap_content"

        android:layout_height="wrap_content"

        android:layout_weight="1"

        android:text="Button" />

</LinearLayout>
线性布局摆放的方向:我们可以通过orientation来修改LinerLayout的布局的摆放方向,它的值有两个,一个是horizontal(水平),另一个是vertical(竖直)
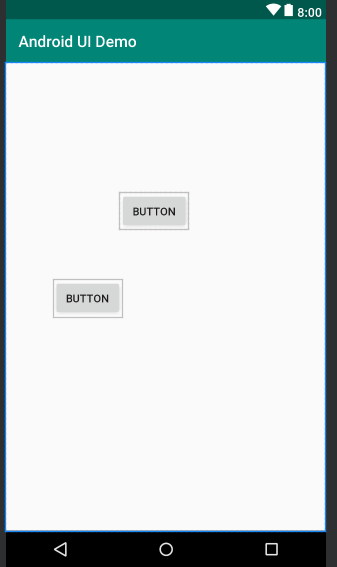
3、线性布局的权重
当有些时候,我们需要平均地给孩子分配宽度或高度,我们就可以使用权重;
有时候不平均,但点占的宽或高成比例,我们也可以使用权重。
android:layout_width="0th"
android:layout_weight="1"
将宽度设为零,权重设为1,即可平均。
权重就是把所有的数字加起来,上面的占的比例就是大小的比例。
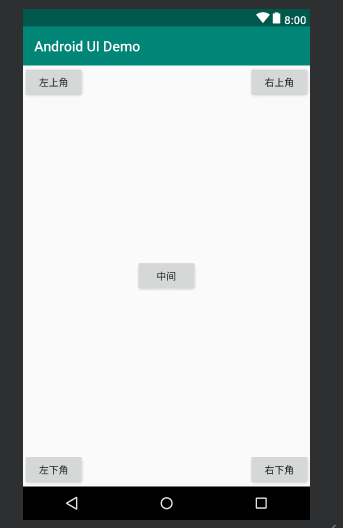
二、相对布局RelativeLayout
1、相对布局相对于父控件
<?xml version="1.0" encoding="utf-8"?>

<RelativeLayout

    xmlns:android="http://schemas.android.com/apk/res/android"

    android:orientation="vertical" android:layout_width="match_parent"

    android:layout_height="match_parent">

    <Button

        android:id="@+id/button5"

        android:layout_width="wrap_content"

        android:layout_height="wrap_content"

        android:layout_centerInParent="true"

        android:text="中间" />

    <Button

        android:id="@+id/button6"

        android:layout_width="wrap_content"

        android:layout_height="wrap_content"

        android:layout_alignParentRight="true"

        android:layout_alignParentTop="true"

        android:text="右上角" />

    <Button

        android:id="@+id/button7"

        android:layout_width="wrap_content"

        android:layout_height="wrap_content"

        android:layout_alignParentLeft="true"

        android:layout_alignParentTop="true"

        android:text="左上角" />

    <Button

        android:id="@+id/button8"

        android:layout_width="wrap_content"

        android:layout_height="wrap_content"

        android:layout_alignParentLeft="true"

        android:layout_alignParentBottom="true"

        android:text="左下角" />

    <Button

        android:id="@+id/button9"

        android:layout_width="wrap_content"

        android:layout_height="wrap_content"

        android:layout_alignParentRight="true"

        android:layout_alignParentBottom="true"

        android:text="右下角" />

</RelativeLayout>
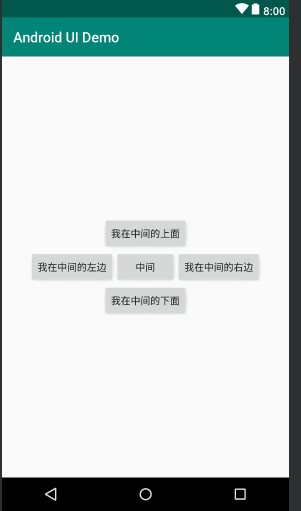
2、相对布局相对于同级控件
<?xml version="1.0" encoding="utf-8"?>

<RelativeLayout

    xmlns:android="http://schemas.android.com/apk/res/android"

    android:orientation="vertical" android:layout_width="match_parent"

    android:layout_height="match_parent">

    <Button

        android:id="@+id/center_button"

        android:layout_width="wrap_content"

        android:layout_height="wrap_content"

        android:layout_centerInParent="true"

        android:text="中间" />

    <Button

        android:layout_width="wrap_content"

        android:layout_height="wrap_content"

        android:layout_centerVertical="true"

        android:layout_toRightOf="@id/center_button"

        android:text="我在中间的右边"/>

        <Button

            android:layout_width="wrap_content"

            android:layout_height="wrap_content"

            android:layout_centerVertical="true"

            android:layout_toLeftOf="@id/center_button"

            android:text="我在中间的左边"/>

    <Button

        android:layout_width="wrap_content"

        android:layout_height="wrap_content"

        android:layout_centerHorizontal="true"

        android:layout_above="@id/center_button"

        android:text="我在中间的上面"/>

    <Button

        android:layout_width="wrap_content"

        android:layout_height="wrap_content"

        android:layout_centerHorizontal="true"

        android:layout_below="@id/center_button"

        android:text="我在中间的下面"/>

</RelativeLayout>
三、其它布局
1、绝对布局AbsoluteLayout
依靠x、y控制自己的位置
<?xml version="1.0" encoding="utf-8"?>

<AbsoluteLayout

    xmlns:android="http://schemas.android.com/apk/res/android"

    android:orientation="vertical" android:layout_width="match_parent"

    android:layout_height="match_parent">

    <Button

        android:id="@+id/button5"

        android:layout_width="wrap_content"

        android:layout_height="wrap_content"

        android:layout_x="147dp"

        android:layout_y="167dp"

        android:text="Button" />

    <Button

        android:id="@+id/button6"

        android:layout_width="wrap_content"

        android:layout_height="wrap_content"

        android:layout_x="61dp"

        android:layout_y="279dp"

        android:text="Button" />

</AbsoluteLayout>
2、表格布局TableLayout
<?xml version="1.0" encoding="utf-8"?>

<TableLayout

    xmlns:android="http://schemas.android.com/apk/res/android"

    android:orientation="vertical"

    android:layout_width="match_parent"

    android:layout_height="match_parent">

    <TableRow>

        <Button

            android:layout_width="wrap_content"

            android:layout_height="wrap_content"

            android:text="1" />

        <Button

            android:layout_width="wrap_content"

            android:layout_height="wrap_content"

            android:text="2" />

        <Button

            android:layout_width="wrap_content"

            android:layout_height="wrap_content"

            android:text="3" />

    </TableRow>

    <TableRow>

        <Button

            android:layout_width="wrap_content"

            android:layout_height="wrap_content"

            android:text="4" />

        <Button

            android:layout_width="wrap_content"

            android:layout_height="wrap_content"

            android:text="5" />

        <Button

            android:layout_width="wrap_content"

            android:layout_height="wrap_content"

            android:text="6" />

    </TableRow>

    <TableRow>

        <Button

            android:layout_width="wrap_content"

            android:layout_height="wrap_content"

            android:text="7" />

        <Button

            android:layout_width="wrap_content"

            android:layout_height="wrap_content"

            android:text="8" />

        <Button

            android:layout_width="wrap_content"

            android:layout_height="wrap_content"

            android:text="9" />

    </TableRow>

</TableLayout>

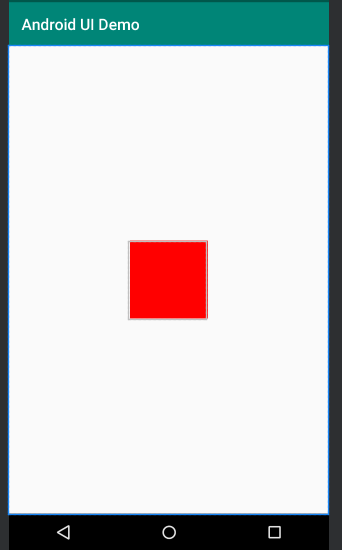
3、帧布局FrameLayout
<?xml version="1.0" encoding="utf-8"?>

<FrameLayout

    xmlns:android="http://schemas.android.com/apk/res/android"

    android:orientation="vertical"

    android:layout_width="match_parent"

    android:layout_height="match_parent">

  <View

      android:layout_width="100dp"

      android:layout_height="100dp"

      android:layout_gravity="center"

      android:background="#ff00"

      />

</FrameLayout>
四、布局中常用的单位
1、像素单位px
像素单位不建议使用,除非是手表,或者机顶盒
2、适配单位dp
推荐使用,因为可以实现适配
以160dp为基准,1dp=1px
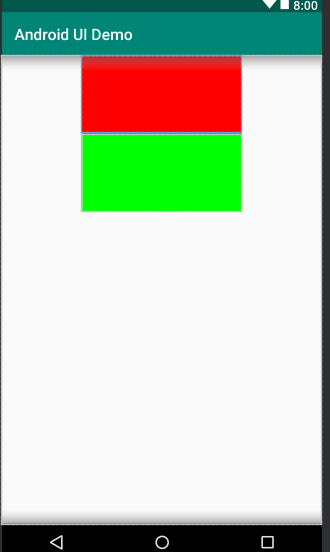
3、字体单位sp
<?xml version="1.0" encoding="utf-8"?>

<LinearLayout xmlns:android="http://schemas.android.com/apk/res/android"

    android:orientation="vertical"

    android:layout_width="match_parent"

    android:layout_height="match_parent">

    <View

        android:layout_width="540px"

        android:layout_height="100dp"

        android:layout_gravity="center"

        android:background="#ff00"

        />

    <View

        android:layout_width="205dp"

        android:layout_height="100dp"

        android:layout_gravity="center"

        android:background="#00ff00"

        />

</LinearLayout>
Android开发 UI布局的更多相关文章
- Android开发--UI之Bundle的使用
Android开发–UI之Bundle的使用 最近,把之前学过的东西大体的整理了以下,并且想把学过的心得分享给大家.我自己做了一个小小的demo,以便说明具体的应用. 这里的两个界面是通过第一个界面输 ...
- Android开发---网格布局案例
Android开发---网格布局案例 效果图: 1.MainActivity.java package com.example.android_activity; import android.ap ...
- Android开发 --代码布局
Android开发 --代码布局 在线性布局LinearLayout里加入view比较简单,因为属性比较少,布局简单 示例,加入一个TextView LinearLayout layout = (Li ...
- Android开发 ---xml布局元素
1.android:orientation="vertical/horizontal" vertical为垂直布局, horizontal为水平布局 2.android:layou ...
- Android开发-动态布局小记
android动态布局相比静态布局,动态布局不用再将xml转变了布局代码,提高了一定的效率,当然可以忽略不记.动态布局主要是比较灵活,可以很快的在代码中直接修改布局,并直接使用控件进行业务逻辑开发.但 ...
- Android开发UI之开源项目第一篇——个性化控件(View)篇
原文:http://blog.csdn.net/java886o/article/details/24355907 本文为那些不错的Android开源项目第一篇——个性化控件(View)篇,主要介绍A ...
- Android开发UI之补间动画-布局添加动画
布局添加动画 使用步骤: 1.获取到布局的id RelativeLayout ly=(RelativeLayout)findViewById(R.id.layout); 2.设置动画样式 ScaleA ...
- Android开发UI之布局文件LinearLayout
LinearLayout-线性布局,该布局中的控件按照水平方向排列或者竖直方向排列. 通过属性android:orientation=""决定的,可选值:vertical和hori ...
- Android开发UI之给ListView设置布局动画效果
1.通过JAVA代码添加,资源文件基本上不修改 XML文件,只添加了一个ListView,就不贴XML文件的代码了. java代码: public class MainActivity extends ...
随机推荐
- Fiddler: AutoResponder 构建模拟测试场景
AutoResponder 可用于拦截某一请求,并重定向到本地的资源,或者使用Fiddler的内置响应.可用于调试服务器端代码而无需修改服务器端的代码和配置,因为拦截和重定向后,实际上访问的是本地的文 ...
- Vue的H5页面唤起支付宝支付
目前项目中比较常用的第三方支付无非就是支付宝支付和微信支付.下面介绍一下Vue中H5页面如何使用支付宝支付.其实很简单的,只不过是调自己后台的一个接口而已(后台根据支付宝文档,写好支付接口). 触发支 ...
- Python 文件&异常 初学者笔记
文件 读取整个文件 with open('pi_30_digits.txt') as file_object :#Python在当前执行文件目录寻找指定文件#filename = 文件的绝对路径或相对 ...
- 0012 基于DRF框架开发(04 序列化器的字段与选项)
1 常用字段类型 字段 构造方式 BooleanField BooleanField() NullBooleanField NullBooleanField() CharField CharField ...
- hdu 1025 Constructing Roads In JGShining's Kingdom(最长上升子序列)
题意:贫穷和富有的城市都按顺序1-n排列,需要在中间建造尽可能多的道路,最多可以建造多少条? 解:如果条件这样给出,贫穷的城市按顺序排列,并且按顺序给出每个贫穷城市需要的资源,那么能建造的最多的道路数 ...
- ArcMap 导入自定义样式Symbols
管网的图例里有一些自定义的样式,这些在ArcMap中找不到,找到的也不合适,所以只能自己动手制作. 1. 菜单 Customize --> Style Manager 2 . 创建新的Style ...
- MAT(memory anlayzer tool)使用方法
Analyzing and understanding the memory use of an application is challenging. A subtle logic error ca ...
- RabbitMQ的五种工作方式详细
在了解之前得先有个RabbitMQ客户端.官网: https://www.rabbitmq.com/getstarted.html connections:无论生产者还是消费者,都需要与RabbitM ...
- 0级搭建类005-Oracle Solaris Unix安装 (11.4) 公开
项目文档引子系列是根据项目原型,制作的测试实验文档,目的是为了提升项目过程中的实际动手能力,打造精品文档AskScuti. 项目文档引子系列目前不对外发布,仅作为博客记录.如学员在实际工作过程中需提前 ...
- z3学习档案
Reference: 看雪-z3巧解逆向 知乎:Z3一把梭 z3 solver学习 使用z3约束求解器解决CTF中的题目 Playing with Z3,hacking the serial chec ...