【daydayup】weTalk
先看一下项目效果

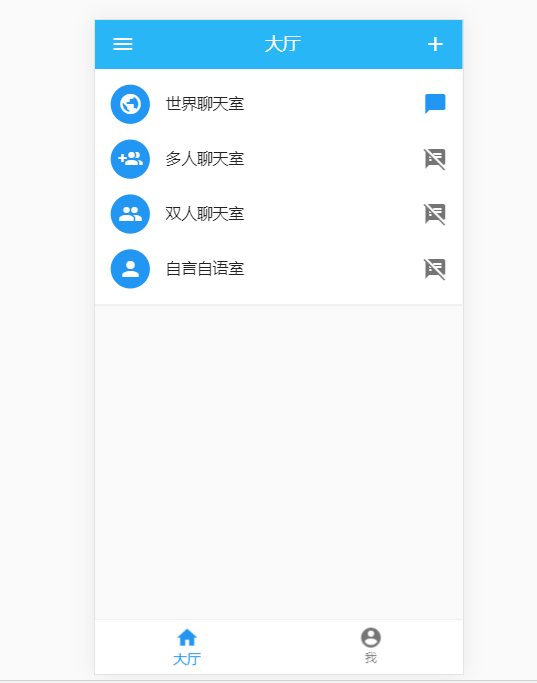
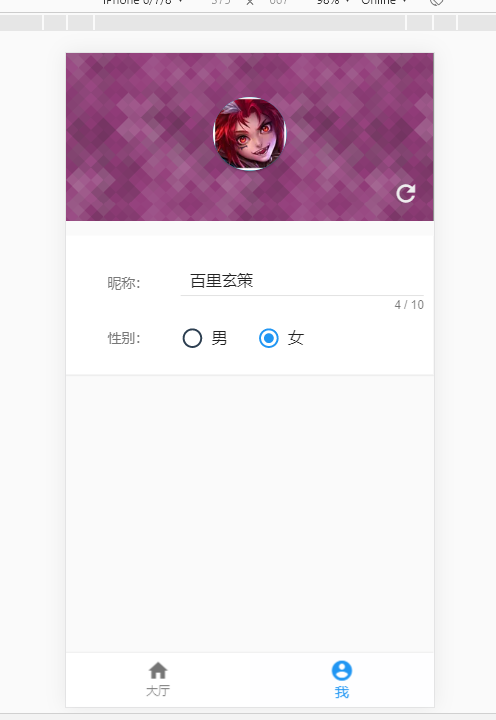
这个是我运行的作者的项目的wetalk-server项目,他还有wetalk-client 项目
先放下作者的github项目地址:https://github.com/mangyui/weTalk
这是一个才华横溢的作者,而且才大三。羡慕作者的青春,也羡慕他们的努力,不需要预计的是作者的前途无量。
因为运行中有点问题,就给作者提了issue
(后记作者人很好,很快就解决了Bug,万分感谢)
先言归正传,看可以运行的wetalk-server项目吧
一般server中都会引入websocket
作者在服务端使用的是Node + WebSocket 搭配 Express
看package.json文件
{

  "name": "wetalk-server",

  "version": "1.0.0",

  "description": "we talk server",

  "scripts": {

    "test": "echo \"Error: no test specified\" && exit 1",

    "main": "nodemon build/main.js"

  },

  "author": "",

  "license": "ISC",

  "dependencies": {

    "@types/express": "^4.16.1",

    "express": "^4.17.0",

    "typescript": "^3.4.5",

    "ws": "^7.0.0"

  },

  "devDependencies": {

    "@types/ws": "^6.0.1",

    "nodemon": "^1.19.0"

  }

}
入口文件main.ts
import express = require('express')

const app: express.Application = express();

app.use(express.static('public'));

const port:number = 9612

const WebSocket = require('ws')

app.get('/', function (req, res) {

  res.send('Hello World!');

});

var server = app.listen(port, '0.0.0.0', () => {

  console.log('Example app listening on port ' + port);

});

const wss = new WebSocket.Server({ server });

// Broadcast to all.

const broadcast = (data: string) => {

	console.log('ccc', wss.clients.size)

	var dataJson = JSON.parse(data)

	dataJson.number = wss.clients.size

	wss.clients.forEach((client: any) => {

		if (client.readyState === WebSocket.OPEN) {

			client.send(JSON.stringify(dataJson));

		}

	});

};

wss.on('connection', (ws: any) => {

	console.log(new Date().toUTCString() + ' - connection established');

	ws.on('message', (data: string) => {

		broadcast(data);

	});

	ws.on('error', (error: any) => {

		console.log(error);

	});

	wss.on('close', (mes: any) => {

		console.log(mes);

		console.log('closed');

	});

});

wss.on('error', (err: any) => {

	console.log('error');

	console.log(err);

});
接下来我们来看客户端的项目
运行效果同服务器中的是一样的,作者是将前端项目打包之后放在后端public里面的。
先上代码
在main.js中会引入router以及对应的museui等框架
import Vue from 'vue'

import App from './App.vue'

import router from './router/'

import store from './store/'

import './plugins/museui.js'

import '@/styles/index.less'

import './guard.ts'

const Toast = require('muse-ui-toast')

Vue.config.productionTip = false

// Vue.use(Toast)

new Vue({

  el: '#app',

  router,

  store,

  render: h => h(App)

}).$mount('#app') // 与el: '#app'对应,手动挂载
guard.ts中进行了路由守卫的一些功能,能够判断当时对应的用户的信息
//guard.ts

import router from './router'

import store from './store'

import User from './model/user'

import Person from './assets/js/person'

let persons : Person[] = require('./assets/js/persons').persons //

// const whiteList = ['/login',

//   '/'

// ] // 不重定向白名单

router.beforeEach((to, from, next) => {

  console.log('....store.getters.user',store.getters.user)

  console.log('....store.getters.user.id',store.getters.user.id)

  if (!store.getters.user.id) {

    console.log('id.....', store.getters.user)

    var date = new Date(+new Date() + 8 * 3600 * 1000).toISOString().replace(/[T:-]/g, '').replace(/\.[\d]{3}Z/, '')

    var index = Math.floor(Math.random() * persons.length)

    var user = new User(date.substring(2) + index, persons[index].name, persons[index].avatar, '男')

    store.commit('initUserInfo', user)

    next()

    // if (whiteList.indexOf(to.path) !== -1) {

    //   next()

    //   console.log('aaaaaaaa')

    // } else {

    //   console.log('bnbbbb')

    //   next('/')

    // }

  } else {

    console.log('cccc')

    next()

  }

})
接下来看router中的文件,router中进行懒加载,以及对应的跳转页面信息
//src\router\index.ts

import Vue from 'vue'

import Router from 'vue-router'

import Home from '@/views/Home.vue'

Vue.use(Router)

export default new Router({

  routes: [

    {

      path: '',

      component: () => import('@/views/Home.vue'),

      redirect: '/home/lobby'

    },

    {

      path: '/home',

      name: 'home',

      component: () => import('@/views/Home.vue'),

      children: [

        {

          path: 'lobby',

          name: 'Lobby',

          component: () => import('@/components/Lobby.vue')

        },

        {

          path: 'usercenter',

          name: 'UserCenter',

          component: () => import('@/components/UserCenter.vue')

        }

      ]

    },

    {

      path: '/WorldRoom',

      name: 'WorldRoom',

      component: () => import('@/views/WorldRoom.vue')

    },

    {

      path: '*',

      redirect: '/'

    }

  ]

})
在App.vue里面定义了页面渲染的入口
<template>

  <div id="app">

    <!-- <div id="nav">

      <router-link to="/">Home</router-link> |

      <router-link to="/about">About</router-link>

    </div> -->

    <router-view />

  </div>

</template>

<style lang="less">

#app {

  font-family: "Avenir", Helvetica, Arial, sans-serif;

  -webkit-font-smoothing: antialiased;

  -moz-osx-font-smoothing: grayscale;

  text-align: center;

  color: #2c3e50;

}

#nav {

  padding: 30px;

  a {

    font-weight: bold;

    color: #2c3e50;

    &.router-link-exact-active {

      color: #42b983;

    }

  }

}

</style>
接下来我们看各个页面效果
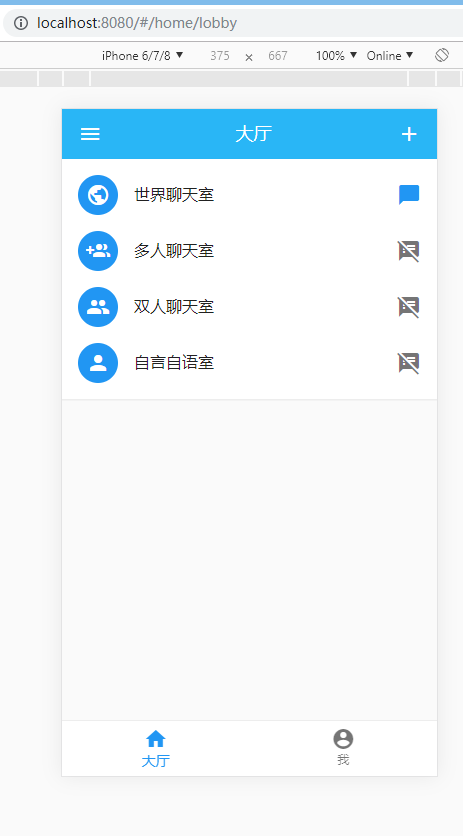
这个是在home.vue
<template>

  <div class="home">

    <router-view />

    <mu-bottom-nav :value.sync="tab" @change="changeTab">

      <mu-bottom-nav-item value="labby" title="大厅" icon="home"></mu-bottom-nav-item>

      <mu-bottom-nav-item value="usercenter" title="我" icon="account_circle"></mu-bottom-nav-item>

    </mu-bottom-nav>

  </div>

</template>

<script lang="ts">

import { Component, Vue } from 'vue-property-decorator'

@Component({

})

export default class Home extends Vue {

  private tab: string = 'labby'

  changeTab () {

    if (this.tab === 'labby') {

      this.$router.push('/home/lobby')

    } else {

      this.$router.push('/home/usercenter')

    }

  }

  created () {

    if (this.$route.name === 'UserCenter') {

      this.tab = 'usercenter'

    }

  }

}

</script>

<style lang="less">

.about{

  .mu-bottom-nav-shift-wrapper{

    justify-content: space-around;

  }

  .mu-paper-round{

    height: calc(100% - 56px);

  }

}

</style>
页面一开始进来会渲染的是lobby组件,但是也会加载UserCenter组件里面的内容

这部分是lobby组件渲染的,也是纯的UI组件,不过有路由跳转的功能,可以跳到另一个页面
<template>

  <div>

    <mu-paper :z-depth="0" class="">

      <mu-appbar :z-depth="0" color="lightBlue400">

        <mu-button icon slot="left">

          <mu-icon value="menu"></mu-icon>

        </mu-button>

        大厅

        <mu-button icon slot="right">

          <mu-icon value="add"></mu-icon>

        </mu-button>

      </mu-appbar>

      <mu-list>

        <router-link to="/WorldRoom">

          <mu-list-item avatar button :ripple="false">

            <mu-list-item-action>

              <mu-avatar color="#2196f3">

                <mu-icon value="public"></mu-icon>

              </mu-avatar>

            </mu-list-item-action>

            <mu-list-item-title>世界聊天室</mu-list-item-title>

            <mu-list-item-action>

              <mu-icon value="chat_bubble" color="#2196f3"></mu-icon>

            </mu-list-item-action>

          </mu-list-item>

        </router-link>

        <mu-list-item avatar button :ripple="false">

          <mu-list-item-action>

            <mu-avatar color="#2196f3">

              <mu-icon value="group_add"></mu-icon>

            </mu-avatar>

          </mu-list-item-action>

          <mu-list-item-title>多人聊天室</mu-list-item-title>

          <mu-list-item-action>

            <mu-icon value="speaker_notes_off"></mu-icon>

          </mu-list-item-action>

        </mu-list-item>

        <mu-list-item avatar button :ripple="false">

          <mu-list-item-action>

            <mu-avatar color="#2196f3">

              <mu-icon value="people"></mu-icon>

            </mu-avatar>

          </mu-list-item-action>

          <mu-list-item-title>双人聊天室</mu-list-item-title>

          <mu-list-item-action>

            <mu-icon value="speaker_notes_off"></mu-icon>

          </mu-list-item-action>

        </mu-list-item>

        <mu-list-item avatar button :ripple="false">

          <mu-list-item-action>

            <mu-avatar color="#2196f3">

              <mu-icon value="person"></mu-icon>

            </mu-avatar>

          </mu-list-item-action>

          <mu-list-item-title>自言自语室</mu-list-item-title>

          <mu-list-item-action>

            <mu-icon value="speaker_notes_off"></mu-icon>

          </mu-list-item-action>

        </mu-list-item>

      </mu-list>

    </mu-paper>

  </div>

</template>

<script lang="ts">

import { Component, Vue } from 'vue-property-decorator'

@Component

export default class Lobby extends Vue {

}

</script>

<style lang="less" scoped>

.mu-list{

  background: #fff;

  box-shadow: 0 1px 1px rgba(0, 0, 0, 0.05);

}

</style>
这个就是跳转到的世界聊天室页面
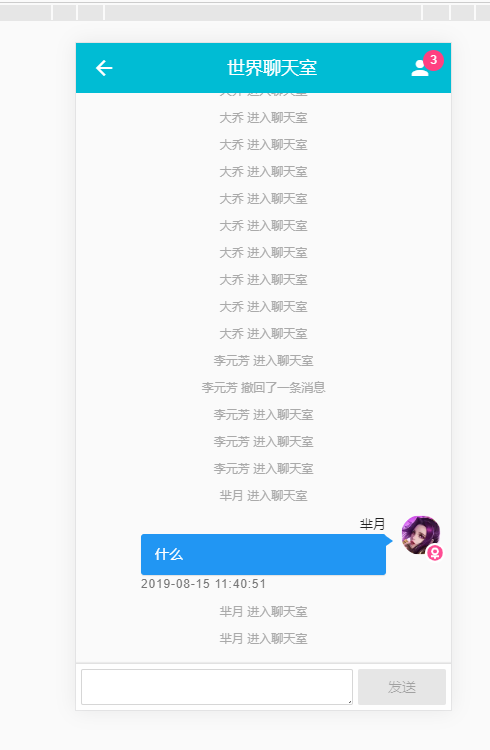
这里使用的是WorldRoom组件
//src\views\WorldRoom.vue

<template>

  <div class="talk-room">

    <mu-paper :z-depth="0" class="demo-list-wrap">

      <mu-appbar :z-depth="0" color="cyan">

        <mu-button icon slot="left" @click="toback">

          <mu-icon value="arrow_back"></mu-icon>

        </mu-button>

        世界聊天室

        <mu-badge class="barBadge" :content="number" slot="right" circle color="secondary">

          <mu-icon value="person"></mu-icon>

        </mu-badge>

      </mu-appbar>

      <div class="mess-box">

        <div class="mess-list">

          <div class="list-item" v-for="(item,index) in msgList" :key="index">

            <div class="mess-item" v-if="item.type==1&&item.user.id!=user.id">

              <mu-avatar>

                <img :src="item.user.avatar">

                <img class="icon-sex" :src="item.user.sex=='男'?require('@/assets/img/male.svg'):require('@/assets/img/female.svg')" alt="">

              </mu-avatar>

              <div class="mess-item-right">

                <span>{{item.user.name}}</span>

                <p class="mess-item-content">{{item.content}}</p>

                <p class="mess-item-time">{{item.time}}</p>

              </div>

            </div>

            <div class="mess-item-me" v-else-if="item.type==1&&item.user.id==user.id">

              <mu-avatar>

                <img :src="user.avatar">

                <img class="icon-sex" :src="user.sex=='男'?require('@/assets/img/male.svg'):require('@/assets/img/female.svg')" alt="">

              </mu-avatar>

              <div class="mess-item-right">

                <span>{{user.name}}</span>

                <mu-menu cover placement="bottom-end">

                  <p class="mess-item-content">{{item.content}}</p>

                  <mu-list slot="content">

                    <mu-list-item button @click="backMess(index)">

                      <mu-list-item-title>撤销</mu-list-item-title>

                    </mu-list-item>

                  </mu-list>

                </mu-menu>

                <p class="mess-item-time">{{item.time}}</p>

              </div>

            </div>

            <div class="mess-system" v-else>

              {{item.content}}

            </div>

          </div>

        </div>

      </div>

    </mu-paper>

    <div class="talk-bottom">

      <div class="talk-send">

        <textarea v-model="sendText" @keyup.enter="toSend" rows="1" name="text"></textarea>

        <mu-button @click="toSend" color="primary" :disabled="sendText==''?true:false">发送</mu-button>

      </div>

    </div>

  </div>

</template>

<script lang="ts">

import Message from '../model/message'

import User from '../model/user'

import { Component, Vue } from 'vue-property-decorator'

import { mapState, mapMutations, mapGetters } from 'vuex'

@Component({

  computed: {

    ...mapGetters(['user', 'msgList'])

  },

  methods: {

    ...mapMutations(['addMsg'])

  }

})

export default class WorldRoom extends Vue {

  sendText: string = ''

  number: string = '0' // ui组件要string型的

  // mesgLists: Array<Object> = []

  ws: any

  private user: User = this.$store.getters.user

  private msgList: Message[] = this.$store.getters.msgList

  public createWebsocket () {

    // this.ws = new WebSocket('ws://' + window.location.host)

    // 创建websocket

    this.ws = new WebSocket('ws://' + 'localhost:9612')

    // 进入聊天室事件

    this.ws.onopen = (e: any) => {

      // console.log('connection established')

      this.creatSending(this.user.name + ' 进入聊天室', 0)

    }

    this.ws.onmessage = (e: any) => {

      // console.log(e)

      // 发送事件

      var resData = JSON.parse(e.data)

      // console.log(message.user, this.user, message.user === this.user)

      // this.mesgLists.push({ message })

      console.log('resData', resData)

      // 移除事件

      if (resData.isRemove) {

        // 删除消息

        this.$store.commit('removeMsg', resData.message)

      } else {

        // 添加消息

        this.$store.commit('addMsg', resData.message)

      }

      if (resData.message.type === -1) {

        this.number = (resData.number - 1) + ''

      } else {

        this.number = resData.number + ''

      }

      this.$nextTick(() => {

        try {

          const msgEl = document.querySelector('.mess-list .list-item:last-child')

          if (msgEl) {

            msgEl.scrollIntoView()

          }

        } catch (err) {

          console.error(err)

        }

      })

    }

  }

  backMess (index: number) {

    this.backoutMess(this.msgList[index])

  }

  // 撤回消息

  backoutMess (message: Message) {

    console.log('Message', Message)

    var data = {

      message: message,

      isRemove: true

    }

    this.ws.send(JSON.stringify(data))

  }

  // 发送消息

  creatSending (content: string, type: number) {

    // 发送消息时间

    var time = new Date(+new Date() + 8 * 3600 * 1000).toISOString().replace(/T/g, ' ').replace(/\.[\d]{3}Z/, '')

    var message = new Message(time, content, type, type === 1 ? this.user : null)

    var data = {

      message: message

    }

    this.ws.send(JSON.stringify(data))

  }

  toSend () {

    if (this.sendText !== '') {

      this.creatSending(this.sendText, 1)

      this.sendText = ''

    }

  }

  // 返回

  toback () {

    this.$router.push('/')

  }

  created () {

    // 页面进来创建websocket连接

    this.createWebsocket()

  }

  // 销毁阶段

  beforeDestroy () {

    this.creatSending(this.user.name + ' 退出聊天室', -1)

    this.ws.close()

  }

}

</script>

<style lang="less">

.mu-paper-round{

  background: #fafafa;

}

.mess-box{

  text-align: left;

  padding: 0 10px 10px;

  height: calc(100% - 37px);

  overflow: auto;

  .mess-system{

    text-align: center;

    margin: 9px 0;

    font-size: 12px;

    color: #aaa;

  }

  .mess-item,.mess-item-me{

    display: flex;

    align-items: top;

    padding-right: 40px;

    margin: 10px 0;

    .mu-avatar{

      flex-shrink: 0;

      position: relative;

      .icon-sex{

        position: absolute;

        right: -4px;

        bottom: -8px;

        width: 20px;

        background: #fff;

        height: 20px;

      }

    }

    .mess-item-right{

      margin-left: 15px;

      margin-right: 15px;

      flex-grow: 1;

      width: 0;

      span{

        overflow: hidden;

        text-overflow: ellipsis;

        white-space: nowrap;

        display: block;

        font-size: 13px;

      }

      p.mess-item-content{

        margin: 0;

        font-size: 14px;

        padding: 10px 14px;

        background: #fff;

        border-radius: 3px;

        box-shadow: 0 1px 1px rgba(0,0,0,0.1);

        position: relative;

        &::after{

          display: block;

          content: '';

          border: 7px solid;

          border-width: 5px 7px;

          position: absolute;

          top: 2px;

          right: 100%;

          border-color: transparent #fff transparent transparent;

        }

      }

      p.mess-item-time{

        margin: 0;

        text-align: right;

        font-size: 12px;

        color: #777;

        letter-spacing: 0.8px;

      }

    }

  }

  .mess-item-me{

    flex-direction: row-reverse;

    padding-left: 40px;

    padding-right: 0px;

    .mess-item-right{

      .mu-menu{

        display: block;

      }

      span{

        text-align: right

      }

      p.mess-item-content{

        background: #2196f3;

        color: #fff;

        &:after{

          right: unset;

          left: calc(100% - 0.5px);

          border-color: transparent transparent transparent #2196f3;

        }

      }

      p.mess-item-time{

        text-align: left

      }

    }

  }

}

.talk-room{

  .mu-paper-round{

    height: calc(100% - 56px);

  }

}

.talk-bottom{

  position: fixed;

  bottom: 0;

  width: 100%;

  .talk-send{

    display: flex;

    padding: 5px 5px;

    align-items: flex-end;

    background: #fefefe;

    box-shadow: 0 -1px 1px rgba(0, 0, 0, 0.1);

    textarea{

      flex-grow: 1;

      min-height: 36px;

      max-height: 240px;

      border: 1px solid #cccc;

      border-radius: 2px;

      margin-right: 5px;

    }

  }

}

</style>
接下来我们看usercenter页面
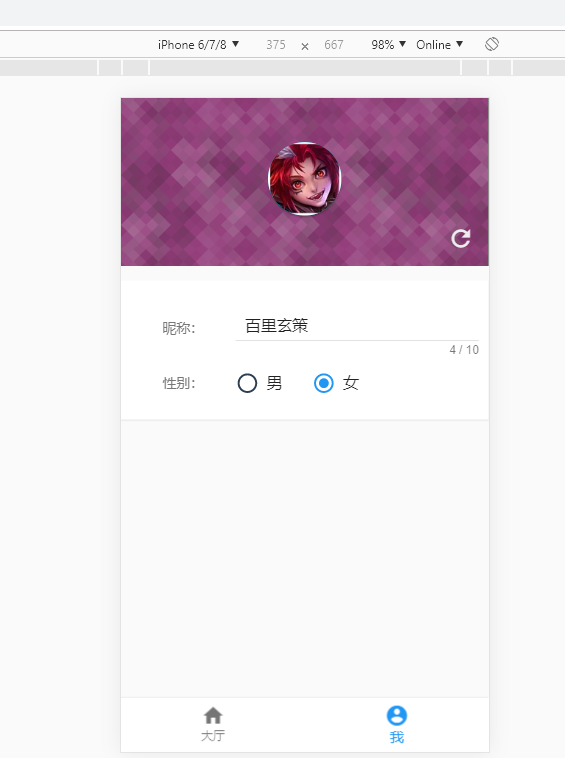
<template>

  <div class="usercenter">

    <div class="avatar-box" :style="{backgroundImage:'url(' + require('@/assets/img/user_bg' + bgindex+ '.svg')+')'}">

      <mu-avatar :size="75" color="#00bcd4">

        <img :src="user.avatar">

      </mu-avatar>

      <mu-button icon large  color="#eee" @click="refreshUser">

        <mu-icon value="refresh"></mu-icon>

      </mu-button>

    </div>

    <div class="info">

      <div class="info-item">

        <span>昵称:</span>

        <mu-text-field v-model="user.name" :max-length="10"></mu-text-field>

      </div>

      <div  class="info-item">

        <span>性别:</span>

        <mu-flex class="select-control-row">

          <mu-radio v-model="user.sex" value="男" label="男"></mu-radio>

          <mu-radio v-model="user.sex" value="女" label="女"></mu-radio>

        </mu-flex>

      </div>

      <!-- <div  class="info-item">

        <span>序号:</span>

        <p>{{user.id}}</p>

      </div> -->

    </div>

  </div>

</template>

<script lang="ts">

import { Component, Vue } from 'vue-property-decorator'

import User from '../model/user'

import Person from '@/assets/js/person'

let persons : Person[] = require('@/assets/js/persons').persons

@Component

export default class UserCenter extends Vue {

  private user: User = this.$store.getters.user

  private bgindex: number = Math.floor(Math.random() * 6)

  // 点击refreshUser图片会改变,对应的昵称的会改变

  refreshUser () {

    this.bgindex = Math.floor(Math.random() * 6)

    var index = Math.floor(Math.random() * persons.length)

    // 图片和名字刷新

    this.$store.commit('updateUserAvatar', persons[index].avatar)

    this.$store.commit('updateUserName', persons[index].name)

  }

  beforeDestroy () {

    this.$store.commit('initUserInfo', this.user)

  }

}

</script>

<style scoped lang="less">

.avatar-box{

  padding: 45px 5px;

  background: #222;

  position: relative;

  // background-image: url('../assets/img/user_bg0.svg')

  .mu-avatar{

    box-shadow: 0 2px 2px rgba(0, 0, 0, 0.25);

  }

  .mu-button{

    position: absolute;

    right: 0;

    bottom: 0;

  }

}

.info{

  background: #fff;

  width: 100%;

  max-width: 768px;

  margin: 15px auto;

  padding: 15px 5px;

  box-shadow: 0 1px 1px rgba(0,0,0,0.05);

  .info-item{

    display: flex;

    padding: 10px 5px;

    align-items: center;

    span{

      width: 30%;

      color: #777;

    }

    p,.mu-input{

      margin: 0;

      width: auto;

      flex-grow: 1;

    }

  }

}

</style>
在model文件夹下,定义了字段的一些基本类型
//src\model\message.ts

import User from './user'

class Message {

  public time: string

  public content: string = ''

  public type: number //  0 为系统消息(加入聊天室) -1(退出聊天室) 1为用户消息

  public user: User | null

  constructor (time: string, content: string, type: number, user: User | null) {

    this.time = time

    this.content = content

    this.type = type

    this.user = user

  }

}

export default Message
//src\model\room.ts

class Room {

  private id: number

	public name: string = ''

	private number: number

	constructor (id: number, name: string, number: number) {

		this.name = name

		this.id = id

    this.number = number

    if (this.name === '') {

      this.name = '第'+this.id+'号聊天室'

    }

	}

}

export default Room
//src\model\user.ts

class User {

  public id: string // 当前以时间为id

  public name: string = ''

  public sex: string = ''

  private avatar : string

  constructor (id: string, name: string, avatar: string, sex: string) {

    this.id = id

    this.name = name

    this.avatar = avatar

    this.sex = sex

    if (this.name === '') {

      this.name = '游客'

    }

  }

  getUserId (): string {

    return this.id

  }

}

export default User
在store中,我们定义的是数据的状态
usercenter对应的状态,里面还使用了localstorage存储数据
//user.ts

import User from '../model/user'

export default {

  state: {

    user: JSON.parse(localStorage.getItem('user') || '{}') || {}

  },

  mutations: {

    updateUserAvatar (state: any, avatar: string) {

      state.user.avatar = avatar

      localStorage.setItem('user', JSON.stringify(state.user))

    },

    updateUserName (state: any, name: string) {

      state.user.name = name

      localStorage.setItem('user', JSON.stringify(state.user))

    },

    initUserInfo (state: any, user: User) {

      state.user = user

      localStorage.setItem('user', JSON.stringify(state.user))

    },

    logoutUser (state: any) {

      state.user = {}

      localStorage.setItem('user', JSON.stringify(state.user))

    }

  },

  actions: {}

}
room.ts中的为更新room的数量名字以及初始化和关闭等方法
import Room from '../model/room'

export default {

  state: {

    isLiving: true,

    room: {}

  },

  mutations: {

    closeOpenRoom (state: any, living: boolean) {

      state.isLiving = living

    },

    updateRoomNumber (state: any, number: number) {

      state.room.number = number

    },

    updateRoomname (state: any, username: string) {

      state.room.number = username

    },

    initRoomInfo (state: any, room: Room) {

      state.room = room

    }

  },

  actions: {}

}
message中为,可以添加message,也可以移除message
import Message from '../model/message'

export default {

  state: {

    msgList: JSON.parse(sessionStorage.getItem('msgList') || '[]') || []

  },

  mutations: {

    // 添加数据方法

    addMsg (state: any, msg: Message) {

      // 数据列表中添加数据

      state.msgList.push(msg)

      sessionStorage.setItem('msgList', JSON.stringify(state.msgList))

    },

    // 移除数据

    removeMsg (state: any, msg: Message) {

      let index = '-1'

      for (const key in state.msgList) {

        if (state.msgList.hasOwnProperty(key)) {

          if (state.msgList[key].time === msg.time && msg.user && state.msgList[key].user.id === msg.user.id) {

            console.log('key', state.msgList[key])

            index = key

          }

        }

      }

      // console.log('index', msg, new Message(state.msgList[3].time, state.msgList[3].content, state.msgList[3].type, state.msgList[3].user))

      console.log('index', index)

      if (index !== '-1') {

        let time = new Date(+new Date() + 8 * 3600 * 1000).toISOString().replace(/T/g, ' ').replace(/\.[\d]{3}Z/, '')

        let message = new Message(time, (msg.user ? msg.user.name : '用户') + ' 撤回了一条消息', 0, null)

        state.msgList.splice(index, 1, message)

        // state.msgList.push(msg)

        sessionStorage.setItem('msgList', JSON.stringify(state.msgList))

      }

    }

  }

}
我觉得我失去梦想了,哈哈哈哈,应该多看书,无论什么通过看书都可以去解决一些问题。
在一个地方久了,或者看到的风景太陈旧了,这个时候,应该给心灵来个旅行,应该在书中旅行。
【daydayup】weTalk的更多相关文章
- 【daydayup】ceshuChat
时时当勉励,岁月不待人.珍惜时间伐~ 先看看项目运行的效果 这个是在本地环境打开了两个8080端口进行模拟运行的. 先放下作者的开源地址:https://github.com/ceshu/ceshuC ...
- 【转载】【Centos linux系统】命令行(静默)安装oracle 11gR2
[原文]:http://blog.chinaunix.net/uid-23886490-id-3565998.html 一.安装前准备 1.内存及swap要求 至于swap如何添加,后文将提到 gre ...
- Python高手之路【六】python基础之字符串格式化
Python的字符串格式化有两种方式: 百分号方式.format方式 百分号的方式相对来说比较老,而format方式则是比较先进的方式,企图替换古老的方式,目前两者并存.[PEP-3101] This ...
- 【原】谈谈对Objective-C中代理模式的误解
[原]谈谈对Objective-C中代理模式的误解 本文转载请注明出处 —— polobymulberry-博客园 1. 前言 这篇文章主要是对代理模式和委托模式进行了对比,个人认为Objective ...
- 【原】FMDB源码阅读(三)
[原]FMDB源码阅读(三) 本文转载请注明出处 —— polobymulberry-博客园 1. 前言 FMDB比较优秀的地方就在于对多线程的处理.所以这一篇主要是研究FMDB的多线程处理的实现.而 ...
- 【原】Android热更新开源项目Tinker源码解析系列之一:Dex热更新
[原]Android热更新开源项目Tinker源码解析系列之一:Dex热更新 Tinker是微信的第一个开源项目,主要用于安卓应用bug的热修复和功能的迭代. Tinker github地址:http ...
- 【调侃】IOC前世今生
前些天,参与了公司内部小组的一次技术交流,主要是针对<IOC与AOP>,本着学而时习之的态度及积极分享的精神,我就结合一个小故事来初浅地剖析一下我眼中的“IOC前世今生”,以方便初学者能更 ...
- Python高手之路【三】python基础之函数
基本数据类型补充: set 是一个无序且不重复的元素集合 class set(object): """ set() -> new empty set object ...
- Python高手之路【一】初识python
Python简介 1:Python的创始人 Python (英国发音:/ˈpaɪθən/ 美国发音:/ˈpaɪθɑːn/), 是一种解释型.面向对象.动态数据类型的高级程序设计语言,由荷兰人Guido ...
随机推荐
- NX二次开发-创建经典工具栏UF_UI_create_toolbar
NX9+VS2012 1.打开D:\Program Files\Siemens\NX 9.0\UGII\menus\ug_main.men 找到装配和PMI,在中间加上一段 TOGGLE_BUTTON ...
- vue中利用scss实现整体换肤和字体大小设置
一.前言 利用Sass预处理实现换肤和字体大小调整. 思路及达到的效果:字体大小的适配使用window.devicePixelRatio的值和需要调整的差量进行控制.页面初始化是的字体适配可以根据de ...
- error C2443: operand size conflict
#include <stdio.h> void main() { int a=98; __asm { mov al,a and al,11011111B mov a ...
- LeetCode 182. Duplicate Emails (查找重复的电子邮箱)
题目标签: 题目给了我们一个 email 的table,让我们找到重复的 email. 可以建立 Person a, Person b, 找到两个表格中,emai 相等 但是 id 不同的 email ...
- L1正则化可以解决过拟合问题(稀疏解)
损失函数最小,也就是求极值点,也就是损失函数导数为0.上面也说了,如果d0+λ和d0-λ为异号的时候刚好为极值点,损失函数导数为0(w为0是条件).而对于L2正则化,在w=0时并不一定是极值点而是d0 ...
- python子线程退出
def thread_func(): while True: #do something #do something #do something t=threading.Thread(target = ...
- 【转】tomcat系统架构分析
https://blog.csdn.net/wsl211511/article/details/51622991
- Tomcat Geoserver等服务器 端口号修改
端口号修改是我们经常会用到的,这里整理一下我们常见的服务器端口号修改位置,后面在用到的时候会持续更新 注意:端口号修改服务都需要重启才有效. 1.Tomcat 位置:..\tomcat路径\conf\ ...
- 2019-8-31-C#-通过编程的方法在桌面创建回收站快捷方式
title author date CreateTime categories C# 通过编程的方法在桌面创建回收站快捷方式 lindexi 2019-08-31 16:55:58 +0800 201 ...
- codeforces 1180E Serge and Dining Room 线段树
题目传送门 题目大意: 给出a序列和b序列,a序列为各种食物的价格,b序列为一列排着队的小朋友拥有的钱,小朋友依次购买食物,每个人都买自己能买的起的最贵的食物,买不起就离开队伍.给出q次操作,操作1是 ...
