arm 添加 samb 文件共享
编译环境: ubunto 12 arm-linux-gcc 4.3.2 arm linux 4.1.36 开发板 2440
测试上传速度,大文件

github源码 https://github.com/samba-team/samba
测试了几个版本,各有问题。
samba-4.6.2 ~ 3.6 需要安装 python 环境,才能编译。4.6 需要 python2.7 ,4.0 3.6 需要 phtyon2.x ,apt-get install 安装的 没有 phtyon.h 还需要编译安装。实在太费时间,不装这个。
samba-2.2.8 编译正常,安装报错 codepages 不能编译,后面有介绍解决方法, 解决了 codepages 以后,启动 报错 Unable to open printcap file /etc/printcap for read!
Failed to setup RT_SIGNAL_LEASE handler , touch /etc/printcap 可以解决,但是 Failed to setup RT_SIGNAL_LEASE handler还是出错。
samba-3.4.17 编译,正常使用。 下载地址 : https://github.com/samba-team/samba/archive/samba-3.4.17.tar.gz
下载好解压 cd source3
./autogen.sh
./configure --bindir=/usr/local/samba --prefix=/usr/local/samba
make CC=arm-linux-gcc
make install
将编译出来的文件全复制到 开发板nfs 文件系统中
cp /usr/local/samba /home/nfs/usr/local/ -rfd
还需要复制 so 库文件 到开发板 nfs 文件系统中
cp /usr/local/samba/lib/*so* /home/nfs/lib/ -d
修改 examples/smb.conf.default 改名为 smb.conf 上传到 开发板 etc 下
smb.conf 红字部分是修改的
 # This is the main Samba configuration file. You should read the

 # smb.conf() manual page in order to understand the options listed

 # here. Samba has a huge number of configurable options (perhaps too

 # many!) most of which are not shown in this example

 #

 # For a step to step guide on installing, configuring and using samba,

 # read the Samba-HOWTO-Collection. This may be obtained from:

 #  http://www.samba.org/samba/docs/Samba-HOWTO-Collection.pdf

 #

 # Many working examples of smb.conf files can be found in the

 # Samba-Guide which is generated daily and can be downloaded from:

 #  http://www.samba.org/samba/docs/Samba-Guide.pdf

 #

 # Any line which starts with a ; (semi-colon) or a # (hash)

 # is a comment and is ignored. In this example we will use a #

 # for commentry and a ; for parts of the config file that you

 # may wish to enable

 #

 # NOTE: Whenever you modify this file you should run the command "testparm"

 # to check that you have not made any basic syntactic errors.

 #

 #======================= Global Settings =====================================

 [global]

 # workgroup = NT-Domain-Name or Workgroup-Name, eg: MIDEARTH

 26    workgroup = WORKGROUP

 # server string is the equivalent of the NT Description field

    server string = Samba Server

 # Security mode. Defines in which mode Samba will operate. Possible

 # values are share, user, server, domain and ads. Most people will want

 # user level security. See the Samba-HOWTO-Collection for details.

 34    security = share

 # This option is important for security. It allows you to restrict

 # connections to machines which are on your local network. The

 # following example restricts access to two C class networks and

 # the "loopback" interface. For more examples of the syntax see

 # the smb.conf man page

 ;   hosts allow = 192.168.. 192.168.. .

 # If you want to automatically load your printer list rather

 # than setting them up individually then you'll need this

    load printers = yes

 # you may wish to override the location of the printcap file

 ;   printcap name = /etc/printcap

 # on SystemV system setting printcap name to lpstat should allow

 # you to automatically obtain a printer list from the SystemV spool

 # system

 ;   printcap name = lpstat

 # It should not be necessary to specify the print system type unless

 # it is non-standard. Currently supported print systems include:

 # bsd, cups, sysv, plp, lprng, aix, hpux, qnx

 ;   printing = cups

 # Uncomment this if you want a guest account, you must add this to /etc/passwd

 # otherwise the user "nobody" is used

 ;  guest account = pcguest

 63 guest account = root

 # this tells Samba to use a separate log file for each machine

 # that connects

    log file = /usr/local/samba/var/log.%m

 # Put a capping on the size of the log files (in Kb).

    max log size =

 # Use password server option only with security = server

 # The argument list may include:

 #   password server = My_PDC_Name [My_BDC_Name] [My_Next_BDC_Name]

 # or to auto-locate the domain controller/s

 #   password server = *

 ;   password server = <NT-Server-Name>

 # Use the realm option only with security = ads

 # Specifies the Active Directory realm the host is part of

 ;   realm = MY_REALM

 # Backend to store user information in. New installations should

 # use either tdbsam or ldapsam. smbpasswd is available for backwards

 # compatibility. tdbsam requires no further configuration.

 ;   passdb backend = tdbsam

 # Using the following line enables you to customise your configuration

 # on a per machine basis. The %m gets replaced with the netbios name

 # of the machine that is connecting.

 # Note: Consider carefully the location in the configuration file of

 #       this line.  The included file is read at that point.

 ;   include = /usr/local/samba/lib/smb.conf.%m

 # Configure Samba to use multiple interfaces

 # If you have multiple network interfaces then you must list them

 # here. See the man page for details.

 ;   interfaces = 192.168.12.2/ 192.168.13.2/

 # Browser Control Options:

 # set local master to no if you don't want Samba to become a master

 # browser on your network. Otherwise the normal election rules apply

 ;   local master = no

 # OS Level determines the precedence of this server in master browser

 # elections. The default value should be reasonable

 ;   os level =

 # Domain Master specifies Samba to be the Domain Master Browser. This

 # allows Samba to collate browse lists between subnets. Don't use this

 # if you already have a Windows NT domain controller doing this job

 ;   domain master = yes

 # Preferred Master causes Samba to force a local browser election on startup

 # and gives it a slightly higher chance of winning the election

 ;   preferred master = yes

 # Enable this if you want Samba to be a domain logon server for

 # Windows95 workstations.

 ;   domain logons = yes

 # if you enable domain logons then you may want a per-machine or

 # per user logon script

 # run a specific logon batch file per workstation (machine)

 ;   logon script = %m.bat

 # run a specific logon batch file per username

 ;   logon script = %U.bat

 # Where to store roving profiles (only for Win95 and WinNT)

 #        %L substitutes for this servers netbios name, %U is username

 #        You must uncomment the [Profiles] share below

 ;   logon path = \\%L\Profiles\%U

 # Windows Internet Name Serving Support Section:

 # WINS Support - Tells the NMBD component of Samba to enable it's WINS Server

 ;   wins support = yes

 # WINS Server - Tells the NMBD components of Samba to be a WINS Client

 #    Note: Samba can be either a WINS Server, or a WINS Client, but NOT both

 ;   wins server = w.x.y.z

 # WINS Proxy - Tells Samba to answer name resolution queries on

 # behalf of a non WINS capable client, for this to work there must be

 # at least one    WINS Server on the network. The default is NO.

 ;   wins proxy = yes

 # DNS Proxy - tells Samba whether or not to try to resolve NetBIOS names

 # via DNS nslookups. The default is NO.

    dns proxy = no

 # These scripts are used on a domain controller or stand-alone

 # machine to add or delete corresponding unix accounts

 ;  add user script = /usr/sbin/useradd %u

 ;  add group script = /usr/sbin/groupadd %g

 ;  add machine script = /usr/sbin/adduser -n -g machines -c Machine -d /dev/null -s /bin/false %u

 ;  delete user script = /usr/sbin/userdel %u

 ;  delete user from group script = /usr/sbin/deluser %u %g

 ;  delete group script = /usr/sbin/groupdel %g

 #============================ Share Definitions ==============================

 [homes]

    comment = Home Directories

    browseable = no

    writable = yes

 # Un-comment the following and create the netlogon directory for Domain Logons

 ; [netlogon]

 ;   comment = Network Logon Service

 ;   path = /usr/local/samba/lib/netlogon

 ;   guest ok = yes

 ;   writable = no

 ;   share modes = no

 # Un-comment the following to provide a specific roving profile share

 # the default is to use the user's home directory

 ;[Profiles]

 ;    path = /usr/local/samba/profiles

 ;    browseable = no

 ;    guest ok = yes

 # NOTE: If you have a BSD-style print system there is no need to

 # specifically define each individual printer

 [printers]

    comment = All Printers

    path = /usr/spool/samba

    browseable = no

 # Set public = yes to allow user 'guest account' to print

    guest ok = no

    writable = no

    printable = yes

 # This one is useful for people to share files

 ;[tmp]

 ;   comment = Temporary file space

 ;   path = /tmp

 ;   read only = no

 ;   public = yes

 # A publicly accessible directory, but read only, except for people in

 # the "staff" group

 ;[public]

 ;   comment = Public Stuff

 ;   path = /home/samba

 ;   public = yes

 ;   writable = no

 ;   printable = no

 ;   write list = @staff

 # Other examples.

 #

 # A private printer, usable only by fred. Spool data will be placed in fred's

 # home directory. Note that fred must have write access to the spool directory,

 # wherever it is.

 ;[fredsprn]

 ;   comment = Fred's Printer

 ;   valid users = fred

 ;   path = /homes/fred

 ;   printer = freds_printer

 ;   public = no

 ;   writable = no

 ;   printable = yes

 # A private directory, usable only by fred. Note that fred requires write

 # access to the directory.

 ;[fredsdir]

 ;   comment = Fred's Service

 ;   path = /usr/somewhere/private

 ;   valid users = fred

 ;   public = no

 ;   writable = yes

 ;   printable = no

 # a service which has a different directory for each machine that connects

 # this allows you to tailor configurations to incoming machines. You could

 # also use the %U option to tailor it by user name.

 # The %m gets replaced with the machine name that is connecting.

 ;[pchome]

 ;  comment = PC Directories

 ;  path = /usr/pc/%m

 ;  public = no

 ;  writable = yes

 # A publicly accessible directory, read/write to all users. Note that all files

 # created in the directory by users will be owned by the default user, so

 # any user with access can delete any other user's files. Obviously this

 # directory must be writable by the default user. Another user could of course

 # be specified, in which case all files would be owned by that user instead.

 ;[public]

 ;   path = /usr/somewhere/else/public

 ;   public = yes

 ;   only guest = yes

 ;   writable = yes

 ;   printable = no

 # The following two entries demonstrate how to share a directory so that two

 # users can place files there that will be owned by the specific users. In this

 # setup, the directory should be writable by both users and should have the

 # sticky bit set on it to prevent abuse. Obviously this could be extended to

 # as many users as required.

 ;[myshare]

 ;   comment = Mary's and Fred's stuff

 ;   path = /usr/somewhere/shared

 ;   valid users = mary fred

 ;   public = no

 ;   writable = yes

 ;   printable = no

 ;   create mask =

272 [share]

273 path = /dev/

274 writeable = yes

275 browseable = yes

276 guest ok = yes

277

278 [mnt]

279 path = /mnt/

280 writeable = yes

281 browseable = yes

282 guest ok = yes

283

284 [rootfs]

285 path = /

286 writeable = yes

287 browseable = yes

288 guest ok = yes
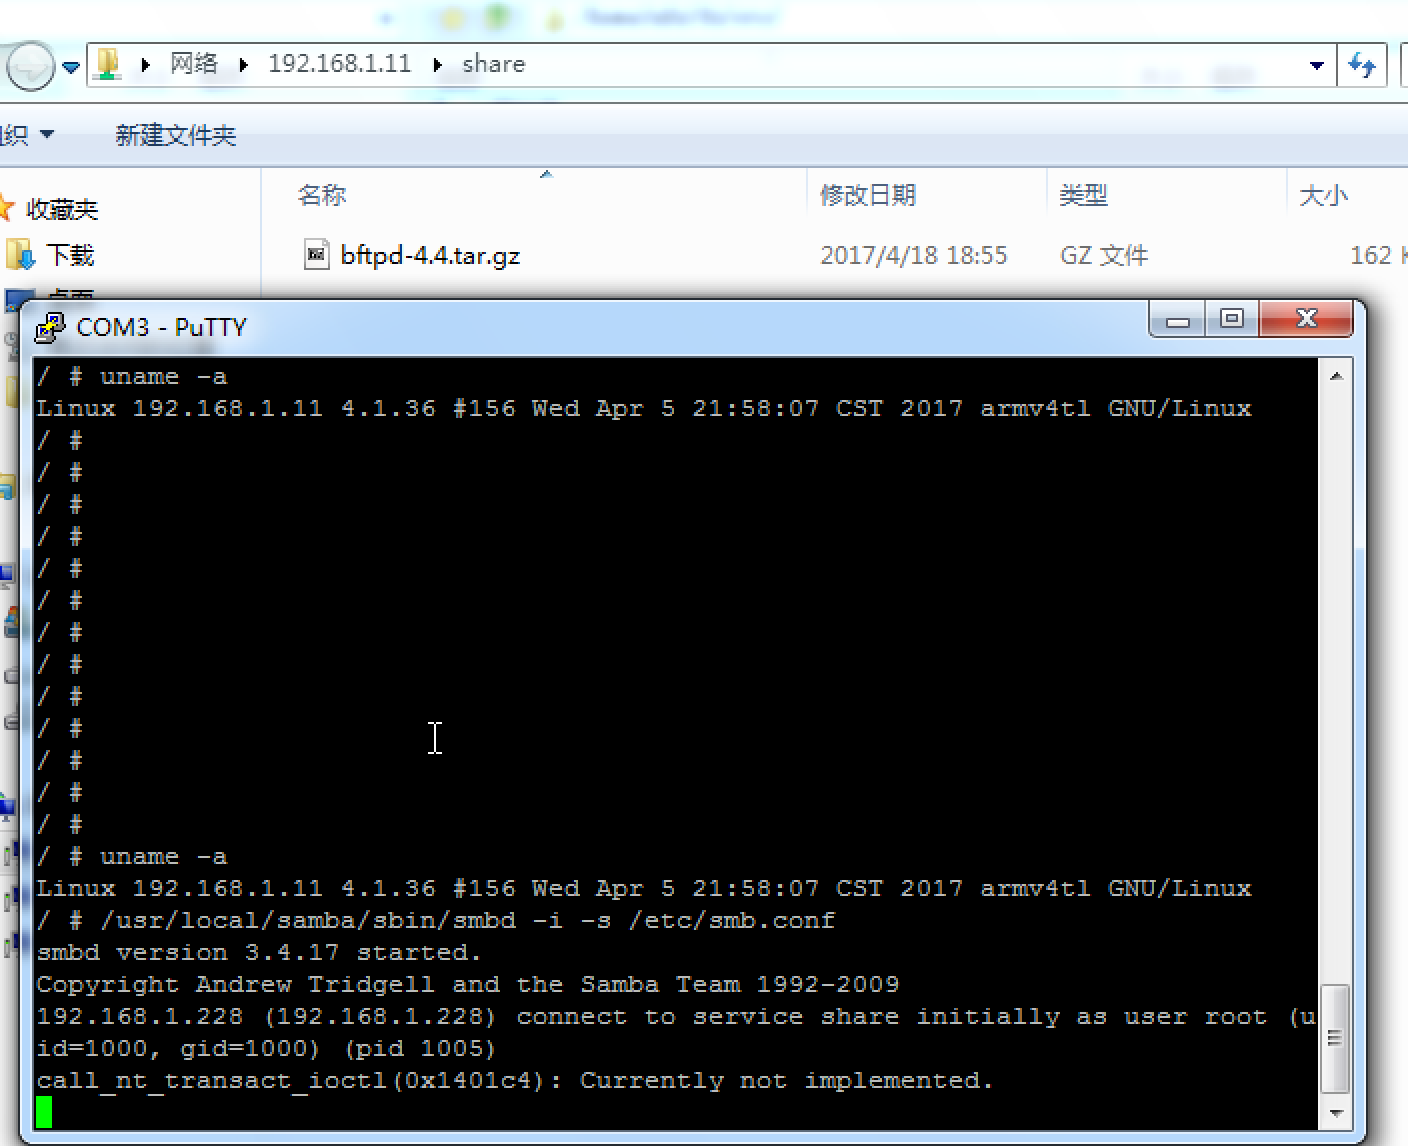
在arm 开发板上,使用 -i -s 启动,这样将错误信息打印到控制台,方便调试
/usr/local/samba/sbin/smbd -i -s /etc/smb.conf
ARM 启动出错
/ # /usr/local/samba/sbin/smbd -i -s /etc/smb.conf
smbd version 3.4.17 started.
Copyright Andrew Tridgell and the Samba Team 1992-2009
get_root_nt_token: getpwnam("root") failed!
svcctl_init_keys: key lookup failed! (WERR_NOMEM)
upgrade_to_version_4: upgrading printer security descriptors
upgrade_to_version_5: normalizing printer keys
guest_user_info: Unable to locate guest account [nobody]!
ERROR: failed to setup guest info.
需要创建一个用户 (在开发板上执行)
如果没有 /etc/passwd
也需要创建一个
touch /etc/passwd
如果没有用户,需要创建一个用户
adduser root
创建软链(在开发板上执行)
ln -s /usr/local/samba/sbin/smbd /usr/bin/smbd
最后测试正常后,将 smb.conf 复制到 /usr/local/samba/lib/ 下
并修改自启动文件
/etc/init.d/rcS
#添加 开机自动运行
smbd
bftpd -d
最后补充一下
出现错误2.2.8 的 错误解决方法
Installing codepage files in /usr/local/samba/lib/codepages
Creating codepage file /usr/local/samba/lib/codepages/codepage.437
/usr/local/samba/make_smbcodepage: 1: /usr/local/samba/make_smbcodepage: Syntax error: word unexpected (expecting ")")
Creating unicode map /usr/local/samba/lib/codepages/unicode_map.437
/usr/local/samba/make_unicodemap: 1: /usr/local/samba/make_unicodemap: Syntax error: word unexpected (expecting ")")
出错原因是因为 make_unicodemap 和 make_smbcodepage 是 使用 编译生成后的文件,而这2个文件是 使用 arm-linux-gcc 编译的 在 ubunto 上无法执行。
解决方法是,在 arm 开发板上运行转码功能,将 源码中的 codepages 文件夹复制到 arm 开发板上 samba 的目录中 /usr/local/samba ,执行以下 我编写的 shell 。
arm_installcp.sh
 #!/bin/sh

 #author: ningdi date:2017-04-20 15:20

 srcdir=$(pwd)

 BINDIR=$(pwd)

 CODEPAGEDIR=$(pwd)/lib/codepages

 # The current codepage definition list.

 CODEPAGELIST="437 737 775 850 852 861 932 866 949 950 936 1251 ISO8859-1 ISO8859-2 ISO8859-5

 ISO8859-7 KOI8-R 857 ISO8859-9 ISO8859-13 ISO8859-15 1125 KOI8-U"

 for p in $(echo $CODEPAGELIST|tr " " "\n");

 do

     echo ${srcdir}/codepages/codepage_def.$p

     if [ -f ${srcdir}/codepages/codepage_def.$p ]; then

         echo Creating codepage file $CODEPAGEDIR/codepage.$p

     $BINDIR/make_smbcodepage c $p ${srcdir}/codepages/codepage_def.$p $CODEPAGEDIR/codepage.$p

 fi

 if [ -f ${srcdir}/codepages/CP${p}.TXT ]; then

     echo Creating unicode map $CODEPAGEDIR/unicode_map.$p

         $BINDIR/make_unicodemap $p ${srcdir}/codepages/CP${p}.TXT $CODEPAGEDIR/unicode_map.$p

 fi

 done
执行后就会在 ARM 文件系统中 生成编码文件 /lib/codepages
arm 添加 samb 文件共享的更多相关文章
- arm 添加 ftp server 之 bftpd
本来想装vsftp 结果装上以后执行报错 Segmentation fault , 换到几个 其它的小型ftp server 软件 ,试了 Stupid-FTPd,不能用. bftpd 可以使用,Ti ...
- 【转】DM8168添加DSP音频编解码算法--集成现有voice或audio codec
本文根据“How to integrate audio/voice in RPE in EZSDK.pdf”整理,建议读者直接下载,参考原文件.原文件下载链接: http://download.csd ...
- 用Windows+VirtualBox搭建嵌入式Linux开发环境
Windows+VirtualBox的嵌入式Linux开发环境的搭建 最近一直在学习Linux的设备驱动编写,一直是在物理机上安装的Ubuntu进行的,但是在Ubuntu12.04的系统中,已经不能用 ...
- Unix/Linux环境C编程入门教程(20) 搭建基于Mac的 Xcode 与 QT 开发环境
1.启动 Vmware,如果没有 VMware 的同学,请看前面我们搭建 VMware 的视频 2.打开虚拟机以后,出现虚拟机界面 3 新建一个虚拟机 4 选择自定义,单击下一步 5 选择默认的 VM ...
- android使用ffmpeg
cygwin上文编译文章. 在ffmpeg/arm添加的文件夹Android.mk 的主要目的是为了宣布动态库libs下一个 LOCAL_PATH:= $(call my-dir) include $ ...
- Python快速入门之与C语言异同
代码较长,建议使用电脑阅读本文. 10分钟入门Python 本文中使用的是Python3如果你曾经学过C语言,阅读此文,相信你能迅速发现这两种语言的异同,达到快速入门的目的.下面将开始介绍它们的异同. ...
- CentOS7配置samba服务
Step1:安装samba相关软件 [root@node-1 ~]# yum -y install samba samba-client Step2:创建共享目录 [root@node-1 ~]# m ...
- Android 7.0下,拍摄照片报错
对于面向 Android 7.0 的应用,Android 框架执行的 StrictMode API 政策禁止在您的应用外部公开 file:// URI.如果一项包含文件 URI 的 intent 离开 ...
- 使用cuteFTP与虚拟机交互文件---安装ftp服务
安装ftp服务,以便在Windows中使用cuteFTP与虚拟机交互文件,使用sudo apt-get install vsftpd 安装完后,打开/etc/vsftpd.conf文件,去掉local ...
随机推荐
- Linux下安装mysql(yun方式)
1.进入下载好的mysql版本 cd /usr/local/mysql 2.解压安装包 tar -xzvf mysql-5.7.11.tar.gz 3.改名 直接改或者 mv 文件名 要改的文件名m ...
- OpenCV、EmguCV函数注解
- top和margin-top的区别
1.top等为绝对定位,需与position:absolute一起用才有效:而margin-top为相对定位: 2.绝对定位一般情况下以body为标准:若父元素设置position:relative, ...
- 吴裕雄--天生自然HTML学习笔记:HTML 脚本
JavaScript 使 HTML 页面具有更强的动态和交互性. <!DOCTYPE html> <html> <head> <meta charset=&q ...
- Hibernate中的对象图关系转换:游离、持久、自由状态
- 吴裕雄--天生自然KITTEN编程:躲迷藏
- numpy创建的array
import numpy as np array = np.array([[1,2,3], [2,3,4]]) #打印列表 print(array)#是几维的 print('number of dim ...
- iOS开发之多线程(NSThread、NSOperation、GCD)
整理一些多线程相关的知识. 并行 & 并发 1.并行:并行是相对于多核而言的,几个任务同时执行.2.并发:并发是相对于单核而言的,几个任务之间快速切换运行,看起来像是"同时" ...
- 从摔得稀碎、蓝屏再到黄牛拒绝加价:iPhone X究竟是怎么了
X究竟是怎么了" title="从摔得稀碎.蓝屏再到黄牛拒绝加价:iPhone X究竟是怎么了"> 近日,iPhone X终于迎来了正式出货的时间.作为十周年的创 ...
- JavaScript的封装和继承
提到JavaScript"面向对象编程",主要就是封装和继承,这里主要依据阮一峰及其他博客的系列文章做个总结. 继承机制的设计思想 所有实例对象需要共享的属性和方法,都放在这个对象 ...